Robert Zubák Using CaptekTM products and Ivoclar ... - JDT Unbound
Robert Zubák Using CaptekTM products and Ivoclar ... - JDT Unbound
Robert Zubák Using CaptekTM products and Ivoclar ... - JDT Unbound

You also want an ePaper? Increase the reach of your titles
YUMPU automatically turns print PDFs into web optimized ePapers that Google loves.
Figure 4<br />
Figure 5<br />
Figure 6<br />
Figure 7<br />
Figure 8<br />
Figure 9<br />
<strong>and</strong> ceramic material. Also, it ensures better refraction of light whereby<br />
the light penetrates through the dentin <strong>and</strong> incisal substances to the<br />
opaque surface. The addition of the margin powder does not change<br />
color.<br />
Achieving a desired color shade is not easy <strong>and</strong> a certain amount of<br />
experience is needed before an appropriate color is created following the<br />
opaque firing. Most teeth feature a darker color shade toward the cervical<br />
<strong>and</strong> gradually become lighter closer to the incisal with varying degrees of<br />
transparency.<br />
When selecting an appropriate color shade the two principal horizontal<br />
lines, which divide the tooth into the cervical, dentin <strong>and</strong> incisal,<br />
should be determined. Close attention should be paid to the selection<br />
of an appropriate dentin color shade because it determines the other<br />
shades.<br />
In this case, the A3 color shade was selected for the dentin. The<br />
cervical has a somewhat darker shade, so a darker color was used for this<br />
area. In this case, the cervical incisal orange (CI.o) was added in a 60-40<br />
ratio to the deep dentin A3 color shade.<br />
The A shades consist of a palette of colors that are close in shade to<br />
each other, differing only in their chroma intensity. <strong>Using</strong> the dentin that<br />
was made darker by adding CI.o as a basis for the cervical color, you can<br />
achieve a more natural <strong>and</strong> animated look.<br />
I prepared pure A3 deep dentin, pure A3 dentin, A3 dentin with<br />
transparent neutral in a 50-50 ratio, pure TS2 incisal substance, a mix of<br />
TS2 <strong>and</strong> TN 50/50, transparent blue TB, mamelon light substance mix<br />
of MML <strong>and</strong> A3 50/50, pure effect E3, <strong>and</strong> pure occlusal dentin orange<br />
(OD.o).<br />
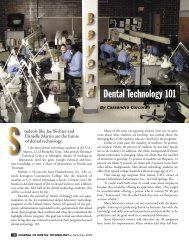
Figure 9 shows the deep dentin used for the cervical <strong>and</strong> the deep<br />
dentin A3+ cervical incisal orange (CI.o) proximal areas. A3 was applied<br />
around the entire upper rim deep dentin. This method hides the rim of<br />
the coping by preventing light from passing through the more transparent<br />
material to be added. This could be a problem if the preparation is<br />
inappropriately reduced <strong>and</strong> develops a hot spot.<br />
I applied a mix of A3 dentin+ transparent neutral (TN) in a 50-50<br />
ratio in the cervical area. Close attention is required to address insufficient<br />
space in the cervical area. This mixture creates the effect of greater<br />
depth, which is important in this area. Further layers consist of A3 dentin<br />
in the dentin area <strong>and</strong> a mixture of dentin A3 with a transparent neutral<br />
(A3+TN) in the incisal area (Figures 10 <strong>and</strong> 11).<br />
I provided some space for applying transparent substance <strong>and</strong><br />
mamelons <strong>and</strong> applied occlusal dentin orange (OD.o) on the occlusal<br />
surface. The edges were overlaid with a thin layer of TS2 incisal, onto<br />
which the mamelons were created using the MML mixture. A3 dentin<br />
<strong>and</strong> TB transparent blue were applied between these (Figure 12). A thin<br />
layer of TS2 incisal between dentin <strong>and</strong> the entire incisal provides for an<br />
appropriate separation of dentin <strong>and</strong> incisal powders, thus the final shade<br />
takes on a more life-like appearance. The deep A3 dentin was applied<br />
onto the OD.o (occlusal dentin orange) already on the occlusal surface,<br />
which starts the initial shape of the cusps (Figure 13). The incisal mix<br />
was then used to cover the entire surface. In the dentin area, mixes of TS2<br />
<strong>and</strong> TS2+TN were used (Figures 14 <strong>and</strong> 15). The occlusal anatomical<br />
features were formed using this substance as well.<br />
continued next page<br />
January 2004 ● JOURNAL OF DENTAL TECHNOLOGY 27