Color Correction - JDT Unbound
Color Correction - JDT Unbound
Color Correction - JDT Unbound
- No tags were found...

Create successful ePaper yourself
Turn your PDF publications into a flip-book with our unique Google optimized e-Paper software.
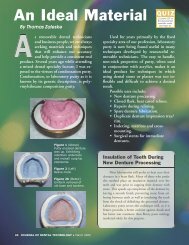
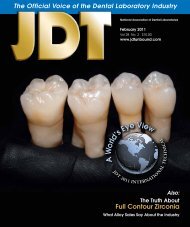
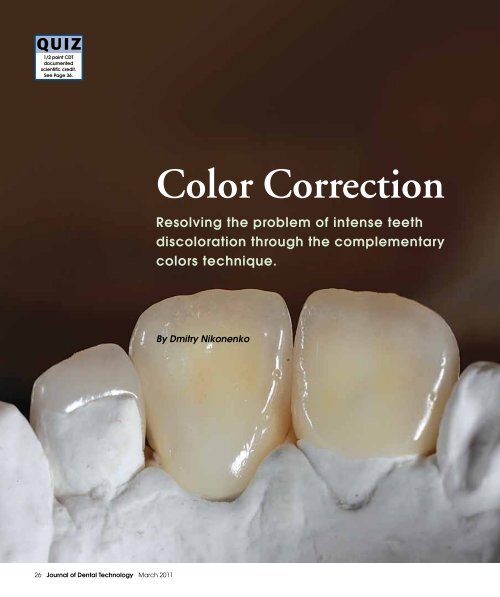
1/2 point CDTdocumentedscientific credit.See Page 36.<strong>Color</strong> <strong>Correction</strong>Resolving the problem of intense teethdiscoloration through the complementarycolors technique.By Dmitry Nikonenko26 Journal of Dental Technology March 2011
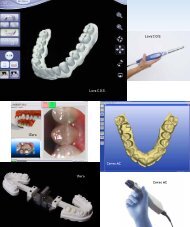
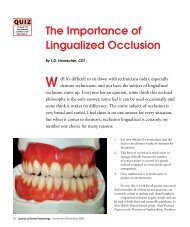
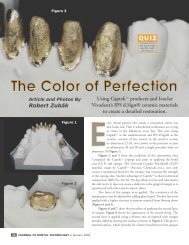
☛ quick takeAuthor Dmitry Nikonenko’s task was to neutralize additionalreddish-grey shade using the complementary colors theory. Hewas worried when he started this case because of the .7mmveneer thickness and the bright red color of the tooth core.However, the effect turned out to be very esthetic. By placingveneer on the abutment, he completely blocked undesiredcolor.The process of color correction is interesting mostly not from the point of viewof the clinical situation, but from the point of technical solution - the porcelainmulti-layer veneers were made in the technique of complementary colors.However, before speaking about the practical patterns of intense discolorationblocking, let us turn to the theory, knowledge of which allows us to solve similarproblems using non-traditional methods.For this, let us refer to the universal colormodel of Albert Henry Mansell, which heintroduced in 1915. It includes 3 parameters:1. Vertical axis characterizes brightness andis built from the white pole to the blackpole.2. Intensity is set by radius (the closer to thethe edge the larger).3. On the perimeter, the main shade isshown.1.Also, there is the fourth, spatial,component—transparence, which wasintroduced later, and which won't bediscussed now.Figure 1Briefly, the essence of Mansell's scale is thatthere are three main colors of substractivecolor synthesis: red, yellow and blue.By mixing the main colors, we get thesecondary ones: green, orange and violet.March 2011 Journal of Dental Technology 27
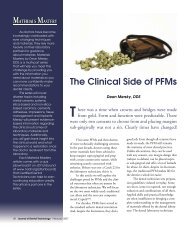
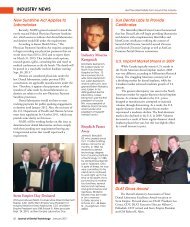
2. 3.4.5.Figure 2Let us imagine a triangle, in the corners of whichthe main colors are situated. The secondary colorsare formed between them.Figure 3Thus, the secondary color, which is complementaryto main one, is situated on the opposite toeach main color. Being positioned closely, thecomplementary colors are perceived sharper andmore dynamically, and complex grey, achromaticcolor can be produced by merging them. TheNoritake company has developed the methodwhich allows us to apply this effect in dentalpractice. Its essence is the following: the brightshade of the tooth, such as red of brown, can beblocked by the complementary color and thustransformed into the neutral grey, to which we mayapply the chosen color of final restoration.Figure 4Such a technique of blocking - neutralizing ofundesirable colors and absorbing filter creationis one of the methods offered by the ScreeningPorcelain Noritake.Figures 5-6The patient had intense discoloration of twocentral teeth, both teeth being vital. The decisionto use multi-layered veneers was made, to keepthe tooth's transparency and to neutralize the initialshade.Table 1Table 1Intensity of toothdiscolorationModeratediscolorationIntensediscoloration<strong>Color</strong> of preparedtoothBrownReddish-greyBrownReddish-greyRecommended porcelainModerate brown (M Brown)Moderate reddish-grey(M-Reddish-Grey)Intense brown (S Brown)Intense reddish-grey(S-Reddish-Grey)In the case of intense discoloration and brownshade of the tooth core, intense brown (s-brown)is used. If the discoloration is moderate, forexample, reddish-grey, the relevant tone is used,which is recommended in the table. The intensityof the discoloration, the color of prepared toothand recommended porcelain of four shades(complementary color) are specified there. Its useallows to resolve some problems using unorthodoxmethods—such as the case represented belowwhere technician had to compensate the intensetooth discoloration.28 Journal of Dental Technology March 2011
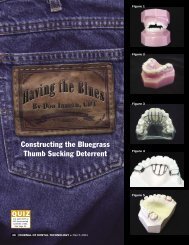
Figures 7-8Using the table, we evaluatedthe degree of toothdiscoloration and the neededshade from complementarycolor list. I defined it as reddishgreyand chose porcelains-reddish-grey.Figure 9We marked the discolorationarea on the refractory dies onthe duplicate model by markingpencil. On the photograph ofthe prepared tooth (Figure 6),we can see this zone clearly. Inthis case, clearness of markingmade work easier. There wasno discoloration in the areaof lateral incisor, so it kept thenatural shade. Thus, therewas no need to overlay it withneutralizing layer - henceforthwe created only the enhancedmorphology, using the commontechnique of ceramicsapplication.Figure 10Refractory dies were soaked.We used distilled water toimbue them to the degreewhen bubbles stop forming,which took 10-15 minutes. Thereis one detail which is oftenput out of the mind and ofteneven not known of—try not toimmerse dies completely, leaveone fragment open, it assuresmore even soaking. Manytechnicians just throw dies intothe glass - in that case some airremains inside, which will latercome outside, forming craterson the porcelain's surface.6.8.7.9.10.March 2011 Journal of Dental Technology 29
11. 12. 13.Figure 11Now, having prepared the chosenmixture s-reddish-grey, we evenlydistributed it as a very thin layer ontothe die, beginning from the zone ofmarking towards the incisal area andcarefully overlay, whittling it down.Figure 12We covered both dies.Figure 13Concerning the lateral incisor, we usedthe common technique. I used dentinfor the washing layer. In this case, A1shade was the optimal one.14.Figure 14Once again we distribute it onto therefractory die, diluting it with distilledwater. Then the porcelain firing followed,after which the second layering is carriedout. In this case, the first layers were notlaid massively, it was better to apply themgradually, making two or three firingsto have the visual control of degree ofdiscoloration zone masking.15.Figure 15The second layer was visible on the die.Its firing should be carried out in the sametemperature to create constant layer.30 Journal of Dental Technology March 2011
Figure 16The dies were ready for layering. The markingborder was well seen, showing transparence ofs-reddish-grey.Figure 17The next stage was the traditional methodof applying dentine porcelain, using themultidentine technique. The cervical area wasshaded by warmer dentine, A2 in this case.Figure 18More intense shade is used in proximal zones tocreate 3D perception.16.Figure 19It was finished with classic A1 up to the fullanatomic shape.Figure 20Then we worked with the incisal area using thecut-back method.17.18.20.19.March 2011 Journal of Dental Technology 31
21. 22. 23.Figure 21We obtained dentine fingers -mamelones. These have an irregular,chiseled edge. Dentine of the naturaltooth doesn't have smooth edgesin the incisal area and forms tridentstylepattern. To get a good porcelainrestoration, we have to imitate thatfeature thoroughly. Thus, we form thedentine edge with three main risesand notches between them.24.Figure 22Then we used transparent material inthe mamelones area into gaps andthe deepest areas to divide threemain fingers more clearly. Layeringis carried out by small portions, butsubsequently it makes remarkableeffect. Large amounts of ceramicsshould not be used, everything shouldbe made very carefully.Figure 23Afterwards, on perimeter we laid theincisal enamel, in this case that is E1.Not trying to cover the labial plate,we did this on perimeter to controlthe degree of overlapping. After that,fluorescent mass was used—it can bemamelon-1, mamelon-2, or mixture ofboth. We applied them evenly, so themamelons were not very bright, buthad some softening.25.Figure 24In the incisal area, slightly thickerlayer is applied, which is graduallywhittled down towards the cervicalarea. As a result, we have a smoothcloud-shaped design.32 Journal of Dental Technology March 2011
Figures 25 - 27Then we covered the dentinelayers by incisal enamel andbegan working on lustreporcelain. Forming of mesialaspect is started with bluelustre porcelain, then LT-Nor LT-0 was applied—that iscalled a technique of lateralsegmentation. If we wanted toimitate a lateral crack, we couldform that zone sharper usingbrush or cutter and apply stain.Figure 28There are special brushes for thatpurpose, which allow techniciansto apply the material very finely,avoiding its penetration into thetaken layer. Porcelain should belaid very clearly on the edge ofceramics.26. 27.28.Figure 29For the photographic effectacquisition, I had to emphasizethis dye. The layer is in fact verythin, but I have shaded it bymarker ink pen.Figures 30 and 31Afterwards, we made the socalledwindow. For this, we usedmore clear transparent material,in this case LT-0.29. 30. 31.March 2011 Journal of Dental Technology 33
34.32. 33.35.Figure 32Then we worked with cream-colored tone, forthe distal aspect always is less transparent andis lighter. Cream enamel suits best of all for that.We finished shaping with LT-1 and formed toothcontour more clearly.Figures 33 and 34After that, we removed the die from the modeland shaped the proximal zones. Usually, theyhave more intense color. We placed orangeinto the contact zone, after which firing wasconducted.36.Figure 35After firing, we had this material structure. So asto not to lose all the restoration effects, a verythorough approach to the program choice wasrequired. Burning temperature could not betoo high. Otherwise, we would have gotten themelted surface (as one of candy). Underbakedceramics was also not acceptable. In this case,temperature is 925 ° with 30 seconds exposure.As a result, the surface has sugar texture. Alleffects are clearly visible and transparency is notcompromised.Figure 36After that, we contoured and corrected asnecessary.37.34 Journal of Dental Technology March 201138.Figure 37We treated it using traditional method, withdiamond stones, to create the suitable texture.For better visualization, we used ink pen or pencil.Figure 38After glazing, the surface is polished with thespecial polishing agents, in this case Pearl Surface(Noritake), which created natural shine andprovided teeth with a realistic appearance. PearlSurface exists in two variants: for final polishingand for preliminary polishing.
40.39.Figure 39Final polishing is used for processing of the surfaceafter the glaze firing. Polishing was made by a bigfelt wheel to polish the prominent fragments betterand to provide natural shine. However, the concavehardly reachable places on the ceramic surfaceare less polished. Thus, the natural surface, formedthroughout many years, is imitated.41.Figures 40 - 43After polishing, the teeth look like this. Themicrostructure of tooth was maintained as well asrelief, which was so difficult to shape.Figure 44The final result ready to place.42.43. 44.March 2011 Journal of Dental Technology 35
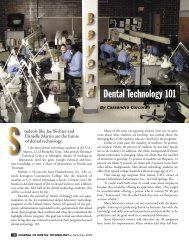
Figures 45-48After a fit check inmouth, the teethwere placed.Our task was to neutralize additional reddishgreyshade using the complementary colors theory.We were worried when we started this case. Theveneer thickness was only .7mm and the bright redcolor of the tooth core was frightening. However,the effect turned out to be very esthetic. By placingveneer on the abutment, we completely blockedundesired color. It is vital to remember, that if youdon't want to get undesired side effects, you need touse transparent luting material.As a result of this work, two centralincisors were recovered, using the technique ofcomplementary colors. At the same time thelateral incisor needed only slight reposition andmorphology enhancement, and was handled usingcommon method.It should be emphasized that there is nomutual mismatch between these restorations. Beingmade with use of fundamentally different methods,they look absolutely natural and restored theimpressive smile of the patient.About the Author:Nikonenko is a master dental technician atPhoenix Dental Labs in Moscow, Russia.Editor’s Note: This article was first published inLAB, Russia.45. 46.47. 48.QUIZ:Receive .5 point documented scientific credit for passing a quiz about this article. To get the quiz go to <strong>JDT</strong> <strong>Unbound</strong>(www.nadl.org/jdtunbound) and click on the CDT link or use the Fax-On-Demand system by calling (877) 355-8029,press 1 for NBC documents and enter document number 44 to have the quiz faxed to you. You can enter youranswers to this quiz (course code #22557 at http://quizzes.nadl.org or fax the completed quiz to (850) 222-0053. Thisquiz is provided to test the technician’s comprehension of the article’s content and does not necessarily serve as anendorsement of the content by NADL or NBC.36 Journal of Dental Technology March 2011