Simplifying Implant Dentistry - JDT Unbound
Simplifying Implant Dentistry - JDT Unbound
Simplifying Implant Dentistry - JDT Unbound

Create successful ePaper yourself
Turn your PDF publications into a flip-book with our unique Google optimized e-Paper software.
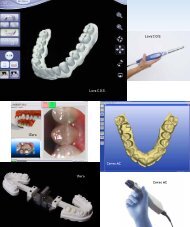
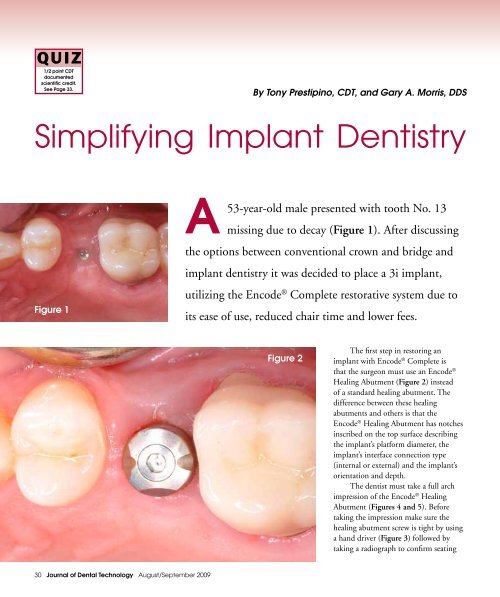
1/2 point CDTdocumentedscientific credit.See Page 33.By Tony Prestipino, CDT, and Gary A. Morris, DDS<strong>Simplifying</strong> <strong>Implant</strong> <strong>Dentistry</strong>Figure 153-year-old male presented with tooth No. 13missing due to decay (Figure 1). After discussingthe options between conventional crown and bridge andimplant dentistry it was decided to place a 3i implant,utilizing the Encode ® Complete restorative system due toits ease of use, reduced chair time and lower fees.Figure 2The first step in restoring animplant with Encode ® Complete isthat the surgeon must use an Encode ®Healing Abutment (Figure 2) insteadof a standard healing abutment. Thedifference between these healingabutments and others is that theEncode ® Healing Abutment has notchesinscribed on the top surface describingthe implant’s platform diameter, theimplant’s interface connection type(internal or external) and the implant’sorientation and depth.The dentist must take a full archimpression of the Encode ® HealingAbutment (Figures 4 and 5). Beforetaking the impression make sure thehealing abutment screw is tight by usinga hand driver (Figure 3) followed bytaking a radiograph to confirm seating30 Journal of Dental Technology August/September 2009
of the abutment. It is not likely thescrew of the healing abutment willcome loose but if it does this will causethe healing abutment to rise due to thehydraulic pressure introduced whenthe impression is taken. It is crucialthat there are no bubbles, rips, tearsor imperfections in this impressionaround the implant site. The reasonfor this is the scanner, which is used inthis CAD/CAM technology, may readthese imperfections as something else.The requirement for this impression isthat the healing abutment be at least1mm supra-gingival (Figure 6). Animpression coping is not indicatedin the production of a final Encode ®Abutment. Simply take a clean, clear,full arch impression of the healingabutment, followed by a full archimpression of the opposing arch and abite registration.The dental technician willpour up the impression with a lowexpansion die stone, free of bubbles(Figure 7). Articulate the models onan articulator within the confines ofthe mounting plates (Figures 8). Onlyarticulators compatible with AddessoSplit Plates, such as the Stratos 100articulator, can be used to replicatearticulation at the milling center. Forthis reason, articulators do not need tobe shipped, only the working models.Filling out the prescription is avital step in the Encode ® Completeproduction process and knowing yourdentist will help you with this process.Your dentist should answer severalquestions as completely as possible.How far sub-gingival should marginsbe buccal, interproximals, and lingual?Is a chamfer or shoulder marginpreferred? What should the abutmentwalls be parallel to and to what degreeof taper? Do you want to stretch any ofthe emergence profiles? Is the implantutilizing a platform switch design?These questions are filled out on theFigure 3 Figure 4Figure 5Figure 6Figure 7August/September 2009 Journal of Dental Technology 31
Figure 8Figure 9Encode ® Complete work order form andshipped out to 3i’s PSR department inWest Palm Beach, Fla.At the PSR department at 3i, adental technician reads the prescription,scans the models and the abutment isdesigned virtually. Upon request, thedigital photos or electronic drawings ofthe abutment are sent to your e-mailaddress to be reviewed and revised ifneed be (Figure 9). After approval ofthe digital photos, the milling machinecan get to work (Figure 10). First, theabutment is milled out of a block oftitanium (Figure 11) with a preciseBiomet 3i interface. Then, the workingmodel is revised to fit an analog in it’sproper orientation. At the same time,the milling is done on the workingmodel to create the proper socket shapefor the emergence profile portion of theabutment to fit in (Figure 12), whichthe computer knows by the scanningof the opposing arch and the adjacentFigure 10dentition to the implant as well as thecross arch dentition.After completion of the robotmodel and the abutment, they aremailed back to the dental laboratory.A porcelain fused to high noble crownwas fabricated over the Encode ®Abutment and polished (Figures 13and 14) by the laboratory.The doctor removes the healingabutment, seats the implant abutment(Figure 15) and takes a radiograph toverify proper interface seating. Aftertorquing the abutment screw to 20Ncm (CERTAIN) or 32 Ncm (EX-HEX) the crown is cemented (Figure16).Needless to say this soundseasy — and it really is. Eliminatingthe need for an impression coping tofabricate the restoration of an implantwill change implant dentistry. Also,it will save chairtime and cost. It willreduce the amount of componentsneeded to restore implants, makingthe process less confusing, at the sametime providing the patient with a highquality,patient-specific restoration.In the last year at my laboratory,we have fabricated more than 300Encode ® Abutments and crowns withexcellent results. Biomet 3i Encode ®Complete Restorative System offers tothe dentist a simple, less confusing wayFigure 1132 Journal of Dental Technology August/September 2009
to restore an implant, for this reasonwe offer a low, flat fee for the Encode ®Abutment and its crown, thus hopingto further simplify the restoration of animplant.Figure 12 Figure 13About the AuthorsPrestipino is president of ArtifexDental Laboratory Inc., whichspecializes in implants and is locatedin the suburbs of Washington D.C.He is a Certified Dental Technician.He attended the dental technologyprogram at Northern VirginiaCommunity College, is an NADLmember, has trained at the PankeyInstitute and the Dawson Academy,is a member of the Northern Virginia<strong>Implant</strong> Society and lectures nationallyabout implants. His laboratory is aBeta test site for Biomet 3i Encode ®Complete.Morris received his dentaldegree from the University of Illinoisand completed his residency inprosthodontics at the University ofMissouri, Kansas City, Mo. He is amember of the American College ofProsthodontics, International Collegeof Prosthodontics, Academy ofOsseointegration and the InternationalCollege of Oral <strong>Implant</strong>ologists.Morris has lectured extensively bothnationally and internationally aboutimplant prosthodontics and relatedimplant topics and maintains a privatepractice, limited to prosthodonticsand restorative dentistry, in BuffaloGrove, Ill.Figure 14 Figure 15Figure 16QUIZ:Receive .5 point documented scientific credit for passing a quiz about this article. To get the quiz go to <strong>JDT</strong><strong>Unbound</strong> (www.nadl.org/jdtunbound) and click on the CDT link or use the Fax-On-Demand system by calling(877) 355-8029, press 1 for NBC documents and enter document number 55 to have the quiz faxed to you.You can enter your answers to this quiz (course code #18975 at http://quizzes.nadl.org or fax the completedquiz to (850) 222-0053. This quiz is provided to test the technician’s comprehension of the article’s contentand does not necessarily serve as an endorsement of the content by NADL or NBC.August/September 2009 Journal of Dental Technology 33