Robert Zubák Using CaptekTM products and Ivoclar ... - JDT Unbound
Robert Zubák Using CaptekTM products and Ivoclar ... - JDT Unbound
Robert Zubák Using CaptekTM products and Ivoclar ... - JDT Unbound

Create successful ePaper yourself
Turn your PDF publications into a flip-book with our unique Google optimized e-Paper software.
Figure 3<br />
1/2 point CDT or<br />
RG documented<br />
scientific credit.<br />
See Page 28.<br />
Article <strong>and</strong> Photos By<br />
<strong>Robert</strong> Zubák<br />
<strong>Using</strong> Captek TM <strong>products</strong> <strong>and</strong> <strong>Ivoclar</strong><br />
Vivadent’s IPS d.Sign® ceramic materials<br />
to create a detailed restoration.<br />
Figure 1<br />
Figure 2<br />
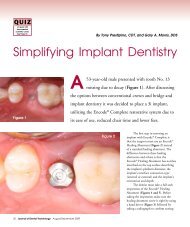
very dental patient who needs a restoration wants one<br />
that looks real. That is what dental technicians are trying<br />
to create in the laboratory every day. This case, using<br />
Captek TM as the understructure <strong>and</strong> IPS d.Sign® as the<br />
ceramic, consists of five crowns in the anterior section<br />
on abutments 22-26, two crowns in the posterior section<br />
on abutments 28 <strong>and</strong> 30 <strong>and</strong> a single porcelain inlay on<br />
abutment 19 (Figure 1).<br />
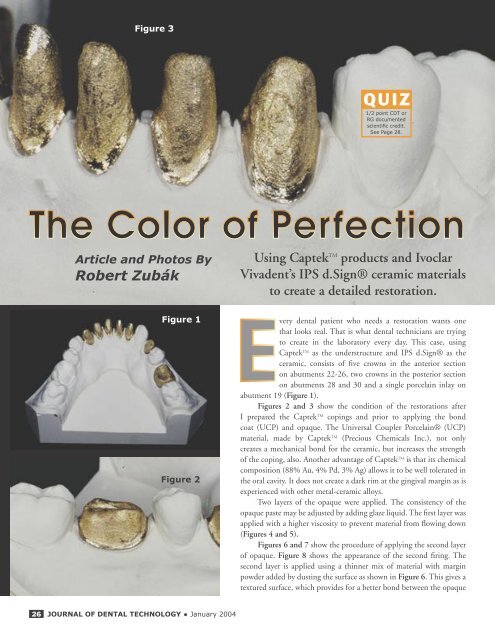
Figures 2 <strong>and</strong> 3 show the condition of the restorations after<br />
I prepared the Captek TM copings <strong>and</strong> prior to applying the bond<br />
coat (UCP) <strong>and</strong> opaque. The Universal Coupler Porcelain® (UCP)<br />
material, made by Captek TM (Precious Chemicals Inc.), not only<br />
creates a mechanical bond for the ceramic, but increases the strength<br />
of the coping, also. Another advantage of Captek TM is that its chemical<br />
composition (88% Au, 4% Pd, 3% Ag) allows it to be well tolerated in<br />
the oral cavity. It does not create a dark rim at the gingival margin as is<br />
experienced with other metal-ceramic alloys.<br />
Two layers of the opaque were applied. The consistency of the<br />
opaque paste may be adjusted by adding glaze liquid. The first layer was<br />
applied with a higher viscosity to prevent material from flowing down<br />
(Figures 4 <strong>and</strong> 5).<br />
Figures 6 <strong>and</strong> 7 show the procedure of applying the second layer<br />
of opaque. Figure 8 shows the appearance of the second firing. The<br />
second layer is applied using a thinner mix of material with margin<br />
powder added by dusting the surface as shown in Figure 6. This gives a<br />
textured surface, which provides for a better bond between the opaque<br />
26<br />
JOURNAL OF DENTAL TECHNOLOGY ● January 2004
Figure 4<br />
Figure 5<br />
Figure 6<br />
Figure 7<br />
Figure 8<br />
Figure 9<br />
<strong>and</strong> ceramic material. Also, it ensures better refraction of light whereby<br />
the light penetrates through the dentin <strong>and</strong> incisal substances to the<br />
opaque surface. The addition of the margin powder does not change<br />
color.<br />
Achieving a desired color shade is not easy <strong>and</strong> a certain amount of<br />
experience is needed before an appropriate color is created following the<br />
opaque firing. Most teeth feature a darker color shade toward the cervical<br />
<strong>and</strong> gradually become lighter closer to the incisal with varying degrees of<br />
transparency.<br />
When selecting an appropriate color shade the two principal horizontal<br />
lines, which divide the tooth into the cervical, dentin <strong>and</strong> incisal,<br />
should be determined. Close attention should be paid to the selection<br />
of an appropriate dentin color shade because it determines the other<br />
shades.<br />
In this case, the A3 color shade was selected for the dentin. The<br />
cervical has a somewhat darker shade, so a darker color was used for this<br />
area. In this case, the cervical incisal orange (CI.o) was added in a 60-40<br />
ratio to the deep dentin A3 color shade.<br />
The A shades consist of a palette of colors that are close in shade to<br />
each other, differing only in their chroma intensity. <strong>Using</strong> the dentin that<br />
was made darker by adding CI.o as a basis for the cervical color, you can<br />
achieve a more natural <strong>and</strong> animated look.<br />
I prepared pure A3 deep dentin, pure A3 dentin, A3 dentin with<br />
transparent neutral in a 50-50 ratio, pure TS2 incisal substance, a mix of<br />
TS2 <strong>and</strong> TN 50/50, transparent blue TB, mamelon light substance mix<br />
of MML <strong>and</strong> A3 50/50, pure effect E3, <strong>and</strong> pure occlusal dentin orange<br />
(OD.o).<br />
Figure 9 shows the deep dentin used for the cervical <strong>and</strong> the deep<br />
dentin A3+ cervical incisal orange (CI.o) proximal areas. A3 was applied<br />
around the entire upper rim deep dentin. This method hides the rim of<br />
the coping by preventing light from passing through the more transparent<br />
material to be added. This could be a problem if the preparation is<br />
inappropriately reduced <strong>and</strong> develops a hot spot.<br />
I applied a mix of A3 dentin+ transparent neutral (TN) in a 50-50<br />
ratio in the cervical area. Close attention is required to address insufficient<br />
space in the cervical area. This mixture creates the effect of greater<br />
depth, which is important in this area. Further layers consist of A3 dentin<br />
in the dentin area <strong>and</strong> a mixture of dentin A3 with a transparent neutral<br />
(A3+TN) in the incisal area (Figures 10 <strong>and</strong> 11).<br />
I provided some space for applying transparent substance <strong>and</strong><br />
mamelons <strong>and</strong> applied occlusal dentin orange (OD.o) on the occlusal<br />
surface. The edges were overlaid with a thin layer of TS2 incisal, onto<br />
which the mamelons were created using the MML mixture. A3 dentin<br />
<strong>and</strong> TB transparent blue were applied between these (Figure 12). A thin<br />
layer of TS2 incisal between dentin <strong>and</strong> the entire incisal provides for an<br />
appropriate separation of dentin <strong>and</strong> incisal powders, thus the final shade<br />
takes on a more life-like appearance. The deep A3 dentin was applied<br />
onto the OD.o (occlusal dentin orange) already on the occlusal surface,<br />
which starts the initial shape of the cusps (Figure 13). The incisal mix<br />
was then used to cover the entire surface. In the dentin area, mixes of TS2<br />
<strong>and</strong> TS2+TN were used (Figures 14 <strong>and</strong> 15). The occlusal anatomical<br />
features were formed using this substance as well.<br />
continued next page<br />
January 2004 ● JOURNAL OF DENTAL TECHNOLOGY 27
Figure 10<br />
Figure 11<br />
Figure 12<br />
Figure 13<br />
“The Color of Perfection,” continued from page 27<br />
After dismounting from the model, the incisal mix is applied<br />
onto the proximal areas thereby fixing the imperfections.<br />
Overbuild slightly to account for approximately 10 percent<br />
shrinkage (Figure 16).<br />
Figures 16-20 show the crowns prior to <strong>and</strong> after the first firing.<br />
Figures 21-23 show applying the corrective layers <strong>and</strong> second<br />
firing. The corrective layers are intended to create the final appearance<br />
<strong>and</strong> shape. The TS2+TN mixture was used <strong>and</strong> an E3 effect<br />
provided optical lift of cusps. The better this procedure is done,<br />
the less amount of time will be needed for final finishing work.<br />
The finishing work is an important step because it influences<br />
the final color. A minor defect can result in an inappropriate refraction<br />
(light reflection) <strong>and</strong> may cause the entire restoration to<br />
be lifeless.<br />
Concave shapes provide for optically darker surfaces while<br />
convex shapes make these surfaces look lighter.<br />
Rubbing the labial surface with carbon paper or using silver<br />
powder will aid the technician with a visual reference in ensuring<br />
the crowns have correct anatomical shape. Close attention must be<br />
paid to the incisal edge, particularly when it comes to lower teeth<br />
because the edge m<strong>and</strong>ates the specific shape.<br />
A glaze firing is used to provide for the final finish. In this<br />
case, I used glazing powder, glazing media <strong>and</strong> a small amount of<br />
stain for highlights. After glazing, the finished product is checked<br />
again for imperfections.<br />
In the end, the thinness of the Captek TM material allows for<br />
more ceramic depth, as shown in Figures 24-26. The warm golden<br />
surface color of the completed coping, which does not oxidize,<br />
improves the shade giving the final restoration a warm natural<br />
appearance.<br />
To see more pictures of <strong>Robert</strong> Zubák’s h<strong>and</strong>iwork visit our Web<br />
site at www.nadl.org/jdt.<br />
About the Author:<br />
Figure 14<br />
Zubák is a dental technician<br />
from Slovokia with 15 years<br />
of experience. He is working<br />
at Ragle Dental Laboratory,<br />
CDL in Champaign, Ill.<br />
QUIZ: Receive 1/2 point CDT or RG documented scientific<br />
credit for reading this article <strong>and</strong> passing the quiz! To get<br />
your credit, complete the quiz located on the NADL Web site at<br />
www.nadl.org under the Certification Section, or call the NBC<br />
Fax-on-Dem<strong>and</strong> at (877) 355-8029, Press 1 for NBC documents,<br />
<strong>and</strong> enter document number 40 to have the quiz sent to your fax<br />
machine. Once completed, mail or fax to NBC at (850) 222-0053.<br />
This quiz is provided to test the<br />
technician’s comprehension of<br />
the article’s content <strong>and</strong> does<br />
not necessarily serve as an<br />
endorsement of the content by<br />
NADL or NBC.<br />
28<br />
JOURNAL OF DENTAL TECHNOLOGY ● January 2004
Figure 15<br />
Figure 21<br />
Figure 22<br />
Figure 16 Figure 17<br />
Figure 23<br />
Figure 18<br />
Figure 24<br />
Figure 19<br />
Figure 25<br />
Figure 20<br />
Figure 26<br />
January 2004 ● JOURNAL OF DENTAL TECHNOLOGY 29