Technical information and operating instruction ... - Essmann
Technical information and operating instruction ... - Essmann
Technical information and operating instruction ... - Essmann
You also want an ePaper? Increase the reach of your titles
YUMPU automatically turns print PDFs into web optimized ePapers that Google loves.
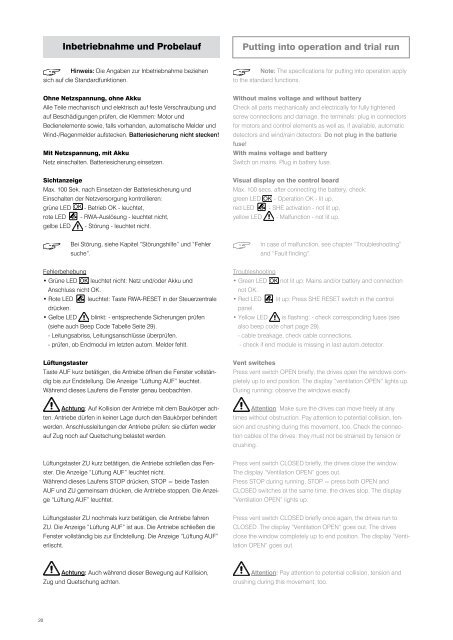
Inbetriebnahme und Probelauf<br />
Putting into operation <strong>and</strong> trial run<br />
Hinweis: Die Angaben zur Inbetriebnahme beziehen<br />
sich auf die St<strong>and</strong>ardfunktionen.<br />
Note: The specifications for putting into operation apply<br />
to the st<strong>and</strong>ard functions.<br />
Ohne Netzspannung, ohne Akku<br />
Alle Teile mechanisch und elektrisch auf feste Verschraubung und<br />
auf Beschädigungen prüfen, die Klemmen: Motor und<br />
Bedienelemente sowie, falls vorh<strong>and</strong>en, automatische Melder und<br />
Wind-/Regenmelder aufstecken. Batteriesicherung nicht stecken!<br />
Mit Netzspannung, mit Akku<br />
Netz einschalten. Batteriesicherung einsetzen.<br />
Without mains voltage <strong>and</strong> without battery<br />
Check all parts mechanically <strong>and</strong> electrically for fully tightened<br />
screw connections <strong>and</strong> damage, the terminals: plug in connectors<br />
for motors <strong>and</strong> control elements as well as, if available, automatic<br />
detectors <strong>and</strong> wind/rain detectors. Do not plug in the batterie<br />
fuse!<br />
With mains voltage <strong>and</strong> battery<br />
Switch on mains. Plug in battery fuse.<br />
Sichtanzeige<br />
Max. 100 Sek. nach Einsetzen der Batteriesicherung und<br />
Einschalten der Netzversorgung kontrollieren:<br />
grüne LED OK - Betrieb OK - leuchtet,<br />
rote LED - RWA-Auslösung - leuchtet nicht,<br />
gelbe LED - Störung - leuchtet nicht.<br />
Visual display on the control board<br />
Max. 100 secs. after connecting the battery, check:<br />
green LED OK - Operation OK - lit up,<br />
red LED - SHE activation - not lit up,<br />
yellow LED - Malfunction - not lit up.<br />
Bei Störung, siehe Kapitel “Störungshilfe” und “Fehler<br />
suche”.<br />
In case of malfunction, see chapter “Troubleshooting”<br />
<strong>and</strong> “Fault finding”.<br />
Fehlerbehebung<br />
• Grüne LED OK leuchtet nicht: Netz und/oder Akku und<br />
Anschluss nicht OK.<br />
• Rote LED leuchtet: Taste RWA-RESET in der Steuerzentrale<br />
drücken.<br />
• Gelbe LED blinkt: - entsprechende Sicherungen prüfen<br />
(siehe auch Beep Code Tabelle Seite 29).<br />
- Leitungsabriss, Leitungsanschlüsse überprüfen.<br />
- prüfen, ob Endmodul im letzten autom. Melder fehlt.<br />
Troubleshooting<br />
• Green LED OK not lit up: Mains <strong>and</strong>/or battery <strong>and</strong> connection<br />
not OK.<br />
• Red LED lit up: Press SHE RESET switch in the control<br />
panel.<br />
• Yellow LED is flashing: - check corresponding fuses (see<br />
also beep code chart page 29).<br />
- cable breakage, check cable connections.<br />
- check if end module is missing in last autom.detector.<br />
Lüftungstaster<br />
Taste AUF kurz betätigen, die Antriebe öffnen die Fenster vollständig<br />
bis zur Endstellung. Die Anzeige “Lüftung AUF” leuchtet.<br />
Während dieses Laufens die Fenster genau beobachten.<br />
Vent switches<br />
Press vent switch OPEN briefly, the drives open the windows completely<br />
up to end position. The display “ventilation OPEN” lights up.<br />
During running: observe the windows exactly.<br />
Achtung: Auf Kollision der Antriebe mit dem Baukörper achten.<br />
Antriebe dürfen in keiner Lage durch den Baukörper behindert<br />
werden. Anschlussleitungen der Antriebe prüfen: sie dürfen weder<br />
auf Zug noch auf Quetschung belastet werden.<br />
Attention: Make sure the drives can move freely at any<br />
times without obstruction. Pay attention to potential collision, tension<br />
<strong>and</strong> crushing during this movement, too. Check the connection<br />
cables of the drives: they must not be strained by tension or<br />
crushing.<br />
Lüftungstaster ZU kurz betätigen, die Antriebe schließen das Fenster.<br />
Die Anzeige “Lüftung AUF” leuchtet nicht.<br />
Während dieses Laufens STOP drücken, STOP = beide Tasten<br />
AUF und ZU gemeinsam drücken, die Antriebe stoppen. Die Anzeige<br />
“Lüftung AUF” leuchtet.<br />
Press vent switch CLOSED briefly, the drives close the window.<br />
The display “Ventilation OPEN” goes out.<br />
Press STOP during running, STOP = press both OPEN <strong>and</strong><br />
CLOSED switches at the same time, the drives stop. The display<br />
“Ventilation OPEN” lights up.<br />
Lüftungstaster ZU nochmals kurz betätigen, die Antriebe fahren<br />
ZU. Die Anzeige “Lüftung AUF” ist aus. Die Antriebe schließen die<br />
Fenster vollständig bis zur Endstellung. Die Anzeige “Lüftung AUF”<br />
erlischt.<br />
Press vent switch CLOSED briefly once again, the drives run to<br />
CLOSED. The display “Ventilation OPEN” goes out. The drives<br />
close the window completely up to end position. The display “Ventilation<br />
OPEN” goes out.<br />
Achtung: Auch während dieser Bewegung auf Kollision,<br />
Zug und Quetschung achten.<br />
Attention: Pay attention to potential collision, tension <strong>and</strong><br />
crushing during this movement, too.<br />
20


