CATIA V5 Fundamentals - WordPress.com
CATIA V5 Fundamentals - WordPress.com
CATIA V5 Fundamentals - WordPress.com

You also want an ePaper? Increase the reach of your titles
YUMPU automatically turns print PDFs into web optimized ePapers that Google loves.
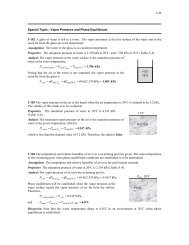
<strong>CATIA</strong> <strong>V5</strong>R16 <strong>Fundamentals</strong><br />
<strong>CATIA</strong> <strong>V5</strong><br />
<strong>Fundamentals</strong><br />
Version 5 Release 16<br />
Infrastructure<br />
Version 1- Aug06<br />
A- 1<br />
Sketcher<br />
Part Design<br />
Assembly Design<br />
Written by Dickson Sham
<strong>CATIA</strong> <strong>V5</strong>R16 <strong>Fundamentals</strong><br />
General<br />
The Workbench Concept<br />
Each workbench contains a set of tools that<br />
is dedicated to perform a specific task. The<br />
following workbenches are the <strong>com</strong>monly<br />
used:<br />
• Part Design: Design parts using a solid<br />
modeling approach<br />
• Sketcher: Create 2D profiles with<br />
associated constraints, which is then used to<br />
create other 3D geometry.<br />
• Assembly Design: Assemble parts together<br />
with constraints<br />
• Drafting: Create drawings from parts or<br />
assemblies<br />
• Generative Shape Design: Design parts<br />
using a surface modeling approach<br />
A- 2<br />
Version 1- Aug06<br />
Written by Dickson Sham
<strong>CATIA</strong> <strong>V5</strong>R16 <strong>Fundamentals</strong><br />
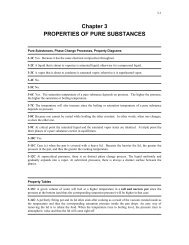
User Interface<br />
A<br />
C<br />
General<br />
D<br />
Below is the layout of the elements of<br />
the standard <strong>CATIA</strong> application.<br />
G<br />
A, Menu Commands<br />
B. Specification Tree<br />
B<br />
H<br />
E<br />
C. Filename and extension of current<br />
document<br />
D. Icon of the active workbench<br />
E. Toolbars specific to the active<br />
workbench<br />
F. Standard Toolbar<br />
G. Compass<br />
H. Geometry area<br />
F<br />
A- 3<br />
Version 1- Aug06<br />
Written by Dickson Sham
<strong>CATIA</strong> <strong>V5</strong>R16 <strong>Fundamentals</strong><br />
General<br />
Type of Documents<br />
The <strong>com</strong>mon documents are:<br />
A, A part document (.CATPart)<br />
B. An assembly document (.CATProduct)<br />
C. A drawing document (.CATDrawing)<br />
A<br />
C<br />
B<br />
A- 4<br />
Version 1- Aug06<br />
Written by Dickson Sham
<strong>CATIA</strong> <strong>V5</strong>R16 <strong>Fundamentals</strong><br />
To improve the 3D surface accuracy,<br />
Display Settings<br />
Use the Tools->Options... Command, then open<br />
the tab page Display->Performances<br />
General<br />
Then lower the fixed sag value to make the<br />
surface look smoother<br />
You can also change the background color on the<br />
tab page Display->Visualization<br />
A- 5<br />
Version 1- Aug06<br />
Written by Dickson Sham
<strong>CATIA</strong> <strong>V5</strong>R16 <strong>Fundamentals</strong><br />
View & Hide Toolbars<br />
General<br />
- Select “View > Toolbars”.<br />
The list of current toolbars is displayed. Currently visible<br />
toolbars are indicated by a tick symbol to the left of<br />
the toolbar name.<br />
In the list, click the toolbar you want to view or hide.<br />
- You can detach toolbars from the application<br />
window border by dragging the double line to the left<br />
of the toolbar: you can drag the toolbar anywhere<br />
around the screen, then dock the toolbar in the<br />
same or in another location by dragging it onto the<br />
application window border<br />
- To restore the original positions of the toolbars on<br />
the current workbench, select<br />
“View>Customize>Toolbars>Restore position”;<br />
A- 6<br />
Version 1- Aug06<br />
Written by Dickson Sham
<strong>CATIA</strong> <strong>V5</strong>R16 <strong>Fundamentals</strong><br />
Change the view with the mouse<br />
General<br />
A. Panning enables you to move the<br />
model on a plane parallel to the<br />
screen. Click and hold the middle<br />
mouse button, then drag the<br />
mouse.<br />
B. Rotating enables you to rotate the<br />
model around a point. Click and<br />
hold the middle mouse button and<br />
the right button, then drag the<br />
mouse.<br />
C. Zooming enables you to increase<br />
or decrease the size of the model.<br />
Click and hold the middle button,<br />
then click ONCE and release the<br />
right button, then drag the mouse<br />
up or down.<br />
Middle button<br />
Right button<br />
Version 1- Aug06<br />
A- 7<br />
Written by Dickson Sham
<strong>CATIA</strong> <strong>V5</strong>R16 <strong>Fundamentals</strong><br />
General<br />
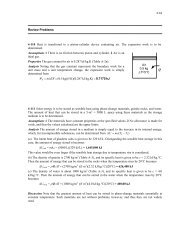
Rendering Styles<br />
A. Shading<br />
B. Shading with Edges<br />
C. Shading with Edges but<br />
without smooth edges<br />
D. Shading with Edges with<br />
hidden edges<br />
E. Shading with Material<br />
F. Wireframe<br />
More:- To change the color or<br />
the degree of transparency,<br />
right-click on the element<br />
A- 8<br />
Version 1- Aug06<br />
Written by Dickson Sham
<strong>CATIA</strong> <strong>V5</strong>R16 <strong>Fundamentals</strong><br />
General<br />
Show & Hide<br />
A. Hide/Show<br />
(Hide an element by transferring<br />
it to the “No Show” space)<br />
B. Swap visible space<br />
(Swap the screen from “Show” to<br />
“No Show” or vice versa)<br />
A<br />
B<br />
You can select any elements in<br />
the “No Show” space and<br />
transfer it back to the “Show”<br />
space by clicking the<br />
“Hide/Show” icon<br />
Elements<br />
are now<br />
hidden<br />
For the hidden elements, their<br />
icons are shaded.<br />
A- 9<br />
Version 1- Aug06<br />
Written by Dickson Sham
<strong>CATIA</strong> <strong>V5</strong>R16 <strong>Fundamentals</strong><br />
General<br />
Reference Planes<br />
The default reference planes<br />
are the first three features in<br />
any part file. Their names are<br />
derived from the plane they<br />
are parallel to, relative to the<br />
part coordinate system:<br />
XY plane<br />
YZ plane<br />
ZX plane<br />
It is impossible to move or<br />
delete the planes.<br />
Version 1- Aug06<br />
The planes can provide a<br />
planer support on which to<br />
create a 2D sketch.<br />
A- 10<br />
Global coordinate system<br />
Written by Dickson Sham
<strong>CATIA</strong> <strong>V5</strong>R16 <strong>Fundamentals</strong><br />
Sketcher<br />
Create a Sketch<br />
1. Select a planer support (e.g.<br />
datum plane, planer solid face)<br />
from the specification tree or by<br />
clicking the support directly.<br />
2<br />
2. Select the Sketcher Icon<br />
from any workbench where is<br />
possible to create a sketcher<br />
(e.g. Part Design workbench).<br />
1<br />
3. <strong>CATIA</strong> switches the current<br />
workbench to the sketcher<br />
workbench; The viewpoint is<br />
now parallel to the selected<br />
plane.<br />
3<br />
A- 11<br />
Version 1- Aug06<br />
Written by Dickson Sham
<strong>CATIA</strong> <strong>V5</strong>R16 <strong>Fundamentals</strong><br />
Sketcher<br />
Toolbars in sketcher<br />
A. Profile: Create 2D elements, such as<br />
points, lines, arcs, circles and axes.<br />
B. Operation: Modify the existing<br />
elements, such as chamfer, fillet, trim,<br />
and mirror.<br />
C. Sketch tools: Provide option<br />
<strong>com</strong>mands<br />
D. Constraint: Set various dimensional<br />
constraints (e.g. length, angle & radius)<br />
& geometrical constraints (e.g.<br />
coincidence, concentric, horizontal and<br />
symmetric)<br />
E. Visualization: Simplify the view<br />
B<br />
C<br />
D<br />
A<br />
E<br />
A- 12<br />
Version 1- Aug06<br />
Written by Dickson Sham
<strong>CATIA</strong> <strong>V5</strong>R16 <strong>Fundamentals</strong><br />
Sketcher<br />
Construction Geometry<br />
Construction geometry is created<br />
within a sketch to aid in profile<br />
creation. Unlike standard geometry,<br />
it does not appear outside the<br />
sketcher workbench.<br />
Construction geometry is shown in<br />
dashed format. When the<br />
“Construction/Standard element”<br />
icon is on, all sketched elements will<br />
be created as construction elements.<br />
Version 1- Aug06<br />
You can also toggle any elements<br />
from standard to construction, or<br />
vice versa by clicking the<br />
“construction/standard element”<br />
icon.<br />
Construction geometry<br />
A- 13<br />
Written by Dickson Sham
<strong>CATIA</strong> <strong>V5</strong>R16 <strong>Fundamentals</strong><br />
Sketcher<br />
Sketch Assistant<br />
CASE-1<br />
This is a line on the<br />
sketch<br />
When the cursor is on the<br />
line, the line will turn in<br />
orange and an empty<br />
circle appears next to the<br />
cursor<br />
When the cursor is at the<br />
endpoint of the line, a solid<br />
circle appears next to the<br />
cursor<br />
CASE-2<br />
We are going to draw a<br />
line, which is tangent to<br />
the arc<br />
A- 14<br />
Tangency<br />
Before clicking the second<br />
point of the line, move the<br />
cursor until the system can<br />
detect that the line is tangent<br />
to the arc. Click and confirm<br />
the position.<br />
Version 1- Aug06<br />
Written by Dickson Sham
<strong>CATIA</strong> <strong>V5</strong>R16 <strong>Fundamentals</strong><br />
Sketcher<br />
Constraining the sketch<br />
• Dimensional Constraints<br />
(click the icon, then select the<br />
element(s))<br />
• Geometrical Constraints<br />
(multi-select the two elements by<br />
pressing “CTRL” key and click the<br />
icon)<br />
• Length<br />
• Distance<br />
• Angle<br />
• Radius/Diameter<br />
Remark: To create the dimensions<br />
continuously, double-click the icon so<br />
that the icon is always on until you reclick<br />
it again<br />
• Perpendicularity<br />
• Horizontal/Vertical<br />
• Concidence<br />
• Tangency<br />
• Symmetry (multi-select the elements<br />
on the both side and then select the<br />
axis)<br />
You can also create constraints with other sketches and 3D elements out of the sketch<br />
A- 15<br />
Version 1- Aug06<br />
Written by Dickson Sham
<strong>CATIA</strong> <strong>V5</strong>R16 <strong>Fundamentals</strong><br />
Controlling the direction of a<br />
dimension constraint<br />
Sketcher<br />
The default dimension direction is<br />
parallel to the line between the<br />
circle centre. To change the<br />
direction to horizontal or vertical,<br />
right mouse click and select the<br />
desired orientation.<br />
A- 16<br />
Version 1- Aug06<br />
Written by Dickson Sham
<strong>CATIA</strong> <strong>V5</strong>R16 <strong>Fundamentals</strong><br />
Sketcher<br />
Color and Diagnostic<br />
1. White: Under-constrained<br />
2. Green: Fixed/Fully constrained<br />
3. Purple: Over-constrained<br />
4. Red: Inconsistent<br />
Only case 1 & 2 are allowable<br />
in <strong>CATIA</strong>; for case 3 & 4, you<br />
must fix the error before<br />
quitting the sketcher<br />
workbench, otherwise a<br />
warning message will pop-out<br />
A- 17<br />
Version 1- Aug06<br />
Written by Dickson Sham
<strong>CATIA</strong> <strong>V5</strong>R16 <strong>Fundamentals</strong><br />
Sketcher<br />
View Orientation<br />
• By default, the screen is parallel to<br />
the sketch support.<br />
• To making constraints between<br />
the sketch geometry and the 3D<br />
element, you may need to rotate<br />
the model into a 3D view.<br />
• To return the default orientation,<br />
select the “Normal View” icon.<br />
Version 1- Aug06<br />
A- 18<br />
We can create a distance<br />
constraint between the circle<br />
centre and the solid edge<br />
Written by Dickson Sham
<strong>CATIA</strong> <strong>V5</strong>R16 <strong>Fundamentals</strong><br />
Sketcher<br />
Exiting the Sketcher<br />
• To exit the sketcher<br />
workbench, select “Exit<br />
Workbench” icon<br />
• After that, the screen will be<br />
back to 3D view and the<br />
workbench will be switched<br />
back to the original.<br />
A- 19<br />
Version 1- Aug06<br />
Written by Dickson Sham
<strong>CATIA</strong> <strong>V5</strong>R16 <strong>Fundamentals</strong><br />
Sketcher<br />
Sketcher<br />
• EXERCISE 1<br />
• Create a sketch on xy<br />
plane<br />
• Circle centre at (0,0,0)<br />
• The geometry is<br />
symmetrical along both x,<br />
y axes.<br />
• R40 must be tangent to<br />
R16<br />
• No endpoint is isolated<br />
• Useless elements must<br />
be cleared<br />
A- 20<br />
Version 1- Aug06<br />
Written by Dickson Sham
<strong>CATIA</strong> <strong>V5</strong>R16 <strong>Fundamentals</strong><br />
Part Design<br />
• Feature-Based Solid Modeling<br />
Sketch<br />
Pad<br />
Hole<br />
Fillet<br />
Parent and Children Relation<br />
If deleting Hole,<br />
we get:<br />
If deleting Fillet,<br />
we get:<br />
If deleting Pad,<br />
we get:<br />
A- 21<br />
Version 1- Aug06<br />
Written by Dickson Sham
<strong>CATIA</strong> <strong>V5</strong>R16 <strong>Fundamentals</strong><br />
Toolbars in Part Design<br />
A. Sketch-Based Features: Create a solid<br />
feature from a 2D sketch/profile<br />
B. Dress-Up Features: Add fillets/chamfers<br />
on the solid edge, add a draft onto the<br />
solid faces, Hollow the solid, offset<br />
faces…<br />
C. Transformation Features: Change the<br />
3D position of the solid, duplicate the<br />
solid by mirroring/ patterning, scale<br />
up/down the solid…<br />
D. Surface-Based Features: Split the solid<br />
with a surface/plane, adding material onto<br />
surfaces…<br />
E. Reference Elements: Create a point, a<br />
line or a plane in the 3D space.<br />
F. Boolean Operations – not covered in<br />
class<br />
G. Analysis (Draft analysis) – not covered<br />
in class<br />
A- 22<br />
E<br />
D<br />
F<br />
C<br />
B<br />
G<br />
A<br />
Version 1- Aug06<br />
Written by Dickson Sham
<strong>CATIA</strong> <strong>V5</strong>R16 <strong>Fundamentals</strong><br />
Limit Type<br />
Type of limit are :<br />
A. Dimension<br />
B. Up to Next<br />
C. Up to Last<br />
D. Up to Plane<br />
E. Up to Surface<br />
A<br />
B<br />
C<br />
D<br />
E<br />
surface<br />
A- 23<br />
A new<br />
plane<br />
Version 1- Aug06<br />
Written by Dickson Sham
<strong>CATIA</strong> <strong>V5</strong>R16 <strong>Fundamentals</strong><br />
Pad & Pocket<br />
A. Pad (material added by<br />
extruding a sketch)<br />
B. Pocket (material removed by<br />
extruding a sketch)<br />
A<br />
B<br />
B<br />
You can define the extrusion direction by<br />
selecting a datum plane, a line, a planar<br />
surface, and a straight solid edge.<br />
Version 1- Aug06<br />
A- 24<br />
A<br />
Written by Dickson Sham
<strong>CATIA</strong> <strong>V5</strong>R16 <strong>Fundamentals</strong><br />
Shaft & Groove<br />
A. Shaft (material added by<br />
rotating a sketch)<br />
B. Groove (material removed by<br />
rotating a sketch)<br />
A<br />
B<br />
B<br />
axis<br />
You can draw the rotation axis in the<br />
profile sketch or draw another straight<br />
line as the axis<br />
Version 1- Aug06<br />
A- 25<br />
A<br />
Written by Dickson Sham
<strong>CATIA</strong> <strong>V5</strong>R16 <strong>Fundamentals</strong><br />
A. Rib (material added by<br />
sweeping a profile along a<br />
center curve)<br />
B. Slot (material removed by<br />
sweeping profile along a<br />
center curve)<br />
Profile Control<br />
-Keep Angle<br />
keeping the angle value<br />
between the sketch<br />
plane used for the profile<br />
and the tangent of the<br />
center curve<br />
Rib & Slot<br />
A<br />
B<br />
-Pulling Direction<br />
Sweeping the profile<br />
with respect to a<br />
specified direction<br />
Version 1- Aug06<br />
A- 26<br />
Center curve<br />
Profile<br />
Written by Dickson Sham
<strong>CATIA</strong> <strong>V5</strong>R16 <strong>Fundamentals</strong><br />
Multi-sections Solid<br />
A. Multi-sections Solid<br />
(material added by sweeping<br />
one or more planar section<br />
curves along one or more<br />
guide curves<br />
B. Removed Multi-sections<br />
Solid (material removed in<br />
the same way)<br />
Section 3<br />
A<br />
B<br />
- You can use an<br />
additional guide<br />
curve to control<br />
sweeping path<br />
- If sections do not<br />
have the same<br />
number of vertices,<br />
use “ratio coupling”<br />
Section 2<br />
- You can always create<br />
another plane other than xyz<br />
planes<br />
Version 1- Aug06<br />
A- 27<br />
Section 1<br />
Written by Dickson Sham
<strong>CATIA</strong> <strong>V5</strong>R16 <strong>Fundamentals</strong><br />
Comparison of <strong>com</strong>mon features<br />
Add/Remove<br />
material<br />
Section along<br />
the guide<br />
Guide/Center<br />
curve<br />
Section profile<br />
Pad<br />
Add<br />
Same<br />
Straight line<br />
Planar<br />
Pocket<br />
Remove<br />
Same<br />
Straight line<br />
Planar<br />
Rib<br />
Add<br />
Same<br />
Curve<br />
Planar<br />
Slot<br />
Remove<br />
Same<br />
Curve<br />
Planar<br />
Multi-section<br />
solid<br />
Add<br />
Various<br />
Curve<br />
Planar<br />
Removed multisection<br />
solid<br />
Remove<br />
Various<br />
Curve<br />
Planar<br />
A- 28<br />
Version 1- Aug06<br />
Written by Dickson Sham
<strong>CATIA</strong> <strong>V5</strong>R16 <strong>Fundamentals</strong><br />
Hole<br />
A. Hole (circular material<br />
removed from the existing<br />
solid);<br />
Several types of holes are available:<br />
Simple, Tapered, Counterbored,<br />
Countersinked, Counterdrilled.<br />
A<br />
To locate the center of the hole<br />
precisely inside the sketcher<br />
workbench, Select the<br />
“positioning sketch” icon<br />
Positioning the hole center<br />
A- 29<br />
Version 1- Aug06<br />
Written by Dickson Sham
<strong>CATIA</strong> <strong>V5</strong>R16 <strong>Fundamentals</strong><br />
Fillet<br />
A. Fillet (creating a curved face<br />
of a constant or variable<br />
radius that is tangent to, and<br />
that joins, two surfaces.)<br />
A<br />
Edge<br />
Variable Radius<br />
Face to face<br />
Version 1- Aug06<br />
- With the Tangency mode, a fillet is<br />
applied to the selected edge and all<br />
edges tangent to the selected edge<br />
- With the minimal mode, a fillet is<br />
applied only to the selected edge<br />
A- 30<br />
Tritangent<br />
Written by Dickson Sham
<strong>CATIA</strong> <strong>V5</strong>R16 <strong>Fundamentals</strong><br />
Chamfer<br />
A. Chamfer (removing & adding a flat<br />
section from a selected edge to<br />
create a beveled surface between<br />
the two original faces <strong>com</strong>mon to<br />
that edge.)<br />
A<br />
Angle<br />
Length1<br />
Length2<br />
Two Dimensioning<br />
Modes<br />
Length1<br />
A- 31<br />
Version 1- Aug06<br />
Written by Dickson Sham
<strong>CATIA</strong> <strong>V5</strong>R16 <strong>Fundamentals</strong><br />
Draft<br />
A. Basic Draft (adding or<br />
removing material depending<br />
on the draft angle and the<br />
pulling direction)<br />
Neutral Element<br />
A<br />
Draft Angle<br />
Pulling direction<br />
Remark: Neutral element<br />
always keeps unchanged<br />
after a draft is created<br />
Side faces to draft<br />
A- 32<br />
Version 1- Aug06<br />
Written by Dickson Sham
<strong>CATIA</strong> <strong>V5</strong>R16 <strong>Fundamentals</strong><br />
Shell<br />
A. Shell (empty a solid while<br />
keeping a given thickness on<br />
its sides)<br />
A<br />
Face to remove<br />
The face-to-remove cannot be tangent to the nearby faces.<br />
Version 1- Aug06<br />
All edges around the face should be sharp edges.<br />
A- 33<br />
Written by Dickson Sham
<strong>CATIA</strong> <strong>V5</strong>R16 <strong>Fundamentals</strong><br />
Translation & Rotation<br />
A. Translation (translating a solid<br />
along a direction)<br />
B. Rotation (rotating a solid about<br />
an axis by a certain angle)<br />
Be careful, the sketch<br />
won’t move with the solid.<br />
A- 34<br />
Version 1- Aug06<br />
Written by Dickson Sham
<strong>CATIA</strong> <strong>V5</strong>R16 <strong>Fundamentals</strong><br />
Symmetry & Mirror<br />
A. Symmetry (translating a solid<br />
to the other side of the mirror<br />
plane)<br />
B. MIrror (duplicating a solid on the<br />
other side of the mirror plane)<br />
A- 35<br />
Version 1- Aug06<br />
Written by Dickson Sham
<strong>CATIA</strong> <strong>V5</strong>R16 <strong>Fundamentals</strong><br />
Patterns<br />
A. Rectangular Pattern<br />
B. Circular Pattern<br />
C. User Pattern<br />
(duplicate the features at<br />
the points created in<br />
sketcher workbench)<br />
A<br />
B<br />
To duplicate a list of features,<br />
multi-select the features before<br />
clicking the icon “pattern”<br />
C<br />
A- 36<br />
Version 1- Aug06<br />
Written by Dickson Sham
<strong>CATIA</strong> <strong>V5</strong>R16 <strong>Fundamentals</strong><br />
Split the solid<br />
A. Split (splitting a solid with a<br />
plane, a face or a surface)<br />
A<br />
The arrow is pointing to the<br />
material to keep; you can click on<br />
the arrow to reverse the direction<br />
You can hide the cutting<br />
surface after the operation<br />
A- 37<br />
Version 1- Aug06<br />
Written by Dickson Sham
<strong>CATIA</strong> <strong>V5</strong>R16 <strong>Fundamentals</strong><br />
Part Design - exercise<br />
• EXERCISE 2-<br />
STEP 1<br />
Open the CATPART file done<br />
in Exercise 1<br />
Make sure that the current<br />
workbench is PART DESIGN<br />
Create a “Pad” with the<br />
height 5.5mm (first limit)<br />
A- 38<br />
Version 1- Aug06<br />
Written by Dickson Sham
<strong>CATIA</strong> <strong>V5</strong>R16 <strong>Fundamentals</strong><br />
Part Design - exercise<br />
STEP 2<br />
Create another sketch on zxplane<br />
The sketch should have an axis<br />
and a triangle with these<br />
dimensions (45deg, 35deg,<br />
2.5mm High)<br />
One edge of the triangle should<br />
sit on the bottom side of the pad<br />
and its peak should not be inside<br />
the pad<br />
Exit Sketcher<br />
Create a “Groove” with First<br />
Angle Limit 360deg<br />
A- 39<br />
Version 1- Aug06<br />
Written by Dickson Sham
<strong>CATIA</strong> <strong>V5</strong>R16 <strong>Fundamentals</strong><br />
Part Design - exercise<br />
STEP 3<br />
Create the 3 rd Sketch on yzplane<br />
The sketch should have an axis<br />
and two lines, which are<br />
symmetrical<br />
One end point sits on the axis<br />
and the other sits on the<br />
outermost plane of the solid<br />
Exit Sketcher<br />
Create a “Pocket” and select<br />
“Up to Last” for limits on both<br />
sides<br />
A- 40<br />
Version 1- Aug06<br />
Written by Dickson Sham
<strong>CATIA</strong> <strong>V5</strong>R16 <strong>Fundamentals</strong><br />
Part Design - exercise<br />
STEP 4<br />
Create the 4 th Sketch (a<br />
circle Dia 28mm) on the top<br />
planar surface of the solid<br />
Create a “Pocket” with depth<br />
1.5mm<br />
STEP 5<br />
Create an offset “Plane”<br />
(15mm from yz plane)<br />
A- 41<br />
Version 1- Aug06<br />
Written by Dickson Sham
<strong>CATIA</strong> <strong>V5</strong>R16 <strong>Fundamentals</strong><br />
Part Design - exercise<br />
STEP 6<br />
Create the 5 th sketch on the<br />
offset plane<br />
Draw a circle (Dia 3.0mm;<br />
distance between the solid<br />
base and the circle center is<br />
2.5mm)<br />
Exit Sketcher<br />
Create a “Pocket” with first<br />
limit “Up to Last”<br />
STEP 7<br />
Create “EdgeFillet” (2mm) at<br />
the 4 corners<br />
A- 42<br />
Version 1- Aug06<br />
Written by Dickson Sham
<strong>CATIA</strong> <strong>V5</strong>R16 <strong>Fundamentals</strong><br />
Part Design - exercise<br />
STEP 8<br />
Create another “EdgeFillet”<br />
(5mm) to remove the four sharp<br />
edges on the top surface<br />
STEP 9<br />
Create a “Chamfer” on both<br />
sides<br />
Length1= 1mm; Angle= 45deg<br />
- END of Exercise 2<br />
Version 1- Aug06<br />
A- 43<br />
Written by Dickson Sham
<strong>CATIA</strong> <strong>V5</strong>R16 <strong>Fundamentals</strong><br />
Assembly Design<br />
A Product stores a collection<br />
of <strong>com</strong>ponents (parts or subproducts).<br />
The file extension<br />
is .CATProduct.<br />
Product<br />
Parts<br />
bracklet<br />
Sub-products<br />
ring<br />
button<br />
Storing the constraints<br />
between parts or subproducts<br />
body<br />
bracklet<br />
A- 44<br />
Version 1- Aug06<br />
Written by Dickson Sham
<strong>CATIA</strong> <strong>V5</strong>R16 <strong>Fundamentals</strong><br />
Create a New Product<br />
Create a New Product by:<br />
A. Switching to Assembly Design<br />
workbench; or<br />
B. Clicking File/New/Product<br />
A<br />
You can change the<br />
Product’s properties (e.g.<br />
name) by right-clicking<br />
here<br />
Or<br />
B<br />
A- 45<br />
Version 1- Aug06<br />
Written by Dickson Sham
<strong>CATIA</strong> <strong>V5</strong>R16 <strong>Fundamentals</strong><br />
Insert an existing <strong>com</strong>ponent<br />
Right-click the product tree, then<br />
select ”Components>”Existing <strong>com</strong>ponent…”<br />
Version 1- Aug06<br />
OR<br />
A- 46<br />
Drag the part tree onto the product tree<br />
-or<br />
Use “copy & paste” function<br />
Written by Dickson Sham
<strong>CATIA</strong> <strong>V5</strong>R16 <strong>Fundamentals</strong><br />
Move <strong>com</strong>ponents by Compass<br />
Active product<br />
Component being moved<br />
Drag the <strong>com</strong>pass from the top-right<br />
corner of the window to the <strong>com</strong>ponent<br />
you want to move; the Compass will<br />
turn in green color<br />
Version 1- Aug06<br />
Remark:<br />
A- 47<br />
Drag any of the green lines of the<br />
<strong>com</strong>pass to move the <strong>com</strong>ponent<br />
(1)You can only move the <strong>com</strong>ponents of the active product<br />
(2) To reset the <strong>com</strong>pass, drag it onto the global coordinate<br />
system at the bottom-right corner of the window<br />
Written by Dickson Sham
<strong>CATIA</strong> <strong>V5</strong>R16 <strong>Fundamentals</strong><br />
Constraints between <strong>com</strong>ponents<br />
A. Coincidence Constraint<br />
B. Contact Constraint<br />
C. Distance Constraint<br />
D. Angle Constraint<br />
E. Fix Component (fix a <strong>com</strong>ponent<br />
in space; normally we ‘d fix at<br />
least one <strong>com</strong>ponent)<br />
A<br />
B<br />
C<br />
D<br />
E<br />
Version 1- Aug06<br />
A- 48<br />
When the cursor is pointing<br />
at the curved surface of the<br />
hole, its axis is highlighted<br />
Written by Dickson Sham
<strong>CATIA</strong> <strong>V5</strong>R16 <strong>Fundamentals</strong><br />
Updating Constraints<br />
The constraints need<br />
to be “Updated”<br />
Use <strong>com</strong>pass to drag a<br />
<strong>com</strong>ponent to another<br />
position<br />
Version 1- Aug06<br />
A- 49<br />
After selecting “Update” icon,<br />
the <strong>com</strong>ponent is back to its<br />
original position<br />
Written by Dickson Sham
<strong>CATIA</strong> <strong>V5</strong>R16 <strong>Fundamentals</strong><br />
Instant Simulation<br />
Version 1- Aug06<br />
Their axes are<br />
coincided<br />
The base is fixed<br />
A- 50<br />
Drag the <strong>com</strong>pass while pressing<br />
“shift” key on the keyboard; you<br />
will see that other <strong>com</strong>ponents will<br />
move with the active <strong>com</strong>ponent<br />
with respect to constraints<br />
Written by Dickson Sham
<strong>CATIA</strong> <strong>V5</strong>R16 <strong>Fundamentals</strong><br />
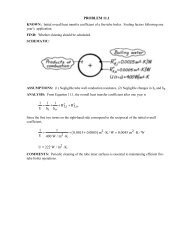
Interference check<br />
Select Type “Contact & Clash”;<br />
“Between all <strong>com</strong>ponents”; then<br />
“apply”<br />
Version 1- Aug06<br />
A- 51<br />
Clash: RED<br />
Contact: Yellow<br />
Clearance: Green<br />
Interference result<br />
Written by Dickson Sham
<strong>CATIA</strong> <strong>V5</strong>R16 <strong>Fundamentals</strong><br />
Sectioning<br />
After clicking<br />
“sectioning” icon, a<br />
section plane will be<br />
automatically created<br />
parallel to the yz plane<br />
at the product origin.<br />
Version 1- Aug06<br />
You can orient the section<br />
plane by dragging the redline<br />
of the plane<br />
A- 52<br />
Volume Cut; When activated,<br />
one side of the volume will be<br />
hidden<br />
Written by Dickson Sham
<strong>CATIA</strong> <strong>V5</strong>R16 <strong>Fundamentals</strong><br />
Assembly Design - exercise<br />
• EXERCISE 3-<br />
• Build the rest of <strong>com</strong>ponents,<br />
such as ring, button, chain as<br />
the separate parts<br />
• Assemble them together<br />
• Check any interference after<br />
assembly<br />
A- 53<br />
Version 1- Aug06<br />
Written by Dickson Sham