
You also want an ePaper? Increase the reach of your titles
YUMPU automatically turns print PDFs into web optimized ePapers that Google loves.
<strong>DIGITAL</strong> <strong>CAMERA</strong><br />
C-<strong>765</strong> <strong>Ultra</strong> <strong>Zoom</strong><br />
REFERENCE MANUAL<br />
<br />
<strong>CAMERA</strong> OPERATION MANUAL<br />
Explanation of digital camera functions and operating instructions.<br />
<strong>DIGITAL</strong> <strong>CAMERA</strong> - PC CONNECTION<br />
OPERATION MANUAL<br />
Explanation of how to download images between your digital camera and PC.
<strong>DIGITAL</strong> <strong>CAMERA</strong><br />
C-<strong>765</strong> <strong>Ultra</strong> <strong>Zoom</strong><br />
REFERENCE MANUAL<br />
� Thank you for purchasing an Olympus digital camera. Before you start<br />
to use your new camera, please read these instructions carefully to<br />
enjoy optimum performance and a longer service life. Keep this manual<br />
in a safe place for future reference.<br />
� We recommend that you take test shots to get accustomed to your<br />
camera before taking important photographs.<br />
� In the interest of continually improving products, Olympus reserves the<br />
right to update or modify information contained in this manual.
For customers in North and South America<br />
For customers in USA<br />
Declaration of Conformity<br />
Model Number : C-<strong>765</strong> <strong>Ultra</strong> <strong>Zoom</strong><br />
Trade Name : OLYMPUS<br />
Responsible Party : Olympus America Inc.<br />
Address : 2 Corporate Center Drive, Melville, New York<br />
11747-3157 U.S.A.<br />
Telephone Number : 1-631-844-5000<br />
Tested To Comply With FCC Standards<br />
FOR HOME OR OFFICE USE<br />
This device complies with Part 15 of the FCC rules. Operation is subject to<br />
the following two conditions:<br />
(1) This device may not cause harmful interference.<br />
(2) This device must accept any interference received, including<br />
interference that may cause undesired operation.<br />
For customers in Canada<br />
This Class B digital apparatus meets all requirements of the Canadian<br />
Interference-Causing Equipment Regulations.<br />
For customers in Europe<br />
“CE” mark indicates that this product complies with the European<br />
requirements for safety, health, environment and customer protection.<br />
“CE” mark cameras are intended for sales in Europe.<br />
Trademarks<br />
• IBM is a registered trademark of International Business Machines Corporation.<br />
• Microsoft and Windows are registered trademarks of Microsoft Corporation.<br />
• Macintosh is a trademark of Apple Computer Inc.<br />
• All other company and product names are registered trademarks and/or<br />
trademarks of their respective owners.<br />
• The standards for camera file systems referred to in this manual are the “Design<br />
Rule for Camera File System/DCF” standards stipulated by the Japan Electronics<br />
and Information Technology Industries Association (JEITA).<br />
2
Composition of the manual<br />
Introduction of the<br />
camera’s functions<br />
Basic Photography<br />
Advanced Photography<br />
To get that particular shot<br />
using various effects or for<br />
fine-tuning the settings.<br />
For playing back and editing<br />
pictures<br />
Settings that make the<br />
camera easier to operate.<br />
Printing pictures<br />
Troubleshooting and other<br />
information<br />
Contents<br />
Names of parts<br />
Getting started<br />
Using the menus<br />
Shooting basics<br />
Flash<br />
Advanced shooting<br />
Adjusting the image quality<br />
and exposure<br />
Playback<br />
Useful functions<br />
Print setting (DPOF)<br />
Direct printing (PictBridge)<br />
P.4<br />
P.10<br />
P.17<br />
P.32<br />
P.43<br />
P.57<br />
P.65<br />
P.96<br />
P.113<br />
P.135<br />
P.158<br />
P.169<br />
Miscellaneous P.186<br />
Specifications P.207<br />
Glossary of terms P.209<br />
Index P.212<br />
3<br />
1<br />
2<br />
3<br />
4<br />
5<br />
6<br />
7<br />
8<br />
9<br />
10<br />
11
Contents<br />
Composition of the manual . . . . . . . . . . . . . . . . . . . . . . . . . . . . 3<br />
Names of parts . . . . . . . . . . . . . . . . . . . . . . . . . . . . . . . . . . . . 10<br />
Camera . . . . . . . . . . . . . . . . . . . . . . . . . . . . . . . . . . . . . . . 10<br />
Viewfinder and monitor indications . . . . . . . . . . . . . . . . . . 12<br />
Memory gauge . . . . . . . . . . . . . . . . . . . . . . . . . . . . . . . . . 15<br />
Battery check . . . . . . . . . . . . . . . . . . . . . . . . . . . . . . . . . . 15<br />
How to use this manual . . . . . . . . . . . . . . . . . . . . . . . . . . . . . . 16<br />
1 Getting started 17<br />
Attaching the strap. . . . . . . . . . . . . . . . . . . . . . . . . . . . . . . . . . 17<br />
Battery/card basics . . . . . . . . . . . . . . . . . . . . . . . . . . . . . . . . . 18<br />
Charging the battery . . . . . . . . . . . . . . . . . . . . . . . . . . . . . 18<br />
Card basics . . . . . . . . . . . . . . . . . . . . . . . . . . . . . . . . . . . . 19<br />
Inserting and removing the battery and card. . . . . . . . . . . 20<br />
Using an AC adapter (optional) . . . . . . . . . . . . . . . . . . . . . . . . 23<br />
Power on/off . . . . . . . . . . . . . . . . . . . . . . . . . . . . . . . . . . . . . . 24<br />
Startup/Shutdown screen . . . . . . . . . . . . . . . . . . . . . . . . . 25<br />
If the card is not recognized (card check) . . . . . . . . . . . . . 25<br />
Selecting a language . . . . . . . . . . . . . . . . . . . . . . . . . . 26<br />
Setting the date and time . . . . . . . . . . . . . . . . . . . . . . . . 28<br />
Adjusting the viewfinder. . . . . . . . . . . . . . . . . . . . . . . . . . . . . . 30<br />
Holding the camera . . . . . . . . . . . . . . . . . . . . . . . . . . . . . . . . . 31<br />
2 Using the menus 32<br />
About the menus . . . . . . . . . . . . . . . . . . . . . . . . . . . . . . . . . . . 32<br />
How to use the menus. . . . . . . . . . . . . . . . . . . . . . . . . . . . . . . 33<br />
Shortcut menus . . . . . . . . . . . . . . . . . . . . . . . . . . . . . . . . . . . . 35<br />
Mode Menus . . . . . . . . . . . . . . . . . . . . . . . . . . . . . . . . . . . . . . 38<br />
3 Shooting basics 43<br />
Shooting modes. . . . . . . . . . . . . . . . . . . . . . . . . . . . . . . . . . . . 43<br />
Taking still pictures . . . . . . . . . . . . . . . . . . . . . . . . . . . . . . . . . 47<br />
4
Contents<br />
If correct focus cannot be obtained . . . . . . . . . . . . . . . . . . . . . 50<br />
Using the Focus Lock function . . . . . . . . . . . . . . . . . . . . . 50<br />
Subjects that are difficult to focus on . . . . . . . . . . . . . . . . 51<br />
Recording movies . . . . . . . . . . . . . . . . . . . . . . . . . . . . . . . 52<br />
<strong>Zoom</strong> . . . . . . . . . . . . . . . . . . . . . . . . . . . . . . . . . . . . . . . . . . . . 54<br />
Using the optical zoom . . . . . . . . . . . . . . . . . . . . . . . . . . . 54<br />
SUPER ZOOM – Using the super zoom . . . . . . . . . . . . . . 55<br />
<strong>DIGITAL</strong> ZOOM - Using the digital zoom . . . . . . . . . . . . . 56<br />
4 Flash 57<br />
Flash shooting . . . . . . . . . . . . . . . . . . . . . . . . . . . . . . . . . . 57<br />
Using the slow synchronization flash . . . . . . . . . . . . . 63<br />
Flash intensity control . . . . . . . . . . . . . . . . . . . . . . . . . . . . 64<br />
5 Advanced shooting 65<br />
A/S/M mode . . . . . . . . . . . . . . . . . . . . . . . . . . . . . . . . 65<br />
Aperture priority shooting . . . . . . . . . . . . . . . . . . . . . . . . . . 66<br />
Shutter priority shooting . . . . . . . . . . . . . . . . . . . . . . . . . . . 67<br />
Manual shooting . . . . . . . . . . . . . . . . . . . . . . . . . . . . . . . . . 68<br />
Using My Mode . . . . . . . . . . . . . . . . . . . . . . . . . . . . . . . . 69<br />
Focusing applications . . . . . . . . . . . . . . . . . . . . . . . . . . . . . . . 70<br />
AF MODE – Changing the focus range. . . . . . . . . . . . . . . 70<br />
FULLTIME AF – A reliable time-saving way to focus . . . . 71<br />
AF AREA – Changing the position of the AF target mark . . . 72<br />
AF LOCK – Locking the focus. . . . . . . . . . . . . . . . . . . . . . 73<br />
Manual focus. . . . . . . . . . . . . . . . . . . . . . . . . . . . . . . . . . . 75<br />
Metering . . . . . . . . . . . . . . . . . . . . . . . . . . . . . . . . . . . . . . 77<br />
Spot metering . . . . . . . . . . . . . . . . . . . . . . . . . . . . . . . . . . 77<br />
MULTI METERING . . . . . . . . . . . . . . . . . . . . . . . . . . . . . . 78<br />
AE LOCK – Locking the exposure . . . . . . . . . . . . . . . . 80<br />
Macro mode shooting . . . . . . . . . . . . . . . . . . . . . . . . . . . . 82<br />
Super macro mode shooting . . . . . . . . . . . . . . . . . . . . . . 83<br />
Self-timer shooting . . . . . . . . . . . . . . . . . . . . . . . . . . . . . . 84<br />
5
Contents<br />
Sequential shooting . . . . . . . . . . . 85<br />
Sequential shooting, high speed sequential shooting and<br />
AF sequential shooting . . . . 85<br />
Auto bracketing . . . . . . . . . . . . . . . . . . . . . . . . . . . 86<br />
Self-portrait shooting . . . . . . . . . . . . . . . . . . . . . . . . . . . . 88<br />
PANORAMA - Panorama shooting . . . . . . . . . . . . . . . . . . . . . 89<br />
2 IN 1 - Taking two-in-one pictures . . . . . . . . . . . . . . . 91<br />
FUNCTION - Adding special effects to pictures . . . . . . . . . . . 93<br />
Recording sound with still pictures . . . . . . . . . . . . . . . . . . . 94<br />
Recording sound with movies . . . . . . . . . . . . . . . . . . . . . . 95<br />
6 Adjusting the image quality and exposure 96<br />
Record mode . . . . . . . . . . . . . . . . . . . . . . . . . . . . . . . . . . 96<br />
3:2 Resolution . . . . . . . . . . . . . . . . . . . . . . . . . . . . . . . . . . 97<br />
ENLARGE SIZE . . . . . . . . . . . . . . . . . . . . . . . . . . . . . . . . 97<br />
Selecting a record mode . . . . . . . . . . . . . . . . . . . . . . . . . . 99<br />
ISO sensitivity . . . . . . . . . . . . . . . . . . . . . . . . . . . . . . . . . . . . 101<br />
Exposure compensation . . . . . . . . . . . . . . . . . . . . . . . . . 102<br />
White balance . . . . . . . . . . . . . . . . . . . . . . . . . . . . . . . 103<br />
Auto white balance . . . . . . . . . . . . . . . . . . . . . . . . . . . . . 103<br />
Preset white balance. . . . . . . . . . . . . . . . . . . . . . . . . . . . 104<br />
One-touch white balane . . . . . . . . . . . . . . . . . . . . . 104<br />
White balance adjustment . . . . . . . . . . . . . . . . . . . 106<br />
SHARPNESS . . . . . . . . . . . . . . . . . . . . . . . . . . . . . . . . . 107<br />
CONTRAST . . . . . . . . . . . . . . . . . . . . . . . . . . . . . . . . . . 108<br />
SATURATION . . . . . . . . . . . . . . . . . . . . . . . . . . . . . . . . 109<br />
NOISE REDUCTION . . . . . . . . . . . . . . . . . . . . . . . . . . . 110<br />
Histogram display . . . . . . . . . . . . . . . . . . . . . . . . . . . . . . 111<br />
7 Playback 113<br />
Viewing still pictures . . . . . . . . . . . . . . . . . . . . . . . . . . . . 113<br />
QUICK VIEW. . . . . . . . . . . . . . . . . . . . . . . . . . . . . . . . . . 114<br />
Close-up playback . . . . . . . . . . . . . . . . . . . . . . . . . . . . . . 115<br />
6
Contents<br />
Index display . . . . . . . . . . . . . . . . . . . . . . . . . . . . . . . . . 116<br />
Selecting the number of pictures. . . . . . . . . . . . . . . . . . . 117<br />
Slideshow . . . . . . . . . . . . . . . . . . . . . . . . . . . . . . . . . . . . 118<br />
Viewing movies . . . . . . . . . . . . . . . . . . . . . . . . . . . . . . . 119<br />
Editing movies . . . . . . . . . . . . . . . . . . . . . . . . . . . . . . . . . . . . 121<br />
INDEX - Creating an index . . . . . . . . . . . . . . . . . . . . . . . 121<br />
EDIT - Editing a movie . . . . . . . . . . . . . . . . . . . . . . . . . . 123<br />
Playback on a TV . . . . . . . . . . . . . . . . . . . . . . . . . . . . . . . . . 125<br />
Picture rotation . . . . . . . . . . . . . . . . . . . . . . . . . . . . . 126<br />
Recording sound . . . . . . . . . . . . . . . . . . . . . . . . . . . . . . . 127<br />
Editing still pictures . . . . . . . . . . . . . . . . . . . . . . . . . . . . . . . . 128<br />
Resizing . . . . . . . . . . . . . . . . . . . . . . . . . . . . . . . . . . 128<br />
Trimming . . . . . . . . . . . . . . . . . . . . . . . . . . . . . . . . . 129<br />
Protecting pictures . . . . . . . . . . . . . . . . . . . . . . . . . . . . . 131<br />
SWITCH FRAME – Playing back only protected pictures . . . . . 132<br />
Erasing pictures . . . . . . . . . . . . . . . . . . . . . . . . . . . . . . . . 133<br />
Single-frame erase . . . . . . . . . . . . . . . . . . . . . . . . . . 133<br />
All-frame erase . . . . . . . . . . . . . . . . . . . . . . . . . . . . 134<br />
8 Useful functions 135<br />
ALL RESET - Saving the camera’s settings . . . . . . . . . . . . . 135<br />
CUSTOM BUTTON . . . . . . . . . . . . . . . . . . . . . . . . . . . . . 137<br />
Setting the custom button . . . . . . . . . . . . . . . . . . . . . . . . 138<br />
Using the custom button . . . . . . . . . . . . . . . . . . . . . . . . . 139<br />
SHORT CUT . . . . . . . . . . . . . . . . . . . . . . . . . . . . . . . . . . . . . 140<br />
Setting the shortcut menu . . . . . . . . . . . . . . . . . . . . . . . . 141<br />
Using the shortcut menu . . . . . . . . . . . . . . . . . . . . . . . . . 142<br />
MY MODE SETUP . . . . . . . . . . . . . . . . . . . . . . . . . . . . . 143<br />
CARD SETUP – Formatting cards . . . . . . . . . . . . . . . . . 146<br />
Information display . . . . . . . . . . . . . . . . . . . . . . . . . . 148<br />
Monitor/viewfinder brightness adjustment . . . . . . . . . . . 149<br />
REC VIEW. . . . . . . . . . . . . . . . . . . . . . . . . . . . . . . . . . . . . . . 150<br />
SLEEP - Sleep Timer . . . . . . . . . . . . . . . . . . . . . . . . . . . . . . 151<br />
Beep . . . . . . . . . . . . . . . . . . . . . . . . . . . . . . . . . . . . . . . 152<br />
7
Contents<br />
POWER ON/OFF SETUP – Power on/off display setting . . . 152<br />
SCREEN SETUP. . . . . . . . . . . . . . . . . . . . . . . . . . . . . . . . . . 153<br />
FILE NAME . . . . . . . . . . . . . . . . . . . . . . . . . . . . . . . . . . . . . . 154<br />
PIXEL MAPPING. . . . . . . . . . . . . . . . . . . . . . . . . . . . . . . . . . 155<br />
Measurement units . . . . . . . . . . . . . . . . . . . . . . . . . . . 156<br />
VIDEO OUT – Video output selection . . . . . . . . . . . . . . . . . . 157<br />
9 Print setting (DPOF) 158<br />
How to print pictures . . . . . . . . . . . . . . . . . . . . . . . . . . . . 158<br />
All-frame reservation . . . . . . . . . . . . . . . . . . . . . . . . . . . 160<br />
Single-frame reservation . . . . . . . . . . . . . . . . . . . . . . . . . 162<br />
Trimming . . . . . . . . . . . . . . . . . . . . . . . . . . . . . . . . . . . . 165<br />
Resetting print reservation data . . . . . . . . . . . . . . . . . . . 167<br />
10 Direct printing (PictBridge) 169<br />
Using the direct printing function . . . . . . . . . . . . . . . . . . . . . . 169<br />
Connecting the camera to a printer . . . . . . . . . . . . . . . . . . . . 170<br />
Printing pictures. . . . . . . . . . . . . . . . . . . . . . . . . . . . . . . . . . . 171<br />
Easy printing . . . . . . . . . . . . . . . . . . . . . . . . . . . . . . . . . . 172<br />
PRINT mode/MULTI PRINT mode . . . . . . . . . . . . . . . . . 174<br />
ALL PRINT mode . . . . . . . . . . . . . . . . . . . . . . . . . . . . . . 178<br />
ALL INDEX mode/PRINT ORDER mode . . . . . . . . . . . . 180<br />
Trim the picture . . . . . . . . . . . . . . . . . . . . . . . . . . . . . . . . 182<br />
Exiting direct printing . . . . . . . . . . . . . . . . . . . . . . . . . . . . . . . 184<br />
If an error code is displayed . . . . . . . . . . . . . . . . . . . . . . . . . 185<br />
11 Miscellaneous 186<br />
Error codes . . . . . . . . . . . . . . . . . . . . . . . . . . . . . . . . . . . . . . 186<br />
Troubleshooting. . . . . . . . . . . . . . . . . . . . . . . . . . . . . . . . . . . 187<br />
List of menus . . . . . . . . . . . . . . . . . . . . . . . . . . . . . . . . . . . . . 194<br />
List of factory default settings . . . . . . . . . . . . . . . . . . . . . . . . 200<br />
Modes and Shooting Functions . . . . . . . . . . . . . . . . . . . . . . . 203<br />
8
Contents<br />
Camera maintenance . . . . . . . . . . . . . . . . . . . . . . . . . . . . . . 206<br />
Specifications . . . . . . . . . . . . . . . . . . . . . . . . . . . . . . . . . . . . 207<br />
Glossary of terms . . . . . . . . . . . . . . . . . . . . . . . . . . . . . . . . . 209<br />
Index . . . . . . . . . . . . . . . . . . . . . . . . . . . . . . . . . . . . . . . . . . . 212<br />
Indications used in this manual<br />
Note<br />
Important information on factors which may lead to a<br />
malfunction or operational problems. Also warns of operations<br />
that should be absolutely avoided.<br />
Useful information and hints that will help you get the most out<br />
of your camera.<br />
Reference pages describing details or associated information.<br />
9
Names of parts<br />
Camera<br />
10<br />
Lens<br />
<strong>Zoom</strong> lever (W/T•GU) gP.54, 115, 116<br />
Shutter button gP.47<br />
Mode dial gP.43<br />
Flash gP.57<br />
Self-timer lamp gP.84<br />
Strap eyelet gP.17<br />
Microphone gP.94, 95, 127<br />
DC-IN jack gP.23<br />
USB connector gP.170<br />
A/V OUT jack (MONO)<br />
gP.125<br />
Connector cover gP.23, 125, 170
Viewfinder gP.12, 30, 47, 149<br />
Diopter adjustment dial gP.30<br />
Monitor gP.12, 47<br />
Names of parts<br />
AE Lock/Custom button (x) gP.73, 78, 80, 137<br />
Rotation button (y) gP.126<br />
Self-timer button (Y) gP.84<br />
Erase button (S) gP.133<br />
Monitor button (f) gP.47<br />
Power switch gP.24<br />
Flash mode button (#) gP.57<br />
Protect button (0) gP.131<br />
Flash button gP.57<br />
Card access lamp gP.47<br />
QUICK VIEW button gP.114<br />
Arrow pad (acbd) gP.32, 113<br />
OK/Menu button (e) gP.32<br />
Battery compartment/card cover gP.20<br />
Tripod socket<br />
11
Names of parts<br />
Viewfinder and monitor indications<br />
INFO setting allows you to select how much information to display on the<br />
screen. Screens with the Information display set to ON are shown below.<br />
g“Information display” (P.148)<br />
�Shooting modes<br />
12<br />
0.0<br />
HQ 2288 1712<br />
00:36<br />
Still picture Movie<br />
Item Indications<br />
ISO100<br />
Ref.<br />
Page<br />
1 Shooting modes P, A, S, M, N, m, L, J, I, s, P P.43<br />
2 Shutter speed 15" – 1/1000 P.67<br />
3 Aperture value F2.8 – F8.0 P.66<br />
4 Exposure compensation -2.0 – +2.0<br />
P.102<br />
Exposure differential -3.0 – +3.0<br />
P.68<br />
5 Battery check e, f P.15<br />
6 Green lamp � P.48<br />
7 Flash stand-by # (Lights)<br />
Camera movement<br />
warning/Flash charge<br />
# (Blinks) P.59<br />
8 Macro mode &<br />
P.82<br />
Super macro mode %<br />
P.83<br />
Manual focus MF<br />
P.75<br />
9 Noise reduction O P.110
Names of parts<br />
Item Indications<br />
Ref.<br />
Page<br />
10 Flash mode !, #, $, #SLOW1,<br />
HSLOW1, #SLOW2<br />
P.57<br />
11 Flash intensity control w -2.0 – +2.0 P.64<br />
12 Drive o, j, i, k, 7 P.85<br />
13 Self-timer Y P.84<br />
14 Sound record R P.94, 95,<br />
127<br />
15 Record mode TIFF, SHQ, HQ, SQ1, SQ2 P.96<br />
16 Resolution 2288 × 1712, 1280 × 960, 640 × 480 etc. P.98<br />
17 AF target mark [ ] P.47<br />
18 Number of storable 30<br />
still pictures<br />
P.98<br />
Time remaining 00:36<br />
P.52<br />
19 AE lock<br />
AE memory<br />
B<br />
C<br />
P.80<br />
20 Spot metering n P.77<br />
21 ISO ISO 64, ISO 100, ISO 200, ISO 400 P.101<br />
22 White Balance 5, 3, 1, w, x, y, V P.103<br />
23 White balance<br />
adjustment<br />
B1 – B7, R1 – R7<br />
P.106<br />
24 Saturation 6-5 – +5 P.109<br />
25 Sharpness N -5 – +5 P.107<br />
26 Contrast J -5 – +5 P.108<br />
27 Memory gauge a, b, c, d P.15<br />
13
Names of parts<br />
�Playback mode<br />
14<br />
HQ<br />
2288*1712<br />
0.0<br />
'04.06.17 15:30<br />
'04.06.1 '04.06.17 15:30 5:30<br />
00:00/00:20<br />
Still picture Movie<br />
6<br />
7<br />
11<br />
13<br />
14<br />
Item Indications<br />
Ref.<br />
Page<br />
1 Battery check e, f P.15<br />
2 Switch frame J P.132<br />
3 Print reservation,<br />
Number of prints<br />
< × 10<br />
P.160<br />
Movie<br />
n<br />
P.119<br />
4 Sound record H P.94<br />
5 Protect 9 P.131<br />
6 Record mode TIFF, SHQ, HQ, SQ1, SQ2 P.96<br />
7 Resolution 2288 × 1712, 1280 × 960, 640 × 480,<br />
320 × 240 etc.<br />
P.98<br />
8 Aperture value F2.8 – F8.0 P.66<br />
9 Shutter speed 15" – 1/1000 P.67<br />
10 Exposure<br />
compensation<br />
-2.0 – +2.0<br />
P.102<br />
11 White balance WB AUTO, 5, 3, 1, w, x, y, V P.103<br />
12 ISO ISO 64, ISO 100, ISO 200, ISO 400 P.101<br />
13 Date and time ’04.06.17 15:30 P.28<br />
14 File number, Frame FILE : 100 – 0030, 30<br />
number<br />
P.154<br />
Playing time/<br />
Total recording time<br />
00:00/00:20<br />
Note<br />
1 2 3 4 5<br />
• The indications that appear on a movie picture that has been<br />
selected and displayed from the index display are different from<br />
those that appear when the movie picture is displayed using the<br />
movie playback function.
�Memory gauge<br />
The memory gauge lights up when you take a still<br />
picture. While the gauge is lit, the camera is<br />
storing the picture on the card. The memory<br />
gauge indication changes as shown below<br />
depending on the shooting status. The indication<br />
is not displayed during movie recording.<br />
Before<br />
shooting<br />
(Gauge is off)<br />
HQ<br />
Battery check<br />
Names of parts<br />
2288 1712<br />
Memory gauge<br />
a<br />
Shoot<br />
b<br />
Shoot<br />
c<br />
Shoot<br />
Wait d<br />
One picture<br />
taken<br />
(Lit)<br />
Two or more<br />
taken<br />
(Lit)<br />
No more pictures<br />
can be taken<br />
(Fully lit)<br />
Wait until the gauge<br />
returns to the status<br />
on the left to take<br />
the next shot.<br />
�Battery check<br />
If the remaining battery power is low, the battery check indication changes as<br />
follows when the camera is turned on or while the camera is in use.<br />
e f<br />
Lights (green)<br />
(Goes off after a while)<br />
Remaining power level:<br />
high<br />
Blinks (red)<br />
Remaining power level:<br />
low<br />
Charge the battery.<br />
BATTERY EMPTY<br />
is displayed.<br />
Remaining power level:<br />
exhausted<br />
Charge the battery.<br />
15
How to use this manual<br />
This sample page is only for your reference. It may differ from the actual page<br />
in this manual.<br />
16<br />
Set the mode dial to any of the marks shown here.<br />
Follow the arrows to perform menu operations.<br />
For details on operating procedures, see “How<br />
to use the menus” (P.33).<br />
This represents the arrow pad. Only<br />
arrows applicable to the operation<br />
are shown.
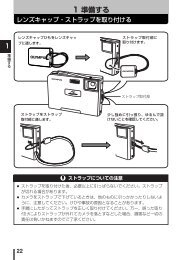
1 Getting started<br />
Attaching the strap<br />
1 Pass the lens cap string through<br />
the hole in the lens cap, then pass<br />
the other end through the loop and<br />
pull tight.<br />
2 Pull the ends of the strap out of the<br />
stopper and ring.<br />
3 Thread one end of the strap (A)<br />
through the string loop (attached to<br />
the lens cap in step 1). Then thread<br />
it through the strap eyelet on the<br />
camera.<br />
4 Thread the end of the strap back<br />
through the ring and stopper as<br />
indicated by the arrows. Adjust the<br />
strap to the desired length.<br />
5 Thread the end of the strap again<br />
through the stopper as indicated by<br />
the arrow. Pull the strap through the<br />
stopper (B) to make sure it is<br />
fastened securely.<br />
6 Attach the strap to the other eyelet<br />
following steps 3 to 5.<br />
Note<br />
Stopper<br />
• Be careful with the strap when you carry the camera, as it can easily<br />
catch on stray objects, causing injury or damage.<br />
• Attach the strap correctly as shown above so that the camera does<br />
not fall off. If the strap is attached incorrectly and the camera falls<br />
off, Olympus is not responsible for any damages.<br />
A<br />
Strap eyelet<br />
Ring<br />
B<br />
17<br />
1<br />
Getting started
1<br />
Getting started<br />
Battery/card basics<br />
Charging the battery<br />
This camera uses an Olympus lithium-ion battery (LI-10B). Other types of<br />
batteries cannot be used.<br />
The battery is not fully charged at the time of purchase. Be sure to use the<br />
specified battery charger (LI-10C) to charge the battery before use. For more<br />
information, read the manual supplied with the battery charger.<br />
1 Connect the power<br />
cord to the power<br />
connector on the<br />
battery charger.<br />
2 Plug the power cord<br />
into an AC wall outlet.<br />
3 Insert the battery into<br />
the battery charger<br />
while aligning the +<br />
- marks on both the<br />
battery and battery<br />
charger.<br />
• The charging indicator<br />
lights red and charging<br />
begins.<br />
• When charging is<br />
complete, the indicator<br />
lights green.<br />
18<br />
Lithium-ion battery (LI-10B)<br />
Battery polarity<br />
Charging indicator<br />
AC wall outlet<br />
Connection<br />
terminals
Note<br />
Battery/card basics<br />
• Charging of the battery usually takes 2 hours.<br />
Charging may be completed quickly depending on how much<br />
battery power remains.<br />
• Do not use a battery charger other than the specified battery<br />
charger.<br />
• If the charging indicator blinks red, this may indicate that the battery<br />
is not properly attached or that the battery has malfunctioned.<br />
• Charging of the battery may cause noise on a television or radio<br />
sharing the same wall outlet; however, this is not a malfunction. If<br />
this should happen, plug the battery charger into a separate wall<br />
outlet.<br />
• The battery may become hot during charging; however, this does<br />
not indicate a malfunction.<br />
• This battery charger is guaranteed to operate within an ambient<br />
temperature range of 0°C to 40°C. To ensure maximum<br />
performance of the battery charger, however, you are<br />
recommended to use it between 10°C and 30°C.<br />
• When using the battery charger in a foreign country, be sure to use<br />
a travel converter that matches the wall outlet in the area the camera<br />
is being used. Please consult a travel agency for more information<br />
on travel converters.<br />
Card basics<br />
“Card” in this manual refers to the xD-Picture Card. The camera uses the card<br />
to record pictures.<br />
The card corresponds to normal camera film for recording the pictures you<br />
have taken. Pictures recorded and stored on the card can easily be erased,<br />
overwritten, and/or edited on a PC.<br />
� Index area<br />
You can write down the card’s contents.<br />
� Contact area<br />
�<br />
Comes into contact with the camera’s signal read<br />
contacts.<br />
Compatible cards<br />
�<br />
• xD-Picture Card (16 to 512 MB)<br />
Note<br />
• This camera may not recognize a non-Olympus card or a card that<br />
was formatted on another device (such as a PC, etc.). Before use,<br />
be sure to format the card on this camera. g“CARD SETUP –<br />
Formatting cards” (P.146)<br />
19<br />
1<br />
Getting started
1<br />
Getting started<br />
Battery/card basics<br />
Inserting and removing the battery and card<br />
1 Make sure the camera is turned off.<br />
• The monitor is off.<br />
• The viewfinder is off.<br />
• The lens is not extended.<br />
2 Slide the battery compartment/card<br />
cover in the direction of A, then lift<br />
in the direction of B.<br />
• Use the ball of your finger to slide the cover.<br />
Do not use your fingernail as this could<br />
result in injury.<br />
3 Loading the battery<br />
Align the battery as shown and<br />
insert it into the battery<br />
compartment until the battery is<br />
locked in position with the battery<br />
lock knob.<br />
20<br />
Removing the battery<br />
Slide the knob in the direction of the<br />
arrow. When the battery is ejected,<br />
pull it out of the battery<br />
compartment.<br />
A<br />
B<br />
Battery lock knob<br />
Battery lock knob<br />
Low battery warning<br />
The amount of power consumed varies considerably depending on the<br />
operations performed on the digital camera. If you use an exhausted<br />
battery, the camera may turn off without displaying the battery level<br />
warning (P.15).
Note<br />
Battery/card basics<br />
• The life of the battery may vary according to the shooting conditions,<br />
etc.<br />
• The amount of power consumed by the camera varies considerably<br />
depending on shooting conditions, etc.<br />
• Power is consumed continuously during the conditions described<br />
below. This discourages the power to last longer.<br />
• When the monitor is turned on.<br />
• When the monitor is in the playback mode for an extended<br />
period of time.<br />
• Repeated zoom adjustments.<br />
• Repeated auto-focus by depressing the shutter button<br />
halfway.<br />
• When the FULLTIME AF mode is turned on.<br />
• When connected to a computer or printer.<br />
• If the camera is left for about 3 hours with the battery removed,<br />
some of the internal settings may revert to the factory default<br />
settings.<br />
Inserting a card<br />
Insert the card in the appropriate<br />
direction.<br />
• Insert the card while keeping it straight.<br />
• Inserting the card the wrong way or at an<br />
angle could damage the contact area or<br />
cause the card to jam.<br />
• If the card is not inserted all the way, data<br />
may not be written to the card.<br />
Notch Contact area<br />
21<br />
1<br />
Getting started
1<br />
Getting started<br />
Battery/card basics<br />
22<br />
Removing the card<br />
Push the card all the way in to unlock it,<br />
then let it return slowly.<br />
• The card is ejected a short way and then stops.<br />
Hold the card straight and pull it out.<br />
4 Close the battery compartment/card<br />
cover in direction C and then slide it in<br />
the direction shown D.<br />
Notes for removing the card<br />
Releasing your finger quickly after pushing the card all the way in may<br />
cause it to eject forcefully out of the slot.<br />
Note<br />
• Do not press on the card with hard or pointed items such as ballpoint<br />
pens.<br />
• Never open the battery compartment/card cover, or remove the card<br />
or the battery while the camera is turned on. Doing so could destroy<br />
the data stored on the card. Once destroyed, data cannot be<br />
restored.<br />
• Do not place a sticker or label on the card as this could prevent the<br />
card from being ejected.<br />
C<br />
D
Using an AC adapter (optional)<br />
An AC adapter is useful for time-consuming tasks such as image downloads<br />
to a computer.<br />
An optional Olympus CAMEDIA-brand AC adapter allows you to power your<br />
digital camera from a common AC wall outlet. Be sure to use the specified AC<br />
adapter.<br />
Use an AC adapter designed to operate on the AC voltage in the area the<br />
camera is being used.<br />
Consult your nearest Olympus dealer or Service center for details.<br />
Note<br />
AC wall outlet<br />
Power plug<br />
Connection<br />
cord plug<br />
AC adapter<br />
DC-IN jack<br />
(black)<br />
Connector cover<br />
• If the battery power runs out while the camera is connected to a<br />
computer or printer, the image data may be lost or damaged. It is<br />
recommended you use the AC adapter when connected to a<br />
computer or printer. Do not connect or disconnect the AC adapter<br />
while the camera is connected to a computer or printer.<br />
• Do not remove or load the battery or connect or disconnect the AC<br />
adapter while the camera is turned on. Doing so could affect the<br />
camera’s internal settings or functions.<br />
• When using an AC adapter, power is supplied to the camera by the<br />
AC adapter even if the battery is loaded in the camera. The AC<br />
adapter does not charge the battery in the camera.<br />
23<br />
1<br />
Getting started
1<br />
Getting started<br />
Power on/off<br />
1 Press the tabs on the lens cap as<br />
indicated by the arrows and<br />
remove the lens cap.<br />
2 Press the power switch.<br />
• The power turns on and the lens extends<br />
when the mode dial is set to any mode<br />
other than q. The monitor turns on.<br />
• When the mode dial is set to q, the<br />
camera turns on in the playback mode<br />
and the monitor turns on.<br />
3 To turn the camera off, press the<br />
power switch again.<br />
Note<br />
24<br />
Mode dial<br />
TIPS<br />
• To save battery power, the camera automatically enters the sleep<br />
mode and stops the operation after about 3 minutes of nonoperation.<br />
The camera activates again as soon as you operate the<br />
shutter button or zoom lever. The sleep time interval can be set in<br />
any shooting mode (except q). g“SLEEP - Sleep Timer” (P.151)<br />
• If the camera is subjected to strong vibrations or shocks while it is<br />
turned on, the camera may immediately turn off and reset the date<br />
and other settings.
Startup/Shutdown screen<br />
This image is displayed on the monitor each<br />
time the camera is turned on or off. You can<br />
also use your favorite image (P.152).<br />
If the card is not recognized (card check)<br />
Power on/off<br />
When the power is turned on, the camera checks the card automatically. If<br />
there is no card in the camera or a card that is not supported by this camera<br />
is inserted, the following screen is displayed.<br />
Note<br />
Monitor indication Corrective action<br />
q<br />
NO CARD<br />
CARD%SEtUP<br />
POWER%OFF<br />
FORMAt<br />
SELECt GO<br />
FORMAt<br />
CAUtION ERASING%ALL<br />
YES<br />
NO<br />
SELECt GO<br />
Startup/Shutdown screen<br />
(Factory default setting)<br />
There is no card in the camera or the card is not<br />
inserted properly.<br />
→ Insert a card. If a card is already inserted,<br />
remove it and insert it again correctly.<br />
The card cannot record, play back or erase<br />
pictures. Format the card or replace it with a new<br />
one.<br />
→ Press ac to select POWER OFF, then press<br />
e. Replace the card with a new one.<br />
→ Format the card.<br />
Press ac to select I FORMAT, then press<br />
e to display the confirmation screen. Select<br />
YES and press e.<br />
Formatting starts. If the card was successfully<br />
formatted, the camera is ready to take pictures.<br />
All data stored on the card is erased when the card is formatted.<br />
25<br />
1<br />
Getting started
1<br />
Getting started<br />
Selecting a language<br />
You can select a language for on-screen display. This reference manual<br />
shows the English on-screen display in the illustrations and explanations.<br />
Available language vary depending on the area where you purchased this<br />
camera.<br />
1 Set the mode dial to P and press<br />
the power switch to turn the<br />
camera on.<br />
2 Press e.<br />
• The top menu is displayed.<br />
3 Press d on the arrow pad to select<br />
MODE MENU.<br />
4 Press ac to select the<br />
SETUP tab, then press d.<br />
26<br />
SETUP tab<br />
SEtUP CARD PIC CAM<br />
Power switch<br />
Mode dial<br />
ESP<br />
Arrow pad<br />
OK button<br />
Top menu<br />
MODE MENU<br />
ALL RESEt ON<br />
ENGLISH<br />
PW 1<br />
REC VIEW ON<br />
SLEEP 3 MIN<br />
ON / OFF SEtUP
5 Press ac to select W, then<br />
press d.<br />
• The green frame moves to the selected<br />
item.<br />
6 Press ac to select a language,<br />
then press e.<br />
7 Press e again to exit the menu.<br />
8 To turn the camera off, press the<br />
power switch.<br />
CAM<br />
PIC<br />
SEtUP CARD<br />
Selecting a language<br />
ALL RESEt ON<br />
ENGLISH<br />
PW 1<br />
REC VIEW ON<br />
SLEEP 3 MIN<br />
ON / OFF SEtUP<br />
ENGLISH<br />
FRANCAIS<br />
DEUtSCH<br />
ESPAÑOL<br />
SELECt GO<br />
Power switch<br />
e button<br />
27<br />
1<br />
Getting started
1<br />
Getting started<br />
Setting the date and time<br />
1 Set the mode dial to P and press<br />
the power switch to turn the<br />
camera on.<br />
2 Press e.<br />
• The top menu is displayed.<br />
3 Press d on the arrow pad to select<br />
MODE MENU.<br />
4 Press ac to select the<br />
SETUP tab, then press d.<br />
5 Press ac to select X, then<br />
press d.<br />
• The green frame moves to the selected<br />
item.<br />
28<br />
SETUP tab<br />
Power switch<br />
SEtUP CARD PIC CAM<br />
SEtUP CARD PIC CAM<br />
ESP<br />
Mode dial<br />
Arrow pad<br />
OK button<br />
Top menu<br />
MODE MENU<br />
ALL RESEt ON<br />
ENGLISH<br />
PW 1<br />
REC VIEW ON<br />
SLEEP 3 MIN<br />
ON / OFF SEtUP<br />
MY MODE SEtUP<br />
FILE NAME<br />
PIXEL MAPPING<br />
RESEt<br />
'04.01.01<br />
00.00
6 Press ac to select one of the<br />
following date formats: Y-M-D<br />
(Year/Month/Day), M-D-Y (Month/<br />
Day/Year), D-M-Y (Day/Month/Year).<br />
Then press d.<br />
• Move to the year setting.<br />
• The following steps show the procedure<br />
used when the date and time settings are<br />
set to Y-M-D.<br />
7 Press ac to set the year, then<br />
press d to move to the month<br />
setting.<br />
• To move back to the previous setting,<br />
press b.<br />
• The first two digits of the year are fixed.<br />
Setting the date and time<br />
8 Repeat this procedure until the date and time are<br />
completely set.<br />
• The time is displayed in the 24-hour format. Consequently, 2 p.m. is<br />
displayed as 14:00.<br />
9 Press e.<br />
Power switch<br />
• For a more accurate setting, press e<br />
when the time signal hits 00 seconds.<br />
10 To turn the camera off, press the<br />
power switch.<br />
Note<br />
2004<br />
Y M D<br />
SELECt SEt GO<br />
20 2004<br />
SELECt SEt GO<br />
e button<br />
• The date and time settings will be returned to the factory default<br />
settings if the camera is left without the battery for approximately<br />
one day. The settings will be canceled more quickly if the battery<br />
was only loaded in the camera for a short time before being<br />
removed. Before taking important pictures, check that the date and<br />
time settings are correct.<br />
29<br />
1<br />
Getting started
1<br />
Getting started<br />
Adjusting the viewfinder<br />
To make the camera easier to use, adjust the viewfinder to match the<br />
eyesight (visual acuity) of the person using the camera.<br />
1 Set the mode dial to h and<br />
press the power switch.<br />
• The camera and the monitor turn on.<br />
2 Press f.<br />
• The monitor turns off and the viewfinder<br />
turns on.<br />
3 While looking through the<br />
viewfinder, slowly turn the diopter<br />
adjustment dial.<br />
4 Turn the dial until the AF target<br />
mark can be seen clearly.<br />
30<br />
Viewfinder<br />
Power switch<br />
Mode dial<br />
f button<br />
Diopter adjustment dial<br />
AF target mark
Holding the camera<br />
Hold the camera firmly with both hands while keeping your elbows at your<br />
sides to prevent the camera from moving. When taking pictures in the vertical<br />
position, hold the camera so that the flash is higher than the lens.<br />
Keep your fingers and the strap away from the lens and flash.<br />
Note<br />
Horizontal grip Vertical grip<br />
Top view<br />
Do not hold this part of the lens.<br />
• Clear pictures cannot be obtained if the camera moves as the<br />
shutter button is pressed. Hold the camera correctly, and press the<br />
shutter button gently.<br />
31<br />
1<br />
Getting started
2<br />
Using the menus<br />
2 Using the menus<br />
About the menus<br />
When you turn on the camera and press e, the top menu is displayed on the<br />
monitor. The functions of this camera are set from the menus. This chapter<br />
explains how the menus work, using the P mode screens.<br />
Press e.<br />
32<br />
SEt CARD PIC <strong>CAMERA</strong><br />
ESP<br />
DRIVE<br />
ISO<br />
A/S/M<br />
The top menu is displayed.<br />
SHORTCUT MENUS<br />
OFF<br />
Top menu<br />
ESP<br />
• Take you directly to the setting<br />
screens.<br />
• Display operational buttons at the<br />
bottom of the screen.<br />
• The functions registered in the<br />
shortcut menus can also be<br />
accessed from the MODE MENU.<br />
• The shortcut menus can be<br />
replaced in modes other than<br />
hnq. g“Setting the<br />
shortcut menu” (P.141)<br />
MODE MENU<br />
Use the arrow pad to<br />
select a menu.<br />
• Lets you access the menu<br />
selections to set the ISO,<br />
sharpness, etc.<br />
• Categorizes the settings into 4<br />
tabs.<br />
• Press ac to select a tab and<br />
display the associated menu<br />
items.<br />
• There is no mode menu in h<br />
mode.<br />
Tab<br />
SEt CARD PIC <strong>CAMERA</strong><br />
MODE MENU<br />
ESP ESP<br />
DRIVE<br />
ISO<br />
A/S/M<br />
OFF<br />
AUtO
How to use the menus<br />
1 Press e to display the top<br />
menu. Press d.<br />
Top menu <strong>CAMERA</strong> tab<br />
ESP<br />
MODE MENU<br />
Arrow pad<br />
OK/Menu button<br />
d<br />
2 Press ac to select<br />
a tab, then press d.<br />
SEt CARD PIC <strong>CAMERA</strong><br />
c<br />
PICTURE tab<br />
SEt CARD PICtURE CAM<br />
c<br />
CARD tab<br />
SEt CARD PIC CAM<br />
SEtUP CARD PIC CAM<br />
CARD%SEtUP<br />
c<br />
SETUP tab<br />
ESP ESP<br />
OFF<br />
DRIVE<br />
ISO AUtO<br />
A/S/M<br />
HQ<br />
WB AUtO<br />
SHARPNESS<br />
CONtRASt<br />
ALL RESEt ON<br />
ENGLISH<br />
PW ON / OFF SEtUP<br />
REC VIEW<br />
SLEEP<br />
1<br />
ON<br />
a<br />
a<br />
a<br />
3 MIN<br />
d<br />
b<br />
Press b to<br />
return to the<br />
tab selection<br />
screen.<br />
continued overleaf.<br />
33<br />
2<br />
Using the menus
2<br />
Using the menus<br />
How to use the menus<br />
3 Press ac to select an<br />
item, then press d.<br />
Note<br />
SEt CARD PIC <strong>CAMERA</strong><br />
SEt CARD PIC <strong>CAMERA</strong><br />
34<br />
ESP ESP<br />
DRIVE<br />
ISO<br />
A/S/M<br />
c<br />
OFF<br />
AUtO<br />
a<br />
ESP ESP<br />
OFF<br />
DRIVE<br />
ISO AUtO<br />
A/S/M<br />
The green frame<br />
moves to the<br />
selected item.<br />
<strong>CAMERA</strong><br />
d<br />
b or e<br />
To return to<br />
select an item,<br />
press b or e.<br />
4 Press acto select a<br />
setting. Press e to<br />
complete setting.Press<br />
e again to exit the menu<br />
and return to shooting<br />
status.<br />
Slider bar<br />
This is also displayed on other<br />
pages with settings.<br />
• Not all items can be selected depending on the status of the camera<br />
and the settings performed.<br />
• If you want to save the settings after the camera is turned off, set<br />
ALL RESET to OFF. g“ALL RESET - Saving the camera’s<br />
settings” (P.135)<br />
SEt CARD PIC <strong>CAMERA</strong><br />
SEt CARD PIC <strong>CAMERA</strong><br />
ESP<br />
DRIVE<br />
ISO<br />
A/S/M<br />
c<br />
ESP<br />
DRIVE<br />
ISO<br />
A/S/M<br />
OFF<br />
a<br />
OFF
Shortcut menus<br />
�Shooting modes<br />
DRIVE<br />
h mode i j l m r<br />
p P mode<br />
(Factory default setting)<br />
*TIFF cannot be selected when the mode dial is set to h.<br />
n mode<br />
Selects a shooting mode from o (single-frame shooting), j<br />
(sequential shooting), i (high speed sequential shooting),<br />
k (AF sequential shooting) and 7 (auto bracketing).<br />
ESP/5<br />
DRIVE<br />
P.85<br />
Selects the metering method (ESP, 5 or MULTI). P.77<br />
<strong>DIGITAL</strong> ZOOM<br />
Extends the maximum optical zoom, making possible up to<br />
approx. 40× zoom.<br />
K<br />
Sets the image quality and resolution.<br />
Still picture : TIFF*, SHQ, HQ, SQ1, SQ2<br />
Movie : SHQ, HQ, SQ<br />
&<br />
ESP<br />
CARD SEtUP MODE MENU<br />
DIGItAL ZOOM<br />
P.56<br />
P.96<br />
Used to take pictures of a close subject.Selects OFF, & or %. P.82<br />
WB<br />
MODE MENU<br />
35<br />
2<br />
Using the menus
2<br />
Using the menus<br />
Shortcut menus<br />
WB<br />
Sets the appropriate white balance according to the light source. P.103<br />
X<br />
Sets the date and time. P.28<br />
CARD SETUP<br />
Formats a card. P.146<br />
36
�Playback mode<br />
m<br />
Still picture Movie<br />
Shortcut menus<br />
Runs through all saved pictures one after another. P.118<br />
MOVIE PLAY<br />
MOVIE<br />
PLAYBACK<br />
Plays back movies.<br />
P.119<br />
INDEX<br />
Creates an index picture of a movie in 9<br />
frames.<br />
P.121<br />
EDIT Edits a movie. P.123<br />
INFO<br />
INFO MODE MENU<br />
SWItCH FRAME<br />
Displays all the shooting information on the monitor. P.148<br />
SWITCH FRAME<br />
MOVIE PLAY<br />
Selects [ALL] to display all images or 0 to display only<br />
protected images.<br />
INFO MODE MENU<br />
SWItCH FRAME<br />
P.132<br />
TIPS<br />
• The functions registered in the shortcut menus can also be<br />
accessed from the MODE MENU. The shortcut menus can be<br />
replaced in modes other than hnq.g“Setting the shortcut<br />
menu” (P.141)<br />
37<br />
2<br />
Using the menus
2<br />
Using the menus<br />
Mode Menus<br />
The MODE MENU has 4 tabs. Press ac to select a tab and display the<br />
associated menu items.<br />
�Shooting modes<br />
<strong>CAMERA</strong> tab<br />
PICTURE tab<br />
CARD tab<br />
SETUP tab<br />
<strong>CAMERA</strong> tab<br />
Selects the metering method (ESP, 5<br />
ESP/5<br />
or MULTI).<br />
Used to take pictures of a close subject.<br />
&<br />
Selects OFF, &, %.<br />
Selects a shooting mode from o<br />
(single-frame shooting), j (sequential<br />
DRIVE<br />
shooting), i (high speed sequential<br />
shooting), k (AF sequential<br />
shooting) and 7 (auto bracketing).<br />
Selects the ISO sensitivity from AUTO,<br />
ISO<br />
64, 100, 200 and 400.<br />
Selects the shooting mode from A<br />
(Aperture priority shooting), S (Shutter<br />
A/S/M<br />
priority shooting) and M (Manual<br />
shooting).<br />
Selects a mode to be activated when<br />
r1/2/3/4<br />
taking pictures in r mode.<br />
Adjusts the amount of light emitted by<br />
w<br />
the flash.<br />
Selects from #SLOW1 (1st curtain),<br />
HSLOW1 (1st curtain with red-eye<br />
#SLOW<br />
reduction) and #SLOW2 (2nd curtain)<br />
when the flash mode is set to #SLOW<br />
(slow synchronization).<br />
Reduces the noise that affects pictures<br />
NOISE REDUCTION<br />
during long exposures.<br />
38<br />
SEt CARD PIC <strong>CAMERA</strong><br />
ESP ESP<br />
OFF<br />
DRIVE<br />
ISO AUtO<br />
A/S/M<br />
P.77<br />
P.82<br />
P.85<br />
P.101<br />
P.65<br />
P.69<br />
P.64<br />
P.63<br />
P.110
<strong>DIGITAL</strong> ZOOM<br />
FULLTIME AF<br />
AF MODE<br />
o<br />
PANORAMA<br />
2 IN 1<br />
FUNCTION<br />
AF AREA<br />
INFO<br />
u<br />
R (still pictures)<br />
R (movies)<br />
SUPER ZOOM<br />
PICTURE tab<br />
K<br />
WB<br />
><br />
Extends the maximum optical zoom up<br />
to approximately 40× magnification.<br />
Keeps the image in focus at all times<br />
without having to press the shutter<br />
button halfway.<br />
Selects the auto focus method (iESP or<br />
SPOT).<br />
Enables you to take a picture of yourself<br />
while holding the camera.<br />
Allows panorama pictures to be taken<br />
with Olympus CAMEDIA-brand cards.<br />
Combines two still pictures taken in<br />
succession and stores them as a single<br />
picture.<br />
Adds special effects to pictures (BLACK<br />
& WHITE, SEPIA, WHITE BOARD,<br />
BLACK BOARD).<br />
Changes the position of the AF target<br />
mark using the arrow pad.<br />
Selects whether to display all the<br />
information such as shutter speed and<br />
white balance, or only the minimum<br />
information.<br />
Displays a histogram showing the<br />
luminance distribution of still pictures.<br />
Sound can be recorded when taking still<br />
pictures.<br />
Selects whether to record sound when<br />
shooting a movie.<br />
Extends the optical zoom, making<br />
possible up to 14× zoom in 1600 × 1200<br />
record mode.<br />
Sets the image quality and resolution.<br />
Still picture: TIFF, SHQ, HQ, SQ1, SQ2<br />
Sets the appropriate white balance<br />
according to the light source.<br />
Makes fine changes to the white<br />
balance.<br />
Mode Menus<br />
P.56<br />
P.71<br />
P.70<br />
P.88<br />
P.89<br />
P.91<br />
P.93<br />
P.72<br />
P.148<br />
P.111<br />
P.94<br />
P.95<br />
P.55<br />
P.96<br />
P.103<br />
P.106<br />
39<br />
2<br />
Using the menus
2<br />
Using the menus<br />
Mode Menus<br />
SHARPNESS Adjusts the sharpness of the image. P.107<br />
CONTRAST Adjusts the contrast of the image. P.108<br />
SATURATION<br />
Adjusts the level of color depth without<br />
changing the tint.<br />
P.109<br />
CARD tab<br />
CARD SETUP Formats a card. P.146<br />
SETUP tab<br />
ALL RESET<br />
Selects whether to keep the current<br />
camera settings when you turn off the<br />
power.<br />
P.135<br />
W<br />
Selects a language for on-screen<br />
display.<br />
P.26<br />
PW ON/OFF SETUP<br />
Sets the picture that is displayed when<br />
the power is turned on and off.<br />
P.152<br />
REC VIEW<br />
Selects whether to display pictures on<br />
the monitor while saving them to a card.<br />
P.150<br />
SLEEP Sets the sleep timer. P.151<br />
MY MODE SETUP<br />
Customizes settings which are activated<br />
in the r mode.<br />
P.143<br />
FILE NAME Changes how file names are assigned. P.154<br />
PIXEL MAPPING<br />
Checks the CCD and image processing<br />
functions for errors.<br />
P.155<br />
s<br />
Adjusts the brightness of the viewfinder<br />
or monitor.<br />
P.149<br />
X Sets the date and time. P.28<br />
m/ft<br />
Sets the measurement unit (m/ft) used<br />
during manual focus.<br />
Selects NTSC or PAL according to your<br />
P.156<br />
VIDEO OUT TV’s video signal type. TV video signal<br />
types differ depending on the region.<br />
P.157<br />
SHORT CUT<br />
Assigns frequently used functions as<br />
shortcut menus.<br />
P.140<br />
CUSTOM BUTTON<br />
Assigns a frequently used function to the<br />
camera’s custom button.<br />
P.137<br />
8<br />
Turns off the beep sound for button<br />
operations and warnings.<br />
P.152<br />
40
�Playback mode<br />
PLAY tab<br />
EDIT tab<br />
CARD tab<br />
SETUP tab<br />
PLAY tab *1<br />
Stores the necessary information on the<br />
<<br />
card to allow you to print the pictures<br />
taken.<br />
Displays a histogram showing the<br />
u<br />
luminance distribution.<br />
Adds sound to a still picture already<br />
R<br />
taken.<br />
*1 The PLAY tab is not displayed during movie playback.<br />
EDIT tab *2<br />
Makes the file size smaller and saves it<br />
Q<br />
as a new file.<br />
Crops part of a picture and saves it as a<br />
P<br />
new file.<br />
*2 The EDIT tab is not displayed during movie playback.<br />
CARD tab<br />
CARD SETUP<br />
SETUP tab<br />
ALL RESET<br />
W<br />
PW ON/OFF SETUP<br />
SEt CARD EDIt PLAY<br />
OFF<br />
Erases all image data stored on the card<br />
or format the card.<br />
Selects whether to keep the current<br />
camera settings when you turn off the<br />
power.<br />
Selects a language for on-screen<br />
display.<br />
Sets the picture that is displayed when<br />
the power is turned on and off.<br />
Mode Menus<br />
P.158<br />
P.111<br />
P.127<br />
P.128<br />
P.129<br />
P.134,<br />
146<br />
P.135<br />
P.26<br />
P.152<br />
41<br />
2<br />
Using the menus
2<br />
Using the menus<br />
Mode Menus<br />
SCREEN SETUP<br />
Registers a stored picture for use as the<br />
picture displayed when the power is<br />
turned on and off.<br />
P.153<br />
s<br />
Adjusts the brightness of the viewfinder<br />
or monitor.<br />
P.149<br />
X Sets the date and time.<br />
Selects NTSC or PAL according to your<br />
P.28<br />
VIDEO OUT TV’s video signal type. TV video signal<br />
types differ depending on the region.<br />
P.157<br />
G<br />
Selects the number of frames in the<br />
index display.<br />
P.117<br />
8<br />
Turns off the beep sound for button<br />
operations and warnings.<br />
P.152<br />
42
3 Shooting basics<br />
Shooting modes<br />
The shooting modes include modes where the optimal settings for the<br />
situation are automatically selected, and modes where you can select the<br />
settings best suited to the shooting conditions and the effect you wish to<br />
achieve.<br />
You can change the shooting mode before and after turning the camera on.<br />
Mode dial<br />
Situation-related modes<br />
h Full-auto shooting<br />
Allows you to take still pictures using no special functions or manual<br />
adjustments. The camera sets the optimal focusing and exposure. This is the<br />
simplest of all shooting modes.<br />
i Portrait shooting<br />
Playback mode<br />
gP.113<br />
Setting-related<br />
modes<br />
Shooting<br />
modes<br />
Situationrelated<br />
modes<br />
Suitable for taking a portrait-style shot of a person. This mode features an infocus<br />
subject against a blurred background. The camera automatically sets<br />
the optimal shooting conditions.<br />
43<br />
3<br />
Shooting basics
3<br />
Shooting basics<br />
Shooting modes<br />
j Sports shooting<br />
Suitable for capturing fast-moving action (such as sports) without blur. Even<br />
a fast-moving subject will be clear and sharp, as if it is not moving, enabling<br />
you to capture facial expressions and detailed activity. The camera<br />
automatically sets the optimal shooting conditions.<br />
l Landscape shooting<br />
Suitable for taking pictures of landscapes and other outdoor scenes. Both the<br />
foreground and the background are in focus. Since blues and greens are<br />
vividly reproduced in this mode, it is excellent for shooting natural scenery.<br />
The camera automatically sets the optimal shooting conditions.<br />
m Night Scene shooting<br />
Suitable for shooting pictures in the evening or at night. The camera sets a<br />
slower shutter speed than is used in normal shooting. For example, if you<br />
take a picture of a street at night in h mode, the lack of brightness will<br />
result in a dark picture with the background underexposed and without<br />
details. In the Night Scene shooting mode, the true appearance of the street<br />
is captured. The camera automatically selects the optimal settings for this<br />
type of shooting condition. Since the shutter speed is slow, make sure you<br />
stabilize the camera by using a tripod.<br />
44
Setting-related modes<br />
P Program shooting<br />
Shooting modes<br />
Allows you to take still pictures. The camera sets the aperture and shutter<br />
speed. Other functions, such as flash modes and drive modes, can be<br />
adjusted manually.<br />
p Aperture priority/Shutter priority/Manual shooting<br />
When the mode dial is set to p, the following items can be set with the<br />
menus. g“A/S/M mode” (P.65).<br />
A Aperture priority shooting<br />
Allows you to set the aperture manually. The camera sets the shutter<br />
speed automatically. By decreasing the aperture value (F-number), the<br />
camera will focus within a smaller range, producing a picture with a<br />
blurred background. Increasing the value forces the camera to focus<br />
over a wider range in the forward and backward directions, resulting in<br />
increased “depth of field”, in which both the subject and the background<br />
are in focus.<br />
g“Aperture priority shooting” (P.66)<br />
Aperture (F-number) is<br />
decreased.<br />
S Shutter priority shooting<br />
Aperture (F-number) is<br />
increased.<br />
Allows you to set the shutter speed manually. The camera sets the<br />
aperture automatically. Set the shutter speed according to the subject<br />
and the type of effect you want.<br />
g“Shutter priority shooting” (P.67)<br />
45<br />
3<br />
Shooting basics
3<br />
Shooting basics<br />
Shooting modes<br />
46<br />
M Manual shooting<br />
Allows you to set the aperture and shutter speed manually. To check the<br />
exposure, refer to the exposure differential. This mode gives you more<br />
creative control, allowing you to make the settings you need to get the<br />
type of picture you want, regardless of optimum exposure.<br />
g“Manual shooting” (P.68)<br />
r My Mode<br />
Allows you to save your favorite settings as your own personal mode and use<br />
these customized settings when taking pictures. Current settings can also be<br />
saved for retrieving by this mode. g“MY MODE SETUP” (P.143)<br />
g“Using My Mode” (P.69)<br />
n Movie record<br />
Allows you to record movies. The camera sets the aperture and shutter speed<br />
automatically. Even if the subject moves during recording or the distance to<br />
the subject changes, correct focusing and exposure are maintained<br />
continuously. If R is set to ON, soud is recorded at the same time.<br />
g“Recording movies” (P.52)<br />
Note<br />
Setting the shutter speed<br />
higher lets you capture fastmoving<br />
action without blur.<br />
The subject will be clear and<br />
sharp, as if it is not moving.<br />
Setting the shutter speed<br />
lower blurs a moving subject,<br />
giving the impression of<br />
movement.<br />
• The available settings vary depending on the mode. g“Modes<br />
and Shooting Functions” (P.203)
Taking still pictures<br />
You can take still pictures using either the monitor or the viewfinder.<br />
Mode dial<br />
1 Set the mode dial to h i j<br />
l m r p P and press the<br />
power switch.<br />
g“Power on/off” (P.24)<br />
• The monitor turns on.<br />
To shoot using the viewfinder,<br />
press f to turn the<br />
viewfinder on.<br />
2 Decide the composition of the<br />
picture.<br />
Shutter button<br />
Mode dial<br />
Flash button<br />
f button<br />
Power switch<br />
Card access lamp<br />
HQ<br />
2288 1712<br />
AF target mark<br />
47<br />
3<br />
Shooting basics
3<br />
Shooting basics<br />
Taking still pictures<br />
3 Press the shutter button gently (halfway)<br />
to adjust the focus.<br />
48<br />
• When the focus and exposure are locked,<br />
the green lamp lights (focus lock).<br />
• The AF target mark moves to the focused<br />
position.<br />
• The shutter speed and aperture value<br />
automatically set by the camera are<br />
displayed (except in M mode).<br />
• # blinks to warn of camera movement.<br />
Press the flash button to open the<br />
flash.(P.57)<br />
• When # lights after the flash has popped<br />
HQ<br />
up, the flash is ready to fire. The flash fires automatically when the<br />
shutter button is pressed all the way.<br />
4 Press the shutter button all the way<br />
(fully).<br />
• The camera takes the picture.<br />
• The card access lamp blinks while the picture is<br />
stored on the card.<br />
TIPS<br />
The subject cannot be focused on.<br />
g“If correct focus cannot be obtained” (P.50)<br />
The green lamp blinks.<br />
→ You are too close to the subject. Take the picture at least 7 cm/2.8"<br />
(wide-angle) (1.2 m/3.9 ft. (telephoto)) away from the subject. If you<br />
use the super macro mode, you can take pictures as close as 3 cm/<br />
1.2" from the subject. (P.83)<br />
→ Depending on the subject, the focus and exposure may not be<br />
locked. g“Subjects that are difficult to focus on” (P.51)<br />
# blinks when the shutter button is pressed halfway.<br />
→ The flash is charging. Wait until the lamp goes off.<br />
To check the picture you have just taken immediately<br />
→ Set Rec View to ON. g“REC VIEW” (P.150)<br />
F2.8<br />
2288 1712<br />
#mark<br />
Green lamp
Note<br />
Taking still pictures<br />
To record sound with the picture<br />
→ You can record sound when taking still pictures. Set R to ON.<br />
g“Recording sound with still pictures” (P.94) You can also add<br />
sound to a picture that has already been taken. g“Recording<br />
sound” (P.127)<br />
The monitor or viewfinder turns off automatically<br />
→ If the camera is not used for over 3 minutes, the monitor and<br />
viewfinder turn off automatically. Operate the shutter button or<br />
zoom lever to turn the viewfinder or monitor on. g“SLEEP -<br />
Sleep Timer” (P.151)<br />
To adjust the brightness of the monitor or viewfinder<br />
→ Go to “Monitor brightness Adjustment” and adjust the brightness.<br />
g“Monitor/viewfinder brightness adjustment” (P.149)<br />
The monitor or viewfinder is hard to see<br />
→ Bright light, such as direct sunlight, may cause vertical lines<br />
(smears) to appear on the image in the monitor or viewfinder. This<br />
does not affect recorded pictures.<br />
To check the area the camera is<br />
focusing on<br />
→ If you press f while pressing the<br />
shutter button halfway, the area you<br />
are focusing on is enlarged. Pressing<br />
f once more returns the size to<br />
normal. This function is not available<br />
in the digital zoom range.<br />
g“<strong>DIGITAL</strong> ZOOM - Using the<br />
digital zoom” (P.56)<br />
HQ<br />
2288 1712<br />
• Press the shutter button gently using the ball of your finger. If it is<br />
pressed hard, the camera may move and pictures may come out<br />
blurred.<br />
• Recorded pictures will be saved on the card regardless of whether<br />
the camera is turned off or the batteries are replaced or removed.<br />
• Never open the battery compartment/card cover, remove the battery<br />
or disconnect the AC adapter while the card access lamp is blinking.<br />
Doing so could destroy stored pictures and prevent storage of<br />
pictures you have just taken.<br />
• When taking pictures against strong backlight, the area of the<br />
picture in shadow may appear colored.<br />
49<br />
3<br />
Shooting basics
3<br />
Shooting basics<br />
If correct focus cannot be obtained<br />
When the subject cannot be focused on, you can focus the camera on<br />
another point at roughly the same distance (focus lock) and take the picture<br />
as explained below.<br />
Using the Focus Lock function<br />
Mode dial<br />
1 Position the AF target mark on<br />
the subject you want to focus<br />
on.<br />
• When shooting a hard-to-focus subject<br />
or a fast-moving subject, point the<br />
camera at an object about the same<br />
distance away as the subject.<br />
2 Press the shutter button halfway<br />
until the green lamp lights.<br />
• When the focus and exposure are<br />
locked, the green lamp lights.<br />
• The AF target mark moves to the<br />
Shutter button<br />
focused position.<br />
• When the green lamp blinks, the focus<br />
and exposure are not locked. Release your finger from the shutter<br />
button, re-position your subject and press the shutter button halfway<br />
again.<br />
3 Keeping the shutter button<br />
pressed halfway, recompose<br />
your shot.<br />
50<br />
HQ<br />
2288 1712<br />
AF target mark<br />
HQ<br />
2288 1712
4 Press the shutter button fully.<br />
If correct focus cannot be obtained<br />
TIPS<br />
The frame in which you focus on a subject is different from the<br />
frame in which you lock the exposure.<br />
g“AE LOCK – Locking the exposure” (P.80)<br />
Fix the focus position.<br />
g“AF LOCK – Locking the focus” (P.73)<br />
Focus on the subject in the center of the frame.<br />
g“AF MODE – Changing the focus range” (P.70)<br />
Subjects that are difficult to focus on<br />
Under certain types of conditions, the auto focus may not work properly. If this<br />
happens, focus on an object with high contrast at the same distance as the<br />
intended subject (focus lock), recompose your shot and then take the picture.<br />
If the subject has no vertical lines, hold the camera vertically and focus the<br />
camera using the focus lock function by pressing the shutter button halfway,<br />
then return the camera to the horizontal position while keeping the button<br />
pressed halfway and take the picture.<br />
If the subject still cannot be focused on, use the manual focus. g “Manual<br />
focus” (P.75)<br />
The green lamp<br />
blinks.<br />
The subject cannot be<br />
brought into focus.<br />
Subject with low<br />
contrast<br />
The green lamp lights,<br />
but the subject cannot<br />
be brought into focus.<br />
Subjects at different<br />
distances<br />
Subject with an<br />
extremely bright area in<br />
the center of the frame<br />
Shutter button<br />
Subject without<br />
vertical lines<br />
Fast-moving subject The subject to be<br />
focused on is not in the<br />
center of the frame.<br />
51<br />
3<br />
Shooting basics
3<br />
Shooting basics<br />
Recording movies<br />
This function allows you to record movies. If R is set to ON, sound is recorded<br />
at the same time.<br />
Mode dial<br />
1 Set the mode dial to n and press<br />
the power switch.<br />
g“Power on/off” (P.24)<br />
52<br />
• The monitor turns on.<br />
• The available recording time on the card<br />
that you are using is displayed.<br />
2 Decide the composition of the<br />
picture.<br />
• You can use the zoom lever to enlarge<br />
your subject.<br />
3 Press the shutter button fully to<br />
start recording.<br />
• You can adjust the zoom during movie<br />
recording.<br />
• The card access lamp blinks while the<br />
movie is stored on the card.<br />
• During movie recording, N lights red.<br />
Shutter button<br />
Mode dial<br />
Power switch<br />
Card access lamp<br />
Time remaining<br />
00:36<br />
00:10<br />
4 Press the shutter button again to stop recording.<br />
• When the remaining recording time has been used up, recording stops<br />
automatically.<br />
• When there is space in the card memory, the remaining recording time<br />
(gP.99) is displayed, and the camera is ready to shoot.
Note<br />
Recording movies<br />
• Depending on the card, the remaining recording time may drop<br />
rapidly during recording. Try using the card again after formatting it<br />
with your camera. g“CARD SETUP – Formatting cards” (P.146)<br />
• When R is set to ON, the position of the optical zoom cannot be<br />
changed during movie recording. To use the zoom during recording,<br />
set <strong>DIGITAL</strong> ZOOM to ON. g“<strong>DIGITAL</strong> ZOOM - Using the digital<br />
zoom” (P.56)<br />
•In n mode, the flash and manual focus (MF) cannot be used.<br />
• This camera cannot play back sound.<br />
Notes for recording movies over a long time<br />
• Recording will continue until the card is full unless stopped by<br />
pressing the shutter button.<br />
• A long recorded movie cannot be edited. (P.121)<br />
• If a single movie recording uses up all of the card’s memory, create<br />
space on the card by deleting the movie or downloading it to a PC.<br />
53<br />
3<br />
Shooting basics
3<br />
Shooting basics<br />
<strong>Zoom</strong><br />
In addition to the optical zoom, this camera is equipped with a super zoom and<br />
digital zoom for taking telephoto and wide-angle shots. You can increase the<br />
zoom magnification by combining the super zoom or digital zoom with the optical<br />
zoom. The super zoom and digital zoom cannot be used at the same time.<br />
Camera movement is likely to occur at higher magnifications. Stabilize the<br />
camera with a tripod, etc. to avoid camera movement.<br />
The characteristics and maximum magnification of each zoom are shown below.<br />
Optical zoom Use for normal zoom shooting.<br />
Max. magnification: 10× (equivalent to 38 mm to 380 mm<br />
on a 35 mm camera)<br />
Super zoom Use to extend the optical zoom up to 14× magnification.<br />
However, the resolution is automatically fixed at 1600 ×<br />
1200.<br />
Max. magnification: 14×<br />
Digital zoom Use to extend the maximum optical zoom. However,<br />
pictures taken with the digital zoom may appear grainy.<br />
Max. magnification: Approx. 40×<br />
(Digital zoom magnification during<br />
movie recording is 2.5×)<br />
Using the optical zoom<br />
Mode dial<br />
1 Push or pull the zoom lever.<br />
54<br />
Wide-angle: Push the zoom<br />
lever toward W to zoom out.<br />
<strong>Zoom</strong> lever<br />
Telephoto: Pull the zoom<br />
lever toward T to zoom in.
SUPER ZOOM – Using the super zoom<br />
Mode dial<br />
1 In the top menu, select MODE<br />
MENU � <strong>CAMERA</strong> � SUPER<br />
ZOOM � ON, and press e.<br />
g “How to use the menus” (P.33)<br />
• When ON is selected, the record mode is<br />
automatically set to 1600 × 1200.<br />
•Press e again to exit the menu.<br />
2 Pull the zoom lever<br />
toward T until the optical<br />
zoom reaches its limit.<br />
• When 10× magnification is<br />
reached, zoom adjustment<br />
stops. To zoom in further,<br />
keep pulling the zoom lever<br />
toward T.<br />
<strong>Zoom</strong><br />
3 Push the zoom lever toward W to zoom out.<br />
• When the zoom reaches 10× magnification, zoom adjustment stops.<br />
To zoom out further, keep pushing the zoom lever toward W.<br />
Note<br />
HQ<br />
2288 1712<br />
<strong>Zoom</strong> lever<br />
Arrow pad<br />
OK button<br />
Super<br />
zoom range<br />
Normal<br />
zoom range<br />
The cursor turns orange when inside the<br />
super zoom field.<br />
• Setting <strong>DIGITAL</strong> ZOOM to ON or changing the record mode setting<br />
automatically disables the super zoom.<br />
55<br />
3<br />
Shooting basics
3<br />
Shooting basics<br />
<strong>Zoom</strong><br />
<strong>DIGITAL</strong> ZOOM - Using the digital zoom<br />
Mode dial<br />
1 In the top menu, select MODE<br />
MENU � <strong>CAMERA</strong> � <strong>DIGITAL</strong><br />
ZOOM � ON, and press e.<br />
g “How to use the menus” (P.33)<br />
56<br />
•Press e again to exit the menu.<br />
Mode dial<br />
1 In the top menu, select <strong>DIGITAL</strong><br />
ZOOM � ON, and press e.<br />
2 Pull the zoom lever toward T.<br />
• The white area of the zoom indicator<br />
indicates the optical zoom. If the digital<br />
zoom is set to ON, a red area appears on<br />
the zoom indicator. When you reach the<br />
limit of the optical zoom, the digital zoom<br />
is enabled.<br />
Note<br />
HQ<br />
• Pictures taken with the digital zoom may appear grainy.<br />
<strong>Zoom</strong> lever<br />
Arrow pad<br />
OK button<br />
2288 1712<br />
The cursor moves up and<br />
down on the zoom indicator<br />
according to the zoom<br />
magnification.<br />
The cursor turns orange<br />
when inside the digital zoom<br />
field.
4 Flash<br />
Flash shooting<br />
Select the flash mode best suited to the light conditions and the effect you<br />
want to achieve. You can also adjust the amount of light emitted using the<br />
flash intensity control.<br />
Mode dial<br />
1 Press the flash button. (�)<br />
• The flash pops up. (�)<br />
2 Set the flash mode by repeatedly<br />
pressing #.<br />
• The flash mode changes in the sequence<br />
shown below (when all modes are available).<br />
Auto (Auto-flash) ! (Red-eye<br />
reduction flash)<br />
#SLOW (Slow #(Fill-in flash)<br />
synchronization)<br />
Shutter button<br />
• If no operation is performed for about 3 seconds, the flash mode is set<br />
and the mode selector screen is automatically exited.<br />
• To prevent the flash from firing, press down on the top of the flash to<br />
retract it.<br />
�<br />
�<br />
#Flash mode<br />
button<br />
SLOW<br />
HQ 2288 1712<br />
57<br />
4<br />
Flash
4<br />
Flash<br />
Flash shooting<br />
3 Press the shutter button halfway.<br />
• In conditions where the flash will fire, #<br />
lights.<br />
4 Press the shutter button fully to<br />
take the picture.<br />
58<br />
HQ<br />
Flash working range<br />
W (max.) : Approx. 0.3 m to 4.5 m (1.0 ft. to 14.8 ft.)<br />
T (max.) : Approx. 1.2 m to 3.5 m (3.9 ft. to 11.5 ft.)<br />
# mark<br />
F2.8<br />
2288 1712<br />
Function restrictions according to mode<br />
Mode<br />
h i<br />
m<br />
j l r*<br />
�:Available, −:Not available, :Factory default setting<br />
* The factory default settings and available modes vary depending on<br />
the selected mode.<br />
p Flash mode A S M<br />
P<br />
Auto � � � � − �<br />
! � � � � − �<br />
# − � � � − �<br />
#SLOW1 − � � � � �<br />
#SLOW2 − � � � � �<br />
HSLOW1 − � � � − �<br />
$ � � � � �
Note<br />
TIPS<br />
The # (flash charge) indication blinks.<br />
→ The flash is charging. Wait until # goes off.<br />
Flash shooting<br />
Camera movement warning (Auto-flash, red-eye reduction flash,<br />
fill-in flash)<br />
→ When # (camera movement warning) lights, the shutter speed<br />
locks at its current level. This helps prevent camera shake<br />
problems (shutter speeds that are too slow can cause blur).<br />
However, if the zoom magnification is increased, the camera will<br />
increase the locked shutter speed accordingly.<br />
<strong>Zoom</strong> position Shutter speed<br />
W (max.) 1/30 sec.<br />
T (max.) 1/320 sec.<br />
• The flash does not fire in the following situations:<br />
In the movie record mode, during auto bracketing, during<br />
super-macro shooting, when FUNCTION is set to WHITE<br />
BOARD/BLACK BOARD, and during Panorama shooting<br />
• The flash may not give you the optimum result in macro mode,<br />
especially with wide-angle shooting. Check the resulting picture on<br />
the monitor.<br />
• If a conversion lens is attached to the camera, do not use the flash.<br />
59<br />
4<br />
Flash
4<br />
Flash<br />
Flash shooting<br />
�Auto-flash (No indication)<br />
The flash fires automatically in low light or backlight conditions.<br />
To shoot a subject with backlight, position the AF target mark over the<br />
subject.<br />
�Red-eye reduction flash (!)<br />
The light from the flash may make the subject’s eyes appear red in the<br />
picture. The red-eye reduction flash mode significantly reduces this<br />
phenomenon by emitting pre-flashes before firing the regular flash. This helps<br />
accustom the subject’s eyes to the bright light and minimizes the red-eye<br />
phenomenon.<br />
• After the pre-flashes, it takes about 1 second before the shutter is<br />
released. Hold the camera firmly to avoid camera movement.<br />
Note • Effectiveness may be limited if the subject is not looking directly at<br />
the pre-flashes, or if the shooting range is too far. Individual physical<br />
characteristics may also limit effectiveness.<br />
�Fill-in flash (#)<br />
The flash fires regardless of the available light. This mode is useful for<br />
eliminating shadows on the subject’s face (such as shadows from tree<br />
leaves), in a backlight situation, or for correcting the color shift produced by<br />
artificial lighting (especially fluorescent light).<br />
Note<br />
60<br />
The subject’s eyes appear red.<br />
• The fill-in flash may not have the desired effect under excessively<br />
bright light.
Flash shooting<br />
�Flash off ($)<br />
The flash does not fire even in low light conditions. Use this mode in situations<br />
where flash photography is not desired or is prohibited. You can also use this<br />
mode when you want to shoot a natural-looking twilight or night scene.<br />
• Since a slow shutter speed is automatically selected in low light<br />
situations when in the flash off mode, the use of a tripod is<br />
Note<br />
recommended to prevent your pictures from being blurred by<br />
camera movement.<br />
�Slow Synchronization (#SLOW1 #SLOW2 HSLOW1)<br />
The slow synchronization flash is designed for slow shutter speeds. Normally,<br />
when shooting with a flash, shutter speeds cannot go below a certain level to<br />
prevent camera movement. But when shooting a night scene background,<br />
fast shutter speeds can make the background too dark. Slow synchronization<br />
flash allows both a slow shutter speed for the background and a flash for the<br />
subject. Since the shutter speed is slow, make sure you stabilize the camera<br />
by using a tripod. Otherwise, camera movement may cause the picture to be<br />
blurred.<br />
1st curtain (front curtain) #SLOW1<br />
Usually, regardless of the shutter speed, the flash fires right after the shutter<br />
fully opens. This is called 1st curtain. Unless you change it, this is how the<br />
flash always fires. The slow synchronization factory default setting is<br />
# SLOW1.<br />
61<br />
4<br />
Flash
4<br />
Flash<br />
Flash shooting<br />
2nd curtain (rear curtain) #SLOW2<br />
With 2nd curtain, the flash fires just before the shutter closes. Changing the<br />
flash timing can create interesting effects in your picture, such as expressing<br />
the movement of a car by showing the tail-lights streaming backwards. The<br />
slower the shutter speed, the better the effects turn out.<br />
The slowest possible shutter speed depends on the shooting mode:<br />
M mode : 15 sec.<br />
P, A, S, m mode : 4 sec.<br />
When the shutter speed is set to 4 sec.<br />
rear curtain<br />
1st curtain with red-eye reduction HSLOW1<br />
This mode is for when you want to use slow synchronization, yet also reduce<br />
the red-eye phenomenon. For instance, when shooting a person against a<br />
brightly lit night background. A normal flash might make the person’s eyes<br />
red, but 1st curtain with red-eye reduction lets you capture the background<br />
correctly and reduce the red-eye phenomenon at the same time. 2nd curtain<br />
with red-eye reduction is not available.<br />
62<br />
2nd curtain flash fires<br />
Shutter closes<br />
4sec.<br />
4sec. 0<br />
1st curtain flash fires<br />
Shutter fully opens<br />
front curtain
Using the slow synchronization flash<br />
Mode dial<br />
1 In the top menu, select MODE<br />
MENU � <strong>CAMERA</strong> � #SLOW �<br />
#SLOW1, HSLOW, #SLOW2,<br />
and press e.<br />
g“How to use the menus” (P.33)<br />
•Press e again to exit the menu.<br />
SEt CARD PIC <strong>CAMERA</strong><br />
SLO W<br />
NOISE REDUCtION<br />
DIGItAL ZOOM<br />
FULLtIME AF<br />
Arrow pad<br />
OK button<br />
SLO W1<br />
SLO W<br />
SLO W2<br />
63<br />
4<br />
Flash
4<br />
Flash<br />
Flash intensity control<br />
You can adjust the amount of light emitted by the flash.<br />
In some situations, you may get better results by adjusting the light emission.<br />
Examples include small subjects, distant backgrounds, or situations when<br />
increased contrast is desired. You can adjust the exposure in the range of<br />
±2.0 in 1/3 EV steps.<br />
Mode dial<br />
1 In the top menu, select MODE<br />
MENU � <strong>CAMERA</strong> � w, and<br />
press d.<br />
g“How to use the menus” (P.33)<br />
2 Press ac to adjust the<br />
exposure, then press e.<br />
a : Light emission is increased by 1/3 EV<br />
each time you press the button.<br />
(EV : Exposure Value)<br />
c : Light emission is decreased by 1/3 EV<br />
each time you press the button.<br />
Note<br />
64<br />
•Press e again to exit the menu.<br />
Arrow pad<br />
OK button<br />
• The flash adjustment effect may not be sufficient if the shutter speed<br />
is too fast.<br />
SEt CARD PIC <strong>CAMERA</strong><br />
SLO W<br />
NOISE REDUCtION<br />
DIGItAL ZOOM<br />
FULLtIME AF<br />
0.0
5 Advanced shooting<br />
A/S/M mode<br />
Select the shooting mode to be used when the mode dial is set to p.<br />
Mode dial<br />
1 In the top menu, select MODE<br />
MENU � <strong>CAMERA</strong> � A/S/M � A,<br />
S or M, and press e.<br />
g“How to use the menus” (P.33)<br />
•Press e again to exit the menu.<br />
SEt CARD PIC <strong>CAMERA</strong><br />
ESP<br />
DRIVE<br />
ISO<br />
A/S/M<br />
Arrow pad<br />
OK button<br />
A<br />
S<br />
M<br />
65<br />
5<br />
Advanced shooting
5<br />
Advanced shooting<br />
Aperture priority shooting<br />
Mode dial<br />
1 Select A mode.<br />
g“A/S/M mode” (P.65)<br />
2 Press ac to set the aperture<br />
value.<br />
a : The aperture value increases.<br />
c : The aperture value decreases.<br />
If the aperture value is displayed in red, the aperture setting is unsuitable for<br />
the conditions. Take the following steps. (When the aperture value is<br />
displayed in green, the setting will provide optimum exposure.)<br />
HQ 2288 1712<br />
� appears : The image is<br />
overexposed.<br />
Press a to increase the aperture<br />
value.<br />
Note<br />
66<br />
Aperture value<br />
Aperture range : Toward W : f2.8 to f8.0<br />
Toward T : f3.7 to f8.0<br />
ac<br />
HQ HQ 2288 1712<br />
� appears : The image is<br />
underexposed.<br />
Press c to decrease the<br />
aperture value.<br />
• When the flash is set to the auto-flash mode, the shutter speed is<br />
fixed at 1/30 sec. in the maximum wide angle, or 1/320 sec. in the<br />
maximum telephoto, and will not go slower.
Shutter priority shooting<br />
Mode dial<br />
1 Select S mode.<br />
g“A/S/M mode” (P.65)<br />
2 Press ac to set the shutter<br />
speed.<br />
a : Sets a faster shutter speed.<br />
c : Sets a slower shutter speed.<br />
If the shutter speed is displayed in red, the setting is unsuitable for the<br />
conditions. Take the following steps. (When the shutter speed is displayed in<br />
green, the setting will provide optimum exposure.)<br />
� appears : The image is<br />
overexposed.<br />
Press a to set a faster shutter<br />
speed.<br />
Note<br />
Shutter speed<br />
Shutter speed range: 1" to 1/1000<br />
ac<br />
HQ 2288 1712<br />
HQ 2288 1712<br />
� appears : The image is<br />
underexposed.<br />
Press c to set a slower shutter<br />
speed.<br />
• Shutter speeds that can be set differ according to the flash setting.<br />
67<br />
5<br />
Advanced shooting
5<br />
Advanced shooting<br />
Manual shooting<br />
Mode dial<br />
1 Select M mode.<br />
g“A/S/M mode” (P.65)<br />
2 Use the arrow pad to set the<br />
aperture value and shutter speed.<br />
b : The aperture value increases.<br />
d : The aperture value decreases.<br />
a : Sets a faster shutter speed.<br />
c : Sets a slower shutter speed.<br />
Note<br />
68<br />
• When the shutter button is halfway<br />
pressed, the difference (ranging from -3.0<br />
to +3.0 EV) between the exposure<br />
determined by the currently selected<br />
aperture and shutter speed compared to<br />
the exposure level considered optimal by<br />
the camera is displayed.<br />
• If the exposure differential appears in red,<br />
it indicates that the exposure differential is<br />
less than -3.0 EV or more than +3.0 EV.<br />
• When you press x, the screen on<br />
the right appears with the bar indicating<br />
current exposure settings.<br />
Aperture value : f2.8 to f8.0 (W)<br />
f3.7 to f8.0 (T)<br />
Shutter speed : 15" to 1/1000<br />
HQ<br />
x<br />
AE Lock/<br />
Custom button<br />
2288 1712<br />
Arrow pad<br />
Exposure differential<br />
• To avoid camera movement, you are recommended to use a tripod<br />
when taking pictures requiring a slow shutter speed.
Using My Mode<br />
When you use r mode, the settings you selected with the menus in My<br />
Mode are activated.<br />
Saving the shooting mode or function settings you want to use in advance lets<br />
you shoot with your favorite settings straightaway. You can also save the<br />
settings you are currently using.You can create and save up to 4 different<br />
patterns. g“MY MODE SETUP” (P.143)<br />
Mode dial<br />
1 In the top menu, select MODE<br />
MENU � <strong>CAMERA</strong> � r 1/2/3/4 �<br />
MY MODE 1 to MY MODE4, and<br />
press e.<br />
g“How to use the menus” (P.33)<br />
Note<br />
•Press e again to exit the menu.<br />
• Only the settings in MY MODE 1 have<br />
already been saved. You cannot select<br />
MY MODE 2 to MY MODE 4 if no settings<br />
have been saved in them.<br />
g“MY MODE SETUP” (P.143)<br />
Arrow pad<br />
OK button<br />
• Although the settings you are using can be saved, the zoom saved<br />
may not be the same as the one being used.<br />
69<br />
5<br />
Advanced shooting
5<br />
Advanced shooting<br />
Focusing applications<br />
AF MODE – Changing the focus range<br />
This function allows you to select the focus range of your subject.<br />
iESP Focus selection is based on the entire picture on the screen. Even<br />
when the subject is not in the center of the screen, focusing is<br />
possible.<br />
SPOT Focus selection is based on the subject within the AF target mark.<br />
Mode dial<br />
1 In the top menu, select MODE<br />
MENU � <strong>CAMERA</strong> � AF MODE �<br />
iESP or SPOT, and press e.<br />
g“How to use the menus” (P.33)<br />
Note<br />
70<br />
•Press e again to exit the menu.<br />
Arrow pad<br />
OK button<br />
•In h and n mode, the AF MODE is fixed at iESP and cannot<br />
be changed.<br />
SEt CARD PIC <strong>CAMERA</strong><br />
AF MODE<br />
PANORAMA<br />
2 IN 1<br />
FUNCtION<br />
iESP<br />
SPOt
Focusing applications<br />
FULLTIME AF – A reliable time-saving way to focus<br />
FULLTIME AF keeps the subject in front of the lens in focus at all times,<br />
without having to press the shutter button halfway. When ON is selected, the<br />
focusing time is reduced, letting you take successive snapshots.<br />
Mode dial<br />
1 In the top menu, select MODE<br />
MENU � <strong>CAMERA</strong> � FULLTIME<br />
AF � ON, and press e.<br />
g“How to use the menus” (P.33)<br />
Note<br />
•Press e again to exit the menu.<br />
SEt CARD PIC <strong>CAMERA</strong><br />
SLO W<br />
NOISE REDUCtION<br />
DIGItAL ZOOM<br />
FULLtIME AF<br />
Arrow pad<br />
OK button<br />
• Battery consumption increases when FULLTIME AF is used.<br />
OFF<br />
ON<br />
71<br />
5<br />
Advanced shooting
5<br />
Advanced shooting<br />
Focusing applications<br />
AF AREA – Changing the position of the AF target mark<br />
You can select the area you want to focus on by changing the position of the<br />
AF target mark.<br />
Mode dial<br />
1 Set the AF MODE to SPOT.<br />
g“AF MODE – Changing the focus<br />
range” (P.70)<br />
2 In the top menu, select MODE<br />
MENU � <strong>CAMERA</strong> � AF AREA,<br />
and press d.<br />
g“How to use the menus” (P.33)<br />
3 Use the arrow pad to move the AF<br />
target mark to the area you want to<br />
focus on.<br />
• The AF target mark at the center of the<br />
screen can be moved vertically or<br />
horizontally.<br />
AF target mark<br />
4 Take the picture.<br />
• To restore the AF target mark to its original position (at the center),<br />
press e.<br />
•Press e again to exit AF target mark selection mode.<br />
Note<br />
72<br />
Arrow pad<br />
OK button<br />
AF AREA<br />
SELECt CANCEL<br />
• AF AREA is not available when the digital zoom is set to ON.<br />
• The location of the AF target mark cannot be saved.
AF LOCK – Locking the focus<br />
Focusing applications<br />
Registering the AF lock function on the x in advance enables easy<br />
locking of the focus.<br />
Mode dial<br />
1 Register the AF lock function on<br />
x.<br />
g“Setting the custom button” (P.138)<br />
x<br />
AE Lock/<br />
Custom button<br />
Shutter button<br />
2 Position the AF target mark on the<br />
subject you want to focus on and<br />
press x.<br />
• The focus is locked and the AF LOCK mark is displayed.<br />
• To reset the AF LOCK, press x again to cancel the AF LOCK.<br />
Each time you press x, AF lock is alternately engaged and<br />
canceled.<br />
When x is pressed When focus is locked<br />
F2.8<br />
AF LOCK<br />
HQ 2288 1712 HQ 2288 1712<br />
AF LOCK mark<br />
3 Press the shutter button fully.<br />
73<br />
5<br />
Advanced shooting
5<br />
Advanced shooting<br />
Focusing applications<br />
Note<br />
74<br />
TIPS<br />
How to save the locked focus after<br />
shooting (AF MEMORY)<br />
→ Hold down x for more than 1<br />
second. The AF MEMORY mark<br />
appears. When the mark appears, the<br />
locked focus is memorized. To cancel<br />
AF MEMORY, press x again.<br />
AF MEMORY mark<br />
F2.8<br />
AF MEMORY<br />
HQ 2288 1712<br />
AF LOCK was canceled.<br />
→ Do not operate any of the buttons or the mode dial after performing<br />
AF LOCK. AF LOCK will be canceled.<br />
→ The camera had emerged from sleep mode or the power was<br />
turned off.<br />
• The focus may be compromised by operating the zoom after setting<br />
the AF LOCK. Complete zoom operations before setting the AF<br />
LOCK.<br />
• AF LOCK is not available when a menu is displayed on the screen.<br />
Exit the menu. g“How to use the menus” (P.33)
Manual focus<br />
If auto focus is unable to focus on a subject, use manual focus.<br />
Mode dial<br />
1 Hold down e for more than 1<br />
second.<br />
2 When the focus distance selection<br />
screen appears on the monitor,<br />
press b to select MF.<br />
Focusing applications<br />
Arrow pad<br />
OK button<br />
3 Press ac to set the focus<br />
position.<br />
• During operation, the area you are<br />
focusing on is enlarged. This lets you<br />
check whether the focus is in the right<br />
position.<br />
• The distance indicator on the left of the<br />
monitor is for reference only.<br />
• When the indicator is moved to less than 2 m (6.6 ft.), the display<br />
automatically switches to the 7 cm (2.8") to 2 m (6.6 ft.) display.<br />
4 Hold down e for more than 1 second to save the setting.<br />
• MF is displayed in red on the monitor.<br />
75<br />
5<br />
Advanced shooting
5<br />
Advanced shooting<br />
Focusing applications<br />
5 Take the picture.<br />
• The focus is locked at the distance you have set.<br />
�To cancel manual focus<br />
1 Hold down e for more than 1<br />
second to display the focus<br />
distance selection screen.<br />
2 Press d to select AF, then press e.<br />
• Manual focus is canceled.<br />
Note<br />
76<br />
TIPS<br />
How to shoot while keeping the same focus distance at all times<br />
→ The focus can be fixed at the same distance as when you perform<br />
focus lock.<br />
1 Position the AF target mark on a subject at the desired distance<br />
and press the shutter button halfway.<br />
2 Keeping the shutter button half-pressed, press e.<br />
• The distance indicator is displayed.<br />
• MF is selected and the focus is locked at the same distance as<br />
when you performed focus lock.<br />
Even if you move the cursor to the top of the distance indicator,<br />
focusing is not possible at ).<br />
→ Adjust the cursor position by pressing ac while watching the<br />
monitor.<br />
• If the zoom lever is pressed after performing manual focus, the<br />
saved focus distance may be changed. Perform setting again.
Metering<br />
There are three ways of measuring the brightness of a subject.<br />
ESP metering Meters the center of the subject and the surrounding<br />
area separately.<br />
Spot metering Exposure is determined by metering within the AF<br />
target area. In this mode, a subject can be shot with<br />
optimal exposure regardless of the background light.<br />
gP.77<br />
Multi-metering Meters the brightness of the subject at up to 8 different<br />
points to set the optimal exposure based on the<br />
average brightness. This method is useful with a high<br />
contrast subject. gP.78<br />
Spot metering<br />
Mode dial<br />
1 In the top menu, select ESP/5 �<br />
5 and press e.<br />
• In the top menu, the setting can be made<br />
in the same way as selecting MODE<br />
MENU � <strong>CAMERA</strong> � ESP/5 � 5.<br />
g“How to use the menus” (P.33)<br />
Arrow pad<br />
OK button<br />
77<br />
5<br />
Advanced shooting
5<br />
Advanced shooting<br />
Metering<br />
MULTI METERING<br />
Mode dial<br />
1 When using the camera in the<br />
p mode, multi-metering is<br />
not available in the M mode. Set<br />
to any mode except M.<br />
g“A/S/M mode” (P.65)<br />
78<br />
• If a function other than AE lock is<br />
registered on x, set AE lock to<br />
the button.<br />
g“Setting the custom button” (P.138)<br />
OK button<br />
2 In the top menu, select ESP/5 �<br />
MULTI, and press e.<br />
• In the top menu, the setting can be made in the same way as selecting<br />
MODE MENU � <strong>CAMERA</strong> � ESP/5 � MULTI.<br />
g“How to use the menus” (P.33)<br />
•Press e again to exit the menu.<br />
3 Position the AF target mark on the<br />
area you want to meter and press<br />
x. The brightness is metered<br />
at up to 8 different points.<br />
• Multi-metering bar appears.<br />
• Brightness meter readings are ignored<br />
after the 9th reading.<br />
• To perform metering again, press<br />
x<br />
AE Lock/<br />
Custom button<br />
Arrow pad<br />
F2.8<br />
x for more than 1 second to display C. Press x again<br />
to cancel the metering values.
Ex: When metering 2 points (pressing x twice)<br />
Metering<br />
The aperture and shutter speed as calculated from the average values<br />
obtained by metering at 2 points. These values are recalculated every time<br />
another metering point is added.<br />
The average for the 2<br />
metering points. The<br />
average is always<br />
shown at the center of<br />
the bar.<br />
F2.8<br />
The reading when x was pressed.<br />
The number of Z indicates the number of<br />
times you have pressed the button. The<br />
distance Z is from the center of the bar<br />
indicates the difference between the<br />
metered and average readings.<br />
Indicates how much<br />
the present exposure<br />
you are metering<br />
differs from the<br />
average exposure<br />
value. The present<br />
exposure can be fixed<br />
by pressing the<br />
shutter button<br />
halfway.<br />
(The present<br />
exposure is not<br />
added to the average<br />
value unless you<br />
press x.)<br />
When Z moves more than ±3 from the center of the bar (the average<br />
reading), red XY appear.<br />
TIPS<br />
To save the locked multi-metering exposure after shooting (AE<br />
memory)<br />
→ After metering in step 3, hold down x for more than 1<br />
second. C appears. While C is displayed, the exposure is<br />
saved. Press x again to cancel the AE memory.<br />
The multi-metering exposure is canceled.<br />
→ If you operate any of the buttons or the mode dial after metering in<br />
step 4, the multi-metering exposure is canceled.<br />
79<br />
5<br />
Advanced shooting
5<br />
Advanced shooting<br />
AE LOCK – Locking the exposure<br />
This function is suitable for situations when optimal exposure is difficult to<br />
achieve, such as when there is excessive contrast between the subject and<br />
the surroundings.<br />
For example, when the sky takes up much of the frame, shooting with<br />
automatic exposure sometimes results in a dark subject. Recompose your<br />
shot so that not much sky is in the frame. Then press x to lock the<br />
metered value (exposure) temporarily. Next, compose your shot again with<br />
the sky in the frame and take the picture.<br />
Mode dial<br />
1 When using the camera in the<br />
A/S/M mode, AE lock is not<br />
available in the M mode. Set to any<br />
mode except M.<br />
g“A/S/M mode” (P.65)<br />
• If a function other than AE lock is<br />
registered on x, set AE lock to the<br />
button.<br />
g“Setting the custom button” (P.138)<br />
2 Compose the picture where you<br />
want to lock the metered value<br />
(exposure), then press x.<br />
• The exposure is memorized.<br />
• If you want to lock a different exposure,<br />
press x again to cancel AE lock.<br />
Each time you press x, AE lock is<br />
alternately engaged and canceled.<br />
80<br />
HQ<br />
x<br />
AE Lock/<br />
Custom button<br />
Shutter button<br />
2288 1712<br />
During AE lock, AEL is<br />
displayed.
3 Position the AF target mark on the<br />
subject you want to focus on and<br />
press the shutter button halfway.<br />
• The green lamp lights.<br />
• AE lock cannot be canceled while the<br />
shutter button is pressed halfway.<br />
4 Press the shutter button fully.<br />
• AE lock is automatically canceled after<br />
one shot.<br />
Note<br />
AE LOCK – Locking the exposure<br />
During AE lock, AEL is<br />
displayed.<br />
HQ<br />
2288 1712<br />
TIPS<br />
To save the locked metered value (exposure) after shooting (AE<br />
memory)<br />
→ After step 2 or 3, hold down x for more than 1 second. C<br />
appears. While C is displayed, the exposure is saved. Press<br />
x again to cancel the AE memory.<br />
AE lock was canceled.<br />
→ Do not operate any of the buttons or the mode dial after performing<br />
AE lock. Doing so will cancel AE lock.<br />
→ The camera had emerged from sleep mode or the power was<br />
turned off.<br />
• AE lock is not available when multi-metering is enabled. Turn multimetering<br />
off. g“MULTI METERING” (P.78)<br />
• AE lock is not available when a menu is displayed on the screen.<br />
Exit the menu. g“How to use the menus” (P.33)<br />
81<br />
5<br />
Advanced shooting
5<br />
Advanced shooting<br />
Macro mode shooting<br />
Focusing is usually slow when you get close to a subject (W: 7 cm/2.8" to 60<br />
cm/2.0 ft., T: 1.2 m/3.9 ft. to 2 m/6.6 ft.). However, in the & mode focusing is<br />
performed quickly. When the optical zoom lever is at the maximum wide<br />
position and you are as close as 7 cm/2.8" to your subject, you can fill the<br />
entire frame with your subject.<br />
If the center of the frame (within the AF target mark) is metered when you are<br />
close to the subject and you shoot with the optimal exposure, the picture will<br />
turn out well. g“Spot metering” (P.77)<br />
Mode dial<br />
1 In the top menu, select & � &,<br />
and press e.<br />
• In the top menu, the setting can be made<br />
in the same way as selecting MODE<br />
MENU � <strong>CAMERA</strong> � & � &.<br />
g“How to use the menus” (P.33)<br />
82<br />
Normal shooting With the macro mode<br />
• You cannot select & in manual focus<br />
mode. Set to AF.<br />
g“Manual focus” (P.75)<br />
Arrow pad<br />
OK button
Super macro mode shooting<br />
This mode lets you shoot from as close as 3 cm/1.2" to your subject. Subjects<br />
measuring up to approximately 4 × 3 cm (1.6" × 1.2") can be captured on the<br />
monitor.<br />
In the % mode, normal shooting is also possible, but the position of the zoom<br />
is fixed automatically and cannot be changed.<br />
Mode dial<br />
1 In the top menu, select & � %, and press e.<br />
• In the top menu, the setting can be made<br />
in the same way as selecting MODE<br />
MENU � <strong>CAMERA</strong> � & � %.<br />
g“How to use the menus” (P.33)<br />
Note<br />
•Press e again to exit the menu.<br />
TIPS<br />
The subject is in shadow<br />
→ When taking pictures close to the subject, shadows may become<br />
conspicuous, and the auto focus may not be able to maintain<br />
correct focus. If this happens, use the manual focus. g“Manual<br />
focus” (P.75)<br />
• During super macro shooting, the flash is not available.<br />
Arrow pad<br />
OK button<br />
83<br />
5<br />
Advanced shooting
5<br />
Advanced shooting<br />
Self-timer shooting<br />
This function lets you take pictures using the self-timer. Fix the camera<br />
securely on a tripod for self-timer shooting. This function is useful for taking<br />
pictures where you want to be included in the photograph.<br />
Mode dial<br />
1 Select Y by repeatedly pressing Y.<br />
• If no operation is performed for about 3<br />
seconds, the selected mode is set and the<br />
mode selector screen is automatically<br />
exited.<br />
2 Press the shutter button fully to<br />
take the picture.<br />
• Pressing the shutter button halfway locks<br />
the focus and exposure.<br />
• The self-timer lamp lights for approximately<br />
10 seconds, then starts blinking. After<br />
blinking for approximately 2 seconds, the<br />
picture is taken.<br />
Self-timer lamp<br />
• To stop shooting while in n mode, press<br />
the shutter button fully again.<br />
• To cancel the self-timer, press Y.<br />
• The self-timer mode is automatically canceled after one shot.<br />
Note<br />
84<br />
Y Self-timer button<br />
Shutter button<br />
HQ 2288 1712<br />
• If sequential shooting is attempted in self-timer mode, the camera<br />
shoots max. 5 frames regardless of the setting.
Sequential shooting<br />
There are 4 sequential shooting modes: sequential shooting, high speed<br />
sequential shooting, AF sequential shooting and auto bracketing. Sequential<br />
shooting modes can be selected from the DRIVE mode menu.<br />
Sequential shooting cannot be performed when the record mode is set to<br />
TIFF.<br />
Drive mode<br />
o Shoots 1 frame at a time when the shutter button is<br />
pressed. (Normal shooting mode, single-frame<br />
shooting)<br />
j Focus, exposure and white balance are locked at the<br />
first frame. Approx. 7 frames at approx.1.6 frames/<br />
sec. (in HQ mode)<br />
i Pictures can be taken at a faster speed than normal<br />
sequential shooting. The sequential shooting speed<br />
varies depending on the record mode setting. Approx.<br />
2 frames at approx. 2.1 frames/sec.<br />
k Focus is individually locked for each frame. The AF<br />
sequential shooting speed is slower than for normal<br />
sequential shooting.<br />
7 g“Auto bracketing” (P.86)<br />
Sequential shooting, high speed sequential shooting<br />
and AF sequential shooting<br />
Mode dial<br />
1 In the top menu, select MODE<br />
MENU � <strong>CAMERA</strong> � DRIVE � j,<br />
i or k, and press e.<br />
g“How to use the menus” (P.33)<br />
Mode dial<br />
In the top menu, select DRIVE � j,<br />
i or k, and press e.<br />
•Press e again to exit the menu.<br />
Arrow pad<br />
OK button<br />
85<br />
5<br />
Advanced shooting
5<br />
Advanced shooting<br />
Sequential shooting<br />
2 Take the picture.<br />
• Press the shutter button fully and keep it<br />
pressed. The camera will take pictures in<br />
sequence until you release the button.<br />
Auto bracketing<br />
Under some conditions, you may obtain better results shooting with exposure<br />
compensation than by using the exposure setting considered optimal by the<br />
camera.<br />
When auto bracketing is set, the exposure is changed automatically for each<br />
frame when you start shooting. The exposure differential and number of<br />
frames can be selected in the menus. The focus and white balance are locked<br />
at the first frame.<br />
Ex: When 7 is set to ±1.0 ×3<br />
Mode dial<br />
1 In the top menu, select MODE<br />
MENU � <strong>CAMERA</strong> � DRIVE �<br />
BKT, and press d.<br />
g“How to use the menus” (P.33)<br />
86<br />
SEt CARD PIC <strong>CAMERA</strong><br />
ESP<br />
DRIVE<br />
ISO<br />
A/S/M<br />
-1.0 0.0 +1.0<br />
HI<br />
AF<br />
BKt<br />
Arrow pad<br />
OK button
2 Select the exposure differential.<br />
Press ac to select ±0.3, ±0.7 or<br />
±1.0, then press d.<br />
Sequential shooting<br />
3 Select the number of shots. Press ac to select ×3 or ×5,<br />
then press e.<br />
•Press e repeatedly until the menu disappears.<br />
4 Take the picture.<br />
• Press the shutter button fully and keep it pressed to shoot the preset<br />
number of pictures. You can stop shooting at any time by releasing the<br />
shutter button.<br />
Note<br />
CANCEL<br />
BKt<br />
SELECt<br />
• Sequential shooting (j, i, k, 7) is not possible in<br />
the following situations:<br />
– When the TIFF or SHQ record mode is set to ENLARGE SIZE<br />
– When NOISE REDUCTION is set to ON.<br />
• Auto bracketing is not possible in M mode.<br />
• The flash does not fire in 7 mode.<br />
• In modes other than S and M, since the shutter speed is set to max.<br />
1/30 sec., exposure is decreased when shooting a dark subject.<br />
•In 7 mode other than S mode, if the shutter speed is set to<br />
longer than 1/30 sec. when the exposure differential is 0, the shutter<br />
speed is fixed at 1/30 sec. and the picture is taken in 7 mode.<br />
• If the battery power is low and the battery check blinks during<br />
sequential shooting, shooting stops and the camera starts saving<br />
the pictures you have taken. Whether or not all of the shots are<br />
saved depends on how much battery power remains.<br />
• If there is not enough space available on the card for the number of<br />
frames you have set during auto bracketing, you cannot continue<br />
shooting.<br />
GO<br />
87<br />
5<br />
Advanced shooting
5<br />
Advanced shooting<br />
Self-portrait shooting<br />
Enables you to take a picture of yourself while holding the camera. Point the<br />
lens towards yourself and the focus will be locked on you. The camera<br />
automatically sets the optimal shooting conditions. The zoom is fixed in the<br />
wide position and cannot be changed.<br />
Mode dial<br />
1 In the top menu, select MODE<br />
MENU � <strong>CAMERA</strong> � o, and<br />
press d.<br />
g“How to use the menus” (P.33)<br />
88<br />
• The self-portrait mode is set.<br />
2 Take the picture.<br />
•Press e to exit self-portrait shooting.<br />
•Press e again to exit the menu.<br />
Arrow pad<br />
OK button
PANORAMA - Panorama shooting<br />
You can take advantage of panorama shooting with Olympus xD-Picture<br />
Card. Panorama shooting lets you connect pictures with overlapping edges<br />
into a single panoramic picture, using the CAMEDIA Master software.<br />
Mode dial<br />
1 In the top menu, select MODE<br />
MENU � <strong>CAMERA</strong> �<br />
PANORAMA, and press d.<br />
g“How to use the menus” (P.33)<br />
• The PANORAMA mode is set.<br />
Arrow pad<br />
OK button<br />
2 Use the arrow pad to choose at<br />
which edge you want to connect<br />
the pictures.<br />
d : The next picture is connected at the<br />
right edge<br />
b : The next picture is connected at the<br />
left edge<br />
Connects pictures from left to<br />
a : The next picture is connected at the<br />
right<br />
top<br />
c : The next picture is connected at the bottom<br />
Connects pictures from bottom<br />
to top<br />
89<br />
5<br />
Advanced shooting
5<br />
Advanced shooting<br />
PANORAMA - Panorama shooting<br />
3 Make sure that the edge of the pictures overlap, then take<br />
pictures.<br />
• Focus, exposure and white balance are set by the first picture. Do not<br />
select an extremely bright subject (such as the sun) for the first picture.<br />
• You cannot adjust the zoom after the first picture.<br />
• Panorama shooting is possible for up to 10 pictures.<br />
The part of the previous picture where it will be joined to the next picture does<br />
not remain in the frame on the edge of the screen. You have to remember<br />
what the part in the frame looked like and take the next picture so it overlaps.<br />
Compose your shots so that the right edge of the previous picture overlaps<br />
with the left edge of the next picture if you are connecting pictures from left<br />
to right (or vice versa if you are connecting pictures from right to left).<br />
90<br />
• When you have taken 10 pictures, a<br />
warning mark appears.<br />
4 Press e to finish panorama shooting.<br />
• The frame on the screen disappears and the camera returns to the<br />
normal shooting mode.<br />
Note<br />
• The panorama mode is only available with Olympus CAMEDIAbrand<br />
cards.<br />
• During panorama shooting, the flash and sequential shooting are<br />
not available.<br />
• Images are saved in JPEG format when panorama shooting is done<br />
in the TIFF mode. The size of the image does not change.<br />
• If the mode dial is operated during panorama shooting, the camera<br />
cancels the panorama mode and returns to normal shooting.<br />
• The camera itself cannot connect panorama pictures. The<br />
CAMEDIA Master software is necessary to connect the pictures.
2 IN 1 - Taking two-in-one pictures<br />
This function allows you to combine two pictures<br />
taken in succession and store them as a single<br />
picture. You can combine two different subjects<br />
in one picture.<br />
Mode dial<br />
1 In the top menu, select MODE<br />
MENU � <strong>CAMERA</strong> � 2 IN 1, and<br />
press d.<br />
g“How to use the menus” (P.33)<br />
• The 2 IN 1 picture mode is set.<br />
2 Take the first shot.<br />
• The subject will be positioned on the left in<br />
the combined picture.<br />
3 Take the second shot.<br />
• The subject will be positioned on the right<br />
in the combined picture.<br />
• The BUSY bar is displayed during<br />
processing. After the image is saved, the<br />
camera returns to the mode menu.<br />
Picture when played back<br />
Arrow pad<br />
OK button<br />
F2.8<br />
HQ 2288 1712<br />
F2.8<br />
HQ 2288 1712<br />
Image when shot<br />
91<br />
5<br />
Advanced shooting
5<br />
Advanced shooting<br />
2 IN 1 - Taking two-in-one pictures<br />
Note<br />
92<br />
• During 2 IN 1 picture shooting, the panorama, sequential shooting<br />
and self-portrait modes are not available.<br />
• To cancel the 2 IN 1 picture mode after the first shot has been taken,<br />
press e. The first shot will not be saved.<br />
• Operating the mode dial will exit 2 IN 1 picture mode.<br />
• If the camera enters sleep mode after the first shot, 2 IN 1 picture<br />
mode will be canceled.
FUNCTION - Adding special effects to pictures<br />
This feature lets you add special effects to your pictures during shooting.<br />
4 effects are available.<br />
BLACK & WHITE Takes pictures in black and white.<br />
SEPIA Gives pictures a sepia tone.<br />
WHITE BOARD Pictures are in black and white, with black letters on a<br />
white background emphasized to make them easier to<br />
read.<br />
BLACK BOARD Pictures are in black and white, with white letters on a<br />
black background emphasized to make them easier to<br />
read.<br />
Mode dial<br />
1 In the top menu, select MODE<br />
MENU � <strong>CAMERA</strong> � FUNCTION,<br />
then select a mode and press e.<br />
g“How to use the menus” (P.33)<br />
Note<br />
• WHITE BOARD and BLACK BOARD are<br />
not available in n mode.<br />
• Press e again to exit the menu.<br />
Arrow pad<br />
OK button<br />
TIPS<br />
Letters do not show clearly with WHITE BOARD or BLACK BOARD.<br />
→ Use exposure compensation. g“Exposure compensation”<br />
(P.102)<br />
• When WHITE/BLACK BOARD is selected, the flash is automatically<br />
set to off.<br />
•WB, > and SATURATION cannot be used in Function shooting.<br />
SEt CARD PIC <strong>CAMERA</strong><br />
AF MODE<br />
PANORAMA<br />
2 IN 1<br />
FUNCtION<br />
OFF<br />
BLACK&WHItE<br />
SEPIA<br />
W HItE BOARD<br />
BLACK BOARD<br />
93<br />
5<br />
Advanced shooting
5<br />
Advanced shooting<br />
Recording sound with still pictures<br />
Sound can be recorded when taking still pictures. Recording starts about 0.5<br />
seconds after the shutter is released and lasts about 4 seconds.<br />
When this function is enabled, sound is recorded automatically every time<br />
you take a picture.<br />
Mode dial<br />
1 In the top menu, select MODE<br />
MENU � <strong>CAMERA</strong> � R � ON,<br />
and press e.<br />
g“How to use the menus” (P.33)<br />
94<br />
•Press e again to exit the menu.<br />
2 When recording starts, turn the<br />
camera microphone towards the<br />
source of the sound you want to<br />
record.<br />
• The BUSY bar is displayed during<br />
recording.<br />
Shutter button<br />
Arrow pad<br />
OK button<br />
Microphone<br />
TIPS<br />
• H appears on all still pictures and movies that have recorded<br />
sound.<br />
• Sound can be added later to still pictures. Recorded sound can also<br />
be changed. g“Recording sound” (P.127)
Note<br />
Recording sound with movies<br />
• If the camera is more than 1 m (3.3 ft.) away from the source of the<br />
sound, sound may not be recorded clearly.<br />
• Pictures cannot be taken during sound recording.<br />
• Sound recording is not possible in the following cases:<br />
the record mode is set to TIFF/the drive mode is set to<br />
sequential shooting (j , i, k, 7)<br />
• Sound recording may also pick up camera noises, such as button<br />
operations, shutter movement, etc.<br />
• This camera cannot play back sound.<br />
• Sound recording may not be possible if there is insufficient space in<br />
the card memory.<br />
Recording sound with movies<br />
Sound can be recorded while shooting a movie.<br />
Mode dial<br />
1 In the top menu, select MODE<br />
MENU � <strong>CAMERA</strong> � R � ON,<br />
and press e.<br />
g“How to use the menus” (P.33)<br />
2 Recording starts at the same time<br />
as shooting.<br />
Note<br />
Arrow pad<br />
OK button<br />
• When R is set to ON, the optical zoom position is locked during<br />
movie recording. If you wish to use the zoom during movie<br />
recording, set <strong>DIGITAL</strong> ZOOM to ON. If R is set to OFF, you can use<br />
both the optical zoom and digital zoom during movie recording.<br />
• If the camera is more than 1 m (3.3 ft.) away from the source of the<br />
sound, sound may not be recorded clearly.<br />
• This camera cannot play back sound.<br />
95<br />
5<br />
Advanced shooting
6<br />
Adjusting the image quality and exposure<br />
6 Adjusting the image quality and exposure<br />
Record mode<br />
You can select a record mode in which to take pictures or shoot movies.<br />
Choose the best record mode for your purpose (printing, editing on a PC,<br />
website editing, etc.). For information on the image size for each record mode<br />
and the number of remaining pictures and remaining recording time for the<br />
card, see the table on P.98.<br />
Normal image mode<br />
Image becomes clearer<br />
Number of pixcels increas<br />
(Resolution<br />
The number of pixels (horizontal × vertical) used when saving an image. If the<br />
image will be printed, higher resolutions (larger numbers) are recommended<br />
so that the image will be clearer. However, higher resolutions make the file<br />
size (amount of data) larger, so the number of pictures that can be saved will<br />
be fewer.<br />
(Compression<br />
In record modes other than TIFF, image data are compressed. The higher the<br />
compression, the less clear the image will be.<br />
(Resolution and picture size on a computer screen<br />
When a picture is transferred to a computer, the size of the picture on the<br />
computer screen varies depending on the computer’s monitor setting. For<br />
instance, a picture taken in 1024 × 768 resolution is the same size as the<br />
screen if you set the picture to 1× when the monitor setting is 1024 × 768.<br />
However, if the monitor setting is over 1024 × 768 (such as 1280 × 1024), the<br />
picture only takes up part of the screen.<br />
96<br />
Application<br />
Resolution<br />
Compression<br />
Un- Low High<br />
compressed compression compression<br />
2288 × 1712<br />
2048 × 1536<br />
SHQ HQ<br />
Select for the print<br />
size<br />
1600 × 1200<br />
1280 × 960 TIFF<br />
SQ1<br />
HIGH<br />
SQ1<br />
NORMAL<br />
1024 × 768<br />
For small sized<br />
prints and website<br />
640 × 480<br />
SQ2<br />
HIGH<br />
SQ2<br />
NORMAL
Special record modes<br />
Record mode<br />
Record mode Features Resolution<br />
ENLARGE SIZE<br />
(SHQ, HQ)<br />
3:2<br />
(TIFF, SHQ, HQ)<br />
3:2 Resolution<br />
The image aspect ratio is normally 4:3. If the<br />
aspect ratio is changed to 3:2, the image can be<br />
printed at a photo lab without losing the image<br />
borders. The 3:2 aspect ratio setting is not<br />
available in h or n mode.<br />
ENLARGE SIZE<br />
When ENLARGE SIZE is selected, the actual 4 million pixels used by this<br />
camera can be increased to the equivalent of approx. 8 million pixels (3200 ×<br />
2400). This allows you to make quality prints in larger sizes, such as A3<br />
(297 mm × 420 mm/11.7" × 16.5"). However, file sizes also become larger.<br />
ENLARGE SIZE is not available in the h or n mode.<br />
Note<br />
Increases the resolution. This is useful for<br />
printing large-sized prints.<br />
This is useful for ordering prints from a<br />
photo lab.<br />
3200 × 2400<br />
2288 × 1520<br />
Monitor display when<br />
is set<br />
• If the SHQ record mode is set to ENLARGE SIZE, sequential<br />
shooting modes (j, i, k, 7) are not available.<br />
3:2<br />
97<br />
6<br />
Adjusting the image quality and exposure
6<br />
Adjusting the image quality and exposure<br />
Record mode<br />
(Record modes and the number of storable still pictures/<br />
remaining recording time<br />
The number of storable still pictures and<br />
remaining recording time is also displayed on the<br />
monitor when a card is in the camera.<br />
Still picture record mode<br />
Record<br />
mode<br />
Resolution<br />
Com- File<br />
pression format<br />
Memory capacity in no. of shots<br />
16MB<br />
With sound Without sound<br />
2288 × 1712<br />
TIFF<br />
Uncompressed<br />
TIFF<br />
– 1<br />
3:2 2288 × 1520 – 1<br />
2048 × 1536<br />
1600 × 1200<br />
1280 × 960<br />
–<br />
–<br />
–<br />
1<br />
2<br />
4<br />
1024 × 768 – 6<br />
640 × 480 – 16<br />
2288 × 1712 Low<br />
5 5<br />
SHQ 3:2 2288 × 1520 com-<br />
6 6<br />
ENLARGE SIZE 3200 × 2400 pression<br />
2 2<br />
2288 × 1712 High<br />
15 16<br />
HQ 3:2<br />
2288 × 1520 com-<br />
17 18<br />
ENLARGE SIZE 3200 × 2400 pression<br />
8 8<br />
SQ1<br />
2048 × 1536<br />
1600 × 1200<br />
HIGH<br />
NORMAL<br />
HIGH<br />
NORMAL<br />
JPEG<br />
8<br />
19<br />
11<br />
30<br />
8<br />
20<br />
11<br />
32<br />
1280 × 960<br />
HIGH<br />
NORMAL<br />
*<br />
16<br />
45<br />
17<br />
49<br />
SQ2<br />
1024 × 768<br />
640 × 480<br />
HIGH<br />
NORMAL<br />
HIGH<br />
NORMAL<br />
25<br />
66<br />
58<br />
124<br />
26<br />
76<br />
66<br />
165<br />
98<br />
HQ<br />
2288 1712<br />
Number of storable<br />
still pictures<br />
* HIGH uses low compression/NORMAL uses high compression
Record mode<br />
Movie Record Modes<br />
Record mode Resolution<br />
Seconds of remaining recording<br />
time (sec.)<br />
16MB<br />
With sound Without sound<br />
SHQ 640 × 480 (15 frames/sec.) 17 sec. 17 sec.<br />
HQ 320 × 240 (15 frames/sec.) 46 sec. 48 sec.<br />
SQ 160 × 120 (15 frames/sec.) 186 sec. 211 sec.<br />
Note<br />
• The number of storable still pictures and remaining recording time<br />
listed in the table are approximate.<br />
• The number of storable still pictures may change according to the<br />
subject or factors like whether print reservations have been made or<br />
not. In certain instances, the number of remaining pictures does not<br />
change even when you take pictures or stored images are erased.<br />
• If movies are shot with VIDEO OUT set to PAL and the AV cable<br />
connected, the movie recording time will differ from the time listed in<br />
the Movie Record Modes table.<br />
Selecting a record mode<br />
Mode dial<br />
1 In the top menu, select MODE<br />
MENU � PICTURE � K, and<br />
press d.<br />
g“How to use the menus” (P.33)<br />
•If K is displayed on the top menu as a<br />
shortcut menu, press the arrow pad in<br />
the same direction as the arrow shown<br />
next to K.<br />
g“SHORT CUT” (P.140)<br />
Arrow pad<br />
OK button<br />
99<br />
6<br />
Adjusting the image quality and exposure
6<br />
Adjusting the image quality and exposure<br />
Record mode<br />
Mode dial<br />
In the top menu, press b to select K, and choose SHQ<br />
2288 × 1712, HQ 2288 × 1712, SQ1 1280 × 960 or SQ2 640 ×<br />
480. gGo to Step 4.<br />
Mode dial<br />
In the top menu, press b to select<br />
K, then press ac to select<br />
SHQ, HQ or SQ. gGo to Step 4.<br />
2 Press ac to select the desired<br />
record mode from TIFF, SHQ, HQ,<br />
SQ1 and SQ2, then press d.<br />
3 Press ac to select the<br />
resolution.<br />
If you selected SQ1 or SQ2, press<br />
d after selecting the resolution,<br />
then select HIGH or NORMAL by<br />
pressing ac.<br />
4 Press e.<br />
•Press e again to exit the menu.<br />
100<br />
DIGItAL ZOOM<br />
WB<br />
SHQ<br />
2288*1712<br />
2288*1520<br />
MODE MENU<br />
ENLARGE SIZE3200*2400<br />
CANCEL SELECt GO
ISO sensitivity<br />
The higher the ISO value, the greater the camera’s light sensitivity and the<br />
better its ability to shoot in low light conditions. However, higher values also<br />
introduce electrical noise into the resulting image, which may give them a<br />
grainy appearance.<br />
AUTO Sensitivity is automatically adjusted according to the<br />
light conditions and the subject brightness.<br />
64/100/200/400 With a lower ISO setting, you can shoot clear, sharp<br />
images in daylight. With a higher ISO setting, you can<br />
use faster shutter speeds with the same amount of<br />
light.<br />
Mode dial<br />
1 In the top menu, select MODE<br />
MENU � <strong>CAMERA</strong> � ISO, then<br />
choose the most suitable ISO<br />
sensitivity and press e.<br />
g“How to use the menus” (P.33)<br />
Note<br />
• AUTO is not available in p mode.<br />
•Press e again to exit the menu.<br />
Arrow pad<br />
OK button<br />
• Higher ISO settings produce more electrical noise.<br />
• When ISO is set to AUTO and you are shooting in dark conditions<br />
without a flash, the sensitivity automatically increases, otherwise the<br />
shutter speed will be reduced, possibly resulting in camera<br />
movement and blurred images.<br />
• If the subject is too far away for the flash illumination to reach when<br />
ISO is set to AUTO, the sensitivity is automatically increased.<br />
SEt CARD PIC <strong>CAMERA</strong><br />
ESP<br />
DRIVE<br />
ISO<br />
A/S/M<br />
AUtO<br />
64<br />
100<br />
200<br />
400<br />
101<br />
6<br />
Adjusting the image quality and exposure
6<br />
Adjusting the image quality and exposure<br />
Exposure compensation<br />
This function allows you to make fine changes to the present exposure setting<br />
using the arrow pad. In some situations, you may get better results when the<br />
exposure that the camera sets is compensated (adjusted) manually. You can<br />
adjust the exposure in the range of ±2.0 in 1/3 EV steps. When the setting is<br />
changed, you can check the result on the monitor or viewfinder.<br />
Mode dial<br />
1 Press bd to select a setting.<br />
• Adjust toward +: Press d to adjust<br />
up to +2.0 in 1/3 EV<br />
steps.<br />
• Adjust toward –: Press b to adjust<br />
up to -2.0 in 1/3 EV<br />
steps.<br />
Note<br />
102<br />
TIPS<br />
• Often bright subjects (such as snow) will turn out darker than their<br />
natural colors. Adjusting toward + makes these subjects closer to<br />
their real shades. For the same reason, adjust toward - when<br />
shooting dark subjects.<br />
• You can set the aperture by pressing bd in M mode. g“Manual<br />
shooting” (P.68)<br />
• If the flash is used, the image brightness (exposure) may differ from<br />
the intended brightness.<br />
• Exposure compensation cannot correct the image if the<br />
surroundings of the subject are extremely bright or dark.<br />
bd
White balance<br />
Color reproduction differs depending on the light conditions. For instance,<br />
when daylight, the setting sun or tungsten lighting are reflected on white<br />
paper, the shade of white produced will be slightly different for each. By<br />
setting the WB (white balance), you can achieve more natural-looking colors.<br />
Mode dial<br />
1 In the top menu, select MODE<br />
MENU � PICTURE � WB, and<br />
press d.<br />
g“How to use the menus” (P.33)<br />
Mode dial<br />
1 In the top menu, press c to<br />
select WB.<br />
2 Press ac to select AUTO,<br />
PRESET or V according to the<br />
shooting conditions.<br />
AUTO Press e. Press e again to exit the menu.<br />
PRESET Press d to display the next selection screen.<br />
g“Preset white balance” (P.104)<br />
V Press d to display the next selection screen.<br />
g“One-touch white balance” (P.104)<br />
Auto white balance<br />
SEt CARD PICtURE CAM<br />
Automatically adjusts the white balance for any light source.<br />
WB<br />
SHARPNESS<br />
CONtRASt<br />
Arrow pad<br />
OK button<br />
AUtO<br />
PRESEt<br />
During still picture shooting<br />
103<br />
6<br />
Adjusting the image quality and exposure
6<br />
Adjusting the image quality and exposure<br />
White balance<br />
Preset white balance<br />
Select a preset white balance setting according to the type of light. Press<br />
ac to select one of the following settings, then press e.<br />
Press e again to exit the menu.<br />
PRESEt WB<br />
5: For shooting on a sunny day.<br />
3: For shooting on a cloudy day.<br />
1: For shooting under a tungsten light.<br />
w: For shooting under a daylight<br />
fluorescent lamp. This type of lamp is<br />
used mainly in homes.<br />
CANCEL SELECt GO<br />
x: For shooting under a neutral white fluorescent lamp.<br />
This type of lamp is generally used in desk lamps, etc.<br />
y: For shooting under a cool white fluorescent lamp.<br />
This type of lamp is generally used in offices, etc.<br />
104<br />
TIPS<br />
• You can also preview different color tones by trying the different<br />
PRESET WB settings under the actual light source and checking the<br />
result on the monitor.<br />
One-touch white balance<br />
This function is useful when you need a more precise white balance than<br />
PRESET WB can provide. To set the optimum white balance for the shooting<br />
conditions, point the camera at a white object under the light source you want<br />
to use and adjust the white balance.<br />
1 Display V screen and point the<br />
camera at a sheet of white paper.<br />
• Position the paper so that it fills the screen,<br />
making sure there are no shadows.<br />
CANCEL<br />
GO
2 Press e.<br />
• The white balance is set and<br />
the screen returns to the<br />
mode menu.<br />
• To cancel one-touch white<br />
balance, press b.<br />
3 Press e repeatedly untill the menu disappears.<br />
Note<br />
e button<br />
HQ<br />
2288 1712<br />
White balance<br />
One-touch white balance<br />
• When setting the white balance by pointing the camera at a sheet of<br />
white paper, the correct setting may not be obtained if the light<br />
reflected by the paper is too bright or too dark.<br />
• White balance may not be effective under some special light<br />
sources.<br />
• After setting a white balance other than AUTO, play back the picture<br />
and check the colors on the monitor.<br />
• When the flash is fired with a white balance setting other than<br />
AUTO, colors may appear different in the resulting picture from the<br />
colors you see on the monitor.<br />
105<br />
6<br />
Adjusting the image quality and exposure
6<br />
Adjusting the image quality and exposure<br />
White balance<br />
White balance adjustment<br />
This function lets you make fine changes to the current white balance setting.<br />
Mode dial<br />
1 In the top menu, select MODE<br />
MENU � PICTURE � >, and<br />
press d.<br />
g“How to use the menus” (P.33)<br />
106<br />
• The white balance adjustment indicator<br />
appears on the screen.<br />
Arrow pad<br />
OK button<br />
2 The color becomes bluer each<br />
time you press a, and redder<br />
each time you press c, depending<br />
on the original white balance<br />
conditions. Press e to save your<br />
adjustment.<br />
• The white balance can be adjusted in 7<br />
increments in both red and blue directions.<br />
ADJUSt<br />
GO<br />
• After saving the adjustment, press e again to exit the menu.
SHARPNESS<br />
This function adjusts the sharpness of the image.<br />
1 In the top menu, select MODE<br />
MENU � PICTURE �<br />
SHARPNESS, and press d.<br />
g“How to use the menus” (P.33)<br />
2 Press ac to adjust the<br />
sharpness between +5 and -5.<br />
• To increase the sharpness (+) :<br />
Press a. The image<br />
contours are emphasized,<br />
making the image appear<br />
sharper and more vivid.<br />
Use this setting when you<br />
want to print pictures.<br />
• To reduce the sharpness (-) :<br />
Note<br />
Mode dial<br />
Press c. The image contours are softened. Use this<br />
setting when you want to edit images on a PC.<br />
• When you have finished setting the sharpness, press e. Press e<br />
again to exit the menu.<br />
SEt CARD PICtURE CAM<br />
Arrow pad<br />
OK button<br />
• If you adjust the sharpness too far toward +, noise may become<br />
conspicuous in the picture.<br />
WB<br />
SHARPNESS<br />
CONtRASt<br />
107<br />
6<br />
Adjusting the image quality and exposure
6<br />
Adjusting the image quality and exposure<br />
CONTRAST<br />
This function adjusts the contrast of images. For example, you can make<br />
images with marked differences in light and shadow softer, and those with<br />
less differences more vivid.<br />
Mode dial<br />
1 In the top menu, select MODE<br />
MENU � PICTURE � CONTRAST,<br />
and press d.<br />
g“How to use the menus” (P.33)<br />
2 Press ac to adjust the contrast<br />
between +5 and -5.<br />
• To increase the contrast (+) :<br />
Press a. The light and<br />
dark areas are defined<br />
more clearly, making the<br />
image look crisper.<br />
• To reduce the contrast (-) :<br />
108<br />
Arrow pad<br />
OK button<br />
Press c. The light and dark areas become less<br />
defined, giving the image a softer impression. Use this<br />
setting when you want to edit images on a PC.<br />
• When you have finished setting the contrast, press e. Press e again<br />
to exit the menu.<br />
SEt CARD PICtURE CAM<br />
WB<br />
SHARPNESS<br />
CONtRASt
SATURATION<br />
This function adjusts the color depth.<br />
Mode dial<br />
1 In the top menu, select MODE<br />
MENU � PICTURE �<br />
SATURATION, and press d.<br />
g“How to use the menus” (P.33)<br />
2 Press ac to adjust the<br />
saturation between +5 and -5.<br />
• To increase the saturation (+) :<br />
Press a. Colors become<br />
darker and more intense.<br />
• To reduce the saturation (-) :<br />
Press c. Colors become<br />
lighter.<br />
• When you have finished setting the saturation, press e. Press e<br />
again to exit the menu.<br />
SEt CARD PICtURE CAM<br />
SAtURAtION<br />
Arrow pad<br />
OK button<br />
109<br />
6<br />
Adjusting the image quality and exposure
6<br />
Adjusting the image quality and exposure<br />
NOISE REDUCTION<br />
This function reduces the noise that is generated during long exposures.<br />
When shooting night scenes, shutter speeds become slower and noise tends<br />
to appear on images. When noise reduction is set to ON, the camera<br />
automatically reduces noise to produce clearer images. However, shooting<br />
time is approximately twice as long as usual.<br />
Noise reduction can only be used when the shutter speed is set slower than 1/2 sec.<br />
Mode dial<br />
1 In the top menu, select MODE<br />
MENU � <strong>CAMERA</strong> � NOISE<br />
REDUCTION � ON or OFF, and<br />
press e.<br />
g“How to use the menus” (P.33)<br />
Note<br />
110<br />
Noise Reduction: OFF Noise Reduction: ON<br />
•Press e again to exit the menu.<br />
Arrow pad<br />
OK button<br />
• Noise reduction is always fixed to ON in the m mode.<br />
• When noise reduction is set to ON, the camera implements noisereducing<br />
processes after each shot to produce clearer images.<br />
However, shooting time is approximately twice as long as usual.<br />
During this time, the next shot cannot be taken.<br />
• When noise reduction is set to ON, sequential shooting (j, i,<br />
k, 7) and 2 IN 1 are not possible.<br />
• This function may not work effectively with some shooting conditions or subjects.<br />
• As the shutter speed is relatively slow, the use of a tripod is recommended.
Histogram display<br />
During shooting and playback of still pictures, you can display a histogram<br />
showing the brightness and contrast of your subject in the viewfinder or<br />
monitor.<br />
Checking the histogram enables precise exposure control when taking<br />
pictures.<br />
During playback, you can display a histogram showing the brightness and<br />
contrast of recorded pictures.<br />
The histogram display can be set separately for shooting mode and playback<br />
mode.<br />
Ex: When a histogram is displayed in P mode<br />
HQ<br />
When the image is bright When the image is dark<br />
HQ HQ<br />
If the peak fills<br />
too much of the<br />
right frame, the<br />
image will<br />
appear mostly<br />
white.<br />
The part indicated in<br />
green in the histogram<br />
shows the luminance<br />
distribution within the AF<br />
target mark.<br />
If the peak fills<br />
too much of the<br />
left frame, the<br />
image will<br />
appear mostly<br />
black.<br />
111<br />
6<br />
Adjusting the image quality and exposure
6<br />
Adjusting the image quality and exposure<br />
Histogram display<br />
1 In the top menu, select MODE<br />
MENU � <strong>CAMERA</strong> � u � ON or<br />
OFF, and press e.<br />
g“How to use the menus” (P.33)<br />
Note<br />
Mode dial<br />
Mode dial<br />
In the top menu, select MODE<br />
MENU � PLAY� u � ON or OFF,<br />
and press e.<br />
g“How to use the menus” (P.33)<br />
• When ON is selected, the histogram is<br />
displayed.<br />
•Press e again to exit the menu.<br />
112<br />
Arrow pad<br />
OK button<br />
'04.06.17 15:30<br />
Playback mode<br />
HQ<br />
• The histogram is not displayed in the following situations even if<br />
histogram display is set to ON.<br />
During M mode, panorama shooting, 2 IN 1 shooting, multimetering<br />
and self-portrait<br />
• The histogram displayed during shooting may differ from the<br />
histogram displayed during playback.<br />
• A histogram may not appear when you play back pictures shot on<br />
another camera.<br />
• A histogram is not displayed in n mode.
7 Playback<br />
Viewing still pictures<br />
1 Set the mode dial to q and press<br />
the power switch.<br />
g“Power on/off” (P.24)<br />
• The monitor turns on and displays the last<br />
picture taken. (Single-frame playback)<br />
2 Use the arrow pad to play back other pictures.<br />
Note<br />
Mode dial<br />
Displays the previous<br />
picture.<br />
Power switch<br />
Jumps to the picture 10 frames back.<br />
Jumps to the picture 10 frames ahead.<br />
Mode dial<br />
Arrow pad<br />
Displays the next<br />
picture.<br />
• If the camera is not used for over 3 minutes, the camera enters the<br />
sleep mode and the monitor turns off.<br />
113<br />
7<br />
Playback
7<br />
Playback<br />
Viewing still pictures<br />
QUICK VIEW<br />
This function lets you play back pictures while the camera is in the shooting<br />
mode. This is useful when you want to check shooting results and resume<br />
shooting quickly.<br />
Functions available in normal playback mode are also available in QUICK<br />
VIEW.<br />
Mode dial<br />
1 Press the QUICK VIEW button in<br />
the shooting mode.<br />
• The camera immediately enters the<br />
playback mode and displays the last<br />
picture taken. (Single-frame playback)<br />
2 Press the QUICK VIEW button again to return to the shooting<br />
mode.<br />
• You can also return to the shooting mode when the shutter button is<br />
gently pressed.<br />
114<br />
Shutter button
Close-up playback<br />
Pictures displayed on the monitor can be enlarged 1.5, 2, 2.5, 3, 3.5 or 4<br />
times.<br />
Mode dial<br />
1 Select the still picture you want to<br />
<strong>Zoom</strong> lever<br />
enlarge.<br />
g“Viewing still pictures” (P.113)<br />
• You cannot enlarge pictures with n.<br />
2 Pull the zoom lever toward T (U).<br />
• Each time you pull the zoom lever, the<br />
picture is enlarged gradually.<br />
• By using the arrow pad while the<br />
enlarged picture is displayed, you can<br />
shift the picture in the desired direction,<br />
enabling you to view a different portion.<br />
• To return the picture to the original size (1×), push the zoom lever<br />
toward W.<br />
'0 '04.06.17 17 15:30 30<br />
Note<br />
• Pictures cannot be stored in an enlarged state.<br />
115<br />
7<br />
Playback
7<br />
Playback<br />
Index display<br />
This function lets you show several pictures at the same time on the monitor.<br />
The number of pictures shown can be 4, 9 or 16. g“Selecting the number<br />
of pictures” (P.117)<br />
Mode dial<br />
1 In the single-frame playback mode,<br />
push the zoom lever toward W (G).<br />
g“Viewing still pictures” (P.113)<br />
• Use the arrow pad to select the picture.<br />
b : Moves to the previous frame.<br />
d : Moves to the next frame.<br />
a : Jumps to the previous index display<br />
(the frames before the top left frame).<br />
c : Jumps to the next index display (the<br />
frames following the bottom right<br />
frame).<br />
• To return to the single-frame playback, pull<br />
the zoom lever toward T.<br />
116<br />
<strong>Zoom</strong> lever
Selecting the number of pictures<br />
Index display<br />
This function lets you select the number of pictures in an index display from<br />
4, 9 and 16.<br />
Mode dial<br />
1 In the top menu, select MODE<br />
MENU � SETUP � G � 4, 9 or<br />
16, and press e.<br />
g“How to use the menus” (P.33)<br />
•Press e again to exit the menu.<br />
SEtUP CARD EDIt PLAY<br />
VIDEO OUt<br />
Arrow pad<br />
OK button<br />
4<br />
9<br />
16<br />
117<br />
7<br />
Playback
7<br />
Playback<br />
Slideshow<br />
This function displays still pictures stored in the card one after another. Only<br />
the first frame of movies is played back.<br />
1 Select a still picture, then press<br />
e to display the top menu.<br />
g“Viewing still pictures” (P.113)<br />
2 Press a to start the slideshow.<br />
3 Press e to stop the slideshow.<br />
• The slideshow will not stop until you<br />
cancel it by pressing e.<br />
Note<br />
Mode dial<br />
118<br />
a button<br />
e button<br />
INFO MODE MENU<br />
SWItCH FRAME<br />
'0 '04.06.17 17 15:30 30<br />
• You are recommended to use the optional AC adapter when running<br />
a slideshow for a long period of time. If batteries are used, the<br />
camera will enter the sleep mode after about 30 minutes and stop<br />
the slideshow automatically.
Viewing movies<br />
Mode dial<br />
1 Use the arrow pad to display the<br />
picture with n you want to play<br />
back.<br />
g“Viewing still pictures” (P.113)<br />
2 Press e.<br />
• The top menu is displayed.<br />
3 Press a to select MOVIE PLAY.<br />
4 Press ac to select MOVIE<br />
PLAYBACK, then press e.<br />
• The movie is played back. When playback<br />
ends, the display automatically returns to<br />
the beginning of the movie.<br />
• Fast forward/fast rewind functions are<br />
available during playback.<br />
d : Fast forward.Each press switches<br />
the speed between ×1, ×2 and ×20.<br />
Arrow pad<br />
OK button<br />
MOVIE PLAY<br />
INFO MODE MENU<br />
SWItCH FRAME<br />
MOVIE PLAY<br />
MOVIE PLAYBACK<br />
INDEX<br />
EDIt<br />
CANCEL SELECt GO<br />
b : Fast rewind.Each press switches the speed between ×1, ×2 and<br />
×20.<br />
119<br />
7<br />
Playback
7<br />
Playback<br />
Viewing movies<br />
•Press e again after playback ends to<br />
display the menu.<br />
MOVIE%PLAYBACK<br />
PLAYBACK Plays back the entire<br />
PLAYBACK<br />
movie again.<br />
FRAME BY FRAME<br />
FRAME%BY%FRAME<br />
Plays back the movie<br />
EXIt<br />
manually one frame at a<br />
time.<br />
SELECt GO<br />
EXIT Leaves the movie playback mode.<br />
Press ac to select PLAYBACK, FRAME BY FRAME or EXIT, then<br />
press e.<br />
�When FRAME BY FRAME is selected<br />
a : Displays the first frame of the movie.<br />
c : Displays the last frame of the movie.<br />
d : Displays the next frame. The movie can be played continuously by<br />
holding the button down.<br />
b : Displays the previous frame. The movie can be played continuously<br />
in reverse by holding the button down.<br />
e : Displays the MOVIE PLAYBACK menu.<br />
Note<br />
120<br />
TIPS<br />
• Movies can also be played back in the shooting mode using QUICK<br />
VIEW. g“QUICK VIEW” (P.114)<br />
• This camera cannot play back sound.<br />
• The card access lamp blinks while the camera is reading the movie<br />
from the card. Reading of movies may take considerable time. Do<br />
not open the battery compartment/card cover while the card access<br />
lamp is blinking, as this may cause not only the data on the card to<br />
be damaged, but may also render the card unusable.
Editing movies<br />
This function lets you create indexes as well as edit movies. However, you<br />
cannot edit movies of the following lengths:<br />
Movies without sound: Longer than approximately 20 seconds in SHQ<br />
mode, 70 seconds in HQ mode, or 300 seconds in<br />
SQ mode<br />
Movies with sound: Longer than approximately 20 seconds in SHQ<br />
mode, 70 seconds in HQ mode, or 300 seconds in<br />
SQ mode<br />
INDEX 9 frames extracted from a movie are displayed as an index to<br />
show the movie at a glance. Indexes can be stored on the card<br />
as a still picture.<br />
EDIT This function lets you erase parts of the movie that you do not<br />
want.<br />
Mode dial<br />
1 Use the arrow pad to select a<br />
picture with n.<br />
g“Viewing still pictures” (P.113)<br />
2 In the top menu, select MOVIE<br />
PLAY, then choose each item.<br />
g“How to use the menus” (P.33)<br />
• Select INDEX gP.121<br />
• Select EDIT gP.123<br />
INDEX - Creating an index<br />
3 Press ac to select INDEX, then<br />
press e.<br />
• When there is insufficient card memory, a<br />
warning screen appears and the display<br />
returns to the setting screen.<br />
Arrow pad<br />
OK button<br />
MOVIE PLAY<br />
INFO MODE MENU<br />
SWItCH FRAME<br />
MOVIE PLAY<br />
MOVIE PLAYBACK<br />
INDEX<br />
EDIt<br />
CANCEL SELECt GO<br />
121<br />
7<br />
Playback
7<br />
Playback<br />
Editing movies<br />
4 Use the arrow pad to select the first<br />
frame of the index and press e.<br />
a : Jumps to the first frame of the movie.<br />
c : Jumps to the last frame of the movie.<br />
d : Displays the next frame. The movie<br />
can be played continuously by<br />
holding the button down.<br />
b : Displays the previous frame. The<br />
movie can be played continuously in reverse by holding the button<br />
down.<br />
5 As in Step 4, use the arrow pad to<br />
GO<br />
select the last frame of the index<br />
and press e.<br />
6 Press ac to select OK, then<br />
press e.<br />
• The 9 frames extracted from the movie<br />
appear as an index display, then the<br />
camera returns to the playback mode. The<br />
index is stored as a new picture.<br />
• If you want to select different frames,<br />
select RESET and press e and repeat<br />
the procedure from Step 4.<br />
122<br />
• To quit the editing function, select CANCEL and press e.<br />
TIPS<br />
• The index is stored as a still picture in a different record mode from<br />
the original movie.<br />
Record mode<br />
when the movie was shot<br />
00:36 00:36<br />
SELECt<br />
00:00 00:36<br />
INDEX<br />
OK<br />
RESEt<br />
CANCEL<br />
GO<br />
GO<br />
Record mode<br />
when stored as an index<br />
SHQ SQ2 (1024 × 768 pixels: HIGH)<br />
HQ SQ2 (1024 × 768 pixels: HIGH)<br />
SQ SQ2 (640 × 480 pixels: HIGH)
Note<br />
Editing movies<br />
• The interval between the frames that are automatically picked out<br />
varies depending on the length of the movie.<br />
• An index consists of 9 frames.<br />
• You cannot create an index if there is insufficient memory space on<br />
the card.<br />
EDIT - Editing a movie<br />
3 Press ac to select EDIT, then<br />
press e.<br />
MOVIE PLAY<br />
MOVIE PLAYBACK<br />
INDEX<br />
EDIt<br />
CANCEL SELECt GO<br />
4 Use the arrow pad to select the first<br />
frame of the part you want to keep<br />
and press e.<br />
a : Jumps to the first frame of the movie.<br />
c : Jumps to the last frame of the movie.<br />
d : Displays the next frame. The movie<br />
can be played continuously by<br />
holding the button down.<br />
b : Displays the previous frame. The movie can be played<br />
continuously in reverse by holding the button down.<br />
5 As in Step 4, use the arrow pad to<br />
select the last frame of the part you<br />
want to keep and press e.<br />
00:36 00:36<br />
00:00<br />
GO<br />
GO<br />
00:36<br />
123<br />
7<br />
Playback
7<br />
Playback<br />
Editing movies<br />
6 Press ac to select OK, then<br />
press e.<br />
• If you want to select different frames,<br />
select RESET and press e and repeat<br />
the procedure from Step 4.<br />
• To quit the editing function, select<br />
CANCEL and press e.<br />
7 Press ac to select NEW FILE or<br />
OVERWRITE, then press e.<br />
NEW FILE Stores the edited movie as<br />
a new movie.<br />
OVERWRITE Stores the edited movie with<br />
the same name as the<br />
original. The original movie<br />
is not stored.<br />
Note<br />
124<br />
SELECt<br />
EDIt<br />
• The edited movie is stored and the screen returns to the playback<br />
mode.<br />
• You cannot edit movies with sound which were taken with another<br />
digital camera.<br />
• You cannot select NEW FILE if there is insufficient memory space<br />
on the card.<br />
• You cannot create an index or edit a movie when the movie is<br />
played back setting SWITCH FRAME to 0.<br />
OK<br />
RESEt<br />
CANCEL<br />
EDIt<br />
GO<br />
NEW FILE<br />
OVERWRItE<br />
CANCEL SELECt GO
Playback on a TV<br />
Use the AV cable provided with the camera to play back recorded images on<br />
your TV. You can play back both still pictures and movies on your TV. Sounds<br />
stored with an image are also played.<br />
1 Make sure that the TV and camera are turned off. Connect<br />
the A/V OUT jack on the camera to the Video input<br />
terminal on the TV using the AV cable.<br />
2 Turn the TV on and set it to the video input mode.<br />
• For details of switching to video input, refer to your TV’s instruction<br />
manual.<br />
3 Set the mode dial to q and turn the camera on.<br />
• The last picture taken is displayed on the TV. Use the arrow pad to<br />
select the picture you want to display.<br />
• The close-up playback, index display and slideshow functions can also<br />
be used on a TV screen.<br />
TIPS<br />
• You are recommended to use the optional AC adapter when using<br />
the camera with a TV.<br />
Note<br />
Mode dial<br />
Connect to the TV’s video input (yellow)<br />
and audio input (white) terminals.<br />
AV cable<br />
Connector cover<br />
A/V OUT jack (MONO)<br />
• Make sure that the camera’s video output signal type is the same as<br />
the TV’s video signal type. g“VIDEO OUT – Video output<br />
selection” (P.157)<br />
• The camera’s monitor or viewfinder turns off automatically when the<br />
AV cable is connected to the camera.<br />
• Be sure to use the AV cable provided to connect the camera to the TV.<br />
• The picture may appear off-center on the TV screen.<br />
125<br />
7<br />
Playback
7<br />
Playback<br />
Playback on a TV<br />
126<br />
• When pictures are compressed in order to fit the entire picture on the<br />
TV screen, a black frame appears around the picture. If the picture is<br />
output to a video printer via the TV, the black frame may be printed.<br />
Picture rotation<br />
Pictures taken with the camera held vertically are displayed horizontally. This<br />
function lets you turn such pictures 90 degrees counterclockwise or clockwise<br />
so that they are displayed vertically.<br />
Mode dial<br />
1 In the single-frame playback<br />
mode, press y.<br />
g“Viewing still pictures” (P.113)<br />
• Each pressing rotates the image in the<br />
following sequence: 90 degrees<br />
counterclockwise, 90 degrees clockwise,<br />
and back to the original.<br />
Note<br />
y Rotation button<br />
'0 '04.06. 6.17 17 15:30 30 '0 '04.06. 6.17 17 15:30 30<br />
'0 '04.06. 6.17 17 15:30 30<br />
• The following pictures cannot be rotated.<br />
Movies, protected pictures, pictures being played with 0,<br />
pictures that have been edited on a PC, and pictures taken with<br />
another camera.<br />
• New picture orientations are saved even when the power is turned off.
Recording sound<br />
Sound can be added to a still picture that you have already taken. (This is<br />
known as “after-recording”) You can also re-record over the sound that has<br />
already been recorded. Total recording time per picture is approximately 4<br />
seconds.<br />
Mode dial<br />
1 Use the arrow pad to select the<br />
still picture you want to add sound<br />
to.<br />
g“Viewing still pictures” (P.113)<br />
2 In the top menu, select MODE<br />
MENU � PLAY � R.<br />
g“How to use the menus” (P.33)<br />
3 Press d to display START.<br />
4 Turn the camera microphone<br />
toward the sound you want to<br />
record and press e to start<br />
recording.<br />
• The BUSY bar is displayed during recording.<br />
Note<br />
• If the microphone is placed farther than 1 m (3.3 ft.) from the subject,<br />
sound may not be recorded properly.<br />
• If you re-record the sound, the original sound is erased.<br />
• You may not be able to record sound when there is insufficient card<br />
memory (the “CARD FULL” message is displayed).<br />
• Sound recording may pick up camera noises, such as button<br />
operation or shutter movement.<br />
• Once sound is added to a picture, it is not possible to erase only the<br />
sound. In this case, make a re-recording with silence.<br />
• This camera cannot play back sound.<br />
SEt CARD EDIt PLAY<br />
Arrow pad<br />
OK button<br />
Microphone<br />
StARt<br />
127<br />
7<br />
Playback
7<br />
Playback<br />
Editing still pictures<br />
This function lets you edit still pictures and store them as new pictures. The<br />
following editing operations are possible.<br />
Resizing Q Changes the picture size to 640 × 480 or 320 × 240 and<br />
stores the picture as a new file.<br />
Trimming P Crops part of a picture and saves it as a new file.<br />
Mode dial<br />
1 Use the arrow pad to select the<br />
still picture you want to edit.<br />
g“Viewing still pictures” (P.113)<br />
2 In the top menu, select MODE<br />
MENU � EDIT, then choose each<br />
item.<br />
g“How to use the menus” (P.33)<br />
• Select Q gP.128<br />
• Select P gP.129<br />
Resizing<br />
3 Select Q, then press d.<br />
4 Press ac to select the picture<br />
size, then press e.<br />
• The BUSY bar is displayed during<br />
resizing. After the image is saved, the<br />
camera returns to the playback mode.<br />
• To quit the resizing function, select<br />
CANCEL, then press e.<br />
Note<br />
128<br />
<strong>Zoom</strong> lever<br />
Arrow pad<br />
OK button<br />
640*480<br />
320*240<br />
CANCEL<br />
EXIt SELECt GO<br />
• Resizing is not possible in the following cases.<br />
Movies, pictures that have been edited on a PC, or when there<br />
is insufficient memory space on the card.<br />
• If the size of the selected picture is 640 × 480, you cannot select<br />
640 × 480.
Trimming<br />
3 Select P, then press d.<br />
4 Press ac to select P, then<br />
press e.<br />
5 Use the arrow pad and zoom lever<br />
to decide the trimming position<br />
and size.<br />
•Press acbd to move the trimming<br />
frame.<br />
• Use the zoom lever to decide the trimming<br />
size. The trimming frame changes from<br />
horizontal to vertical and vice versa when<br />
the maximum or minimum size is reached.<br />
Editing still pictures<br />
CANCEL<br />
EXIt SELECt GO<br />
6 Press e.<br />
7 Press ac to select OK, then<br />
press e.<br />
• The BUSY bar is displayed during<br />
OK<br />
trimming. After the image is saved, the<br />
RESEt<br />
camera returns to the playback mode.<br />
• The trimmed picture is stored as a separate<br />
picture from the original.<br />
SELECt<br />
• If you want to trim the picture again, select<br />
RESET and press e and repeat the procedure from Step 5.<br />
• To quit the trimming function, select CANCEL and press e.<br />
GO<br />
GO<br />
CANCEL<br />
GO<br />
129<br />
7<br />
Playback
7<br />
Playback<br />
Editing still pictures<br />
Note<br />
130<br />
• Trimming is not possible in the following cases.<br />
Movies, when there is insufficient memory space on the card, or<br />
when the picture was taken with the record mode set to<br />
ENLARGE SIZE<br />
• It may not be possible to trim pictures taken with another camera.<br />
• If a trimmed picture is printed out, it may appear grainy.
Protecting pictures<br />
You are recommended to protect important pictures to avoid accidentally<br />
erasing them. You can play back only protected pictures. g“SWITCH<br />
FRAME – Playing back only protected pictures” (P.132)<br />
Protected pictures cannot be erased by the single-frame/all-frame erase<br />
function.<br />
Mode dial<br />
1 Use the arrow pad to display the<br />
picture you want to protect.<br />
g“Viewing still pictures” (P.113)<br />
2 Press 0.<br />
• To cancel protection, press 0 again.<br />
Note<br />
0 Protect button<br />
Arrow pad<br />
OK button<br />
'0 '04.06.17 17 15:30 30<br />
Displayed when a<br />
picture is protected.<br />
• Protected pictures cannot be erased by the single-frame/all-frame<br />
erase function, but they are all erased by formatting.<br />
131<br />
7<br />
Playback
7<br />
Playback<br />
SWITCH FRAME – Playing back<br />
only protected pictures<br />
You can play back only protected pictures.<br />
This can be used to separately manage pictures taken as a travel memo and<br />
separate those pictures you want to show to others.<br />
ALL All pictures are played back.<br />
0 Only protected pictures are played back.<br />
Mode dial<br />
1 In the top menu, select SWITCH<br />
FRAME � 0 , and press e.<br />
g“How to use the menus” (P.33)<br />
Note<br />
• Only protected pictures are played back.<br />
• When ALL is selected, all pictures<br />
stored in the card are played back.<br />
132<br />
Arrow pad<br />
OK button<br />
• Images selected from 0 and played back are protected and<br />
cannot be erased. To erase a picture, press 0 to cancel the<br />
protection setting, then select ALL and erase the desired picture.<br />
•If 0 is pressed during playback of a picture selected from 0, the<br />
protection setting for the displayed picture is canceled and the<br />
picture cannot be played back even by selecting 0.<br />
• If the card is formatted, all of the pictures on the card will be erased.<br />
• Images selected from 0 and played back cannot be rotated.<br />
g“Picture rotation” (P.126)
Erasing pictures<br />
This function erases recorded pictures. Pictures can be erased either one<br />
frame at a time or all the pictures in the card.<br />
Note<br />
• You cannot erase protected pictures. Cancel protection before<br />
erasing such pictures.<br />
• Pictures played back with 0 cannot be deleted.<br />
g“SWITCH FRAME – Playing back only protected pictures”<br />
(P.132)<br />
• Once erased, pictures cannot be restored. Check each picture<br />
before erasing to avoid accidentally erasing pictures you want to<br />
keep. g“Protecting pictures” (P.131)<br />
Single-frame erase<br />
Mode dial<br />
1 Use the arrow pad to display<br />
the picture you want to erase.<br />
g“Viewing still pictures” (P.113)<br />
2 Press S.<br />
• The S ERASE screen is displayed.<br />
3 Press ac to select YES, then<br />
press e.<br />
• The picture is erased and the menu is<br />
closed.<br />
S Erase button<br />
Arrow pad<br />
OK button<br />
ERASE<br />
YES<br />
NO<br />
SELECt GO<br />
133<br />
7<br />
Playback
7<br />
Playback<br />
Erasing pictures<br />
All-frame erase<br />
This function erases all the pictures on the card.<br />
Mode dial<br />
1 In the top menu, select MODE<br />
MENU � CARD � CARD SETUP<br />
and press d.<br />
g“How to use the menus” (P.33)<br />
2 Press ac to select R ALL<br />
ERASE, then press e.<br />
3 Press ac to select YES, then<br />
press e.<br />
• All the pictures are erased.<br />
134<br />
Arrow pad<br />
OK button<br />
CARD%SEtUP<br />
ALL%ERASE<br />
FORMAt<br />
CANCEL SELECt GO<br />
ALL%ERASE<br />
CAUtION ERASING%ALL<br />
YES<br />
NO<br />
SELECt GO
8 Useful functions<br />
ALL RESET - Saving the camera’s settings<br />
This function lets you choose whether or not to save the current camera<br />
settings after the power is turned off. The settings affected by ALL RESET are<br />
listed on the next page.<br />
The All Reset setting (ON/OFF) applies to all the modes. If ALL RESET is set<br />
to OFF in one shooting mode, this setting applies to all the other modes, both<br />
shooting and playback.<br />
ON All settings are returned to the factory default settings after the power<br />
is turned off. (Factory default settings)<br />
Example: If ALL RESET is set to ON and the record mode is changed<br />
to SQ1, the record mode returns to the default factory setting<br />
(HQ) when the camera is turned on again.<br />
OFF The settings made before the power is turned off are saved.<br />
Mode dial<br />
1 In the top menu, select MODE<br />
MENU � SETUP � ALL RESET �<br />
OFF or ON , and press e.<br />
g“How to use the menus” (P.33)<br />
Note<br />
•Press e again to exit the menu.<br />
Arrow pad<br />
OK button<br />
• MY MODE settings and the settings in the SETUP tab in the MODE<br />
MENU (ALL RESET, W, 8 etc.) are saved even when ALL<br />
RESET is set to ON.<br />
135<br />
8<br />
Useful functions
8<br />
Useful functions<br />
ALL RESET - Saving the camera’s settings<br />
�Functions that All Reset ON setting affects<br />
Function<br />
* This sets whether the monitor turns on or not when the camera is turned on.<br />
136<br />
Factory<br />
default<br />
setting<br />
Ref.<br />
Page<br />
Function<br />
Factory<br />
default<br />
setting<br />
Ref.<br />
Page<br />
F No F2.8 P.66 FULLTIME AF OFF P.71<br />
SHUTTER 1/1000 P.67 AF MODE iESP P.70<br />
F 0.0 P.102 FUNCTION OFF P.93<br />
FLASH MODE AUTO<br />
P.57<br />
INFO OFF<br />
P.148<br />
w 0.0 P.64 u OFF P.111<br />
AF/MF AF P.75 R (still pictures) OFF P.94<br />
Y OFF P.84 R (movies) OFF P.95<br />
LCD* ON (lights) — SUPER ZOOM OFF P.55<br />
OPTICAL ZOOM 38mm P.54 K HQ P.96<br />
ESP/5 ESP P.77 White balance AUTO P.103<br />
& OFF P.82 > None P.106<br />
DRIVE o P.85 SHARPNESS ±0 P.107<br />
BKT ±1.0,<br />
3 pictures<br />
P.86<br />
CONTRAST ±0<br />
P.108<br />
ISO AUTO/64 P.101 SATURATION ±0 P.109<br />
A/S/M A P.65 TIFF, SHQ, HQ 2288 × 1712 P.98<br />
#SLOW #SLOW1<br />
P.63<br />
SQ1 1280 × 960<br />
NORMAL<br />
P.98<br />
NOISE<br />
REDUCTION<br />
OFF<br />
P.110<br />
SQ2 640 × 480<br />
NORMAL<br />
P.98<br />
<strong>DIGITAL</strong> ZOOM OFF P.56 INFO OFF P.148
CUSTOM BUTTON<br />
Functions listed in the table below can be<br />
assigned to the custom button on the camera.<br />
This makes it easy to jump to frequently used<br />
functions simply by pressing the custom button<br />
without having to select a shortcut menu or<br />
MODE MENU from the top menu.<br />
x AE Lock/Custom button<br />
Available functions Settings<br />
Ref.<br />
Page<br />
AE LOCK (factory<br />
default setting)<br />
–<br />
P.80<br />
AF LOCK – P.73<br />
5 ESP, 5 P.77<br />
& OFF, &, % P.82<br />
DRIVE o, j, i, k, 7 P.85<br />
ISO AUTO, 64, 100, 200, 400 P.101<br />
A/S/M A, S, M P.65<br />
#SLOW #SLOW1, HSLOW1, #SLOW2 P.63<br />
NOISE REDUCTION OFF, ON P.110<br />
<strong>DIGITAL</strong> ZOOM OFF, ON P.56<br />
FULLTIME AF OFF, ON P.71<br />
AF MODE iESP, SPOT P.70<br />
FUNCTION OFF, BLACK & WHITE, SEPIA,<br />
WHITE BOARD, BLACK BOARD<br />
P.93<br />
INFO OFF, ON P.148<br />
u OFF, ON P.111<br />
K TIFF, SHQ, HQ, SQ1, SQ2 P.96<br />
WB AUTO,5, 3, 1, w, x, y P.103<br />
R (still pictures) OFF, ON P.94<br />
SUPER ZOOM OFF, ON P.55<br />
137<br />
8<br />
Useful functions
8<br />
Useful functions<br />
CUSTOM BUTTON<br />
Setting the custom button<br />
Mode dial<br />
1 In the top menu, select MODE<br />
MENU � SETUP � CUSTOM<br />
BUTTON, and press d.<br />
g“How to use the menus” (P.33)<br />
2 Press ac to select a function,<br />
then press e.<br />
•Press e again to exit the menu.<br />
138<br />
SELECt<br />
Arrow pad<br />
OK button<br />
CUStOM BUttON<br />
AE LOCK<br />
AF LOCK<br />
ESP<br />
GO
Using the custom button<br />
Mode dial<br />
1 Press x.<br />
• The monitor turns on and the function<br />
currently set to the custom button<br />
appears.<br />
Note<br />
Ex: When DRIVE is set on the custom button<br />
CUSTOM BUTTON<br />
x AE Lock/Custom button<br />
HQ 2288 1712<br />
Set by repeatedly<br />
pressing the<br />
button.<br />
HQ 2288 1712<br />
TIPS<br />
When ISO is set to the custom button but you want to use AE lock<br />
→ The AE lock function cannot be used when a different function is<br />
set to the custom button. Reset AE lock to the custom button by<br />
following “Setting the custom button” (P.138).<br />
• You cannot set the custom button separately in each mode.<br />
139<br />
8<br />
Useful functions
8<br />
Useful functions<br />
SHORT CUT<br />
You can set three shortcut menus (A, B, C) on the top menu in a still picture<br />
shooting mode (except h).<br />
This is useful when you want to go quickly to frequently used functions.<br />
Functions that can be set<br />
in the shortcut menu<br />
140<br />
B<br />
ESP A<br />
Top menu<br />
MODE MENU<br />
C<br />
Ref.<br />
Page<br />
Default setting<br />
A: ESP/5<br />
B: K<br />
C: &<br />
Functions that can be set<br />
in the shortcut menu<br />
Ref.<br />
Page<br />
ESP/5 P.77 PANORAMA P.89<br />
& P.82 2 IN 1 P.91<br />
DRIVE P.85 FUNCTION P.93<br />
ISO P.101 AF AREA P.72<br />
A/S/M P.65 INFO P.148<br />
r1/2/3/4 P.69 u P.111<br />
w P.64 K P.96<br />
#SLOW P.63 WB P.103<br />
NOISE REDUCTION P.110 > P.106<br />
<strong>DIGITAL</strong> ZOOM P.56 SHARPNESS P.107<br />
FULLTIME AF P.71 CONTRAST P.108<br />
AF MODE P.70 SATURATION P.109<br />
o P.88 R (still pictures) P.94<br />
SUPER ZOOM P.55
Setting the shortcut menu<br />
You can set the three shortcut menus<br />
designated by A, B and C on the diagram shown<br />
right.<br />
Mode dial<br />
1 In the top menu, select MODE<br />
MENU � SETUP � SHORT CUT,<br />
and press d.<br />
g“How to use the menus” (P.33)<br />
2 Press ac to select A, B or C,<br />
then press d.<br />
3 Press ac to select a function,<br />
then press e.<br />
• The shortcut menu is set.<br />
•Press e again to exit the menu.<br />
SELECt<br />
SHORT CUT<br />
MODE MENU<br />
Arrow pad<br />
OK button<br />
SHORt CUt<br />
A<br />
B<br />
C<br />
ESP<br />
GO<br />
SHORt CUt<br />
A ESP<br />
B<br />
C DRIVE<br />
ISO<br />
SELECt<br />
GO<br />
141<br />
8<br />
Useful functions
8<br />
Useful functions<br />
SHORT CUT<br />
Using the shortcut menu<br />
When you have set a shortcut menu, you can use it to jump to the setting<br />
screen for that function.<br />
1 Press e to display the top menu.<br />
• The shortcut menu you have set appears<br />
on the top menu.<br />
2 Press a b or c to select the<br />
shortcut menu.<br />
• The monitor jumps directly to the setting<br />
screen for that function.<br />
Note<br />
Mode dial<br />
Ex: When > is set in shortcut menu A<br />
Top menu<br />
Press e<br />
142<br />
AF MODE MODE MENU<br />
ISO<br />
Pressing a takes you<br />
directly to > screen.<br />
Arrow pad<br />
OK button<br />
AF MODE MODE MENU<br />
ADJUSt<br />
ISO<br />
• You cannot set the custom button separately in each mode.<br />
GO
MY MODE SETUP<br />
You can set shooting-related functions in MY MODE. When the camera is in<br />
P, A, S or M mode, you can also save the current settings in MY MODE.<br />
When the mode dial is set to r, your customized settings are activated. You<br />
can save up to 4 different settings in MY MODE 1 to 4. Only MY MODE 1 has<br />
a factory default setting.ì<br />
�Functions affected by MY MODE SETUP<br />
Functions that<br />
can be set in<br />
MY MODE<br />
Default<br />
setting<br />
Ref.<br />
Page<br />
Functions that<br />
can be set in<br />
MY MODE<br />
Default<br />
setting<br />
Ref.<br />
Page<br />
P/A/S/M/S-Prg P P.43 <strong>DIGITAL</strong> ZOOM OFF P.56<br />
FNo F 2.8 P.66 FULLTIME AF OFF P.71<br />
SHUTTER 1/1000 P.67 AF MODE iESP P.70<br />
F 0.0 P.102 o OFF P.88<br />
LCD *<br />
*1 This will set the monitor to ON or OFF when the camera is turned on.<br />
*2 In the r mode, available zoom positions are 38mm/50mm/100mm/200mm<br />
and 380mm (these numbers are based on the focal length of a 35mm<br />
camera).<br />
1<br />
ON — PANORAMA OFF P.89<br />
ZOOM * 2<br />
38mm — 2 IN 1 OFF P.91<br />
FLASH MODE AUTO P.57 FUNCTION OFF P.93<br />
Y OFF P.84 INFO OFF P.148<br />
AF/MF AF P.75 u OFF P.111<br />
ESP/5 ESP P.77 K HQ P.96<br />
& OFF P.82 WB AUTO P.103<br />
DRIVE o P.85 > None P.106<br />
ISO AUTO P.101 SHARPNESS ±0 P.107<br />
w 0.0 P.64 CONTRAST ±0 P.108<br />
#SLOW #SLOW1 P.63 SATURATION ±0 P.109<br />
NOISE<br />
REDUCTION<br />
OFF P.110 R (still pictures) OFF P.94<br />
SUPER ZOOM OFF P.55<br />
143<br />
8<br />
Useful functions
8<br />
Useful functions<br />
MY MODE SETUP<br />
Mode dial<br />
1 In the top menu, select MODE<br />
MENU � SETUP � MY MODE<br />
SETUP, and press d.<br />
g“How to use the menus” (P.33)<br />
2 Press ac to select the type of<br />
setting, then press d.<br />
CURRENT Saves the current camera<br />
settings.<br />
RESET Restores the factory default<br />
settings.<br />
CUSTOM Saves settings one by one.<br />
• The MY MODE SETUP screen appears.<br />
3 Select a MY MODE number.<br />
•Press ac to select MY MODE number<br />
from 1 to 4, then press e.<br />
�When selecting CURRENT in Step 2<br />
4 Press ac to select SET, then<br />
press e.<br />
• The current camera settings are saved in<br />
the selected MY MODE.<br />
144<br />
SEtUP CARD EDIt PLAY<br />
MY MODE SEtUP<br />
FILE NAME<br />
PIXEL MAPPING<br />
Arrow pad<br />
OK button<br />
CURRENt<br />
RESEt<br />
CUStOM<br />
MY MODE1<br />
MY MODE2<br />
MY MODE3<br />
MY MODE4<br />
CANCEL SELECt GO<br />
MY MODE SEtUP<br />
SEt CURRENt SEttING<br />
SEt<br />
CANCEL<br />
SELECt<br />
GO
�When selecting RESET in Step 2<br />
4 Press ac to select ALL RESET,<br />
then press e.<br />
• The settings in the selected MY MODE are<br />
reset.<br />
If no settings are saved, MY MODE<br />
settings cannot be selected.<br />
�When selecting CUSTOM in Step 2<br />
4 Press ac to select the item you<br />
want to save in MY MODE, then<br />
press d.<br />
• For the available items, see “Functions<br />
affected by MY MODE SETUP” (P.143).<br />
Press ac to change the setting,<br />
then press e.<br />
• The setting is saved.<br />
• You can also change the other custom<br />
settings.<br />
5 When you have made all the<br />
settings you want, press e.<br />
• The screen displayed in Step 2 appears.<br />
•Press e again to exit the menu.<br />
Note<br />
SELECt<br />
MY MODE SETUP<br />
MY MODE SEtUP<br />
RESEt CURRENt SEttING<br />
ALL RESEt<br />
CANCEL<br />
• Although the settings you are using can be saved, the zoom position<br />
you are currently using may not be saved. The zoom position will be<br />
the closest of the 5 zoom settings in MY MODE to the position<br />
currently being used.<br />
GO<br />
MY MODE SEtUP<br />
P/A/S/M/S-Prg M<br />
FNo F2.8<br />
SHUttER 1/1000<br />
LCD<br />
OFF<br />
MY MODE SEtUP<br />
P/A/S/M/S-Prg<br />
FNo FNo F2.8<br />
SHUttER<br />
LCD<br />
145<br />
8<br />
Useful functions
8<br />
Useful functions<br />
CARD SETUP – Formatting cards<br />
This function lets you format a card. Formatting prepares cards to receive<br />
data. Before using non-Olympus cards or cards which have been formatted<br />
on a PC, you must format them with this camera.<br />
All existing data, including protected pictures, are erased when the card<br />
is formatted. Make sure that you save or transfer important data to a PC<br />
before formatting a card.<br />
Mode dial<br />
1 In the top menu, select MODE<br />
MENU � CARD � CARD SETUP,<br />
and press d.<br />
g“How to use the menus” (P.33)<br />
146<br />
• The I FORMAT screen is displayed.<br />
Mode dial<br />
In the top menu, press d to select CARD SETUP.<br />
Mode dial<br />
Arrow pad<br />
OK button<br />
In the top menu, select MODE MENU � CARD � CARD<br />
SETUP, and press d. Press ac to select I FORMAT,<br />
then press e.<br />
g“How to use the menus” (P.33)
2 Press a to select YES, then press<br />
e.<br />
• The BUSY bar is displayed and the card is<br />
formatted.<br />
Note<br />
CARD SETUP – Formatting cards<br />
CAUtION ERASING%ALL<br />
• Never do the following during formatting, as they may cause the<br />
card to malfunction.<br />
Open the battery compartment/card cover. Remove the battery.<br />
Connect or disconnect the AC adapter.<br />
NO<br />
SELECt GO<br />
BUSY<br />
FORMAt<br />
YES<br />
147<br />
8<br />
Useful functions
8<br />
Useful functions<br />
Information display<br />
This function lets you display detailed shooting information on the monitor for<br />
approx. 3 seconds in the playback mode. For details of the information<br />
displayed, see “Viewfinder and monitor indications” (P.12).<br />
Mode dial<br />
1 In the top menu, select MODE<br />
MENU � <strong>CAMERA</strong> � INFO � ON<br />
or OFF, and press e.<br />
g“How to use the menus” (P.33)<br />
Note<br />
Mode dial<br />
Arrow pad<br />
Pressing b in the top menu<br />
displays the full amount of<br />
OK button<br />
shooting information on the<br />
monitor (ON).<br />
• To turn INFO off, press e to display the top menu and press b again.<br />
148<br />
Ex. Playback mode<br />
HQ<br />
2288*1712<br />
0.0<br />
'04.06.17 15:30<br />
'0 '04.06. 6.17 17 15:30 30<br />
When INFO is ON When INFO is OFF<br />
HQ<br />
• If the picture has been taken with a different camera, setting INFO<br />
to ON in q mode may still not display all the information.<br />
•If u is set, the histogram is displayed regardless of whether INFO<br />
is set to ON or OFF.<br />
• If you are using a print service without DPOF, the specified file<br />
numbers are displayed when INFO is set to ON in q mode.<br />
g“How to print pictures” (P.158)
Monitor/viewfinder brightness adjustment<br />
This function lets you adjust the brightness of the monitor and viewfinder<br />
respectively.<br />
Mode dial<br />
1 In the top menu, select MODE<br />
MENU � SETUP � s, and press<br />
d.<br />
g“How to use the menus” (P.33)<br />
2 Press ac to adjust the<br />
brightness while looking in the<br />
monitor or viewfinder, and when<br />
you have set the desired level,<br />
press e.<br />
•Pressing a brightens the monitor or<br />
viewfinder, and pressing c darkens it.<br />
•Press e again to exit the menu.<br />
Arrow pad<br />
OK button<br />
ADJUSt GO<br />
149<br />
8<br />
Useful functions
8<br />
Useful functions<br />
REC VIEW<br />
You can choose whether or not to display the picture you have just taken on<br />
the monitor.<br />
ON The picture being recorded to the card is displayed. This is useful for<br />
making a brief check of the picture you have just taken. Pressing the<br />
shutter button halfway during Rec View lets you resume shooting<br />
immediately.<br />
OFF The picture being recorded to the card is not displayed. This is<br />
useful when you want to prepare for your next shot while the<br />
previous picture is being recorded.<br />
Mode dial<br />
1 In the top menu, select MODE<br />
MENU � SETUP � REC VIEW �<br />
OFF or ON, and press e.<br />
g“How to use the menus” (P.33)<br />
150<br />
•Press e again to exit the menu.<br />
Arrow pad<br />
OK button
SLEEP - Sleep Timer<br />
The camera automatically enters the sleep mode and stops the operation<br />
when the preset time has elapsed with no operations performed. The camera<br />
activates again as soon as you touch the shutter button or arrow pad.<br />
Mode dial<br />
1 In the top menu, select MODE<br />
MENU � SETUP � SLEEP � 30<br />
SEC, 1 MIN, 3 MIN, 5 MIN or 10<br />
MIN, and press e.<br />
g“How to use the menus” (P.33)<br />
Note<br />
• Press e again to exit the menu.<br />
Arrow pad<br />
OK button<br />
• The sleep mode is not activated when using the AC adapter.<br />
•In q mode, the sleep mode is activated after 3 minutes regardless<br />
of the setting and the monitor turns off.<br />
• If a slideshow lasts more than 30 minutes, the camera automatically<br />
enters the sleep mode and the monitor turns off.<br />
151<br />
8<br />
Useful functions
8<br />
Useful functions<br />
Beep<br />
You can turn off the beep sound for button operations and warnings.<br />
Mode dial<br />
1 In the top menu, select MODE<br />
MENU � SETUP � 8 � OFF or<br />
ON, and press e.<br />
g“How to use the menus” (P.33)<br />
152<br />
•Press e again to exit the menu.<br />
You can set your favorite picture to be displayed when the power is turned on<br />
and off. It is also possible to register your favorite picture. g“SCREEN<br />
SETUP” (P.153)<br />
OFF No picture is displayed.<br />
1 Factory default setting<br />
2 Selects a picture already registered. If there is no picture registered,<br />
nothing is displayed when the power is turned on or off.<br />
Mode dial<br />
1 In the top menu, select MODE<br />
MENU � SETUP � PW ON/OFF<br />
SETUP � OFF, 1 or 2, and press<br />
e.<br />
g“How to use the menus” (P.33)<br />
•Press e again to exit the menu.<br />
Arrow pad<br />
OK button<br />
POWER ON/OFF SETUP – Power on/off display setting<br />
Arrow pad<br />
OK button
SCREEN SETUP<br />
You can register your favorite picture to be displayed when the power is<br />
turned on and off. The desired picture can be registered from the card. Make<br />
the POWER ON/OFF SETUP to display the registered picture.<br />
g“POWER ON/OFF SETUP – Power on/off display setting” (P.152)<br />
Mode dial<br />
1 In the top menu, select MODE<br />
MENU � SETUP � SCREEN<br />
SETUP, and press d.<br />
g“How to use the menus” (P.33)<br />
• If a picture is already registered, the<br />
IMAGE EXISTING screen is displayed<br />
asking if you want to cancel the currently<br />
registered picture and register a new<br />
one. To register a new picture, select<br />
RESET and press e. If you select<br />
KEEP, the screen returns to the menu.<br />
Arrow pad<br />
OK button<br />
SCREEN SEtUP<br />
IMAGE EXIStING<br />
RESEt<br />
KEEP<br />
CANCEL SELECt GO<br />
2 Select the picture you want to register using the arrow pad<br />
and press e.<br />
3 Press ac to select OK, then<br />
press e.<br />
• The picture is registered and the screen<br />
SEt AS PW<br />
returns to the menu.<br />
OK<br />
•Press e again to exit the menu.<br />
ON SCREEN SEtUP<br />
/ OFF SCREEN<br />
Note<br />
CANCEL<br />
CANCEL<br />
SELECt GO<br />
• You cannot register pictures and movie frames that cannot be<br />
played back on this camera.<br />
153<br />
8<br />
Useful functions
8<br />
Useful functions<br />
FILE NAME<br />
The camera automatically creates file names and folder names for images to<br />
be stored in. Files can be numbered from 0001 to 9999 and folders can be<br />
numbered from 100 to 999. Examples are shown below.<br />
There are two settings from which you can choose: RESET or AUTO. Choose<br />
the one that is best for you when transferring images to a PC.<br />
File name settings<br />
RESET The file number and folder number are reset every time a new card<br />
is inserted in the camera. The folder number returns to No. 100<br />
and the file number returns to No. 0001. This method is useful<br />
when grouping files on separate cards.<br />
AUTO Even if a new card is inserted, the folder number and file number<br />
are retained from the previous card, so the same file number is not<br />
used on different cards. This helps you to manage multiple cards.<br />
This method is useful when you want to manage all your files with<br />
sequential numbers.<br />
Mode dial<br />
1 In the top menu, select MODE<br />
MENU � SETUP � FILE NAME �<br />
RESET or AUTO, and press e.<br />
g“How to use the menus” (P.33)<br />
154<br />
Folder name<br />
\DCIM\***OLYMP\Pmdd****.jpg<br />
Folder No.<br />
(100 – 999)<br />
•Press e again to exit the menu.<br />
File name<br />
Month (1 – C) File No.<br />
(0001 – 9999)<br />
Day (01 – 31)<br />
• Month: Jan. – Sep. = 1 – 9, Oct. = A, Nov. = B, Dec. = C<br />
Arrow pad<br />
OK button
Note<br />
PIXEL MAPPING<br />
• When the File No. reaches 9999, the file number returns to 0001<br />
and the folder number changes.<br />
• When both the Folder and File No. reach their respective maximum<br />
number (999/9999), the number of storable pictures becomes 0<br />
even if the card is not full. No more pictures can be taken. Replace<br />
the card with a new one.<br />
PIXEL MAPPING<br />
The Pixel Mapping feature allows the camera to check and adjust the CCD<br />
and image processing functions. It is not necessary to operate this function<br />
frequently. Approximately once a year is recommended. Wait at least one<br />
minute after taking or viewing pictures to allow for proper performance of the<br />
Pixel Mapping function.<br />
Mode dial<br />
1 In the top menu, select MODE<br />
MENU � SETUP � PIXEL<br />
MAPPING, and press d.<br />
g“How to use the menus” (P.33)<br />
• START appears.<br />
2 Press e.<br />
Note<br />
• The BUSY bar is displayed during Pixel<br />
Mapping. When Pixel Mapping is finished,<br />
the screen returns to the mode menu.<br />
BUSY<br />
Arrow pad<br />
OK button<br />
• If you accidentally turn the camera off during Pixel Mapping, start<br />
again from Step 1.<br />
155<br />
8<br />
Useful functions
8<br />
Useful functions<br />
Measurement units<br />
The measurement unit can be selected from either meters or feet in the<br />
manual focus mode.<br />
m At long ranges, the camera measures in meters, and at shorts ranges<br />
in centimeters.<br />
ft At long ranges, the camera measures in feet, and at short ranges in<br />
inches.<br />
Mode dial<br />
1 In the top menu, select MODE<br />
MENU � SETUP � m/ft � m or ft,<br />
and press e.<br />
g“How to use the menus” (P.33)<br />
156<br />
•Press e again to exit the menu.<br />
Arrow pad<br />
OK button
VIDEO OUT – Video output selection<br />
You can select NTSC or PAL according to your TV’s video signal type. When<br />
playing back pictures while connected to a TV in a foreign country, be sure to<br />
set the VIDEO OUT setting accordingly. Select the video signal type before<br />
connecting the AV cable. If you select the wrong video signal type, you will<br />
not be able to play back the recorded pictures properly on the TV.<br />
Mode dial<br />
1 In the top menu, select MODE<br />
MENU � SETUP � VIDEO OUT �<br />
NTSC or PAL, and press e.<br />
g“How to use the menus” (P.33)<br />
•Press e again to exit the menu.<br />
Arrow pad<br />
OK button<br />
TIPS<br />
TV video signal types & main regions<br />
Check the video signal type before connecting the camera.<br />
NTSC Japan, Taiwan, Korea, North America<br />
PAL European countries, China<br />
157<br />
8<br />
Useful functions
9<br />
Print setting (DPOF)<br />
9 Print setting (DPOF)<br />
How to print pictures<br />
Print reservation allows you to save printing data (the number of prints and<br />
the date/time information) with the pictures stored on the card.<br />
With print reservation, you can print out pictures easily either at home using<br />
a personal DPOF-compatible printer or at a print shop that supports DPOF.<br />
DPOF is a standard format used to record automatic print information from<br />
digital cameras. You can print out pictures automatically, at home or in a print<br />
shop, by storing such data as which pictures you wish to print and the number<br />
of prints on a card.<br />
Pictures taken with print reservation can be printed using the following<br />
procedures.<br />
Printing using a DPOF-compatible print shop.<br />
You can print the pictures using the print reservation data.<br />
Printing using a DPOF-compatible printer.<br />
Printing is possible directly from a card containing print reservation data<br />
without using a PC. For more details, refer to the printer’s instruction manual.<br />
A PC card adapter may also be necessary.<br />
158
Note<br />
How to print pictures<br />
TIPS<br />
Picture size and printing<br />
The resolution of a computer/printer is generally based on the number<br />
of dots (pixels) per square inch. This is called dpi (dots per inch). The<br />
higher the dpi value, the better the printed results. Keep in mind,<br />
however, that the dpi of the picture does not change. This means that<br />
when you print an image with a higher resolution, the size of the<br />
printed picture will be smaller. Although you can print magnified<br />
images, picture quality will decrease.<br />
If you want to print large, high-quality pictures, set the record mode as<br />
high as possible when taking the pictures.<br />
g“Record mode” (P.96)<br />
• DPOF reservations set by another device cannot be changed by this<br />
camera. Make changes using the original device.<br />
• If a card contains DPOF reservations set by another device,<br />
entering reservations using this camera may overwrite the previous<br />
reservations.<br />
• If there is not enough space in the card memory, you may not be<br />
able to enter the reservation data. CARD FULL will be displayed.<br />
• You can make DPOF print reservations for up to 999 images per<br />
card.<br />
• Even if an image appears with the message “PICTURE ERROR”, it<br />
may be possible to make print reservations. In this case, the print<br />
reservation icon (
9<br />
Print setting (DPOF)<br />
All-frame reservation<br />
Use this feature to print all the pictures stored on the card. Select the desired<br />
number of prints and whether you want the date and time included.<br />
Mode dial<br />
1 Play back a still picture.<br />
g“Viewing still pictures” (P.113)<br />
• You cannot make the print reservation for<br />
pictures with n.<br />
2 In the top menu, select MODE<br />
MENU � PLAY �
5 Perform each setting as illustrated.<br />
SELECt<br />
*<br />
Select
9<br />
Print setting (DPOF)<br />
Single-frame reservation<br />
Use this feature to print only selected pictures. Display the picture to be<br />
printed and select the desired number of prints.<br />
Mode dial<br />
1 Play back a still picture.<br />
g“Viewing still pictures” (P.113)<br />
• You cannot make the print reservation for<br />
pictures with n.<br />
2 In the top menu, select MODE<br />
MENU � PLAY �
5 Select the appropriate item using<br />
the arrow pad.<br />
MORE Sets the number of prints,<br />
date/time and trim size.<br />
The print reservation data is<br />
set and the screen proceeds<br />
to Step 6.<br />
SINGLE PRINT Sets single-frame print. The<br />
Single-frame reservation<br />
date/time and trimming settings are not available.<br />
→ Go to Step 9.<br />
CANCEL Cancels the print reservation for the displayed picture.<br />
g“Resetting print reservation data” (P.167)<br />
END Completes the print reservation. → Go to Step 11.<br />
6 Press ac to select
9<br />
Print setting (DPOF)<br />
Single-frame reservation<br />
�Trim the picture<br />
g“Trimming” (P.165)<br />
8 After setting the number of prints<br />
and date/time printing data and<br />
trimming the picture, press e to<br />
complete the print reservations and<br />
return to the screen in Step 4.<br />
• The < icon appears on the displayed<br />
picture.<br />
• Repeat Steps 4 to 8 to make print reservations for other images.<br />
9 Press e to display the singleframe<br />
reservation menu.<br />
SINGLE PRINt<br />
10 Press b to select END.<br />
END MORE<br />
• The < PRINT ORDER screen appears.<br />
CANCEL<br />
11 Press b again to display the < PRINT ORDER SETTING<br />
screen, then press b once more to complete the print<br />
reservations.<br />
164<br />
2<br />
HQ<br />
'04.06.10 12:30 16<br />
SELECt<br />
GO
Trimming<br />
This function enables you to crop part of a recorded picture and print out the<br />
enlarged section only.<br />
Mode dial<br />
1 Press ac on the single-frame reservation screen to<br />
select P (trimming) and press d.<br />
g“Single-frame reservation” (P.162)<br />
• If trimming has already been set, the P<br />
screen appears. Press ac to select<br />
RESET, then press e.<br />
2 Use the arrow pad and zoom lever<br />
to decide the trimming position<br />
and size.<br />
•Press acbd to move the trimming<br />
frame.<br />
• Use the zoom lever to decide the<br />
trimming size. The trimming frame<br />
changes from horizontal to vertical and<br />
vice versa when the maximum or<br />
minimum size is reached.<br />
3 Press e.<br />
SELECt<br />
OK<br />
RESEt<br />
CANCEL<br />
GO<br />
<strong>Zoom</strong> lever<br />
Arrow pad<br />
OK button<br />
GO<br />
165<br />
9<br />
Print setting (DPOF)
9<br />
Print setting (DPOF)<br />
Trimming<br />
4 Press ac to select OK, then<br />
press e.<br />
OK Saves the current trimming size<br />
OK<br />
and returns to the single-frame<br />
RESEt<br />
reservation screen.<br />
CANCEL<br />
RESET Sets a new trimming size.<br />
→ Go to Step 2.<br />
SELECt<br />
GO<br />
CANCEL Cancels the current trimming<br />
setting and returns to the single-frame reservation screen.<br />
5 Press e to complete the print reservations and return to<br />
the picture selection screen. Press e again.<br />
6 Press b to select END.<br />
• The < PRINT ORDER screen appears.<br />
•Press b repeatedly until the playback<br />
SINGLE PRINt<br />
screen appears.<br />
END MORE<br />
Note<br />
166<br />
CANCEL<br />
• The size of the printed picture varies depending on the printer<br />
settings. If the trimmed picture size is small, printing magnification<br />
increases accordingly, resulting in a printed picture with lower<br />
resolution.<br />
• For best results with trimmed pictures, you are recommended to use<br />
the TIFF, SHQ or HQ mode.<br />
• The original picture is not trimmed. If your printer does not have the<br />
trimming function, the picture will be printed untrimmed.<br />
• Do not rotate pictures that have been trimmed, otherwise the<br />
cropped area will change.<br />
• If images recorded in 3:2 are trimmed, the ratio is fixed at 4:3.
Resetting print reservation data<br />
This function allows you to reset the print reservation data for pictures stored<br />
on the card.<br />
You can reset all the print reservation data or just for selected pictures.<br />
�To reset the print reservation data for all the pictures<br />
Mode dial<br />
1 In the top menu, select MODE<br />
MENU � PLAY �
9<br />
Print setting (DPOF)<br />
Resetting print reservation data<br />
�To reset the print reservation data for a selected picture<br />
Mode dial<br />
1 In the top menu, select MODE MENU � PLAY �
10 Direct printing (PictBridge)<br />
Using the direct printing function<br />
By connecting the camera to a PictBridge-compatible printer with the USB<br />
cable, you can print out recorded pictures directly. With the camera<br />
connected to the printer, select the pictures you want to print and the number<br />
of prints on the camera’s monitor. It is also possible to print out pictures using<br />
the print reservation data. g“Print setting (DPOF)” (P.158)<br />
To find out if your printer is compatible with PictBridge, refer to the printer’s<br />
instruction manual.<br />
What is PictBridge? … It is the standard for connecting digital cameras and<br />
printers of different makers and printing out pictures directly.<br />
< STANDARD … All printers that support PictBridge have standard print<br />
settings. Selecting < STANDARD on the settings screens (g P.174 to<br />
180), images are printed according to this settings. See the instruction<br />
manual for your printer for its standard settings or inquire with the printer<br />
manufacturers.<br />
TIPS<br />
• For details of printing paper types, ink cassettes, etc., refer to the<br />
printer’s instruction manual.<br />
Note<br />
• You are recommended to use the optional AC adapter when printing<br />
pictures. If you use the battery, make sure that it is fully charged. If<br />
the camera stops operating while communicating with the printer,<br />
the printer may malfunction or image data may be lost.<br />
• Images recorded in movie mode cannot be printed.<br />
• The camera will not enter sleep mode when connected to the USB<br />
cable.<br />
169<br />
Direct printing (PictBridge)<br />
10
10<br />
Direct printing (PictBridge)<br />
Connecting the camera to a printer<br />
Use the USB cable provided to connect the camera to a PictBridgecompatible<br />
printer.<br />
1 Turn the printer on and plug the<br />
printer end of the USB cable into<br />
the printer’s USB port.<br />
• For details of how to turn the printer on and<br />
the position of the USB port, refer to the<br />
printer’s instruction manual.<br />
2 Set the camera’s mode dial to<br />
q and plug the USB cable into<br />
the camera’s USB connector.<br />
3 Press the power switch to turn<br />
the camera on.<br />
• The monitor turns on and the selection<br />
screen for the USB connection is<br />
displayed.<br />
4 Press ac to select PRINT, then<br />
press e.<br />
• ONE MOMENT is displayed and the<br />
camera and printer are connected. The<br />
PRINT MODE SELECT screen is<br />
displayed on the monitor. Make the print<br />
settings on the camera’s monitor. g Go<br />
to “Printing pictures” (P.171).<br />
Note<br />
170<br />
Connector<br />
cover<br />
SELECt<br />
Power switch<br />
USB connector<br />
• When the USB mode is set to PC, the PRINT MODE SELECT<br />
screen is not displayed. Remove the USB cable, and repeat the<br />
procedure from Step 1.<br />
GO
Printing pictures<br />
When the camera is connected to a PictBridgecompatible<br />
printer, the PRINT MODE SELECT<br />
screen is displayed on the monitor. Use this<br />
screen to select the print mode. You can choose<br />
from the following print modes.<br />
EXIt SELECt GO<br />
PRINT MODE SELECT screen<br />
PRINT Prints the selected picture.<br />
g“PRINT mode/MULTI PRINT mode” (P.174)<br />
ALL PRINT Prints all the pictures stored on the card.<br />
g“ALL PRINT mode” (P.178)<br />
MULTI PRINT Prints one picture in multiple layout format.<br />
g“PRINT mode/MULTI PRINT mode” (P.174)<br />
ALL INDEX Prints an index of all the pictures stored on the card.<br />
g“ALL INDEX mode/PRINT ORDER mode” (P.180)<br />
PRINT ORDER Prints the pictures according to the print reservation data<br />
on the card. If no print reservations (P.158) have been<br />
made, this option is not available.<br />
g“ALL INDEX mode/PRINT ORDER mode” (P.180)<br />
Print modes and each setting<br />
• Available printing modes, paper sizes etc., vary depending on the<br />
printer you use. Please consult with the services of your printer's<br />
manufacture or to the printer manual.<br />
171<br />
Direct printing (PictBridge)<br />
10
10<br />
Direct printing (PictBridge)<br />
Printing pictures<br />
Easy printing<br />
The method described below is the easiest way to print out pictures. The<br />
selected picture is printed without the date, time or file name.<br />
1 In the PRINT MODE SELECT<br />
screen (P.171), press ac to<br />
select PRINT, then press e.<br />
• The PRINT PAPER screen is displayed.<br />
2 Press ac to select the paper<br />
size, then press d.<br />
• When the PRINT PAPER screen is not<br />
displayed, SIZE, BORDERLESS and<br />
PICS/SHEET are set to < STANDARD.<br />
→ Go to Step 4.<br />
3 Use ac to select framed or<br />
unframed, then press e.<br />
OFF ( ) The image is printed<br />
inside a blank frame.<br />
ON ( ) The image is printed filling<br />
the entire page.<br />
172<br />
Arrow pad<br />
OK button<br />
PRINt PAPER<br />
SIZE BORDERLESS<br />
StANDARD<br />
CANCEL SELECt GO<br />
StANDARD<br />
PRINt PAPER<br />
SIZE BORDERLESS<br />
StANDARD<br />
SELECt<br />
GO<br />
StANDARD
4 Use bd or the control dial to select<br />
the image you want to print and<br />
press e.<br />
• The PRINT screen is displayed.<br />
5 Press ac to select OK, then<br />
press e.<br />
• Printing starts.<br />
• To cancel printing, select CANCEL and<br />
press e. The PRINT MODE SELECT<br />
screen is displayed.<br />
• When printing is finished, the screen<br />
returns to Step 4. Repeat Steps 4 and 5<br />
and print all the pictures you want to print.<br />
Printing pictures<br />
SELECt PRINt<br />
SINGLE PRINt MORE<br />
PRINt<br />
OK<br />
CANCEL<br />
CANCEL SELECt GO<br />
173<br />
Direct printing (PictBridge)<br />
10
10<br />
Direct printing (PictBridge)<br />
Printing pictures<br />
PRINT mode/MULTI PRINT mode<br />
1 In the PRINT MODE SELECT<br />
screen, press ac to select<br />
PRINT or MULTI PRINT, then<br />
press e.<br />
• The PRINT PAPER screen is displayed.<br />
2 Press ac to select the paper<br />
size, then press d.<br />
• PRINT mode: Go to Step 3.<br />
• MULTI PRINT mode: Go to Step 4.<br />
• When the PRINT PAPER screen is not<br />
displayed, SIZE, BORDERLESS and PICS/<br />
SHEET are set to < STANDARD. Go to<br />
step 5.<br />
3 Use ac to select framed or<br />
unframed, then press e.<br />
Go to step 5.<br />
OFF ( ) The image is printed inside a<br />
blank frame.<br />
ON ( ) The image is printed filling the<br />
entire page.<br />
174<br />
<strong>Zoom</strong> lever<br />
Arrow pad<br />
OK button<br />
PRINt PAPER<br />
SIZE BORDERLESS<br />
StANDARD<br />
CANCEL SELECt GO<br />
StANDARD<br />
PRINt PAPER<br />
SIZE BORDERLESS<br />
StANDARD<br />
SELECt<br />
GO<br />
StANDARD
4 Press ac to select PICS/SHEET,<br />
then press e.<br />
• PICS/SHEET depends on the paper size<br />
set in Step 2 and the capabilities of your<br />
printer.<br />
5 Press bd to select the picture you<br />
want to print.<br />
• Turn the zoom lever toward W to display<br />
the pictures in index format. You can also<br />
select the pictures you want to print from<br />
the index.<br />
Printing pictures<br />
6 Select the print reservation method.<br />
SINGLE PRINT Makes a single-frame print reservation for the<br />
selected picture according to standard settings.<br />
MORE Sets the number of prints of the selected picture in<br />
the print reservation data. You can also add the date<br />
or file name, and trim the picture.<br />
�Set a SINGLE PRINT reservation<br />
Press a.<br />
•Press a when the picture with < is<br />
displayed to cancel the reservation.<br />
PRINt PAPER<br />
SIZE<br />
PICS/SHEEt<br />
StANDARD<br />
SELECt<br />
GO<br />
16<br />
SELECt PRINt<br />
SINGLE PRINt MORE<br />
Print resevation<br />
mark is displayed.<br />
SELECt PRINt<br />
CANCEL MORE<br />
175<br />
Direct printing (PictBridge)<br />
10
10<br />
Direct printing (PictBridge)<br />
Printing pictures<br />
�Set MORE print reservations<br />
� Press c.<br />
• Print information setting screen is displayed.<br />
� Press ac to select the item<br />
you want to set, then press d.<br />
• Press ac to select the item, then<br />
press e.<br />
176<br />
< × Sets the number of prints.You can select up to<br />
10 prints.<br />
DATE ( ) If you select WITH, pictures are printed with the<br />
date and time.<br />
FILE NAME ( ) If you select WITH, pictures are printed with the<br />
file name.<br />
P Crops part of a recorded picture so that only the<br />
enlarged section is printed. g“Trim the<br />
picture” (P.182)<br />
• DATE and FILE NAME are not available in MULTI PRINT mode.<br />
� When you have finished all the settings for MORE,<br />
press e.<br />
• The screen displayed in Step 5 appears.<br />
• To print more than one picture in PRINT<br />
and/or MULTI PRINT mode, repeat<br />
Steps 5 and 6 and make single and/or<br />
multiple print reservations for all the<br />
pictures you want to print.<br />
• is displayed in MULTI PRINT mode.<br />
7 Press e.<br />
• The PRINT screen is displayed.<br />
X 1<br />
WItHOUt<br />
FILE NAME WItHOUt<br />
NO<br />
SELECt SEt<br />
GO<br />
The settings you have<br />
made are displayed.<br />
SELECt PRINt<br />
CANCEL MORE
8 Print the pictures.<br />
•Press ac to select OK or CANCEL,<br />
then press e.<br />
OK Printing starts.<br />
CANCEL The settings are canceled<br />
and the monitor returns to the<br />
PRINT MODE SELECT<br />
screen.<br />
Printing pictures<br />
PRINt<br />
CANCEL SELECt GO<br />
• When printing is finished, the monitor returns to the PRINT MODE<br />
SELECT screen.<br />
g“Exiting direct printing” (P.184)<br />
�To cancel printing<br />
Pressing e during print data transfer displays<br />
the screen for selecting whether to continue or<br />
PRINt<br />
cancel printing. To cancel printing, press ac<br />
CONtINUE<br />
to select CANCEL, then press e.<br />
CANCEL<br />
SELECt<br />
OK<br />
CANCEL<br />
GO<br />
177<br />
Direct printing (PictBridge)<br />
10
10<br />
Direct printing (PictBridge)<br />
Printing pictures<br />
ALL PRINT mode<br />
1 In the PRINT MODE SELECT<br />
screen, press ac to select ALL<br />
PRINT, then press e.<br />
• The PRINT PAPER screen is displayed.<br />
2 Press ac to select the paper<br />
size, then press d.<br />
• When the PRINT PAPER screen is not<br />
displayed, SIZE and BORDERLESS are<br />
set to < STANDARD. Go to Step 4.<br />
3 Use ac to select framed or<br />
unframed, then press e.<br />
OFF ( ) The image is printed inside a<br />
blank frame.<br />
ON ( ) The image is printed filling the<br />
entire page.<br />
• Print information settings screen is displayed.<br />
4 Press ac to select the item you<br />
want to set, then press d.<br />
•Press ac to select the item, then<br />
press e.<br />
• If PRINT INFO cannot be set with your<br />
printer, go to Step 6.<br />
• Only one print of each image can be made<br />
at a time.<br />
178<br />
EXIt<br />
SELECt<br />
DATE ( ) If you select WITH, pictures are printed with<br />
the date and time.<br />
FILE NAME ( ) If you select WITH, pictures are printed with<br />
the file name.<br />
GO<br />
PRINt PAPER<br />
SIZE BORDERLESS<br />
StANDARD<br />
CANCEL SELECt GO<br />
StANDARD<br />
PRINt PAPER<br />
SIZE BORDERLESS<br />
StANDARD<br />
SELECt<br />
SELECt SEt<br />
GO<br />
GO<br />
StANDARD<br />
X 1<br />
WItHOUt<br />
FILE NAME WItHOUt<br />
NO
5 Press e.<br />
• The PRINT screen is displayed.<br />
6 Print the pictures.<br />
•Press ac to select OK or CANCEL,<br />
then press e.<br />
OK Printing starts.<br />
CANCEL The settings are canceled<br />
and the monitor returns to the<br />
PRINT MODE SELECT<br />
screen.<br />
Printing pictures<br />
PRINt<br />
CANCEL SELECt GO<br />
• When printing is finished, the monitor returns to the PRINT MODE<br />
SELECT screen.<br />
g“Exiting direct printing” (P.184)<br />
�To cancel printing<br />
Pressing e during print data transfer displays<br />
the screen for selecting whether to continue or<br />
PRINt<br />
cancel printing. To cancel printing, press ac<br />
CONtINUE<br />
to select CANCEL, then press e.<br />
CANCEL<br />
SELECt<br />
OK<br />
CANCEL<br />
GO<br />
179<br />
Direct printing (PictBridge)<br />
10
10<br />
Direct printing (PictBridge)<br />
Printing pictures<br />
ALL INDEX mode/PRINT ORDER mode<br />
1 In the PRINT MODE SELECT<br />
screen, press ac to select ALL<br />
INDEX or PRINT ORDER, then<br />
press e.<br />
• The PRINT PAPER screen is displayed.<br />
2 Press ac to select the paper<br />
size, then press d.<br />
• When the PRINT PAPER screen is not<br />
displayed, SIZE and BORDERLESS are<br />
set to < STANDARD. Go to Step 4.<br />
3 Use ac to select framed or<br />
unframed, then press e.<br />
OFF ( ) The image is printed inside a<br />
blank frame.<br />
StANDARD<br />
StANDARD<br />
ON ( ) The image is printed filling the<br />
entire page.<br />
SELECt GO<br />
• The print screen is displayed.<br />
• BORDERLESS is not available in ALL INDEX mode. Press e and go<br />
to Step 4.<br />
4 Print the pictures.<br />
•Press ac to select OK or CANCEL,<br />
PRINt<br />
then press e.<br />
OK<br />
180<br />
OK Printing starts.<br />
CANCEL The settings are canceled and<br />
the monitor returns to the<br />
PRINT MODE SELECT screen.<br />
EXIt<br />
SELECt<br />
• When printing is finished, the monitor returns to the PRINT MODE<br />
SELECT screen.<br />
g“Exiting direct printing” (P.184)<br />
GO<br />
PRINt PAPER<br />
SIZE BORDERLESS<br />
StANDARD<br />
CANCEL SELECt GO<br />
StANDARD<br />
PRINt PAPER<br />
SIZE BORDERLESS<br />
CANCEL<br />
CANCEL SELECt GO
�To cancel printing<br />
Pressing e during print data transfer displays<br />
the screen for selecting whether to continue or<br />
cancel printing. To cancel printing, press ac<br />
to select CANCEL, then press e.<br />
SELECt<br />
Printing pictures<br />
PRINt<br />
CONtINUE<br />
CANCEL<br />
GO<br />
181<br />
Direct printing (PictBridge)<br />
10
10<br />
Direct printing (PictBridge)<br />
Printing pictures<br />
Trim the picture<br />
To set the trim by MORE in PRINT or MULTI PRINT mode, follow the<br />
procedure below.<br />
1 Use the arrow pad and zoom<br />
lever to select the trimming<br />
position and size.<br />
•Press acbd to move the trimming<br />
frame.<br />
• Use the zoom lever to decide the<br />
trimming size. The trimming frame<br />
changes from horizontal to vertical and<br />
vice versa when the maximum or<br />
minimum size is reached.<br />
• If trimming has already been set, the P<br />
screen appears. Press ac to select<br />
RESET, then press e.<br />
2 Press e.<br />
3 Press ac to select OK, then<br />
press e.<br />
OK Saves the current trimming<br />
size.<br />
RESET Sets a new trimming size.<br />
→ Repeat the procedure from<br />
Step 1.<br />
SELECt<br />
CANCEL Cancels the current trimming setting.<br />
182<br />
<strong>Zoom</strong> lever<br />
Arrow pad<br />
OK button<br />
•Press e to complete trimming setting and return to the PRINT INFO<br />
screen.<br />
GO<br />
OK<br />
RESEt<br />
CANCEL<br />
GO
Note<br />
Printing pictures<br />
• The size of the printed picture varies depending on the printer<br />
settings. If the trimmed picture size is small, printing magnification<br />
increases accordingly, resulting in a printed picture with lower<br />
resolution.<br />
• For the best results in enlarged prints, you are recommended to<br />
use the TIFF, SHQ or HQ mode.<br />
183<br />
Direct printing (PictBridge)<br />
10
10<br />
Direct printing (PictBridge)<br />
Exiting direct printing<br />
When you have finished printing, disconnect the camera from the printer.<br />
1 In the PRINT MODE SELECT screen,<br />
select b.<br />
184<br />
• The message is displayed.<br />
2 Press the power switch to turn the<br />
camera off.<br />
3 Remove the USB cable from<br />
the camera.<br />
4 Remove the USB cable from<br />
the printer.<br />
EXIt<br />
SELECt<br />
GO<br />
TURN OFF THE POWER<br />
Power switch
If an error code is displayed<br />
If an error code appears on the camera’s monitor during direct print setting or<br />
printing, see the following table.<br />
For more details, refer to the printer’s instruction manual.<br />
Monitor indication Possible cause Corrective action<br />
NO CONNECTION<br />
NO PAPER<br />
NO INK<br />
JAMMED<br />
SETTINGS CHANGED<br />
PRINT ERROR<br />
The camera is not<br />
connected to the printer<br />
correctly.<br />
There is no paper in the<br />
printer.<br />
The printer has run out of<br />
ink.<br />
Disconnect the camera<br />
and connect it again<br />
correctly.<br />
Load some paper in the<br />
printer.<br />
Replace the ink cartridge<br />
in the printer.<br />
The paper is jammed. Remove the jammed<br />
paper.<br />
The printer’s paper<br />
cassette has been<br />
removed or the printer<br />
has been manipulated<br />
while making settings on<br />
the camera.<br />
There is a problem with<br />
the printer and/or<br />
camera.<br />
Do not manipulate the<br />
printer while making<br />
settings on the camera.<br />
Turn off camera and<br />
printer. Check the printer<br />
and remedy any problems<br />
before turning the power<br />
on again.<br />
TIPS<br />
• If an error code other than those shown above is displayed, refer to<br />
“Error codes” (P.186).<br />
185<br />
Direct printing (PictBridge)<br />
10
11<br />
Miscellaneous<br />
11 Miscellaneous<br />
Error codes<br />
Monitor<br />
indication<br />
NO CARD<br />
CARD ERROR<br />
WRITE-<br />
PROTECT<br />
CARD FULL<br />
NO PICTURE<br />
PICTURE<br />
ERROR<br />
CARD-COVER<br />
OPEN<br />
186<br />
CARD%SEtUP<br />
POWER%OFF<br />
FORMAt<br />
SELECt GO<br />
Possible cause Corrective action<br />
The card is not inserted,<br />
or it cannot be recognized.<br />
There is a problem with the<br />
card.<br />
Writing to the card is<br />
prohibited.<br />
The card is full.<br />
No more pictures, movies or<br />
information such as print<br />
reservations can be<br />
recorded.<br />
There are no pictures on the<br />
card.<br />
There is a problem with the<br />
selected picture and it<br />
cannot be played back on<br />
this camera.<br />
Insert a card or insert a different card.<br />
If the problem persists, format the<br />
card. If the card cannot be formatted,<br />
it cannot be used.<br />
Use a different card. Insert a new<br />
card.<br />
The recorded image has been<br />
protected (read-only) on a PC.<br />
Download the image to a PC and<br />
cancel the read-only setting.<br />
Replace the card or erase unwanted<br />
pictures. Before erasing, download<br />
important images to a PC.<br />
The card contains no pictures.<br />
Record pictures.<br />
Use image processing software to<br />
view the picture on a PC. If that<br />
cannot be done, the image file is<br />
damaged.<br />
The card cover is open. Close the card cover.<br />
The card is not formatted. Format the card.<br />
All data on the card is deleted.
Troubleshooting<br />
�Preparatory operations<br />
Possible cause Corrective action Ref. page<br />
The camera does not turn on or function buttons do not respond.<br />
The power is off. Press the power switch to turn the camera on. P.24<br />
The battery is<br />
exhausted.<br />
Charge the battery. P.18<br />
The battery is Warm the battery by putting it in your pocket for a —<br />
temporarily unable to<br />
function because of<br />
the cold.<br />
while.<br />
The camera is in the Operate the camera (press the shutter button or P.24<br />
sleep mode.<br />
turn the zoom lever).<br />
The camera is The camera will not operate while it is connected —<br />
connected to a PC.<br />
�Shooting<br />
to a PC.<br />
Possible cause Corrective action Ref. page<br />
No picture is taken when the shutter button is pressed.<br />
The battery is<br />
exhausted.<br />
Charge the battery. P.18<br />
The camera is in the<br />
playback mode.<br />
Set the mode dial to any position except q. P.47<br />
The flash has not Remove your finger from the shutter button, and P.57<br />
finished charging. wait until the # (flash standby) indication stops<br />
blinking. Press the shutter button again.<br />
The card is full. Erase unwanted pictures or insert a new card.<br />
Before erasing, download important images to a<br />
PC.<br />
P.133<br />
The battery ran out of Charge the battery. (Wait until the card access P.18<br />
power during shooting<br />
or while the images<br />
were being written to<br />
the card. (Monitor<br />
turns off, or the battery<br />
check indicator blinks.)<br />
lamp turns off when flashing.)<br />
The memory gauge is<br />
full.<br />
Wait until there is room in the memory gauge. P.15<br />
There is a problem<br />
with the card.<br />
Refer to “Error codes”. P.186<br />
The viewfinder does not turn on.<br />
The monitor is turned<br />
on.<br />
Press f to turn the viewfinder on. P.47<br />
187<br />
11<br />
Miscellaneous
Miscellaneous<br />
Troubleshooting<br />
Possible cause Corrective action Ref. page<br />
The monitor does not turn on.<br />
The viewfinder is<br />
turned on.<br />
Press f to turn the monitor on. P.47<br />
The viewfinder or monitor is hard to see.<br />
The diopter is not Adjust the diopter so that the AF target mark is P.30<br />
adjusted properly. clearly visible.<br />
There is condensation<br />
11<br />
* Wait until the camera dries before turning it on —<br />
inside the camera. again.<br />
The brightness of the Select s in the mode menu tab and adjust the P.149<br />
viewfinder or monitor is<br />
not adjusted properly.<br />
brightness.<br />
The monitor is exposed Position the monitor in the down position or block —<br />
to direct sunlight. the sunlight with your hand.<br />
Vertical lines appear in Aiming the camera at a bright subject in sunlight —<br />
the viewfinder or on may cause vertical lines to appear on the screen.<br />
the monitor screen<br />
during shooting.<br />
This is not a malfunction.<br />
The date recorded with the image data is wrong.<br />
The date/time is not Set the date/time. The clock adjustment is not P.28<br />
set.<br />
factory-preset.<br />
The camera has been If the camera is left for one day with the battery P.20, 28<br />
left with the battery removed, the date/time setting is canceled. Set<br />
removed.<br />
the date/time again.<br />
The settings are returned to the factory default settings when the camera is<br />
turned off.<br />
ALL RESET is set to Select the SETUP tab in the mode menu and set P.135<br />
ON.<br />
ALL RESET to OFF.<br />
The picture is out of focus.<br />
The subject was too Move further away from the subject. To take pictures P.82, 83<br />
close.<br />
closer than 7 cm (2.8") with the zoom in the maximum<br />
WIDE position, use the super macro mode.<br />
Auto focus is not Use manual focus or focus lock to focus on the P.50, 68<br />
possible.<br />
There is<br />
condensation<br />
subject and then shoot.<br />
* on the<br />
lens.<br />
Turn the camera off and wait until it dries before<br />
turning it on again.<br />
—<br />
* Condensation: When it is cold outside, the water vapor in the air is rapidly cooled<br />
and turns to droplets of water.<br />
Condensation occurs when the camera is suddenly taken from a<br />
cold place into a warm room.<br />
188
Troubleshooting<br />
Possible cause Corrective action Ref. page<br />
The monitor goes off.<br />
The camera is in the<br />
sleep mode.<br />
The power is turned<br />
off with the monitor off.<br />
Operate the camera (press the shutter button or<br />
turn the zoom lever).<br />
If ALL RESET in the mode menu is set to OFF, the<br />
camera settings before the power was turned off<br />
remain unchanged.<br />
Turn on the monitor, and turn off the power.<br />
P.24<br />
P.47, 135<br />
The flash does not fire.<br />
The flash is closed. Press the flash button to make the flash pop up. P.57<br />
The subject is If you want the flash to fire on a brightly<br />
P.57<br />
illuminated.<br />
illuminated subject, set the flash to fill-in mode.<br />
Auto bracketing is set. The flash does not fire in the auto bracketing<br />
mode. Set another mode in the DRIVE menu.<br />
P.86<br />
The camera is in the The flash does not fire in the movie mode. Set a P.52<br />
movie mode.<br />
different shooting mode.<br />
FUNCTION is set to The flash does not fire in the BLACK/WHITE P.93<br />
BLACK/WHITE<br />
BOARD.<br />
BOARD mode.<br />
Super macro mode is The flash does not fire in the super macro mode. P.83<br />
set.<br />
Cancel the super macro mode.<br />
Panorama mode is The flash does not fire in the panorama mode. P.89<br />
set.<br />
Cancel the panorama mode.<br />
The battery run time is brief.<br />
You are using the Battery performance deteriorates in low<br />
—<br />
camera in a cold temperatures. Keep the camera warm by putting<br />
environment.<br />
it inside your coat or clothing.<br />
The remaining battery When battery consumption fluctuates<br />
P.15, 18<br />
power is not indicated considerably, the camera may turn off without<br />
correctly.<br />
displaying the battery warning indicator. Charge<br />
the battery.<br />
189<br />
11<br />
Miscellaneous
11<br />
Miscellaneous<br />
Troubleshooting<br />
�Playback of recorded images<br />
Possible cause Corrective action Ref. page<br />
The picture is out of focus.<br />
A subject unsuited to<br />
AF was taken.<br />
The camera moved<br />
when the shutter<br />
button was pressed.<br />
The flash was closed<br />
in a lighting condition<br />
requiring use of the<br />
flash.<br />
190<br />
Use manual focus or focus lock to focus on the<br />
subject and then shoot.<br />
Hold the camera correctly and press the shutter<br />
button gently.<br />
Press the flash button to make the flash pop up.<br />
Camera movement occurs easily with slower<br />
shutter speeds. Use a tripod, or set the flash to<br />
AUTO.<br />
P.50, 68<br />
P.31<br />
P.57<br />
The lens was dirty. Clean the lens. Use a commercially available<br />
blower blush and then wipe with a lens cleaner to<br />
remove dust. Mold may form on the lens surface<br />
if the lens is left dirty.<br />
P.206<br />
The picture is too bright.<br />
The flash was set to<br />
the fill-in flash mode.<br />
Select a flash mode other than fill-in flash. P.57<br />
The center of the<br />
subject is too dark.<br />
The ISO is at a high<br />
setting.<br />
The aperture value is<br />
small in A (M) mode.<br />
The shutter speed<br />
setting is too slow in S<br />
(M) mode.<br />
If the center of the subject is too dark, the<br />
P.102<br />
surrounding area emerges as too bright. Adjust<br />
the exposure compensation toward minus (–).<br />
Set the ISO to AUTO or to a low sensitivity: 64 P.101<br />
Increase the aperture value or set the camera to<br />
P mode.<br />
Increase the shutter speed or set the camera to P<br />
mode.<br />
P.66<br />
P.67
Troubleshooting<br />
Possible cause Corrective action Ref. page<br />
The picture is too dark.<br />
The flash was blocked<br />
by your finger.<br />
The subject was out of<br />
the working range of<br />
the flash.<br />
Hold the camera correctly, keeping your fingers<br />
away from the flash.<br />
P.31<br />
Shoot within the flash working range. P.57<br />
The flash was closed. Press the flash button to make the flash pop up. P.57<br />
The subject was too Set the flash to fill-in mode, or use the spot P.57, 77<br />
small and was backlit. metering mode.<br />
The sequential Higher shutter speeds are used when the<br />
P.85<br />
shooting mode was sequential shooting mode is selected, which may<br />
used.<br />
result in pictures that are darker than usual. Set<br />
o in the sequential shooting menu.<br />
The center of the If the center of the subject is too bright, the image P.102<br />
subject is too bright. as a whole emerges darker. Adjust the exposure<br />
compensation toward plus (+).<br />
The aperture value Decrease the aperture value or set the camera to P.66<br />
setting is too high in A<br />
(M) mode.<br />
P mode.<br />
The shutter speed Reduce the shutter speed or set the camera to P P.67<br />
setting is too fast in S<br />
(M) mode.<br />
mode.<br />
The colors of pictures look unnatural.<br />
Indoor lighting<br />
affected the picture's<br />
colors.<br />
Set the white balance according to the lighting. P.103<br />
No white in the Include something white in the picture, or shoot P.57<br />
picture.<br />
using the fill-in flash mode.<br />
The white balance Adjust the white balance according to the light P.103<br />
setting is wrong. source.<br />
Part of the picture is too dark.<br />
The lens was partly Hold the camera correctly, keeping your fingers P.31<br />
blocked by your finger<br />
or the strap.<br />
and the strap away from the lens.<br />
191<br />
11<br />
Miscellaneous
11<br />
Miscellaneous<br />
Troubleshooting<br />
Possible cause Corrective action Ref. page<br />
Halation produces unnatural colors in the picture.<br />
This may be caused<br />
by excessively bright<br />
ultraviolet light on the<br />
subject, such as<br />
sunlight shining<br />
through the leaves of<br />
trees, window frames<br />
in bright light at night,<br />
reflection of metal in<br />
direct sunlight, etc.<br />
192<br />
• Use a UV filter. As this may upset the overall<br />
color balance, it should only be used in the<br />
conditions described on the left.<br />
• Process the picture using a graphics<br />
application (Photoshop, Paint Shop Pro, etc.).<br />
For example, after picking up unnatural colors<br />
with a syringe tool, etc. you can select color<br />
areas, and try color conversion or saturation<br />
adjustment. For details, refer to the manual for<br />
the graphics application you are using.<br />
Pictures you have taken do not appear on the monitor.<br />
The power is off. Set the mode dial to q before pressing the<br />
power switch to turn the camera on.<br />
The camera is in the<br />
shooting mode.<br />
There are no pictures<br />
on the card.<br />
There is a problem<br />
with the card.<br />
The camera is<br />
connected to a TV.<br />
—<br />
P.113<br />
Press the QUICK VIEW button or set the mode P.113, 114<br />
dial to q.<br />
NO PICTURE appears on the monitor. Record —<br />
pictures.<br />
Refer to “Error codes”. P.186<br />
The monitor does not function when the AV cable<br />
is connected to the camera.<br />
Single-frame erase and all-frame erase cannot be performed.<br />
The pictures are<br />
protected.<br />
Display pictures with 9 and press 0 to cancel<br />
protection.<br />
No picture is displayed on the TV when connected to the camera.<br />
The video output<br />
signal is incorrect.<br />
The TV video signal<br />
setting is incorrect.<br />
P.125<br />
P.131<br />
Set the video output signal according to the region<br />
where used.<br />
P.157<br />
Set the TV to the video input mode. P.125<br />
The viewfinder or monitor is hard to see.<br />
The brightness of the<br />
viewfinder or monitor is<br />
not adjusted properly.<br />
The monitor is exposed<br />
to direct sunlight.<br />
Select s in the mode menu and adjust the<br />
brightness.<br />
Position the monitor in the down position or block<br />
the sunlight with your hand.<br />
P.149<br />
—
Troubleshooting<br />
(When the camera is connected to a PC or printer.<br />
Possible cause Corrective action Ref. page<br />
The printer fails to connect.<br />
PC was selected on<br />
the monitor after<br />
connecting to the<br />
printer with a USB<br />
cable.<br />
The printer does not<br />
support PictBridge.<br />
Remove the USB cable, and start again from step<br />
1 of “Connecting the camera to a printer”.<br />
Refer to the printer’s instruction manual or contact<br />
the manufacturer.<br />
The camera is not recognized by the PC.<br />
The USB driver has<br />
not been installed.<br />
The camera has not<br />
been turned on.<br />
P.170<br />
It is necessary to install the USB driver for<br />
—<br />
Windows 98/98SE. For installation instructions,<br />
see “<strong>DIGITAL</strong> <strong>CAMERA</strong>-PC CONNECTION<br />
OPERATION MANUAL” on the CD-ROM.<br />
Press the power switch to turn the camera on. P.24<br />
—<br />
193<br />
11<br />
Miscellaneous
11<br />
Miscellaneous<br />
List of menus<br />
�h mode<br />
Top menu Setting Ref. Page<br />
DRIVE o, j, i, k P.85<br />
K SHQ 2288 × 1712, HQ 2288 × 1712,<br />
SQ1 1280 × 960, SQ2 640 × 480<br />
P.96<br />
X P.28<br />
CARD SETUP YES, NO P.146<br />
194
�i/j/l/m/r/p/Pmode<br />
List of menus<br />
Top menu Tab Function Setting Ref. Page<br />
MODE MENU <strong>CAMERA</strong> ESP/5 ESP, 5, MULTI P.77<br />
& OFF, &, % P.82<br />
DRIVE∗1 o, j, i,<br />
k, BKT∗5 P.85<br />
To the next page<br />
ISO AUTO, 64, 100, 200,<br />
400<br />
P.101<br />
A/S/M∗2 A/S/M P.65<br />
r1/2/3/4∗3 MY MODE 1 –<br />
MY MODE 4<br />
P.69<br />
-2.0 – +2.0 P.64<br />
#SLOW #SLOW1,<br />
HSLOW,<br />
#SLOW2<br />
P.63<br />
NOISE REDUCTION∗4 OFF, ON P.110<br />
<strong>DIGITAL</strong> ZOOM∗6 OFF, ON P.56<br />
FULLTIME AF OFF, ON P.71<br />
AF MODE iESP, SPOT P.70<br />
o∗5 P.88<br />
PANORAMA∗6 P.89<br />
2 IN 1 P.91<br />
FUNCTION OFF, BLACK &<br />
WHITE, SEPIA,<br />
WHITE BOARD,<br />
BLACK BOARD<br />
P.93<br />
AF AREA P.72<br />
INFO OFF, ON P.148<br />
u∗7 OFF, ON P.111<br />
R (still pictures) OFF, ON P.94<br />
SUPER ZOOM OFF, ON P.55<br />
PICTURE K TIFF, SHQ, HQ,<br />
SQ1, SQ2<br />
P.96<br />
WB AUTO, PRESET,<br />
V<br />
P.103<br />
> RED 7 – BLUE 7 P.106<br />
SHARPNESS -5 – +5 P.107<br />
CONTRAST -5 – +5 P.108<br />
SATURATION -5 – +5 P.109<br />
CARD CARD SETUP YES, NO P.146<br />
195<br />
11<br />
Miscellaneous
11<br />
Miscellaneous<br />
List of menus<br />
�i/j/k/l/m/o/r/p/Pmode (cont.)<br />
Top menu Tab Function Setting Ref. Page<br />
MODE MENU SETUP ALL RESET∗8 OFF, ON P.135<br />
W ENGLISH,<br />
FRANCAIS,<br />
DEUTSCH,<br />
ESPAÑOL,<br />
ITALIANO,<br />
РУССКИЙ,<br />
PORTUGUES<br />
P.26<br />
PW ON/OFF SETUP OFF, 1, 2 P.152<br />
REC VIEW OFF, ON P.150<br />
SLEEP 30 SEC, 1 MIN, 3<br />
MIN, 5 MIN, 10 MIN<br />
P.151<br />
MY MODE SETUP CURRENT, RESET,<br />
CUSTOM<br />
P.143<br />
FILE NAME RESET, AUTO P.154<br />
PIXEL MAPPING P.155<br />
s P.149<br />
X P.28<br />
m/ft m, ft P.156<br />
VIDEO OUT NTSC, PAL P.157<br />
SHORT CUT A, B, C P.140<br />
CUSTOM BUTTON P.137<br />
8 OFF, ON P.152<br />
(DRIVE)<br />
(K)<br />
(WB)<br />
∗ 1 Not available in m mode.<br />
∗ 2 Only available in p modes.<br />
∗ 3 Only available in r mode.<br />
∗ 4 Not available in i j l m modes.<br />
∗ 5 Not available in j l m p modes.<br />
∗ 6 Not available in p mode.<br />
∗ 7 Not available in M mode.<br />
∗ 8 Not available in r mode.<br />
196<br />
Functions set as<br />
shortcuts
�n mode<br />
List of menus<br />
Top menu Tab Function Setting Ref. Page<br />
MODE MENU <strong>CAMERA</strong> ESP/5 ESP, 5, MULTI P.77<br />
& OFF, &, % P.82<br />
ISO AUTO, 64, 100, 200,<br />
400<br />
P.101<br />
FULLTIME AF OFF, ON P.71<br />
% OFF, ON P.83<br />
FUNCTION OFF, BLACK &<br />
WHITE, SEPIA<br />
P.93<br />
R OFF, ON P.95<br />
PICTURE > -7 – +7 P.106<br />
SHARPNESS -5 – +5 P.107<br />
CONTRAST -5 – +5 P.108<br />
SATURATION -5 – +5 P.109<br />
CARD CARD SETUP YES, NO P.146<br />
SETUP ALL RESET OFF, ON P.135<br />
W ENGLISH,<br />
FRANCAIS,<br />
DEUTSCH,<br />
ESPAÑOL,<br />
ITALIANO,<br />
РУССКИЙ,<br />
PORTUGUES<br />
P.26<br />
PW ON/OFF SETUP OFF, 1, 2 P.152<br />
FILE NAME RESET, AUTO P.154<br />
PIXEL MAPPING P.155<br />
s P.149<br />
X P.28<br />
VIDEO OUT NTSC, PAL P.157<br />
8 OFF, ON P.152<br />
<strong>DIGITAL</strong> ZOOM OFF, ON P.56<br />
K SHQ, HQ, SQ P.96<br />
WB AUTO, PRESET,<br />
V<br />
P.103<br />
197<br />
11<br />
Miscellaneous
11<br />
Miscellaneous<br />
List of menus<br />
�q mode (still pictures)<br />
Top menu Tab Function Setting Ref. Page<br />
MODE MENU PLAY < P.158<br />
u OFF, ON P.111<br />
R START P.127<br />
EDIT Q 640 × 480,<br />
320 × 240, CANCEL<br />
P.128<br />
P NEW FILE,<br />
CANCEL<br />
P.129<br />
198<br />
CARD CARD SETUP ALL ERASE,<br />
FORMAT<br />
P.134,<br />
146<br />
SETUP ALL RESET OFF, ON P.135<br />
W ENGLISH,<br />
FRANCAIS,<br />
DEUTSCH,<br />
ESPAÑOL,<br />
ITALIANO,<br />
РУССКИЙ,<br />
PORTUGUES<br />
P.26<br />
PW ON/OFF SETUP OFF, 1, 2 P.152<br />
SCREEN SETUP P.153<br />
s P.149<br />
X P.28<br />
VIDEO OUT NTSC, PAL P.157<br />
G 4, 9, 16 P.117<br />
8 OFF, ON P.152<br />
m P.118<br />
INFO P.148<br />
SWITCH FRAME ALL, 0 P.132
�q mode (movies)<br />
List of menus<br />
Top menu Tab Function Setting Ref. Page<br />
MODE MENU CARD CARD SETUP ALL ERASE,<br />
FORMAT<br />
P.134,<br />
146<br />
SETUP ALL RESET OFF, ON P.135<br />
W ENGLISH,<br />
FRANCAIS,<br />
DEUTSCH,<br />
ESPAÑOL,<br />
ITALIANO,<br />
РУССКИЙ,<br />
PORTUGUES<br />
P.26<br />
PW ON/OFF SETUP OFF, 1, 2 P.152<br />
s P.149<br />
X P.28<br />
VIDEO OUT NTSC, PAL P.157<br />
G 4, 9, 16 P.117<br />
8 OFF, ON P.152<br />
MOVIE PLAY MOVIE PLAYBACK PLAYBACK,<br />
FRAME BY FRAME,<br />
EXIT<br />
P.119<br />
INDEX OK, RESET,<br />
CANCEL<br />
P.121<br />
EDIT OK, RESET,<br />
CANCEL<br />
P.123<br />
INFO P.148<br />
SWITCH FRAME ALL, 0 P.132<br />
199<br />
11<br />
Miscellaneous
11<br />
Miscellaneous<br />
List of factory default settings<br />
The functions are set as follows when the camera leaves the factory.<br />
�Shooting mode<br />
F No F2.8<br />
SHUTTER 1/1000<br />
ZOOM 38mm<br />
LCD ON<br />
F 0.0<br />
FLASH AUTO (S, M: #SLOW1, n: $)<br />
AF/MF AF<br />
Y OFF<br />
5 ESP<br />
& OFF<br />
DRIVE o<br />
7 ±1.0 EV, 3<br />
ISO AUTO (A, S, M: 64)<br />
p A<br />
r1/2/3/4 MY MODE 1<br />
w 0.0<br />
#SLOW #SLOW1<br />
NOISE REDUCTION OFF (m: fixed on ON)<br />
<strong>DIGITAL</strong> ZOOM OFF<br />
FULLTIME AF OFF (n: ON)<br />
AF MODE iESP<br />
o OFF<br />
PANORAMA OFF<br />
2 IN 1 OFF<br />
FUNCTION OFF<br />
AF AREA CENTER<br />
INFO OFF<br />
u OFF<br />
200
R (still pictures) OFF<br />
R (movies) OFF<br />
List of factory default settings<br />
SUPER ZOOM OFF<br />
K HQ (2288 × 1712, n: 320 × 240)<br />
TIFF 2288 × 1712<br />
SHQ 2288 × 1712<br />
HQ 2288 × 1712<br />
SQ1 1280 × 960 NORMAL<br />
SQ2 640 × 480 NORMAL<br />
WB AUTO<br />
> None<br />
SHARPNESS ±0<br />
CONTRAST ±0<br />
SATURATION ±0<br />
REC VIEW ON<br />
SLEEP 3 MIN<br />
FILE NAME RESET<br />
m/ft m<br />
SHORT CUT<br />
A: ESP/5, B: K<br />
C: &<br />
CUSTOM BUTTON AE LOCK<br />
201<br />
11<br />
Miscellaneous
11<br />
Miscellaneous<br />
List of factory default settings<br />
�Playback mode<br />
SWITCH FRAME ALL<br />
INFO OFF<br />
u OFF<br />
0 OFF<br />
y 0°<br />
< OFF<br />
G 9<br />
R OFF<br />
�Others<br />
ALL RESET ON<br />
W ENGLISH<br />
PW ON/OFF SETUP 1<br />
s NORMAL<br />
X Y-M-D 2004.01.01 00:00<br />
VIDEO OUT NTSC or PAL*<br />
8 ON<br />
∗ Settings differ according to the region where the camera is sold.<br />
202
Modes and Shooting Functions<br />
In r mode, available functions vary depending on the modes set in the MY<br />
MODE SETUP menu.<br />
Mode<br />
p<br />
Function h ijlm A S M<br />
p — � —<br />
<strong>Zoom</strong> �<br />
<strong>DIGITAL</strong> ZOOM — �<br />
SUPER ZOOM — � —<br />
AF MODE — � —<br />
FULLTIME AF — �<br />
AF AREA — � —<br />
Manual focus — � —<br />
FLASH MODE<br />
AUTO � — � —<br />
! � — � —<br />
# — � — � —<br />
#SLOW1 — � —<br />
HSLOW — � — � —<br />
#SLOW2 — � —<br />
$ �<br />
w — � —<br />
#SLOW — � —<br />
n — � ∗1<br />
AEL — � —<br />
AF LOCK — � —<br />
& �<br />
Y �<br />
P<br />
n<br />
203<br />
11<br />
Miscellaneous
11<br />
Miscellaneous<br />
Modes and Shooting Functions<br />
j, i, k � ∗2 —<br />
7 — � ∗2<br />
204<br />
— � —<br />
o — � ∗3 — � —<br />
PANORAMA — � — � —<br />
2 IN 1 — � —<br />
FUNCTION<br />
Mode<br />
Function h ijlm A S M<br />
BLACK&WHITE — �<br />
SEPIA — �<br />
WHITE BOARD — � —<br />
BLACK BOARD — � —<br />
R — � —<br />
R (movie) — �<br />
K �<br />
ISO — �<br />
F — � — �<br />
WB — �<br />
> — �<br />
SHARPNESS — �<br />
CONTRAST — �<br />
SATURATION — �<br />
NOISE REDUCTION — � —<br />
INFO — � —<br />
u — � — � —<br />
ALL RESET — � ∗4<br />
W — �<br />
PW ON/OFF SETUP — �<br />
REC VIEW — � —<br />
SLEEP — �<br />
p<br />
MY MODE SETUP — � —<br />
P<br />
n
Mode<br />
FILE NAME — �<br />
PIXEL MAPPING — �<br />
s — �<br />
X �<br />
� : Available — : Not available<br />
∗ 1 Cannot be selected in M n mode.<br />
∗ 2 Cannot be selected in m mode.<br />
∗ 3 Can be selected only in i mode.<br />
∗ 4 Cannot be selected in r mode.<br />
Modes and Shooting Functions<br />
m/ft — � —<br />
VIDEO OUT — �<br />
SHORT CUT — � —<br />
CUSTOM BUTTON — � —<br />
8 — �<br />
p<br />
Function h ijlm A S M<br />
P<br />
n<br />
205<br />
11<br />
Miscellaneous
11<br />
Miscellaneous<br />
Camera maintenance<br />
�After use<br />
Turn off the camera and fit the lens cap on the lens.<br />
If you do not intend to use the camera for a long period, remove the battery.<br />
�Cleaning the camera<br />
1 Turn off the camera. (gP.24)<br />
2 Remove the battery. (gP.20) (If you are using an AC<br />
adapter, unplug the AC adapter from the camera first<br />
before removing the plug from the AC outlet.)<br />
3 Exterior:<br />
→ Wipe gently with a soft cloth. If the camera is very dirty, soak the<br />
cloth in mild soapy water and wring well. Wipe the camera with<br />
the damp cloth and then dry it with a dry cloth. If you have used<br />
the camera at the beach, use a cloth soaked in clean water and<br />
well wrung.<br />
Viewfinder and monitor:<br />
→ Wipe gently with a soft cloth.<br />
Lens<br />
→ Blow dust off the lens with a commercially available blower, then<br />
wipe gently with a lens cleaner.<br />
Card<br />
→ Wipe gently with a soft, dry cloth.<br />
�Storage<br />
• When storing the camera for extended periods, remove the<br />
battery and card, and keep in a cool, dry place that is ventilated<br />
well.<br />
• Periodically, replace the battery, and test camera functions.<br />
Note<br />
206<br />
• Do not use strong solvents such as benzene or alcohol, or<br />
chemically treated cloth.<br />
• Cleaning should be done only after the battery has been removed or<br />
the AC adapter has been disconnected.<br />
• Mold may form on the lens surface if the lens is left dirty.<br />
• Avoid leaving the camera in places where chemical products are<br />
handled since this may result in corrosion.
Specifications<br />
Product type<br />
Recording system<br />
: Digital camera (for shooting and displaying)<br />
Still picture : Digital recording, TIFF (non-compression), JPEG (in<br />
accordance with Design rule for Camera File system<br />
(DCF))<br />
Applicable standards : Exif 2.2, Digital Print Order Format (DPOF),<br />
PRINT Image Matching II, PictBridge<br />
Sound with still pictures : Wave format<br />
Movie : QuickTime Motion JPEG support<br />
Memory : xD-Picture Card (16-512 MB)<br />
Resolution : 3200 × 2400 pixels (ENLARGE SIZE: SHQ, HQ)<br />
2288 × 1712 pixels (TIFF, SHQ, HQ)<br />
2288 × 1520 pixels (3:2 TIFF, SHQ, HQ)<br />
2048 × 1536 pixels (TIFF, SQ1)<br />
1600 × 1200 pixels (TIFF, SQ1)<br />
1280 × 960 pixels (TIFF, SQ1)<br />
1024 × 768 pixels (TIFF, SQ2)<br />
640 × 480 pixels (TIFF, SQ2)<br />
No. of storable pictures<br />
when using a 16 MB card : Approx. 1 frame (TIFF : 2288 × 1712)<br />
(Without sound)<br />
Approx. 5 frames (SHQ : 2288 × 1712)<br />
Approx. 16 frames (HQ : 2288 × 1712)<br />
Approx. 49 frames (SQ1 : 1280 × 960 NORMAL)<br />
No. of effective pixels<br />
Approx. 165 frames (SQ2 : 640 × 480 NORMAL)<br />
: 4,000,000 pixels<br />
Image pickup device : 1/2.5" CCD solid-state image pickup,<br />
4,110,000 pixels (gross)<br />
Lens : Olympus lens 6.3 mm to 63 mm, f2.8 to f3.7,<br />
11 elements in 7 groups<br />
(equivalent to 38 mm to 380 mm lens on 35 mm camera)<br />
Photometric system : ESP metering, spot metering system<br />
Aperture : f2.8 to f8.0<br />
Shutter speed : 15 to 1/1000 sec.<br />
Shooting range : 0.6 m (2 ft.) to ) (W), 2 m (6.6 ft.) to ) (T) (NORMAL)<br />
0.07 m (0.2 ft.) to ) (W), 1.2 m (4 ft.) to ) (T) (macro<br />
mode)<br />
Viewfinder : 0.44" TFT color LCD display, 240,000 pixels<br />
207<br />
11<br />
Miscellaneous
11<br />
Miscellaneous<br />
Specifications<br />
Monitor : 1.8" TFT color LCD display, 118,000 pixels<br />
Auto focus : TTL system autofocus<br />
Contrast detection system<br />
Outer connector : DC-IN jack, USB connector (mini-B), A/V OUT jack<br />
Automatic calendar : 2000 up to 2099<br />
system<br />
Operating environment<br />
Temperature : 0°C to 40°C (32°F to 104°F) (operation)<br />
–20°C to 60°C (–4°F to 140°F) (storage)<br />
Humidity : 30% to 90% (operation)/10% to 90% (storage)<br />
Power supply : Only an Olympus LI-10B lithium-ion battery<br />
AC adapter specified by Olympus (optional)<br />
Dimensions : 104.5 mm (W) × 60 mm (H) × 68.5 mm (D)<br />
(4.1" × 2.4" × 2.7") (excluding protrusions)<br />
Weight : 280 g (0.62 lb.) (without battery and card)<br />
SPECIFICATIONS ARE SUBJECT TO CHANGE WITHOUT ANY NOTICE OR<br />
OBLIGATION ON THE PART OF THE MANUFACTURER.<br />
208
Glossary of terms<br />
A (Aperture Priority) Mode<br />
You set the aperture yourself and the camera automatically varies the shutter<br />
speed so that the picture is taken with the best exposure.<br />
AE (Automatic Exposure)<br />
The camera’s built-in exposure meter automatically sets the exposure. The 3<br />
AE modes available on this camera are P mode, in which the camera selects<br />
both the aperture and shutter speed, A mode, in which the user selects the<br />
aperture and the camera sets the shutter speed, and S mode, in which the<br />
user selects the shutter speed and the camera sets the aperture. In M mode,<br />
the user selects both the aperture and the shutter speed.<br />
Aperture<br />
The adjustable lens opening which controls the amount of light that enters the<br />
camera. The larger the aperture, the shorter the depth of field and the fuzzier<br />
the background. The smaller the aperture, the greater the depth of field and<br />
the sharper the background. Larger aperture values indicate smaller<br />
apertures, and smaller aperture values indicate larger apertures.<br />
CCD (Charge-Coupled Device)<br />
This converts light passing through the lens into electrical signals. On this<br />
camera, light is picked up and converted into RGB signals to build a single image.<br />
Contrast Detection Method<br />
This is used to measure the distance to the subject. The camera determines<br />
if the image is focused by the level of contrast in the subject.<br />
Conventional Photograph<br />
This refers to recording images using silver halide (the method for recording<br />
images in conventional, non-digital photography). This system is in contrast<br />
to still video and digital photography.<br />
DCF (Design rule for Camera File system)<br />
A standard for image files by the Japan Electronics and Information<br />
Technology Industries Association (JEITA).<br />
DPOF (Digital Print Order Format)<br />
This is for saving desired print settings on digital cameras. By entering which<br />
images to print and the number of copies of each, the user can easily have the<br />
desired images printed by a printer or print lab that supports the DPOF format.<br />
Eclipsing (Vignetting)<br />
This refers to when an object obscures part of the field of view so that the<br />
whole subject is not photographed. Vignetting also refers to when the image<br />
seen through the viewfinder does not exactly match the image shot through<br />
the objective lens, so the photographed image includes objects not seen<br />
through the viewfinder. In addition, vignetting can occur when an incorrect<br />
lens hood is used, causing shadowing to appear in the corners of the image.<br />
ESP (Electro-Selective Pattern) Light Metering/Digital ESP Light<br />
Metering<br />
This determines the exposure by metering and calculating the light levels in<br />
the center and other areas of the image separately.<br />
209<br />
11<br />
Miscellaneous
11<br />
Miscellaneous<br />
Glossary of terms<br />
EV (Exposure Value)<br />
A system for measuring exposure. EV0 is when the aperture is at F1 and the<br />
shutter speed is 1 second. The EV then increases by 1 each time the aperture<br />
increases by one F stop or the shutter speed increases by one increment. EV<br />
can also be used to indicate brightness and ISO settings.<br />
Exposure<br />
The amount of light used to capture an image. The exposure is determined<br />
by the time the shutter is open (shutter speed) and the amount of light that<br />
passes through the lens (aperture).<br />
ISO<br />
A method for indicating film speed by the International Organization for<br />
Standardization (ISO) (e.g. “ISO100”). Higher ISO values indicate greater<br />
sensitivity to light, so images can be exposed even in low-light conditions.<br />
JPEG (Joint Photographic Experts Group)<br />
A compression format for color still images. Photographs (images) shot using<br />
this camera are recorded onto the card in JPEG format when the Record<br />
mode is set to SHQ, HQ, SQ1 or SQ2. By downloading these images to a<br />
personal computer, users can edit them using graphics application software<br />
or view the images using an Internet web browser.<br />
M (Manual) Mode<br />
The user sets both the aperture and shutter speed.<br />
NTSC (National Television Systems Committee) / PAL (Phase<br />
Alternating Line)<br />
Television formats. NTSC is mainly used in Japan, North America and Korea.<br />
PAL is mainly used in Europe and China.<br />
P (Program) Mode<br />
Also called Program AE mode. The camera automatically sets the best<br />
shutter speed and aperture for the shot.<br />
PictBridge<br />
A standard for connecting digital cameras and printers of different makers<br />
and printing out pictures directly.<br />
Pixels<br />
A pixel is the smallest unit (dot) used to make up an image. Clear large-sized<br />
printed images require millions of pixels.<br />
Resolution<br />
The size of an image expressed by the number of pixels that make up the<br />
image. For instance, a picture taken in 640 × 480 resolution is the same size<br />
as the screen when the monitor setting is 640 × 480. However, if the monitor<br />
setting is 1024 × 768, the picture only takes up part of the screen.<br />
S (Shutter Priority) Mode<br />
Also called Shutter Priority AE mode. The user selects the shutter speed and<br />
the camera automatically varies the aperture so that the picture is taken with<br />
the best exposure.<br />
210
Glossary of terms<br />
Sleep Mode<br />
A mode designed to save battery life. The camera automatically enters the<br />
sleep mode if you do not operate it for a certain time. To get out of the sleep<br />
mode, use any button on the camera (shutter button, arrow pad, etc.).<br />
TIFF (Tagged Image File Format)<br />
A format used for saving highly detailed black and white or color image data.<br />
TIFF image files can be handled by software programs for scanners and<br />
graphics applications. This camera uses an uncompressed image file<br />
format.<br />
TFT (Thin-Film Transistor) Color Monitor<br />
A transistor color monitor constructed using thin-film technology.<br />
TTL (Through the Taking Lens) System<br />
To help adjust exposure, a light receptor built into the camera directly<br />
measures the light passing through the lens.<br />
211<br />
11<br />
Miscellaneous
Index<br />
0 . . . . . . . . . . . . . . . . . . . . . . 131<br />
1st curtain #SLOW1 . . . . . . . . . 61<br />
1st curtain with red-eye reduction<br />
HSLOW1 . . . . . . . . 62<br />
2 IN 1 2 IN 1 . . . . . . . . . . . . . . . . 91<br />
2nd curtain #SLOW2 . . . . . . . . . 62<br />
3:2 . . . . . . . . . . . . . . . . . . . . . . . . 97<br />
212<br />
Battery check . . . . . . . . . . . . . . . .15<br />
Battery compartment/card<br />
cover . . . . . . . . . . . .11, 20<br />
Beep sound 8. . . . . . . . . . . . . .152<br />
BKT. . . . . . . . . . . . . . . . . . . . . . . .86<br />
BLACK & WHITE . . . . . . . . . . . . .93<br />
BLACK BOARD . . . . . . . . . . . . . .93<br />
A<br />
C<br />
p. . . . . . . . . . . . . 65, 209, 210 Camera movement warning . . . . .48<br />
A/V OUT jack. . . . . . . . . . . . 10, 125 Card . . . . . . . . . . . . . . . . . . . . . . .19<br />
AC adapter . . . . . . . . . . . . . . . . . 23 Card access lamp . . . . . . . . . .11, 47<br />
AE . . . . . . . . . . . . . . . . . . . . . . . 209 Card check . . . . . . . . . . . . . . . . . .25<br />
AE lock B . . . . . . . . . . . . . . . . 80 CARD SETUP. . . . . . . . . . . . . . .146<br />
AE Lock/custom button x CCD . . . . . . . . . . . . . . . . . . . . . .209<br />
. . . . . . . . . 11, 78, 80, 139 Charger. . . . . . . . . . . . . . . . . . . . .18<br />
AE memory C . . . . . . . . . . . . . 81 Close-up playback U . . . . . . . . .115<br />
AF . . . . . . . . . . . . . . . . . . . . . 50, 76 Cloudy day 3 . . . . . . . . . . . . . .104<br />
AF AREA . . . . . . . . . . . . . . . . . . . 72 Compression. . . . . . . . . . . . . . . . .96<br />
AF LOCK . . . . . . . . . . . . . . . . . . . 73 Connector cover . . .10, 23, 125, 170<br />
AF MEMORY. . . . . . . . . . . . . . . . 74 CONTRAST J . . . . . . . . . . . . . .108<br />
AF MODE . . . . . . . . . . . . . . . . . . 70 Creating an index . . . . . . . . . . . .121<br />
AF sequential<br />
shooting k . . . . . . 85<br />
CUSTOM BUTTON z . . . . . . . .137<br />
AF target mark. . . . . . . . . . . . 47, 72 D<br />
ALL ERASE. . . . . . . . . . . . . . . . 134<br />
ALL RESET . . . . . . . . . . . . . . . . 135<br />
All-frame erase R . . . . . . . . . . 134<br />
All-frame reservation . . . . . . . . . 160<br />
Aperture priority<br />
shooting A . . . . . . . 45, 66<br />
Aperture value . . . . . . . . . . . . . . . 66<br />
Arrow pad . . . . . . . . . . . 11, 33, 113<br />
Auto bracketing 7 . . . . . . . . . 86<br />
Date and time X . . . . . . . . . . . .28<br />
DC-IN jack . . . . . . . . . . . . . . .10, 23<br />
DCF . . . . . . . . . . . . . . . . . . . . . .209<br />
<strong>DIGITAL</strong> ZOOM . . . . . . . . . . . . . .56<br />
Diopter adjustment dial. . . . . .11, 30<br />
Direct printing . . . . . . . . . . . . . . .169<br />
DPOF . . . . . . . . . . . . . . . . .158, 209<br />
DRIVE. . . . . . . . . . . . . . . . . . . . . .85<br />
Auto white balance . . . . . . . . . . 103<br />
Auto-flash . . . . . . . . . . . . . . . . . . 60<br />
AV cable . . . . . . . . . . . . . . . . . . 125<br />
E<br />
Editing a movie . . . . . . . . . . . . . .121<br />
ENLARGE SIZE . . . . . . . . . . . . . .97<br />
B<br />
Battery . . . . . . . . . . . . . . . . . . . . . 18<br />
Erase button . . . . . . . . . . . . .11, 133<br />
Erasing pictures S . . . . . . . . . . .133<br />
Error codes . . . . . . . . . . . . . . . . .186
ESP metering . . . . . . . . . . . 77, 209<br />
EV . . . . . . . . . . . . . . . . . . . . . . . 210<br />
Exposure . . . . . . . . . . . . . . . . . . . 80<br />
Exposure compensation F. . . . 102<br />
Exposure differential . . . . . . . . . . 68<br />
Index<br />
I<br />
iESP . . . . . . . . . . . . . . . . . . . . . . .70<br />
Index display G . . . . . . . . . . . .116<br />
Information display INFO . . . . . .148<br />
ISO sensitivity. . . . . . . . . . .101, 210<br />
F<br />
J<br />
FILE NAME . . . . . . . . . . . . . . . . 154<br />
File No. . . . . . . . . . . . . . . . . . . . . 14<br />
JPEG . . . . . . . . . . . . . . . . . .98, 210<br />
Fill-in flash #. . . . . . . . . . . . . . . . 60<br />
Flash . . . . . . . . . . . . . . . . . . . 10, 57<br />
Flash button. . . . . . . . . . . . . . 11, 57<br />
Flash charge . . . . . . . . . . . . . . . . 59<br />
Flash intensity control w . . . . . . 64<br />
Flash mode . . . . . . . . . . . . . . . . . 57<br />
Flash mode button # . . . . . . 11, 57<br />
Flash off $ . . . . . . . . . . . . . . . . . 61<br />
L<br />
Landscape shooting l . . . . . . . .44<br />
Language W . . . . . . . . . . . . . .26<br />
Lens . . . . . . . . . . . . . . . . . . . . . . .10<br />
Lens cap . . . . . . . . . . . . . . . . . . . .17<br />
Lens cap string . . . . . . . . . . . . . . .17<br />
Lithium ion battery . . . . . . . . . . . .18<br />
Flash stand-by. . . . . . . . . . . . . . . 48<br />
Fluorescent lamp >. . . . . . . . . 104<br />
Focus. . . . . . . . . . . . . . . . . . . 48, 50<br />
Focus lock . . . . . . . . . . . . . . . . . . 50<br />
FORMAT I. . . . . . . . . . . . . . . . 146<br />
FRAME BY FRAME . . . . . . . . . 120<br />
Full-auto shooting h . . . . . . . 43<br />
FULLTIME AF . . . . . . . . . . . . . . . 71<br />
Fully pressed . . . . . . . . . . . . . . . . 48<br />
FUNCTION . . . . . . . . . . . . . . . . . 93<br />
M<br />
Macro mode shooting & . . . . . . .82<br />
Manual focus . . . . . . . . . . . . . . . .75<br />
Manual shooting M. . . . . . . . .46, 68<br />
Measurement Unit m/ft. . . . . . . .156<br />
Memory gauge . . . . . . . . . . . . . . .15<br />
Metering n . . . . . . . . . . . . . . . . .77<br />
Microphone. . . . . . . .10, 94, 95, 127<br />
Mode. . . . . . . . . . . . . . . . . . . . . . .43<br />
Mode dial . . . . . . . . . . . . . . . .10, 43<br />
G<br />
Green lamp . . . . . . . . . . . . . . . . . 48<br />
MODE MENU . . . . . . . . . . . . . . . .38<br />
Monitor . . . . . . .11, 12, 47, 113, 149<br />
Monitor brightness<br />
H<br />
Halfway pressed . . . . . . . . . . . . . 48<br />
HIGH . . . . . . . . . . . . . . . . . . . . . . 96<br />
High speed sequential<br />
shooting i . . . . . . . 85<br />
Histogram display u . . . . . . . . 111<br />
HQ . . . . . . . . . . . . . . . . . . . . . . . . 98<br />
adjustment s. . . . . . .149<br />
Monitor button f . . . . . . . . .11, 47<br />
Movies n. . . . . . . . . . . .46, 52, 119<br />
MOVIE PLAY . . . . . . . . . . . . . . .119<br />
MOVIE PLAYBACK . . . . . . . . . .119<br />
Multi-metering . . . . . . . . . . . . . . . .78<br />
MY MODE SETUP . . . . . . . . . . .143<br />
My Mode r. . . . . . . . . . . . . .46, 69<br />
MY MODE. . . . . . . . . . . . . . . . . . .69<br />
213
Index<br />
N<br />
Recording sound with still<br />
Night Scene shooting m . . . . . . . 44<br />
pictures R. . . . . . . . . . . .94<br />
NOISE REDUCTION O . . . . . 110 Recording sound with movies R. . .95<br />
NORMAL (Record mode) . . . . . . 98 Red-eye reduction flash ! . . . .60<br />
Number of remaining pictures . . . 98 Resizing Q . . . . . . . . . . . . . . . .128<br />
NTSC. . . . . . . . . . . . . . . . . 157, 210 Resolution. . . . . . . . . . . . . . .96, 210<br />
Rotation button y . . . . . . . .11, 126<br />
O<br />
OK/Menu button e . . . . . . . . 11, 32<br />
One-touch white balance V . . 104<br />
Optical zoom . . . . . . . . . . . . . . . . 54<br />
S<br />
SATURATION 6 . . . . . . . . . . .109<br />
SCREEN SETUP . . . . . . . . . . . .153<br />
Self-portrait shooting o . . . . . . . .88<br />
P<br />
Self-timer Y . . . . . . . . . . . . . . . . .84<br />
PAL . . . . . . . . . . . . . . . . . . 157, 210<br />
PANORAMA . . . . . . . . . . . . . . . . 89<br />
PictBridge . . . . . . . . . . . . . 169, 210<br />
Picture rotation y . . . . . . . . . . . 126<br />
PIXEL MAPPING. . . . . . . . . . . . 155<br />
Playback mode . . . . . . . 14, 37, 113<br />
Playback on TV . . . . . . . . . . . . . 125<br />
Portrait shooting i . . . . . . . . . . . 43<br />
Power switch . . . . . . . . . . . . . 11, 24<br />
Preset white balance . . . . . . . . . 104<br />
Print setting < . . . . . . . . . . . . . 158<br />
Program shooting P . . . . . . . . . . 45<br />
Protect . . . . . . . . . . . . . . . . . . . . 131<br />
Protect button 0. . . . . . . . 11, 131<br />
PW ON/OFF SETUP . . . . . . . . . 152<br />
Self-timer button Y . . . . . . . .11, 84<br />
Self-timer lamp . . . . . . . . . . . .10, 84<br />
SEPIA . . . . . . . . . . . . . . . . . . . . . .93<br />
Sequential shooting j . . . . . . . .85<br />
SHARPNESS N. . . . . . . . . . . . .107<br />
Shooting mode . . . . . .12, 35, 38, 43<br />
SHORT CUT. . . . . . . . . . . . . . . .140<br />
Shortcut Menus. . . . . . . . . . . . . . .35<br />
SHQ . . . . . . . . . . . . . . . . . . . . . . .98<br />
Shutter button . . . . . . . . . . . . .10, 47<br />
Shutter priority shooting S . . .45, 67<br />
Shutter speed . . . . . . . . . . . . . . . .67<br />
Single-frame erase S. . . . . . . . .133<br />
Single-frame playback . . . .113, 114<br />
Single-frame reservation. . . . . . .162<br />
Single-frame shooting. . . . . . . . . .85<br />
Q<br />
QUICK VIEW. . . . . . . . . . . . . . . 114<br />
QUICK VIEW button . . . . . . . . . 114<br />
SLEEP . . . . . . . . . . . . . . . . . . . .151<br />
Sleep mode. . . . . . . . . . . . . . . . .151<br />
Slideshow m. . . . . . . . . . . . . . .118<br />
Slow synchronization<br />
R<br />
#SLOW. . . . . . . . . .61, 63<br />
Sports shooting j. . . . . . . . . . . .44<br />
REC VIEW. . . . . . . . . . . . . . . . . 150 Spot (AF mode) . . . . . . . . . . . . . .70<br />
Record mode K . . . . . . . . . . . . 96 Spot metering n. . . . . . . . . . . . .77<br />
Recording movies . . . . . . . . . 46, 52 SQ. . . . . . . . . . . . . . . . . . . . . . . . .98<br />
Recording sound R . . . . 94, 95, 127 Standard . . . . . . . . . . . . . . . . . . .169<br />
Startup/Shutdown screen . . . . . . .25<br />
214
Strap . . . . . . . . . . . . . . . . . . . . . . 17<br />
Strap eyelet . . . . . . . . . . . . . . 10, 17<br />
Sunny day 5 . . . . . . . . . . . . . . 104<br />
Super macro mode<br />
shooting %. . . . . . . . . . 83<br />
SUPER ZOOM . . . . . . . . . . . . . . 55<br />
SWITCH FRAME. . . . . . . . . . . . 132<br />
T<br />
Taking still pictures . . . . . . . . . . . 47<br />
TIFF. . . . . . . . . . . . . . . . . . . . . . . 98<br />
Time remaining . . . . . . . . . . . . . . 52<br />
Top menu . . . . . . . . . . . . . . . . . . 32<br />
Trimming P . . . . . . . . . . . 165, 182<br />
Tripod socket. . . . . . . . . . . . . . . . 11<br />
Tungsten light 1 . . . . . . . . . . . 104<br />
U<br />
USB cable . . . . . . . . . . . . . . . . . 170<br />
USB connector . . . . . . . . . . 10, 170<br />
V<br />
VIDEO OUT. . . . . . . . . . . . . . . . 157<br />
Viewfinder . . . . . 11, 12, 30, 47, 149<br />
Viewing still pictures q . . . . . . 113<br />
W<br />
White balance WB. . . . . . . . . . . 103<br />
White balance adjustment<br />
> . . . . . . . . . . . . . . 106<br />
WHITE BOARD . . . . . . . . . . . . . . 93<br />
X<br />
xD-Picture Card. . . . . . . . . . . . . . 19<br />
Z<br />
<strong>Zoom</strong> lever . . . . . . 10, 54, 115, 116<br />
Index<br />
215
© 2004 OLYMPUS CORPORATION<br />
http://www.olympus.com/<br />
OLYMPUS CORPORATION<br />
Shinjuku Monolith, 3-1 Nishi-Shinjuku 2-chome, Shinjuku-ku, Tokyo, Japan<br />
OLYMPUS AMERICA INC.<br />
Two Corporate Center Drive, Melville, NY 11747-3157, U.S.A. Tel. 631-844-5000<br />
Technical Support (USA)<br />
24/7 online automated help: http://www.olympusamerica.com/support<br />
Phone customer support: Tel. 1-888-553-4448 (Toll-free)<br />
Our phone customer support is available from 8 am to 10 pm<br />
(Monday to Friday) ET<br />
E-Mail: distec@olympus.com<br />
Olympus software updates can be obtained at: http://www.olympus.com/digital<br />
Olympus Europa GmbH<br />
Premises/Goods delivery: Wendenstrasse 14-18, 20097 Hamburg, Germany<br />
Tel: +49 40-23 77 3-0 / Fax: +49 40-23 07 61<br />
Letters: Postfach 10 49 08, 20034 Hamburg, Germany<br />
European Technical Customer Support:<br />
Please visit our homepage http://www.olympus-europa.com<br />
or call our TOLL FREE NUMBER* : 00800 - 67 10 83 00<br />
for Austria, Belgium, Denmark, Finland, France, Germany, Italy, Luxemburg,<br />
Netherlands, Norway, Portugal, Spain, Sweden, Switzerland, United Kingdom<br />
* Please note some (mobile) phone services/provider do not permit access or<br />
request an additional prefix to +800 numbers.<br />
For all not listed European Countries and in case that you can’t get connected<br />
to the above mentioned number please make use of the following<br />
CHARGED NUMBERS: +49 180 5 - 67 10 83 or +49 40 - 237 73 899<br />
Our Technical Customer Support is available from 9 am to 6 pm MET (Monday to Friday)<br />
VT826001
<strong>DIGITAL</strong><br />
<strong>CAMERA</strong><br />
PERSONAL<br />
COMPUTER<br />
<strong>DIGITAL</strong> <strong>CAMERA</strong> — PC CONNECTION<br />
OPERATION MANUAL<br />
How to use your PC to get the<br />
most from images taken with<br />
your digital camera.<br />
� Thank you for purchasing an Olympus digital camera.<br />
� This manual provides instructions on how to install the USB<br />
driver. To ensure correct installation, refer only to these<br />
installation procedures.
2<br />
Introduction<br />
This manual explains in detail how to connect your Olympus digital camera to<br />
a computer. Read it carefully and keep it in a safe place for future reference.<br />
About this manual<br />
� The information contained in this manual may be subject to change without<br />
notice. For the latest information on the product, please consult your local<br />
Olympus representative.<br />
� The information contained in this manual has been compiled by taking all<br />
possible measures to ensure its accuracy. However, if you find any errors or<br />
incomplete information, please contact your local Olympus representative.<br />
� It is prohibited by copyright laws to duplicate in part or in whole the information<br />
contained in this manual, except for personal use. Reproduction without<br />
permission of the copyright owner is prohibited.<br />
� The PC screens shown in this manual may differ slightly from the actual displays<br />
on some PC models.<br />
Trademarks<br />
� Microsoft and Windows are registered trademarks of Microsoft Corporation.<br />
� Macintosh is a trademark of Apple Computer Inc.<br />
� All other company and product names are registered trademarks and/or<br />
trademarks of their respective owners.
INDEX<br />
Flowchart . . . . . . . . . . . . . . . . . . . . . . . . 4<br />
Identifying the OS . . . . . . . . . . . . . . . . . 6<br />
Windows (98/Me/2000/XP) . . . . . . . . . . . 8<br />
Macintosh (OS 9/X). . . . . . . . . . . . . . . . 23<br />
Downloading image files using other OS<br />
(For other OS users). . . . . . . . . . . . . . . 31<br />
3<br />
Windows<br />
Macintosh
4<br />
Flowchart<br />
By connecting the camera to a computer with the provided USB cable,<br />
images on a card can be transferred to the computer. Some OS’s (operating<br />
systems) may need a special setup before connecting to the camera for the<br />
first time. Follow the chart below.<br />
For details, see the Olympus Corporate Site or phone customer<br />
support.<br />
Windows 98/<br />
98 SE (Second Edition)<br />
Installing the USB<br />
driver for Windows<br />
98 (p.9)<br />
Identifying the OS (p.6)<br />
Windows Me/2000/XP<br />
MacOS 9.0 - 9.2/OS X<br />
* For OS 8.6, see below.<br />
Connecting the camera to the computer using the provided USB cable<br />
(Windows p.11, Mac p.24)<br />
Confirming the computer recognizes<br />
the camera (p.14)<br />
Downloading image files<br />
(Windows p.17, Mac p.26)<br />
Disconnecting the USB cable<br />
(Windows p.20, Mac p.30)<br />
* Even if your computer has a USB connector, data transfer may not function<br />
correctly if you are using one of the operating systems listed below or if you have<br />
an add-on USB connector (extension card, etc.).<br />
� Windows 95/NT 4.0<br />
� Windows 98/98 SE upgrade from Windows 95<br />
� Mac OS 8.6 or lower (except Mac OS 8.6 equipped with USB MASS Storage<br />
Support 1.3.5 installed at the factory)<br />
� Data transfer is not guaranteed on a home-built PC system or PCs with no<br />
factory installed OS.
Flowchart<br />
• When connecting the camera to the computer, make sure that there is<br />
sufficient remaining battery power. When connected (transmitting) to the<br />
computer, the camera does not enter the sleep mode nor will the camera’s<br />
power turn off automatically. Depending on the camera model, when the<br />
battery power runs out or the internal temperature rises, the camera may<br />
stop operating automatically. This could cause the computer to<br />
malfunction, and any image data (file) being transmitted may be lost. Be<br />
careful when downloading files for a long period of time. Use the AC<br />
adapter (optional) when downloading files.<br />
• If you connect or disconnect the AC adapter when the camera is connected<br />
to the computer and is running on battery power, it may result in the loss of<br />
image data on the card or cause a malfunction in the computer. Before<br />
connecting or disconnecting the AC adapter, disconnect the camera from<br />
the computer and make sure that the camera is turned off.<br />
• To avoid computer malfunctions, do not turn off the camera when the<br />
camera is connected to a computer.<br />
• If the camera is connected to the computer via a USB hub, operation may<br />
not be stable if there are any compatibility problems between the computer<br />
and the hub. In such cases, do not use the hub and connect the camera<br />
directly to the computer.<br />
• You can view images using: graphics applications that support the JPEG<br />
file format (Paint Shop Pro, Photoshop, etc.); Internet browsers (Netscape<br />
Communicator, Microsoft Internet Explorer, etc.); CAMEDIA Master<br />
software; or other software. For details on using commercial graphics<br />
applications, refer to their instruction manuals.<br />
• QuickTime is needed for playing back movies. QuickTime is included on<br />
the provided software CD.<br />
• If you want to process images, make sure to download them to your<br />
computer first. Depending on the software, image files may be destroyed if<br />
the images are processed (rotated, etc.) while they are on the card.<br />
5
6<br />
Identifying the OS<br />
Identify the OS on your computer before connecting the camera. How to<br />
identify the OS depends on the computer.<br />
� Windows<br />
1 Double-click the “My Computer”<br />
icon on your desktop.<br />
When the “My computer” icon is not on<br />
your desktop, click “Control Panel”<br />
from the “Start” menu.<br />
2 Double-click the<br />
“Control Panel” icon.<br />
3 Double-click the<br />
“System” icon.<br />
The way the file icons inside the folder appear may vary depending on your<br />
version of Windows. If you don’t see the icon you are looking for, click on<br />
“view all Control Panel options” on the left of the window.
4 A System Properties window will<br />
appear. Note and record the<br />
“System:” information.<br />
Confirm that your system is Windows<br />
98, 98 SE, Me, 2000 Professional or<br />
Windows XP, then press “OK” to close<br />
the window.<br />
Identifying the OS<br />
If your OS is Windows 98/98 SE, proceed to “Installing the USB<br />
driver for Windows 98” ( p.9).<br />
Users running Windows Me/2000/XP p.11<br />
Users running other OS p.31<br />
� Mac OS (Macintosh)<br />
Select “About This Computer” from the Apple menu on the menu bar.<br />
A window appears with the name of the computer’s OS.<br />
Confirm that the OS is OS 9.0-9.2 or OS X.<br />
Users running Mac OS 9/X p.23<br />
Users running other OS p.31<br />
7
Windows<br />
8<br />
Windows<br />
Using Windows 98/Me/2000/XP<br />
Make sure that:<br />
�Your computer is turned on and Windows is running.<br />
�If you are running any applications, quit them all.<br />
�You are recommended to power the camera using the optional AC adapter.<br />
If the battery power runs out while the computer is accessing the card in the<br />
camera, the camera will turn off in the middle of the operation and this could<br />
destroy image files (data). If you are using batteries, make sure that there<br />
is sufficient remaining battery power.<br />
Installing the USB driver for Windows 98 (When using Windows<br />
98/98 SE) ....................................................................................... 9<br />
Connecting the camera to the computer ................................. 11<br />
Confirming the computer recognizes the camera .................. 14<br />
Confirming the USB driver is installed .................................... 15<br />
Downloading images to your computer................................... 17<br />
Disconnecting the camera from your computer ..................... 20
Installing the USB driver for Windows 98<br />
(When using Windows 98/98 SE)<br />
If your OS is Windows 98/98 SE, you must install the USB driver. Follow the<br />
instructions below to install the USB driver in your computer. Once it is fully<br />
installed, you do not need to repeat the procedure again.<br />
If your OS is Windows Me/2000/XP, you do not need to install the USB<br />
driver. Proceed to “Connecting the camera to the computer” ( p.11).<br />
1 Insert the provided software CD<br />
into your CD-ROM drive.<br />
2 The Olympus Windows Installer<br />
should automatically launch. Click<br />
“USB Driver”.<br />
If the USB driver is already installed in<br />
your computer, this option will not<br />
appear.<br />
• This option will not appear if you are<br />
using Windows Me/2000/XP.<br />
If the installer is not automatically launched, select “Run..” on the<br />
“Start” menu and then execute “(drive letter):/ Information.exe”.<br />
The drive letter of the CD-ROM varies depending on the computer.<br />
To identify the drive letter, double-click “My Computer” on the desktop.<br />
9<br />
Windows
Windows<br />
10<br />
Installing the USB driver for Windows 98 (When using Windows 98/98 SE)<br />
3 Click “Continue”. The installation of<br />
the USB driver will start.<br />
4 Click “OK” to restart your computer<br />
and the installation is complete.<br />
5 When the computer has restarted, installation is complete. If the<br />
Olympus Windows Installer screen appears, click “Close” and<br />
remove the CD-ROM from the CD-ROM drive.
Connecting the camera to the computer<br />
Users running Windows 98/98SE need to install the USB drive before<br />
connecting the camera to your computer for the first time. (<br />
1 Some camera models have<br />
a “USB” setting in the<br />
menu. Make sure that “PC”<br />
is selected before<br />
connecting. This is not<br />
p.9)<br />
required if your camera<br />
does not have this setting.<br />
For details on how to<br />
[SETUP] tab<br />
Menu button<br />
Arrow pad<br />
operate the menu, refer to your camera's reference manual.<br />
2 Insert the marked end of the provided USB cable into the USB<br />
port on your computer as shown below.<br />
SEtUP CARD EDIt PLAY<br />
USB port<br />
The location of the USB port varies depending on the computer. For details,<br />
refer to your computer’s manual.<br />
3 After making sure that the camera is turned off, connect the end<br />
of the USB cable to the USB connector on the camera.<br />
The location of the USB connector or multi connector varies depending<br />
on the camera model. Refer to the camera manual for details.<br />
Computer<br />
Rectangular terminal<br />
USB port<br />
Look for this mark.<br />
USB cable<br />
Smaller terminal<br />
USB connector or<br />
multi connector<br />
Terminal<br />
Windows<br />
11
Windows<br />
12<br />
Connecting the camera to the computer<br />
4 Turn the camera on in<br />
(playback) mode.<br />
• Most cameras with a lens barrier<br />
turn on automatically in Step 3,<br />
with the exception of some<br />
models which require you to press<br />
the (monitor) button or<br />
button.<br />
5 When the screen shown right<br />
appears on the monitor in<br />
Step 4, use the arrow pad to<br />
select “PC” and press the OK<br />
button.<br />
Lens barrier<br />
6 The computer recognizes the camera as a new<br />
device.<br />
• Depending on the camera model, when you<br />
connect the camera to the computer, the lamp on<br />
the right of the viewfinder or the self-timer lamp<br />
may light.<br />
button or<br />
button<br />
Power switch<br />
Mode dial<br />
Power switch<br />
Arrow pad<br />
OK button<br />
When you connect the camera to the computer for the first time, the<br />
computer automatically recognizes the camera. Click “OK” when the<br />
message saying that the installation is completed appears. The<br />
computer recognizes the camera as a “Removable Disk”.<br />
SELECt<br />
GO<br />
Lamp
Connecting the camera to the computer<br />
� Windows XP<br />
You can download image files from the camera easily.<br />
Select “Copy pictures to folder on my computer using Microsoft<br />
Scanner and Camera Wizard”, then follow the on-screen instructions.<br />
You may also select “take no action” to bypass the Microsoft Scanner<br />
and Camera Wizard. You may then use a more advanced image<br />
viewing/editing program such as Olympus CAMEDIA Master<br />
software. For detailed instructions on downloading, refer to the<br />
CAMEDIA Master software user’s guide.<br />
When the camera is connected to the computer, none of the camera buttons<br />
are functional.<br />
Windows<br />
13
Windows<br />
14<br />
Confirming the computer recognizes the camera<br />
1 Double-click the “My Computer”<br />
icon on the desktop.<br />
For users running Windows XP, click<br />
“My Computer” from the “Start” menu.<br />
2 Make sure the “Removable Disk”<br />
icon appears in the window.<br />
There may already be other<br />
“Removable Disk” icons for other<br />
devices, such as a removable media<br />
drive or USB SmartMedia Reader/<br />
Writer. In this case, the digital camera<br />
is recognized as another “Removable<br />
Disk”.<br />
If you cannot find the icon, the camera<br />
and computer are not connected<br />
properly. Turn the camera off,<br />
disconnect the camera from the<br />
computer and connect again, or proceed to “Confirming the USB driver<br />
is installed” ( p.15) to make sure that the USB driver is fully<br />
installed.
Confirming the USB driver is installed<br />
If the computer does not recognize the camera as a Removable Disk, follow<br />
the procedure below to check whether the USB driver has been fully installed.<br />
1 Open “My Computer”<br />
and double-click the<br />
“Control Panel” icon.<br />
For users running<br />
Windows XP, open<br />
“Control Panel” from the<br />
“Start” menu.<br />
2 Double-click the<br />
“System” icon.<br />
3 The System window will appear.<br />
Click the “Device Manager” tab.<br />
Windows<br />
15
Windows<br />
16<br />
Confirming the USB driver is installed<br />
4 Confirm that “OLYMPUS Digital<br />
Camera” is in the “Universal Serial<br />
Bus Controller” category.<br />
If you cannot find the “OLYMPUS<br />
Digital Camera”, turn the camera off,<br />
disconnect the camera from the<br />
computer and start again.<br />
Users running Windows 98/98 SE<br />
start again from “Confirming the USB<br />
driver is installed”, and Users running<br />
Windows Me/2000/XP start from<br />
“Connecting the camera to the<br />
computer”.<br />
If the USB driver was successfully installed, you can find the following in the<br />
“Device Manager”.<br />
– the name of the camera you have connected listed under “Disk drives”<br />
– “OLYMPUS Digital Camera” listed as one of the items in the “Universal<br />
Serial Bus Controller” category
Downloading images to your computer<br />
1 Double-click the “My Computer”<br />
icon on the desktop.<br />
For users running Windows XP, click<br />
“Control Panel” from the “Start” menu.<br />
2 Double-click the “Removable Disk”<br />
icon.<br />
A new “Removable Disk” icon appears<br />
when the camera is connected to the<br />
computer, as the digital camera is<br />
recognized as a “Removable Disk”.<br />
If an error message appears when you double-click the icon, there may be a<br />
problem with one of the following:<br />
� the camera’s power source (the AC adapter is not properly connected or<br />
the battery power is low)<br />
Make sure that the AC adapter is correctly connected or that the batteries<br />
are not running low.<br />
� the card (there is no card in the camera or there is a problem with the<br />
card)<br />
Check that you can play back pictures stored on the card on the monitor<br />
of your digital camera.<br />
3 Double-click the<br />
“Dcim” folder.<br />
Windows<br />
17
Windows<br />
18<br />
Downloading images to your computer<br />
4 Double-click the “100olymp” folder.<br />
Image files (JPEG files) with files<br />
names such as “P1010001.jpg” are<br />
displayed.<br />
• The camera automatically assigns folder names and file names according<br />
to the following rules.<br />
Folder name<br />
File name<br />
(Example)<br />
(Example)<br />
Serial number Month / Day / Serial number<br />
• Serial numbers of image files run from 0001 to 9999.<br />
• Serial numbers of folders run from 100 to 999.<br />
• When file number 9999 is reached, a new folder is created and assigned<br />
the next number.<br />
• Months January through September are expressed by the numbers 1<br />
through 9, October by the letter A, November by B and December by C.<br />
5 Double-click the “My Documents”<br />
icon on the desktop.<br />
If you cannot find the icon on the<br />
desktop, select “Explorer” on the Start<br />
menu and double-click the “My<br />
Documents” icon.
The “My Documents” window is<br />
displayed.<br />
6 Drag & drop the image<br />
you want to save in the<br />
computer (in this case,<br />
P1010012.jpg) to the<br />
“My Documents”<br />
window.<br />
The image is saved in the<br />
computer (in My<br />
Documents folder).<br />
• To select all files, choose Edit > Select all.<br />
Downloading images to your computer<br />
When the image file has been downloaded to the computer, you can view<br />
images by double-clicking the image files downloaded to your computer. The<br />
files will be opened in the default image viewer of the operating system. If you<br />
want to view the image a different size or process it, you will need to open the<br />
image with software that supports JPEG or TIFF images files, such as Paint<br />
Shop Pro, Photoshop or CAMEDIA Master software.<br />
The lamp on the right of the viewfinder or the card access lamp blinks while<br />
the image is being copied. Never open the card cover on the camera, load or<br />
remove the batteries, or connect or disconnect the AC adapter while the lamp<br />
is blinking as the image files may be destroyed.<br />
Windows<br />
19
Windows<br />
20<br />
Disconnecting the camera from your computer<br />
If your OS is Windows Me/2000, proceed to “Windows Me/2000/XP” (<br />
p.21).<br />
� Windows 98<br />
1 Make sure that the lamp on the<br />
right of the viewfinder or the selftimer<br />
lamp (which on some<br />
models light while the camera is<br />
connected to the computer) or the<br />
card access lamp is not blinking.<br />
The lamps and their location vary<br />
depending on the model. Refer to<br />
your camera’s reference manual.<br />
2 Double-click the “My Computer”<br />
icon and right-click the “Removable<br />
Disk” to display the menu.<br />
3 Click “Eject” on the menu.<br />
Lamp<br />
Card access lamp
Disconnecting the camera from your computer<br />
4 Make sure that the lamp on the right Lamp<br />
of the viewfinder or the self-timer<br />
lamp (which on some models light<br />
while the camera is connected to<br />
the computer) or the card access<br />
lamp is not blinking.<br />
Depending on the camera model, the<br />
green lamp may light or lamps that<br />
were lit while the camera was connected to the computer may go off. If<br />
the lamp is not flashing, then the cable can be removed.<br />
5 Remove the USB cable from the<br />
camera.<br />
6 Remove the USB cable from your computer.<br />
� Windows Me/2000/XP<br />
1 Make sure that the lamp on the right<br />
of the viewfinder or the self-timer<br />
lamp (which on some models light<br />
while the camera is connected to<br />
the computer) or the card access<br />
lamp is not blinking.<br />
The lamps and their location vary<br />
depending on the model. Refer to your<br />
camera’s reference manual.<br />
Lamp<br />
Windows<br />
21
Windows<br />
22<br />
Disconnecting the camera from your computer<br />
2 Click the “Unplug or Eject<br />
Hardware” icon on the task bar.<br />
The message saying that the drive<br />
has been stopped appears.<br />
3 Click on the message.<br />
The “Unplug or Eject Hardware”<br />
window appears.<br />
4 When a message appears, click<br />
“OK”.<br />
5 Remove the USB cable from the<br />
camera.<br />
6 Remove the USB cable from your computer.<br />
If the window returns the following message when you click “Unplug or Eject<br />
Hardware”, first make sure that no image data is being downloaded from the<br />
camera, and then remove the USB cable.
Make sure that:<br />
Macintosh<br />
Using Mac OS (9/X)<br />
�Your computer is turned on and Mac OS is running.<br />
�If you are running any applications, quit them all.<br />
�You are recommended to power the camera using the optional AC adapter.<br />
If the battery power runs out while the computer is accessing the card in the<br />
camera, the camera will turn off in the middle of the operation and this could<br />
destroy image files (data). If you are using batteries, make sure that there<br />
is sufficient remaining battery power.<br />
If you are running Mac OS X, the connection to the computer and<br />
downloading the image data are verified. Restrictions such as the<br />
following may occur due to the OS.<br />
�The image file properties are not displayed correctly.<br />
�Images in the camera cannot be opened without first downloading<br />
them. etc.<br />
For more details, visit the Olympus web site.<br />
Connecting the camera to the computer ................................. 24<br />
Downloading images to your computer................................... 26<br />
Disconnecting the camera from your computer ..................... 30<br />
Macintosh<br />
23
Macintosh<br />
24<br />
Connecting the camera to the computer<br />
1 Some camera models have<br />
a “USB” setting in the<br />
menu. Make sure that “PC”<br />
is selected before<br />
connecting.This is not<br />
required if your camera<br />
does not have this setting.<br />
For details on how to<br />
[SETUP] tab<br />
Menu button<br />
Arrow pad<br />
operate the menu, refer to your camera's reference manual.<br />
2 Insert the marked end of the USB cable into the USB port on your<br />
computer as shown below.<br />
The location of the USB port varies depending on the computer. For details,<br />
refer to your computer’s manual.<br />
3 After making sure that the camera is turned off, connect the end<br />
of the USB cable to the USB connector on the camera.<br />
The location of the USB connector or multi connector varies depending<br />
on the camera model. Refer to the camera manual for details.<br />
Computer<br />
Rectangular terminal<br />
Smaller terminal<br />
USB port<br />
USB cable<br />
PLAY<br />
EDIt<br />
CARD<br />
SEtUP<br />
Look for this mark.<br />
USB port<br />
Terminal<br />
USB connector or<br />
multi connector
4 Turn the camera on in<br />
(playback) mode.<br />
• Most cameras with a lens barrier<br />
turn on automatically in Step 3,<br />
with the exception of some<br />
models which require you to press<br />
the (monitor) button or<br />
button.<br />
Connecting the camera to the computer<br />
Lens barrier<br />
button or<br />
button<br />
Power switch<br />
Mode dial<br />
Power switch<br />
5 When the screen shown right<br />
appears on the monitor in<br />
Step 4, use the arrow pad to<br />
select “PC” and press the OK<br />
button.<br />
Arrow pad<br />
6 The computer recognizes the<br />
camera as a new device.<br />
SELECt<br />
GO<br />
OK button<br />
• Depending on the camera model,<br />
when you connect the camera to<br />
the computer, the lamp on the<br />
right of the viewfinder or the self-timer lamp may light.<br />
The computer recognizes the camera automatically and an “Untitled”<br />
icon appears on the desktop. If you cannot find this icon, turn off the<br />
camera and connect again.<br />
� Mac OS X<br />
When the computer has recognized the camera, the Apple Image<br />
Capture software automatically launches. p.29<br />
When the camera is connected to the computer, none of the camera buttons<br />
are functional.<br />
Macintosh<br />
25
Macintosh<br />
26<br />
Downloading images to your computer<br />
� Mac OS 9<br />
You can download images from the camera and save them in your computer<br />
(in this case, in the Hard Disk).<br />
1 Double-click the “Untitled” icon<br />
displayed on the desktop when the<br />
camera is connected to the<br />
computer.<br />
If you cannot find this icon, or if an error message appears when you doubleclick<br />
the icon, there may be a problem with one of the following:<br />
� the camera’s power source (the AC adapter is not properly connected or<br />
the battery power is low)<br />
� the card (there is no card in the camera or there is a problem with the<br />
card)<br />
Check that you can play back pictures on the monitor of your camera.<br />
� the USB cable (the camera is not properly connected to the computer by<br />
the USB cable).<br />
� Apple “File Exchange” extension is not enabled.<br />
• Please refer to your Apple operating system manual for instructions on<br />
how to enable this extension.<br />
2 Double-click the<br />
“Dcim” folder.<br />
3 Double-click the<br />
“100OLYMP” folder.
Image files (JPEG files) with files<br />
names such as “P1010001.JPG” are<br />
displayed.<br />
Downloading images to your computer<br />
• The camera automatically assigns folder names and file names according<br />
to the following rules.<br />
Folder name<br />
(Example)<br />
File name<br />
(Example)<br />
Serial number Month / Day / Serial number<br />
• Serial numbers of image files run from 0001 to 9999.<br />
• Serial numbers of folders run from 100 to 999.<br />
• When file number 9999 is reached, a new folder is created and assigned<br />
the next number.<br />
• Months January through September are expressed by the numbers 1<br />
through 9, October by the letter A, November by B and December by C.<br />
4 Double-click the “Macintosh HD”<br />
icon on the desktop.<br />
Macintosh<br />
27
Macintosh<br />
28<br />
Downloading images to your computer<br />
The “Hard Disk” window is displayed.<br />
5 Drag & drop the image<br />
you want to save in the<br />
computer (in this case,<br />
P1010012.JPG) to the<br />
“Hard Disk” window.<br />
The image is saved in<br />
the computer (in the<br />
Hard disk).<br />
• To select all images,<br />
click Edit > Select all.<br />
When the image file has been copied to the computer, you can view images<br />
by double-clicking the image files in the “Hard Disk” folder. The files will be<br />
opened in the default image viewer of the operating system. If you want to<br />
view the image a different size or process it, you will need to open the image<br />
with software that supports JPEG or TIFF images files, such as Paint Shop<br />
Pro, Photoshop or CAMEDIA Master software.<br />
The lamp on the right of the viewfinder or the card access lamp blinks while<br />
the image is being copied. Never open the card cover on the camera, load or<br />
remove the batteries, or connect or disconnect the AC adapter while the lamp<br />
is blinking as the image files may be destroyed.
� Mac OS X<br />
Downloading images to your computer<br />
Malfunctions such as the following may occur due to the OS.<br />
• If the camera is not connected correctly, a malfunction occurs in the<br />
computer.<br />
• Date and time information of image files is not accurately displayed.<br />
• If the card cover of the camera is opened while connecting to the computer,<br />
the “untitled” icon does not disappear from the desktop, etc.<br />
When the computer has recognized the camera, the Apple Image Capture<br />
software dialog appears.<br />
1 From the “Download To” menu,<br />
select a destination folder.<br />
2 To download all images, click<br />
“Download All”.<br />
To selectively download images,<br />
click “Download Some” and<br />
highlight the desired images.<br />
The images are transferred from the camera to your computer.<br />
If you are operating Mac OS X and you want to download images using the<br />
same procedure as for Mac OS 9, select “File > Close” and exit the Apple<br />
Image Capture software. At this time, the camera is indicated as “unlabeled”.<br />
If you use the Apple Image Capture software, images downloaded to your<br />
computer and transferred back to a card may not play back on the camera or<br />
may have other problems.<br />
Macintosh<br />
29
Macintosh<br />
30<br />
Disconnecting the camera from your computer<br />
1 Make sure that the lamp on the<br />
right of the viewfinder or the selftimer<br />
lamp (which on some<br />
models light while the camera is<br />
connected to the computer) or the<br />
card access lamp is not blinking.<br />
The lamps and their location vary<br />
depending on the model. Refer to<br />
your camera’s reference manual.<br />
2 Drag the “untitled” icon on the<br />
desktop to “Trash”.<br />
3 Make sure that the lamp on the right Lamp<br />
of the viewfinder or the self-timer<br />
lamp (which on some models light<br />
while the camera is connected to<br />
the computer) or the card access<br />
lamp is not blinking.<br />
Depending on the camera model, the<br />
green lamp may light or lamps that<br />
were lit while the camera was<br />
connected to the computer may go off. If the lamp is not flashing, then<br />
the cable can be removed.<br />
4 Remove the USB cable from the<br />
camera.<br />
5 Remove the USB cable from your<br />
computer.<br />
Lamp<br />
Card access lamp
Downloading image files using other OS<br />
(For other OS users)<br />
Users running other OS cannot connect the camera directly to a computer.<br />
� Windows 95 � Windows NT � Mac OS before OS 9<br />
For an OS listed above, you can download images directly to your computer<br />
using an optional floppy disk adapter or PC card adapter.<br />
For details, see the Olympus Corporate Site or phone customer support.<br />
Does your computer have a USB interface?<br />
Is there a port marked on your computer?<br />
No<br />
Does your computer have a built-in PC card slot?<br />
No<br />
No<br />
Yes<br />
Is your OS one of<br />
the following?<br />
•Windows 98<br />
•Windows 2000<br />
•Windows Me<br />
•Windows XP<br />
•Mac OS 9/X<br />
Yes<br />
Yes<br />
Consult your nearest Olympus representative.<br />
Connect the camera directly<br />
to your computer using the<br />
provided USB cable.<br />
Use the optional USB<br />
reader/writer.*<br />
*Certain card readers may not be<br />
compatible with Mac OS X.<br />
Check the Olympus website for<br />
the most up-to-date compatibility<br />
information.<br />
Use the optional PC card adapter*.<br />
*Not supported by Windows NT4.0 or<br />
lower<br />
31
© 2004 OLYMPUS CORPORATION<br />
http://www.olympus.com/<br />
OLYMPUS CORPORATION<br />
Shinjuku Monolith, 3-1 Nishi-Shinjuku 2-chome, Shinjuku-ku, Tokyo, Japan<br />
OLYMPUS AMERICA INC.<br />
Two Corporate Center Drive, Melville, NY 11747-3157, U.S.A. Tel. 631-844-5000<br />
Technical Support (USA)<br />
24/7 online automated help: http://www.olympusamerica.com/support<br />
Phone customer support: Tel. 1-888-553-4448 (Toll-free)<br />
Our phone customer support is available from 8 am to 10 pm<br />
(Monday to Friday) ET<br />
E-Mail: distec@olympus.com<br />
Olympus software updates can be obtained at: http://www.olympus.com/digital<br />
Olympus Europa GmbH<br />
Premises/Goods delivery: Wendenstrasse 14-18, 20097 Hamburg, Germany<br />
Tel: +49 40-23 77 3-0 / Fax: +49 40-23 07 61<br />
Letters: Postfach 10 49 08, 20034 Hamburg, Germany<br />
European Technical Customer Support:<br />
Please visit our homepage http://www.olympus-europa.com<br />
or call our TOLL FREE NUMBER* : 00800 - 67 10 83 00<br />
for Austria, Belgium, Denmark, Finland, France, Germany, Italy, Luxemburg,<br />
Netherlands, Norway, Portugal, Spain, Sweden, Switzerland, United Kingdom<br />
* Please note some (mobile) phone services/provider do not permit access or<br />
request an additional prefix to +800 numbers.<br />
For all not listed European Countries and in case that you can’t get connected<br />
to the above mentioned number please make use of the following<br />
CHARGED NUMBERS: +49 180 5 - 67 10 83 or +49 40 - 237 73 899<br />
Our Technical Customer Support is available from 9 am to 6 pm MET (Monday to Friday)<br />
VT826001