VG-170 Instruction Manual
VG-170 Instruction Manual
VG-170 Instruction Manual

Create successful ePaper yourself
Turn your PDF publications into a flip-book with our unique Google optimized e-Paper software.
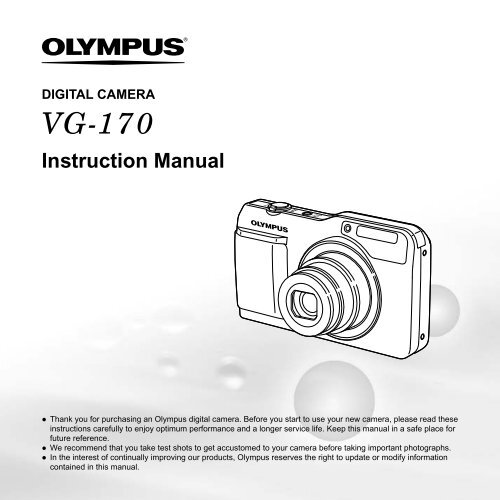
DIGITAL CAMERA<br />
<strong>VG</strong>-<strong>170</strong><br />
<strong>Instruction</strong> <strong>Manual</strong><br />
● Thank you for purchasing an Olympus digital camera. Before you start to use your new camera, please read these<br />
instructions carefully to enjoy optimum performance and a longer service life. Keep this manual in a safe place for<br />
future reference.<br />
● We recommend that you take test shots to get accustomed to your camera before taking important photographs.<br />
● In the interest of continually improving our products, Olympus reserves the right to update or modify information<br />
contained in this manual.
Checking the contents of the box<br />
Other accessories not shown: warranty card<br />
Contents may vary depending on purchase location.<br />
2 EN<br />
Digital camera<br />
Names of Parts<br />
Camera unit<br />
1<br />
2<br />
3<br />
4<br />
or<br />
Strap LI-50B Lithium F-2AC<br />
USB cable AV cable<br />
Ion Battery USB-AC adapter (CB-USB7) (CB-AVC5)<br />
5<br />
6<br />
7<br />
8<br />
9<br />
10<br />
OLYMPUS<br />
Setup<br />
CD-ROM<br />
1 Multi-connector<br />
2 Connector cover<br />
3 Strap eyelet<br />
4 Battery/card compartment<br />
cover<br />
5 Self-timer lamp<br />
AF illuminator<br />
6 Flash<br />
7 Lens<br />
8 Microphone<br />
9 Speaker<br />
10 Tripod socket
1<br />
2<br />
3<br />
Attaching the camera strap<br />
Pull the strap tight so that it does not come loose.<br />
4<br />
5<br />
6<br />
7<br />
8<br />
9<br />
10<br />
1 n button<br />
2 Shutter button<br />
3 Monitor<br />
4 Zoom lever<br />
5 R button (shooting movies)<br />
6 Indicator lamp<br />
7 q button (switch between<br />
shooting and playback)<br />
8 Q button (OK)<br />
9 Arrow pad<br />
INFO button (change<br />
information display)<br />
� button (erase)<br />
10 � button<br />
EN<br />
3
Monitor<br />
Shooting mode display<br />
20<br />
19<br />
4 EN<br />
4 NORM Date<br />
z<br />
1/100 F2.8<br />
0:00:34<br />
18 17 1615<br />
14 13 12 11<br />
23 22<br />
21<br />
1<br />
P<br />
0.0<br />
WB<br />
AUTO<br />
ISO<br />
AUTO<br />
14M<br />
2<br />
3<br />
4<br />
5<br />
6<br />
7<br />
8 910<br />
1 Shooting mode ....... p. 16, 23<br />
2 Flash ............................. p. 19<br />
Flash standby/fl ash charge<br />
.................................... p. 49<br />
3 Macro ........................... p. 28<br />
4 Self-timer ...................... p. 28<br />
5 Exposure compensation<br />
.................................... p. 29<br />
6 White balance ............... p. 29<br />
7 ISO ............................... p. 30<br />
8 Drive ............................. p. 31<br />
9 Image size<br />
(still images)................ p. 31<br />
10 Recording with sound<br />
(movies) ...................... p. 34<br />
11 Image size (movies) ..... p. 32<br />
12 Recording length<br />
(movies) ...................... p. 57<br />
13 Movie recording icon .... p. 17<br />
14 World time .................... p. 42<br />
15 Date stamp ................... p. 34<br />
16 Compression<br />
(still images)................ p. 32<br />
17 Number of storable pictures<br />
(still images)................ p. 16<br />
18 Current memory ........... p. 55<br />
19 Battery check ................ p. 12<br />
20 AF target mark .............. p. 17<br />
21 Aperture value .............. p. 17<br />
22 Shutter speed ............... p. 17<br />
23 Camera shake warning
Playback mode display<br />
● Normal display<br />
1 2 3 4 5<br />
6 7<br />
10 4/30<br />
’12/02/26 12:30<br />
17<br />
00:12/00:34<br />
Still image Movie<br />
● Detailed display<br />
1 2 3 4 5 6 7 8 9 10 11 12<br />
10<br />
4/30<br />
MAGIC<br />
1/1000<br />
F2.8 2.0<br />
1 ISO<br />
100<br />
WB<br />
AUTO<br />
14M NORM 100-0004<br />
’12/02/26 12:30<br />
1<br />
18<br />
MAGIC<br />
1/1000 F2.8<br />
ISO WB<br />
1<br />
100 AUTO<br />
7<br />
2.0<br />
14M NORM 100-0004<br />
’12/02/26 12:30<br />
19<br />
13<br />
14<br />
15<br />
16<br />
17<br />
1 Battery check ................ p. 12<br />
2 Eye-Fi transferred ......... p. 38<br />
3 Protect .......................... p. 37<br />
4 Adding sound ............... p. 35<br />
5 Print reservation/number of<br />
prints ...................p. 47/p. 46<br />
6 Current memory ........... p. 55<br />
7 Frame number/<br />
total number of images<br />
.................................... p. 20<br />
Elapsed time/<br />
total shooting time<br />
(movies) ...................... p. 21<br />
8 P ............................ p. 26<br />
9 Shutter speed ............... p. 17<br />
10 Shooting mode ....... p. 16, 23<br />
11 ISO ............................... p. 30<br />
12 Aperture value .............. p. 17<br />
13 Exposure compensation<br />
.................................... p. 29<br />
14 White balance ............... p. 29<br />
15 File number<br />
16 Compression<br />
(still images)................ p. 32<br />
Frame rate<br />
(movies) ...................... p. 32<br />
17 Date and time ............... p. 15<br />
18 Image size .................... p. 31<br />
19 Volume ......................... p. 40<br />
EN<br />
5
Camera Settings<br />
Using Using the the Direct Direct Buttons Buttons<br />
Frequently used functions can be accessed using the direct buttons.<br />
Arrow pad<br />
6 EN<br />
H (left)<br />
F (up) /<br />
INFO button (change information<br />
display) (p. 19, 22)<br />
G (down) /<br />
� button (erase) (p. 21)<br />
I (right)<br />
Q button<br />
Zoom lever (p. 18)<br />
Shutter button (p. 17)<br />
R button (shooting movies) (p. 17)<br />
q button (switch between shooting and<br />
playback) (p. 17, 20)<br />
� button (p. 9)
Operation guide<br />
The symbols FGHI displayed for image selections<br />
and settings indicate that the arrow pad is to be used.<br />
X Back MENU<br />
Y M D Time<br />
.<br />
.<br />
:<br />
2012 02 26 12 30 Y/M/D<br />
Sel. Image Back MENU<br />
4/30<br />
14 M NORM NORM<br />
100-0004<br />
‘12/02/26 12:30<br />
Single Print More<br />
Operation guides displayed on the screen indicate that the<br />
� button, Q button, or zoom lever can be used.<br />
Camera Menu<br />
Reset<br />
Compression<br />
AF Mode<br />
Digital Zoom<br />
AF Illuminat.<br />
Icon Guide<br />
Date Stamp<br />
Back MENU<br />
Back MENU<br />
Normal<br />
Face/iESP<br />
Off<br />
On<br />
On<br />
On<br />
Sel. Image (1)<br />
Operation guide<br />
OK<br />
4/30<br />
Erase/Cancel MENU<br />
EN<br />
7
Using Using the the Menu Menu<br />
Use the menu to change camera settings such as the shooting mode.<br />
8 EN<br />
There may be menus that are unavailable depending on other related settings or the � mode (p. 24).<br />
Function menu<br />
Press H during shooting to display the function menu. The function menu is used to choose the shooting mode and<br />
provides access to frequently used shooting settings.<br />
Program Auto<br />
Shooting<br />
P<br />
0.0<br />
WB<br />
AUTO<br />
ISO<br />
AUTO<br />
14M<br />
MENU<br />
Shooting mode<br />
Selected option<br />
Function menu<br />
To select the shooting mode<br />
Use HI to select a shooting mode and press the Q button.<br />
To select the function menu<br />
Use FG to select a menu and use HI to select a menu option. Press the Q<br />
button to set the function menu.<br />
P<br />
Setup menu
Setup menu<br />
Setup menu<br />
Press the � button during shooting or playback to display the setup menu. The setup menu provides access to a<br />
variety of camera settings, including options not listed in the function menu, display options, and the time and date.<br />
1 Press the � button.<br />
● The setup menu is displayed.<br />
Camera Menu Back MENU<br />
Reset<br />
Compression<br />
AF Mode<br />
Digital Zoom<br />
AF Illuminat.<br />
Icon Guide<br />
Date Stamp<br />
Normal<br />
Face/iESP<br />
Off<br />
On<br />
On<br />
On<br />
2 Press H to highlight the page tabs. Use FG<br />
to select the desired page tab and press I.<br />
Page tab<br />
Submenu 1<br />
Settings Menu 2<br />
Pixel Mapping<br />
NTSC/PAL<br />
Power Save<br />
Back MENU<br />
Bright<br />
NTSC<br />
Off<br />
English<br />
X ’12.02.26 12:30<br />
World Time<br />
Settings Menu 2<br />
Back MENU<br />
Pixel Mapping<br />
Bright<br />
NTSC/PAL NTSC<br />
Power Save<br />
Off<br />
English<br />
X ’12.02.26 12:30<br />
World Time<br />
3 Use FG to select the desired submenu 1 and<br />
then press the Q button.<br />
Submenu 2<br />
Settings Menu 2<br />
Back MENU<br />
Pixel Mapping<br />
Bright<br />
NTSC/PAL NTSC<br />
Power Save Off<br />
English<br />
X ’12.02.26 12:30<br />
World Time<br />
Settings Menu 2 Back MENU<br />
Pixel Mapping<br />
NTSC/PAL<br />
Power Save<br />
X<br />
World Time<br />
Off<br />
On<br />
4 Use FG to select the desired submenu 2 and<br />
then press the Q button.<br />
● Once a setting is selected, the display returns to<br />
the previous screen.<br />
There may be additional operations.<br />
“Menu Settings” (p. 32 to 43)<br />
Settings Menu 2<br />
Back MENU<br />
Pixel Mapping<br />
Bright<br />
NTSC/PAL NTSC<br />
Power Save On<br />
English<br />
X ’12.02.26 12:30<br />
World Time<br />
5 Press the � button to complete the setting.<br />
EN<br />
9
Menu Index<br />
1 Shooting mode ...........p. 16, 23<br />
P (Program Auto)<br />
M (iAUTO)<br />
N (DIS Mode)<br />
Q (Beauty)<br />
� (Scene Mode)<br />
P (Magic Filter)<br />
~ (Panorama)<br />
2 Flash .................................p. 19<br />
3 Macro ...............................p. 28<br />
4 Self-timer ..........................p. 28<br />
5 Exposure compensation ...p. 29<br />
6 White balance ...................p. 29<br />
7 ISO ...................................p. 30<br />
8 Drive .................................p. 31<br />
9 Image Size .......................p. 31<br />
10 EN<br />
P<br />
Program Auto<br />
0.0<br />
WB<br />
AUTO<br />
ISO<br />
AUTO<br />
1<br />
2<br />
3<br />
4<br />
5<br />
6<br />
7<br />
0<br />
a<br />
b<br />
c<br />
d<br />
Camera Menu<br />
Reset<br />
Compression<br />
AF Mode<br />
Digital Zoom<br />
AF Illuminat.<br />
Icon Guide<br />
Back MENU<br />
Normal<br />
Face/iESP<br />
Off<br />
On<br />
On<br />
8 e<br />
Date Stamp<br />
On<br />
14M<br />
MENU<br />
9<br />
0 K (Camera Menu) ..........p. 32<br />
Reset<br />
Compression<br />
AF Mode<br />
Digital Zoom<br />
AF Illuminat.<br />
Icon Guide<br />
Date Stamp<br />
a A (Movie Menu) ..............p. 32<br />
Frame Rate<br />
IS Movie Mode<br />
R (Movie sound recording)<br />
b q (Playback Menu) ........p. 35<br />
Slideshow<br />
Edit<br />
Erase<br />
Print Order<br />
R (Protect)<br />
y (Rotate)<br />
c d (Settings Menu 1) ..........p. 38<br />
Memory Format/Format<br />
Backup<br />
Eye-Fi<br />
USB Connection<br />
q Power On<br />
Keep K Settings<br />
Sound Settings<br />
d d (Settings Menu 2) ..........p. 40<br />
Pixel Mapping<br />
s (Monitor)<br />
NTSC/PAL<br />
Power Save<br />
W (Language)<br />
X (Date/time)<br />
World Time<br />
e d (Settings Menu 3) ..........p. 43<br />
Beauty Settings
Preparing the Camera<br />
Inserting the battery and card<br />
1<br />
2<br />
1<br />
2<br />
Battery/card<br />
compartment<br />
cover<br />
Battery lock<br />
knob<br />
Write-protect switch<br />
Insert the battery as illustrated with the B mark<br />
toward the battery lock knob.<br />
Damage to the battery exterior (scratches, etc.) may<br />
produce heat or an explosion.<br />
Insert the battery while sliding the battery lock knob in<br />
the direction of the arrow.<br />
Insert the card straight until it clicks into place.<br />
When using the camera, be sure to close the battery/<br />
card compartment cover.<br />
Slide the battery lock knob in the direction of the<br />
arrow to unlock, and then remove the battery.<br />
Turn off the camera before opening the battery/card<br />
compartment cover.<br />
Always use SD/SDHC/SDXC cards or Eye-Fi card<br />
with this camera. Do not insert other types of memory<br />
cards. “Using the card” (p. 55)<br />
Do not touch the contact area of the card directly.<br />
This camera can be used without a card by storing<br />
images in its internal memory.<br />
3 1<br />
“Number of storable pictures (still images)/Recording<br />
length (movies) in the internal memory and cards”<br />
(p. 56)<br />
To remove the card<br />
1 2<br />
Press the card in until it clicks and comes out slightly,<br />
then grab the card and pull it out.<br />
Charging the battery with the<br />
included USB-AC adapter<br />
The included F-2AC USB-AC adapter (hereafter referred<br />
to as USB-AC adapter) differs depending on the region<br />
where you purchased the camera. If you received a plugin<br />
type USB-AC adapter, plug it directly into AC outlet.<br />
2<br />
EN<br />
11
12 EN<br />
The included USB-AC adapter has been designed<br />
to be used for charging and playback. Do not take<br />
pictures while the AC adapter is connected to the<br />
camera.<br />
Be sure to unplug the power plug of the USB-AC<br />
adapter from the wall outlet when the charging is<br />
complete or the playback ends.<br />
The battery can be charged while the camera is<br />
connected to the computer. Charging time varies<br />
depending on the performance of a computer. (There<br />
may be cases in which it takes approx. 10 hours.)<br />
Connecting the camera<br />
Connector cover<br />
AC outlet<br />
or<br />
Multi-connector<br />
USB connector<br />
(supplied)<br />
Indicator lamp<br />
Indicator lamp<br />
On: Charging<br />
Off: Charged<br />
The battery is not fully charged at the time of<br />
purchase. Before use, be sure to charge the battery<br />
until the indicator lamp turns off (up to 4 hours).<br />
If the indicator lamp does not light, the camera is not<br />
correctly connected or the battery, camera, or USB-<br />
AC adapter may not be functioning as expected.<br />
When to charge the batteries<br />
Charge the battery when the error message shown below<br />
appears.<br />
Flashes in red<br />
Battery Empty<br />
Setting up using the supplied CD<br />
Installation of [ib] computer software using the<br />
supplied CD is available on Windows computers only.<br />
Windows<br />
1 Insert the supplied CD in a CD-ROM drive.
Windows XP<br />
● A “Setup” dialog will be displayed.<br />
Windows Vista/Windows 7<br />
● An Autorun dialog will be displayed. Click<br />
“OLYMPUS Setup” to display the “Setup” dialog.<br />
If the “Setup” dialog is not displayed, select “My<br />
Computer” (Windows XP) or “Computer” (Windows<br />
Vista/Windows 7) from the start menu. Double-click<br />
the CD-ROM (OLYMPUS Setup) icon to open the<br />
“OLYMPUS Setup” window and then double-click<br />
“Launcher.exe”.<br />
If a “User Account Control” dialog is displayed, click<br />
“Yes” or “Continue”.<br />
2 Register your Olympus product.<br />
● Click the “Registration” button and follow the onscreen<br />
instructions.<br />
To register the camera, it must be connected to the<br />
computer. “Connecting the camera” (p. 12)<br />
If nothing is displayed on the camera screen even<br />
after connecting the camera to the computer, the<br />
battery may be exhausted. Leave the camera<br />
connected to the computer until the battery has<br />
charged, then disconnect and reconnect the camera.<br />
3 Install OLYMPUS Viewer 2 and [ib] computer<br />
software.<br />
● Check the system requirements before beginning<br />
installation.<br />
● Click the “OLYMPUS Viewer 2” or “OLYMPUS ib”<br />
button and follow the on-screen instructions to<br />
install the software.<br />
OLYMPUS Viewer 2<br />
Operating<br />
System<br />
Windows XP (Service Pack 2 or later) /<br />
Windows Vista / Windows 7<br />
Processor Pentium 4 1.3 GHz or better<br />
RAM<br />
1 GB or more (2 GB or more<br />
recommended)<br />
Free Hard<br />
Drive Space<br />
1 GB or more<br />
Monitor<br />
Settings<br />
1024 × 768 pixels or more<br />
Minimum 65,536 colors<br />
(16,770,000 colors recommended)<br />
[ib]<br />
Operating Windows XP (Service Pack 2 or later) /<br />
System Windows Vista / Windows 7<br />
Pentium 4 1.3 GHz or better<br />
Processor (Pentium D 3.0 GHz or better required<br />
for movies)<br />
512 MB or more (1 GB or more<br />
recommended)<br />
RAM<br />
(1 GB or more required for movies — 2 GB<br />
or more recommended)<br />
Free Hard<br />
1 GB or more<br />
Drive Space<br />
Monitor<br />
Settings<br />
Graphics<br />
1024 × 768 pixels or more<br />
Minimum 65,536 colors (16,770,000<br />
colors recommended)<br />
A minimum of 64 MB video RAM with<br />
DirectX 9 or later.<br />
* See online help for information on using the software.<br />
4 Install the camera manual.<br />
● Click the “Camera <strong>Instruction</strong> <strong>Manual</strong>” button and<br />
follow the on-screen instructions.<br />
EN<br />
13
Macintosh<br />
1 Insert the supplied CD in a CD-ROM drive.<br />
● Double-click the CD (OLYMPUS Setup) icon on<br />
the desktop.<br />
● Double-click the “Setup” icon to display the “Setup”<br />
dialog.<br />
2 Install OLYMPUS Viewer 2.<br />
● Check the system requirements before beginning<br />
installation.<br />
● Click the “OLYMPUS Viewer 2” button and follow<br />
the on-screen instructions to install the software.<br />
You can register via “Registration” in OLYMPUS<br />
Viewer 2 “Help”.<br />
OLYMPUS Viewer 2<br />
Operating<br />
Mac OS X v10.4.11–v10.6<br />
System<br />
Processor Intel Core Solo/Duo 1.5 GHz or better<br />
1 GB or more (2 GB or more<br />
RAM<br />
recommended)<br />
Free Hard<br />
1 GB or more<br />
Drive Space<br />
Monitor<br />
Settings<br />
14 EN<br />
1024 × 768 pixels or more<br />
Minimum 32,000 colors (16,770,000<br />
colors recommended)<br />
* Other languages can be selected from the language<br />
combo box. For information on using the software, see<br />
online help.<br />
3 Copy the camera manual.<br />
● Click the “Camera <strong>Instruction</strong> <strong>Manual</strong>” button to<br />
open the folder containing the camera manuals.<br />
Copy the manual for your language to the<br />
computer.
Language, date, time, and time zone<br />
You can choose the language for the menus and<br />
messages displayed in the monitor. Also, the date and<br />
time set here are saved to image fi le names, date prints,<br />
and other data.<br />
1 Press the n button to turn on the<br />
camera. Then, use FGHI to select your<br />
language and press the A button.<br />
The menus can be used to change the selected<br />
language. [W] (Language) (p. 42)<br />
2 Use FG to select the year for [Y] on the date<br />
and time setting screen.<br />
X Back MENU<br />
Y M D Time<br />
2012.<br />
--. -- -- : --<br />
3 Press I to save the setting for [Y].<br />
Y/M/D<br />
X Back MENU<br />
Y M D Time<br />
2012.<br />
--. -- -- : --<br />
Y/M/D<br />
4 As in Steps 2 and 3, use FGHI to set<br />
[M] (month), [D] (day), [Time] (hours and<br />
minutes), and [Y/M/D] (date order), and then<br />
press the A button.<br />
For a more accurate setting, press the Q button<br />
when the time signal hits 00 seconds while setting the<br />
minutes.<br />
The menus can be used to change the selected date<br />
and time. [X] (Date/time) (p. 42)<br />
5 Use HI to select your home time zone and<br />
press the Q button.<br />
● Use FG to turn daylight saving time ([Summer])<br />
on or off.<br />
’12.02.26 12:30<br />
Seoul<br />
Tokyo<br />
Back MENU<br />
Summer<br />
The menus can be used to change the selected time<br />
zone. [World Time] (p. 42)<br />
EN<br />
15
Shooting, Viewing, and Erasing<br />
Shooting with the optimum aperture<br />
value and shutter speed<br />
[Program Auto]<br />
In this mode, automatic shooting settings are activated<br />
while also allowing changes to a wide range of<br />
other shooting menu functions, such as exposure<br />
compensation, white balance, etc. as needed.<br />
The default settings of the function are highlighted in<br />
.<br />
1 Press the n button to turn on the<br />
camera.<br />
[Program Auto] indicator<br />
16 EN<br />
4 NORM<br />
0:00:34<br />
P<br />
0.0<br />
WB<br />
AUTO<br />
ISO<br />
AUTO<br />
14M<br />
Number of storable still pictures (p. 56)<br />
Monitor (standby mode screen)<br />
If the [Program Auto] indicator is not displayed, press<br />
H to display the function menu and then set the<br />
shooting mode to P. “Using the Menu” (p. 8)<br />
Current shooting mode display<br />
Program Auto<br />
P<br />
0.0<br />
WB<br />
AUTO<br />
ISO<br />
AUTO<br />
14M<br />
MENU<br />
Press the n button again to turn off the camera.<br />
2 Hold the camera and compose the shot.<br />
Monitor<br />
Horizontal grip<br />
Vertical grip<br />
When holding the camera, take care not to cover the<br />
fl ash with your fi ngers, etc.
3 Press the shutter button halfway down to<br />
focus on the subject.<br />
● When the camera focuses on the subject, the<br />
exposure is locked (shutter speed and aperture<br />
value are displayed), and the AF target mark<br />
changes to green.<br />
● The camera was unable to focus if the AF target<br />
mark fl ashes red. Try focusing again.<br />
AF target mark<br />
P<br />
Press halfway<br />
1/400 F2.8<br />
Shutter speed Aperture value<br />
“Focusing” (p. 51)<br />
4 To take the picture, gently press the shutter<br />
button all the way down while being careful<br />
not to shake the camera.<br />
Press fully<br />
Image review screen<br />
To view images during shooting<br />
Pressing the q button enables playback of images. To<br />
return to shooting, either press the q button or press the<br />
shutter button halfway down.<br />
Shooting movies<br />
1 Press the R button to start recording.<br />
Lights up red<br />
when recording<br />
REC<br />
REC 0:00 0:00:34<br />
0:00<br />
Current length<br />
0:00:34<br />
Continuous recording length<br />
Sound will also be recorded.<br />
The shooting mode selected for still photography<br />
applies to movies (some shooting modes have no<br />
effect).<br />
2 Press the R button again to end recording.<br />
During sound recording, only the digital zoom can be<br />
used. To record a movie with optical zoom, set [R]<br />
(Movie sound recording) (p. 34) to [Off].<br />
EN<br />
17
Using the zoom<br />
Turning the zoom lever adjusts the shooting range.<br />
18 EN<br />
Zoom bar<br />
2.3<br />
W side T side<br />
P 5.0 P<br />
0.0<br />
WB<br />
AUTO<br />
ISO<br />
AUTO<br />
0.0<br />
WB<br />
AUTO<br />
ISO<br />
AUTO<br />
14M<br />
14M<br />
4 NORM 0:00:34<br />
4 NORM<br />
0:00:34<br />
Optical zoom: 5×<br />
Digital zoom: 4×<br />
To take larger images [Digital Zoom]<br />
The type and amount of zoom can be identifi ed from<br />
the appearance of the zoom bar. The display differs<br />
depending on the options selected for [Digital Zoom]<br />
(p. 33) and [Image Size] (p. 31).<br />
[Off] selected for [Digital Zoom]:<br />
Image size Zoom bar<br />
14M<br />
Other<br />
Optical zoom range<br />
The magnifi cation ratio changes<br />
depending on the image size setting. *1<br />
[On] selected for [Digital Zoom]:<br />
Image size Zoom bar<br />
14M<br />
Other<br />
Digital zoom range<br />
The magnifi cation<br />
ratio changes<br />
depending on the<br />
image size setting. *1<br />
Digital zoom range<br />
*1 If an image size is less than the full resolution after<br />
reaching the maximum optical zoom, the camera will<br />
automatically resize and crop the image to the selected<br />
image size and enter the digital zoom range if [Digital<br />
Zoom] is [On].<br />
Photographs taken with the zoom bar displayed in<br />
red may appear “grainy.”
Using the fl ash<br />
The fl ash functions can be selected to best match the<br />
shooting conditions.<br />
1 Select the fl ash option in the shooting<br />
function menu.<br />
Flash Auto<br />
2 Use HI to select the setting option, and<br />
press the Q button to set.<br />
Flash Auto<br />
Redeye<br />
Fill In<br />
Option Description<br />
P<br />
0.0<br />
WB<br />
AUTO<br />
ISO<br />
AUTO<br />
14M<br />
MENU<br />
The fl ash fi res automatically in lowlight<br />
or backlight conditions.<br />
Pre-fl ashes are emitted to reduce the<br />
occurrence of red eye in your photos.<br />
The fl ash fi res regardless of the<br />
available light.<br />
Flash Off The fl ash does not fi re.<br />
Long Flash<br />
Flash reaches a longer distance than<br />
Flash Auto.<br />
When set to the long fl ash shooting, [Image Size] is<br />
limited to [n] or lower, the ISO sensitivity is fi xed<br />
to [ISO Auto], and the sequential shooting is fi xed to<br />
[o].<br />
Changing the shooting information<br />
display<br />
The display of the screen information can be changed to<br />
best match the situation, for example, the need for a clear<br />
view of the screen or for making a precise composition by<br />
using the grid display.<br />
1 Press F (INFO).<br />
● The displayed shooting information changes in<br />
the order shown below each time the button is<br />
pressed. “Shooting mode display” (p. 4)<br />
Normal<br />
P<br />
4 NORM<br />
0:00:34<br />
Detailed<br />
4 NORM<br />
0:00:34<br />
0.0<br />
WB<br />
AUTO<br />
ISO<br />
AUTO<br />
14M<br />
P<br />
0.0<br />
WB<br />
AUTO<br />
ISO<br />
AUTO<br />
14M<br />
No information<br />
EN<br />
P<br />
19
Viewing images<br />
1 Press the q button.<br />
Number of frames/Total number of images<br />
20 EN<br />
Playback image<br />
4/30<br />
’12/02/26 12:30<br />
Pictures taken using Q mode are displayed as a<br />
group. Turn the zoom lever to the T side to play back<br />
the image in the group.<br />
2 Use HI to select an image.<br />
Displays<br />
previous image<br />
Displays next<br />
image<br />
Hold I to fast forward and hold H to reverse.<br />
The display size of the images can be changed.<br />
“Index view and close-up view” (p. 22)<br />
To play sound recordings<br />
To play sound recorded with an image, select the image<br />
and press the Q button. A � icon appears on images with<br />
which sound has been recorded.<br />
[R] (still images) (p. 35)<br />
During audio playback<br />
Press FG to adjust volume.<br />
To play back movies<br />
Select a movie, and press the Q button.<br />
Movie Play OK<br />
Movie<br />
4/30<br />
’12/02/26 12:30
Operations during movie playback<br />
Elapsed time/<br />
Total shooting time<br />
Pausing and<br />
resuming<br />
playback<br />
Fast forward<br />
Rewind<br />
Adjusting the<br />
volume<br />
00:12/00:34<br />
During playback<br />
Press the Q button to pause<br />
playback. To resume playback<br />
during pause, fast forward, or<br />
rewind, press the Q button.<br />
Press I to fast forward. Press I<br />
again to increase the fast forward<br />
speed.<br />
Press H to rewind. The rewinding<br />
speed increases each time H is<br />
pressed.<br />
Use FG to adjust the volume.<br />
Operations during pausing playback<br />
During pause<br />
00:14/00:34<br />
Cueing<br />
Advancing and<br />
rewinding one<br />
frame at a time<br />
Resuming<br />
playback<br />
To stop movie playback<br />
Press the � button.<br />
Press F to display the fi rst frame<br />
and press G to display the last<br />
frame.<br />
Press I or H to advance or<br />
rewind one frame at a time. Hold<br />
I or H pressed for continuous<br />
advance or rewind.<br />
Press the Q button to resume<br />
playback.<br />
Erasing images during playback<br />
(Single image erase)<br />
1 Display the image you want to erase and<br />
press G (�).<br />
Erase Back MENU<br />
4/30<br />
Erase<br />
Cancel<br />
2 Press FG to select [Erase], and press the<br />
Q button.<br />
For erasing multiple images at the same time, see<br />
“Erasing images [Erase]” (p. 37).<br />
If a group frame is erased, all images in that group<br />
are erased collectively. If the group includes images<br />
you want to keep, expand the group and protect them<br />
respectively.<br />
EN<br />
21
Index view and close-up view<br />
Index view enables quick selection of a desired image.<br />
Close-up view (up to 10× magnifi cation) allows checking<br />
of image details.<br />
1 Turn the zoom lever.<br />
22 EN<br />
Single-image view Close-up view<br />
4/30<br />
’12/02/26 12:30<br />
W T<br />
Index view<br />
’12/02/26 12:30<br />
W<br />
T<br />
4/30<br />
’12/02/26 12:30<br />
To select an image in index view<br />
Use FGHI to select an image, and press the Q<br />
button to display the selected image in single-image view.<br />
To scroll an image in close-up view<br />
Use FGHI to move the viewing area.<br />
Changing the image information<br />
display<br />
Shooting information settings displayed on the screen can<br />
be changed.<br />
1 Press F (INFO).<br />
● The displayed image information changes in<br />
the order shown below each time the button is<br />
pressed.<br />
Normal<br />
Detailed<br />
10<br />
10<br />
4/30<br />
’12/02/26 12:30<br />
MAGIC<br />
1/1000<br />
F2.8<br />
4/30<br />
2.0<br />
ISO WB<br />
1 100 AUTO<br />
14M NORM 100-0004<br />
’12/02/26 12:30<br />
No information
Using Shooting Modes<br />
To change the shooting mode<br />
The shooting mode (P, M, N, Q, �,<br />
P, ~) can be changed by using the function<br />
menu.<br />
“Using the Menu” (p. 8)<br />
The default settings of the function are highlighted in<br />
.<br />
Shooting with automatic settings<br />
(M mode)<br />
The camera will automatically select the optimal shooting<br />
mode for the scene. The shooting condition is decided by<br />
the camera and most settings cannot be changed.<br />
1 Set the shooting mode to M.<br />
The icon changes depending on the scene<br />
that the camera automatically selects.<br />
4 NORM<br />
0:00:34<br />
In some cases, the camera may not select the<br />
desired shooting mode.<br />
When the camera cannot identify which is the optimal<br />
mode, [Program Auto] will be selected.<br />
14M<br />
Reducing blur on shooting (N mode)<br />
This mode enables the user to reduce blur that is caused<br />
by camera shake and subject movement.<br />
1 Set the shooting mode to N.<br />
N mode indicator<br />
4 NORM<br />
Shooting with Beauty Fix effects<br />
(Q mode)<br />
EN<br />
0.0<br />
WB<br />
AUTO<br />
14M<br />
0:00:34<br />
Depending on the picture, the editing may not be<br />
effective.<br />
1 Set the shooting mode to Q.<br />
Beauty<br />
5M<br />
MENU<br />
23
2 Press G to go to the submenu.<br />
24 EN<br />
Recommended<br />
5M<br />
MENU<br />
3 Use HI to select the retouching setting, and<br />
press the Q button to set.<br />
4 NORM<br />
0:00:34<br />
5M<br />
Retouching setting<br />
● [Set 1], [Set 2] or [Set 3] retouches the image<br />
according to the Beauty Settings. [Beauty Settings]<br />
(p. 43)<br />
4 Point the camera toward the subject. Check<br />
the frame appearing around the face detected<br />
by the camera,and then press the shutter<br />
button to take the picture.<br />
The unedited image and edited image are both<br />
saved.<br />
If the image cannot be retouched, only the<br />
uneditedimage is saved.<br />
The [Image Size] of the retouched image is fi xed at<br />
[n].<br />
5 To save the image, select [OK] on the review<br />
screen and press the Q button. To retouch<br />
the image additionally, select [Beauty Fix].<br />
OK<br />
Beauty Fix<br />
● Beauty Fix<br />
1 Select a retouching item, and press the Q button.<br />
Eye Color Back MENU<br />
2 Press the Q button on the review screen.<br />
● Settings for Beauty Fix can be registered.<br />
Using the best mode for the shooting<br />
scene (� mode)<br />
Off<br />
1 Set the shooting mode to �.<br />
Scene Mode<br />
14M<br />
MENU
2 Press G to go to the submenu.<br />
Portrait<br />
14M<br />
MENU<br />
3 Use HI to select the best shooting mode for<br />
the scene, and press the Q button.<br />
4 NORM<br />
0:00:34<br />
14M<br />
Icon indicating current � mode<br />
In � mode, the optimum shooting settings are<br />
pre-programmed for specifi c shooting scenes. For<br />
this reason, some settings cannot be changed in<br />
some modes.<br />
Option Application<br />
B Portrait/F Landscape/<br />
G Night Scene *1 /M Night+Portrait/<br />
C Sport/N Indoor/W Candle *1 /<br />
R Self Portrait/S Sunset *1 /<br />
X Fireworks *1 /V Cuisine/<br />
d Documents/K Beach & Snow/<br />
� Pet/W 3D Photo<br />
The camera takes<br />
a picture using the<br />
optimum settings<br />
for the scene<br />
conditions.<br />
*1 When the subject is dark, noise reduction is<br />
automatically activated. This approximately doubles the<br />
shooting time during which no other pictures can be<br />
taken.<br />
To take pictures of a moving subject like a<br />
pet ([ ([�� Pet])<br />
1 Use HI to select [� Pet], and press the Q button<br />
to set.<br />
2 Hold the camera to align the AF target mark on the<br />
subject and press the Q button.<br />
● When the camera recognizes the subject, the<br />
AF target mark automatically tracks the subject<br />
movement to focus on it continuously. “To focus on<br />
a moving subject continuously (AF Tracking)” (p. 33).<br />
To shoot 3D images ( (W mode)<br />
1 Use HI to select [Auto] or [<strong>Manual</strong>] and then press<br />
the Q button to set.<br />
Submenu 1 Description<br />
The user only composes the<br />
shots so that the target marks<br />
Auto<br />
and pointers overlap, and the<br />
camera automatically releases<br />
the shutter.<br />
After shooting the fi rst frame,<br />
move the camera to overlap<br />
<strong>Manual</strong><br />
the subject with the image in<br />
the screen. Then manually<br />
release the shutter.<br />
Depending on the subject or the situation (if the<br />
distance between the camera and subject is too<br />
short), the image may not look 3D.<br />
The 3D viewing angle varies depending on the<br />
subject, etc.<br />
To exit 3D shooting mode without saving an image,<br />
press the � button.<br />
The [Image Size] (p. 31) is fi xed to [0].<br />
The zoom ratio is fi xed.<br />
The focus, exposure and the white balance are fi xed<br />
when the fi rst image is taken.<br />
The fl ash is fi xed to [$Flash Off].<br />
EN<br />
25
Shooting with special effects<br />
(P mode)<br />
Add an artistic effect to your photo by selecting the<br />
desired magic fi lter.<br />
1 Set the shooting mode to P.<br />
26 EN<br />
Magic Filter<br />
2 Press G to go to the submenu.<br />
Pop Art<br />
9<br />
0.0<br />
WB<br />
AUTO<br />
14M<br />
MENU<br />
1 2 3<br />
0.0<br />
WB<br />
AUTO<br />
14M<br />
MENU<br />
3 Use HI to select the desired effect and then<br />
press the Q button to set.<br />
1<br />
0.0<br />
WB<br />
AUTO<br />
14M<br />
4 NORM<br />
0:00:34<br />
Icon indicating current P mode<br />
Shooting mode Option<br />
1 Pop Art<br />
2 Pin Hole<br />
3 Fish Eye<br />
4 Drawing<br />
Magic Filter<br />
*1<br />
5 Soft Focus<br />
6 Punk<br />
7 Sparkle<br />
8 Watercolor<br />
9 Refl ection<br />
*1 Two images are saved, an unmodifi ed image and an<br />
image to which the effect has been applied.<br />
In P mode, the optimum shooting settings are<br />
pre-programmed for each effect. For this reason,<br />
some settings cannot be changed in some modes.<br />
Creating panoramic images (~ mode)<br />
Take pictures that can be joined to form a panorama using<br />
the supplied software.<br />
The focus, exposure, zoom position (p. 18), and white<br />
balance (p. 29) are locked at the fi rst frame.<br />
The fl ash (p. 19) is fi xed to $ (Flash Off) mode.<br />
1 Set the shooting mode to ~, and press the<br />
Q button.<br />
Panorama<br />
P<br />
2 Use FGHI to select the pan direction.<br />
0.0<br />
WB<br />
AUTO<br />
14M<br />
MENU
3 Press the shutter button to take the fi rst<br />
frame, and then compose the second shot.<br />
Before fi rst shot<br />
After fi rst shot<br />
Set OK<br />
1 2<br />
Exit MENU<br />
● After the fi rst shot, the area shown in the white<br />
frame reappears on the side of the display<br />
opposite the pan direction. Frame subsequent<br />
photographs so that they overlap with the<br />
image on the monitor.<br />
4 Repeat Step 3 until the number of desired<br />
frames is taken, and then press the<br />
� button when fi nished.<br />
Panorama shooting is possible for up to 10 frames.<br />
For information on creating panoramas, see the<br />
online help for the supplied software.<br />
EN<br />
27
Using Shooting Functions<br />
28 EN<br />
“Using the Menu” (p. 8)<br />
The default settings of the function are highlighted in<br />
.<br />
Shooting closeups (Macro shooting)<br />
This function enables the camera to focus and shoot<br />
subjects at close distances.<br />
1 Select the macro option in the shooting<br />
function menu.<br />
2 Use HI to select the setting option, and<br />
press the Q button to set.<br />
Off<br />
P<br />
0.0<br />
WB<br />
AUTO<br />
ISO<br />
AUTO<br />
14M<br />
MENU<br />
Option Description<br />
Off Macro mode is deactivated.<br />
This enables shooting as close as<br />
Macro<br />
20 cm/7.9 in. *1 (60 cm/23.6 in. *2 ) to<br />
the subject.<br />
Super Macro *3 This enables shooting as close as<br />
5 cm/2.0 in. to the subject.<br />
*1 When the zoom is at the widest (W) position.<br />
*2 When the zoom is at the most telephoto (T) position.<br />
*3 The zoom is automatically fi xed.<br />
The fl ash (p. 19) and zoom (p. 18) cannot be set during<br />
super macro shooting.<br />
Using the self-timer<br />
After the shutter button is pressed all the way down, the<br />
picture is taken after a short delay.<br />
1 Select the self-timer option in the shooting<br />
function menu.<br />
Y Off<br />
2 Use HI to select the setting option, and<br />
press the Q button to set.<br />
P<br />
12 2<br />
0.0<br />
WB<br />
AUTO<br />
ISO<br />
AUTO<br />
14M<br />
MENU<br />
Option Description<br />
Y Off The self-timer is deactivated.<br />
The self-timer lamp turns on for<br />
approx. 10 seconds, then blinks for<br />
Y 12 sec<br />
approx. 2 seconds, and then the<br />
picture is taken.<br />
The self-timer lamp blinks for approx.<br />
Y 2 sec<br />
2 seconds, and then the picture is<br />
taken.<br />
To cancel the self-timer after it starts<br />
Press the � button.
Adjusting the brightness<br />
(Exposure compensation)<br />
The standard brightness (appropriate exposure) set by<br />
the camera based on the shooting mode (M, Q,<br />
and � excluded) can be adjusted brighter or darker to<br />
obtain a desired shot.<br />
1 Select the exposure compensation option in<br />
the shooting function menu.<br />
Exposure Comp. ± 0.0 P<br />
2 1 0 1 2<br />
WB<br />
AUTO<br />
ISO<br />
AUTO<br />
2 Use HI to select the desired brightness,<br />
and press the Q button.<br />
14M<br />
MENU<br />
Adjusting to a natural color scheme<br />
(White balance)<br />
For more natural coloring, choose a white balance option<br />
suited to the scene.<br />
1 Select the white balance option in the<br />
shooting function menu.<br />
WB WB Auto<br />
WB<br />
AUTO<br />
2 Use HI to select the setting option, and<br />
press the Q button to set.<br />
EN<br />
P<br />
0.0<br />
ISO<br />
AUTO<br />
14M<br />
MENU<br />
Option Description<br />
The camera automatically adjusts<br />
WB Auto<br />
the white balance according to the<br />
shooting scene.<br />
5 Sunny<br />
For shooting outdoors under a<br />
clear sky.<br />
3 Cloudy<br />
For shooting outdoors under a<br />
cloudy sky.<br />
1 Incandescent<br />
For shooting under tungsten<br />
lighting.<br />
> Fluorescent<br />
For shooting under white<br />
fl uorescent lighting (offi ces, etc.).<br />
� One Touch 1 For setting the subtle shades of<br />
color that cannot be adjusted by<br />
� One Touch 2<br />
Auto, Sunny, Cloudy, Incandescent,<br />
or Fluorescent.<br />
29
Using the one touch white balance<br />
1 Select the white balance option in the function menu.<br />
2 Use HI to select [�] or [�], and face the camera<br />
toward white paper.<br />
● Set the paper to fi ll the entire screen, and<br />
make sure that there is no shadow area.<br />
● Setting the zoom to telephoto (T) is<br />
recommended.<br />
● Perform this procedure under the light where<br />
the pictures are actually taken.<br />
3 Press the � button.<br />
● The camera releases the shutter and the white<br />
balance is registered.<br />
● The registered white balance is stored in<br />
the camera. The data will not be cleared by<br />
turning off the power.<br />
● When the [�] or [�] whose white balance<br />
has already been registered is selected in<br />
Step 2, new white balance will be registered.<br />
When the white area is not large enough or when the<br />
color is too bright, too dark, or loud, the white balance<br />
cannot be registered. Return to Step 2. Or, set the<br />
other white balance.<br />
30 EN<br />
Selecting the ISO sensitivity<br />
1 Select the ISO setting option in the shooting<br />
function menu.<br />
ISO Auto<br />
1/400 F2.8<br />
P<br />
0.0<br />
WB<br />
AUTO<br />
ISO<br />
1600<br />
ISO ISO ISO<br />
AUTO 100<br />
200<br />
2 Use HI to select the setting option, and<br />
press the Q button to set.<br />
14M<br />
MENU<br />
Option Description<br />
The camera automatically adjusts the<br />
ISO Auto sensitivity according to the shooting<br />
scene.<br />
The ISO sensitivity is fi xed to the<br />
Value<br />
selected value.<br />
In the ISO setting, although smaller values result in<br />
less sensitivity, sharp images can be taken under fully<br />
lit conditions. Larger values result in higher sensitivity,<br />
and images can be taken at fast shutter speeds even<br />
under low light conditions. However, high sensitivity<br />
introduces noise into the resulting picture, which may<br />
give it a grainy appearance.
Sequential shooting (Drive)<br />
Pictures are taken sequentially while the shutter button<br />
is held down.<br />
1 Select the drive option in the shooting<br />
function menu.<br />
Single<br />
2<br />
P<br />
0.0<br />
WB<br />
AUTO<br />
ISO<br />
AUTO<br />
14M<br />
MENU<br />
Option Description<br />
o Single<br />
One frame is shot each time the<br />
shutter button is pressed.<br />
j *1 Take sequential shots using the<br />
Sequential focus, brightness (exposure) and<br />
white balance set in the fi rst frame.<br />
c High-<br />
Speed1<br />
The camera takes sequential shots<br />
at a faster speed than in [j].<br />
d High-<br />
Speed2<br />
The camera takes sequential shots<br />
at approximately 14 frames/sec.<br />
*1 The shooting speed varies depending on the settings<br />
for [Image Size/Compression] (p. 31/p. 32).<br />
When set to [j], the fl ash (p. 19) cannot be set to<br />
[Redeye]. In addition, when set to [c] or [d], the<br />
fl ash is fi xed to [Flash Off].<br />
When set to [c] or [d], [Image Size] is limited to<br />
[3] or lower, and the ISO sensitivity is fi xed to [ISO<br />
Auto].<br />
Vertical lines may appear on the still image shot with<br />
[d] when the camera is pointed at an extremely<br />
bright subject under a clear sky and so on.<br />
Selecting the image size for still<br />
images (Image Size)<br />
1 Select the image size option in the shooting<br />
function menu.<br />
4<br />
14M<br />
16:9S<br />
EN<br />
P<br />
0.0<br />
WB<br />
AUTO<br />
ISO<br />
AUTO<br />
14M 8M 5M<br />
MENU<br />
2 Use HI to select the desired image size,<br />
and press the Q button.<br />
Option Description<br />
14M (4288×3216)<br />
Suitable for printing pictures at A3<br />
(11×17 in.).<br />
8M (3264×2448)<br />
Suitable for printing pictures up to<br />
A3 (11×17 in.).<br />
Suitable for printing pictures at A4<br />
5M (2560×1920)<br />
(8.5×11 in.).<br />
Suitable for printing pictures up to<br />
3M (2048×1536)<br />
A4 (8.5×11 in.).<br />
Suitable for printing pictures at A5<br />
2M (1600×1200)<br />
(5×7 in.).<br />
Suitable for printing pictures at<br />
1M (1280×960)<br />
postcard size.<br />
Suitable for viewing pictures on a<br />
<strong>VG</strong>A (640×480) TV or using pictures on emails and<br />
web sites.<br />
Suitable for playing pictures on a<br />
16:9S (1920×1080) widescreen TV and for printing on<br />
A5 or 5”×7”.<br />
31
Menus for Shooting Functions<br />
32 EN<br />
The default settings of the function are highlighted in .<br />
For information on using the menus, see “Using the Menu” (p. 8).<br />
Restoring Restoring the the shooting shooting functions functions to to the the default default settings settings [Reset] [Reset]<br />
K (Camera Menu) � Reset<br />
Yes<br />
Submenu 2 Application<br />
Restores the following menu functions to the default settings.<br />
• Shooting mode (p. 23)<br />
• Flash (p. 19)<br />
• Macro (p. 28)<br />
• Self-timer (p. 28)<br />
No The current settings will not be changed.<br />
Selecting Selecting the the compression compression for for still still<br />
images images [Compression]<br />
[Compression]<br />
K (Camera Menu) � Compression<br />
Submenu 2 Application<br />
Fine Shooting at high quality.<br />
Normal Shooting at normal quality.<br />
“Number of storable pictures (still images)/Recording<br />
length (movies) in the internal memory and cards”<br />
(p. 56)<br />
• Exposure compensation (p. 29)<br />
• White balance (p. 29)<br />
• ISO (p. 30)<br />
• Drive (p. 31)<br />
• Image size (still images) (p. 31)<br />
• Menu functions in z<br />
(Camera Menu)/A<br />
(Movie Menu) (p. 32 to 34)<br />
Selecting Selecting the the image image quality quality for for movies movies<br />
[Image [Image Size/Frame Size/Frame Rate] Rate]<br />
A (Movie Menu) � Image Size/Frame Rate<br />
Submenu 1 Submenu 2 Application<br />
Image Size<br />
Frame Rate<br />
720P (1280×720)/<br />
<strong>VG</strong>A (640×480)/<br />
Q<strong>VG</strong>A (320×240)<br />
30fps *1 /<br />
15fps *1<br />
Select the image<br />
quality based on<br />
the image size and<br />
frame rate. Higher<br />
frame rates provide<br />
smoother movie<br />
images.<br />
*1 frames per second<br />
“Number of storable pictures (still images)/Recording<br />
length (movies) in the internal memory and cards”<br />
(p. 57)
Reducing Reducing the the blur blur caused caused by by thecamera<br />
thecamera To focus on a moving subject<br />
shake shake when when shooting shooting [IS [IS Movie Movie Mode] Mode] continuously (AF Tracking)<br />
(movies) (movies)<br />
A (Movie Menu) � IS Movie Mode (movies)<br />
1 Hold the camera to align the AF target mark on the<br />
subject and press the Q button.<br />
2 When the camera recognizes the subject, the AF<br />
target mark automatically tracks the subject movement<br />
Submenu 2 Application<br />
to focus on it continuously.<br />
Off<br />
The image stabilizer is deactivated.<br />
This is recommended for shooting<br />
when the camera is fi xed in place on<br />
a tripod or other stable surface.<br />
3 To cancel the tracking, press the Q button.<br />
Depending on the subjects or the shooting conditions,<br />
the camera may be unable to lock the focus or fail to<br />
track the subject movement.<br />
On The image stabilizer is activated.<br />
When the camera fails to track the subject movement,<br />
the AF target mark changes to red.<br />
Images may not be stabilized if camera shake is too<br />
severe.<br />
Selecting Selecting the the focusing focusing area area [AF [AF Mode] Mode]<br />
K (Camera Menu) � AF Mode<br />
Submenu 2 Application<br />
The camera focuses automatically.<br />
(If a face is detected, it is shown by<br />
a white frame<br />
Face/iESP<br />
*1 ; when the shutter<br />
button is pressed halfway and the<br />
camera is able to focus, the frame<br />
color is changed to green *2 if the<br />
camera is able to focus. If no face<br />
is detected, the camera chooses a<br />
subject in the frame and focuses<br />
automatically.)<br />
The camera focuses on the subject<br />
Spot<br />
located within the AF target mark.<br />
The camera tracks the subject<br />
AF Tracking movement automatically to focus on<br />
it continuously.<br />
*1 For some subjects, the frame may not appear or may<br />
take some time to appear.<br />
*2 If the frame blinks in red, the camera is unable to focus.<br />
Try again to press the shutter button halfway.<br />
Shooting Shooting at at higher higher magnifi magnifi cations cations than than<br />
optical optical zoom zoom [Digital [Digital Zoom] Zoom]<br />
K (Camera Menu) � Digital Zoom<br />
Submenu 2 Application<br />
Off Disable digital zoom.<br />
On Enable digital zoom.<br />
[Digital Zoom] is not available when [% Super<br />
Macro] (p. 28) is selected.<br />
The option selected for [Digital Zoom] affects the<br />
appearance of the zoom bar.<br />
“To take larger images [Digital Zoom]” (p. 18)<br />
EN<br />
33
Recording Recording sound sound when when shooting shooting<br />
movies movies [ [RR]]<br />
A (Movie Menu) � R<br />
34 EN<br />
Submenu 2 Application<br />
Off No sound is recorded.<br />
On Sound is recorded.<br />
When set to [On], only the digital zoom can be used<br />
during movie recording. To record the movie with the<br />
optical zoom, set [R] (movies) to [Off].<br />
Using Using the the AF AF illuminator illuminator to to focus focus on on a a<br />
shadowed shadowed subject subject [AF [AF Illuminat.] Illuminat.]<br />
K (Camera Menu) � AF Illuminat.<br />
Submenu 2 Application<br />
Off The AF illuminator is not used.<br />
When the shutter button is pressed<br />
On<br />
halfway down, the AF illuminator<br />
turns on to aid focusing.<br />
AF illuminator<br />
Displaying Displaying icon icon guides guides [Icon [Icon Guide] Guide]<br />
K (Camera Menu) � Icon Guide<br />
Submenu 2 Application<br />
Off No icon guide is displayed.<br />
The explanation of the selected icon<br />
will be displayed when a shooting<br />
mode or shooting function menu<br />
On<br />
icon is selected (position the cursor<br />
on the icon for a while to display the<br />
explanation).<br />
Icon guide<br />
Program Auto<br />
Functions can be<br />
changed manually.<br />
Imprinting Imprinting the the date date of of recording recording<br />
[Date [Date Stamp] Stamp]<br />
K (Camera Menu) � Date Stamp<br />
Submenu 2 Application<br />
Off Do not imprint the date.<br />
On<br />
Stamp new photographs with the<br />
date of recording.<br />
P<br />
0.0<br />
WB<br />
AUTO<br />
ISO<br />
AUTO<br />
14M<br />
MENU<br />
[Date Stamp] is not available if the clock has not been<br />
set. “Language, date, time, and time zone” (p. 15)<br />
The date stamp can not be deleted.<br />
[Date Stamp] is not available in ~ or 3D mode or<br />
during sequential shooting.
Menus for Playback, Editing, and Printing Functions<br />
The default settings of the function are highlighted in .<br />
Playing Playing back back pictures pictures automatically<br />
automatically<br />
[Slideshow]<br />
[Slideshow]<br />
q (Playback Menu) � Slideshow<br />
To start a slideshow<br />
Submenu 2 Submenu 3 Application<br />
BGM Off/On<br />
Type<br />
Normal/Fader/<br />
Zoom<br />
Selects the background<br />
music options.<br />
Selects the type of<br />
transition effect used<br />
between slides.<br />
Start ― Starts the slideshow.<br />
1 Select the desired [BGM] and [Type].<br />
2 Select [Start] and press the Q button.<br />
Single-frame advance/rewind<br />
During a slideshow, press I to skip ahead one frame or<br />
press H to go back one frame.<br />
To stop the slideshow<br />
Press the Q button or the � button.<br />
Changing Changing the the image image size size [ [QQ]]<br />
q (Playback Menu) � Edit � Q<br />
Submenu 2 Application<br />
7 640 × 480<br />
This saves a high-resolution image<br />
as a separate image with a smaller<br />
� 320 × 240<br />
size for use in e-mail attachments<br />
and other applications.<br />
1 Use HI to select an image.<br />
2 Use FG to select the size, and press the Q button.<br />
Cropping Cropping images images [ [PP]]<br />
q (Playback Menu) � Edit � P<br />
1 Use HI to select an image, and press the Q button.<br />
2 Use the zoom lever to choose the crop size and<br />
FGHI to move the crop position.<br />
Back MENU<br />
3 Press the Q button.<br />
● The edited image will be saved as a separate image.<br />
Adding Adding sound sound to to still still images images [ [RR]]<br />
q (Playback Menu) � Edit � R<br />
1 Use HI to select an image.<br />
2 Aim the microphone toward the sound source.<br />
Microphone<br />
3 Press the Q button.<br />
● Recording starts.<br />
● The camera adds (records) sound for approx.<br />
4 seconds while playing back the image.<br />
EN<br />
35
Retouching Retouching faces faces on on still still images images<br />
[Beauty [Beauty Fix] Fix]<br />
q (Playback Menu) � Edit � Beauty Fix<br />
Depending on the picture, the editing may not be<br />
effective.<br />
1 Use HI to select an image, and press the Q button.<br />
2 Use FG to select a retouching item, and press the<br />
Q button.<br />
3 To save the image, select [OK] on the review screen<br />
and press the Q button. To retouch the image<br />
additionally, select [Beauty Fix].<br />
● The retouched image is saved as a separate<br />
image.<br />
36 EN<br />
OK<br />
Beauty Fix<br />
The [Image Size] of the retouched image is fi xed at<br />
[n].<br />
Beauty Fix<br />
1 Select a retouching item, and press the Q button.<br />
Eye Color Back MENU<br />
2 Press the Q button on the review screen.<br />
Off<br />
Brightening Brightening areas areas that that are are dark dark due due<br />
to to backlight, backlight, insuffi insuffi cient cient light light or or other other<br />
reasons reasons [Lighting [Lighting Fix] Fix]<br />
q (Playback Menu) � Edit � Lighting Fix<br />
1 Use HI to select an image, and press the A button.<br />
● The edited image is saved as a separate image.<br />
Depending on the picture, the editing may not be<br />
effective.<br />
The retouching process may lower the image<br />
resolution.<br />
Retouching Retouching red red eyes eyes in in fl fl ash ash shooting shooting<br />
[Redeye [Redeye Fix] Fix]<br />
q (Playback Menu) � Edit � Redeye Fix<br />
1 Use HI to select an image, and press the A button.<br />
● The edited image is saved as a separate image.<br />
Depending on the picture, the editing may not be<br />
effective.<br />
The retouching process may lower the image<br />
resolution.
Erasing Erasing images images [Erase] [Erase]<br />
q (Playback Menu) � Erase<br />
Submenu 1 Application<br />
All Erase<br />
All images in the internal memory or<br />
card will be erased.<br />
Sel. Image<br />
Images are individually selected and<br />
erased.<br />
Erase Deletes the image displayed.<br />
When erasing pictures in a internal memory, do not<br />
insert the card into the camera.<br />
To erase all images [All Erase]<br />
1 Use FG to select [All Erase], and press the<br />
Q button.<br />
2 Use FG to select [Yes], and press the Q button.<br />
To individually select and erase images<br />
[Sel. Image]<br />
1 Use FG to select [Sel. Image], and press the<br />
Q button.<br />
2 Use HI to select the image to be erased, and press<br />
the Q button to add a R mark to the image.<br />
● Turn the zoom lever to the W end to display an index<br />
view. Images can be quickly selected using the<br />
FGHI buttons. Turn to the T end to return to the<br />
single frame display.<br />
R mark<br />
Sel. Image (1)<br />
OK<br />
4/30<br />
Erase/Cancel MENU<br />
3 Repeat Step 2 to select the images to be erased,<br />
and then press the � button to erase the selected<br />
images.<br />
4 Use FG to select [Yes], and press the Q button.<br />
● The images with a R mark are erased.<br />
Saving Saving print print settings settings to to the the image image data data<br />
[Print [Print Order] Order]<br />
q (Playback Menu) � Print Order<br />
“Print Reservations (DPOF)” (p. 47)<br />
Protecting Protecting images images [ [RR]]<br />
q (Playback Menu) � R<br />
Protected images cannot be erased by [Erase] (p. 21,<br />
37), [Sel. Image], or [All Erase] (p. 37), but all images are<br />
erased by [Memory Format]/[Format] (p. 38).<br />
1 Use HI to select an image.<br />
2 Press the Q button.<br />
● Press the Q button again to cancel the settings.<br />
3 If necessary, repeat Steps 1 and 2 to protect other<br />
images, and press the � button.<br />
Rotating Rotating images images [ [yy]]<br />
q (Playback Menu) � y<br />
1 Use HI to select an image.<br />
2 Press the Q button to rotate the image.<br />
3 If necessary, repeat Steps 1 and 2 to make settings<br />
for other images, and press the � button.<br />
The new picture orientations will be saved even after<br />
the power is turned off.<br />
EN<br />
37
Menus for Other Camera Settings<br />
38 EN<br />
The default settings of the function are highlighted in .<br />
Erasing Erasing data data completely<br />
completely<br />
[Memory [Memory Format]/[Format]<br />
Format]/[Format]<br />
d (Settings Menu 1) � Memory Format/Format<br />
Before formatting, check that no important data is left<br />
in the internal memory or card.<br />
Cards must be formatted with this camera before<br />
fi rst use or after being used with other cameras or<br />
computers.<br />
Submenu 2 Application<br />
Completely erases the image data<br />
Yes<br />
in the internal memory *1 or card<br />
(including protected images).<br />
No Cancels formatting.<br />
*1 Be sure to remove the card before formatting the<br />
internal memory.<br />
Copying Copying images images in in the the internal internal memory memory<br />
to to the the card card [Backup] [Backup]<br />
d (Settings Menu 1) � Backup<br />
Submenu 2 Application<br />
Yes<br />
Backs up image data in the internal<br />
memory to the card.<br />
No Cancels the backup.<br />
Using Using an an Eye-Fi Eye-Fi card card [Eye-Fi] [Eye-Fi]<br />
d (Settings Menu 1) � Eye-Fi<br />
Submenu 2 Application<br />
All Automatically sends all the image.<br />
Sel. Image<br />
Automatically sends the selected<br />
images.<br />
Off Disable Eye-Fi communication.<br />
When using an Eye-Fi card, read the Eye-Fi card<br />
instruction manual carefully, and comply with the<br />
instructions.<br />
Use the Eye-Fi card in compliance with the laws and<br />
regulations of the country where the camera is used.<br />
In locations such as on an airplane, where the Eye-Fi<br />
communication is prohibited, remove the Eye-Fi card<br />
from the camera, or set [Eye-fi ] to [Off].<br />
This camera does not support the Eye-Fi card’s<br />
Endless mode.
Selecting Selecting a a method method for for connecting connecting the the<br />
camera camera to to other other devices devices<br />
[USB [USB Connection]<br />
Connection]<br />
d (Settings Menu 1) � USB Connection<br />
Auto<br />
Submenu 2 Application<br />
Storage<br />
MTP<br />
Print<br />
When the camera is connected to<br />
another device, the settings selection<br />
screen is displayed.<br />
Select when transferring images to a<br />
computer or when using the supplied<br />
software with the camera connected<br />
to a computer.<br />
Select when transferring images to<br />
a computer running Windows Vista<br />
or Windows 7 without using the<br />
supplied software.<br />
Select when connecting to a<br />
PictBridge-compatible printer.<br />
System requirements<br />
Windows<br />
Windows XP (Service Pack 1 or later) /<br />
Windows Vista / Windows 7<br />
Macintosh Mac OS X v10.3 or later<br />
Even if a computer has USB ports, proper operation<br />
is not guaranteed in the following cases.<br />
● computers with USB ports installed using an<br />
expansion card, etc.<br />
● computers without a factory-installed OS and<br />
home-built computers<br />
Turning Turning on on the the camera camera with with the the qq<br />
button button [ [qq Power Power On] On]<br />
d (Settings Menu 1) � q Power On<br />
Submenu 2 Application<br />
The camera is not turned on. To turn<br />
No<br />
on the camera, press the n<br />
button.<br />
Press and hold the q button to turn<br />
Yes<br />
the camera on in the playback mode.<br />
Saving Saving the the mode mode when when the the camera camera is is<br />
turned turned off off [Keep [Keep KK Settings] Settings]<br />
d (Settings Menu 1) � Keep K Settings<br />
Submenu 2 Application<br />
The shooting mode is saved when<br />
the camera is turned off and is<br />
Yes<br />
reactivated the next time the camera<br />
is turned on.<br />
The shooting mode is set to P mode<br />
No<br />
when the camera is turned on.<br />
EN<br />
39
Selecting Selecting the the camera camera sound sound and and its its<br />
volume volume [Sound [Sound Settings] Settings]<br />
d (Settings Menu 1) � Sound Settings<br />
40 EN<br />
Submenu 2 Submenu 3 Application<br />
Sound Type 1/2/3<br />
Volume<br />
q Volume<br />
OFF (No Sound)<br />
or 5 levels of<br />
volume<br />
OFF (No Sound)<br />
or 5 levels of<br />
volume<br />
Choose the sound<br />
made by camera<br />
controls.<br />
Choose the volume<br />
of the sound<br />
made by camera<br />
controls.<br />
Adjusts the image<br />
playback volume.<br />
Adjusting Adjusting the the CCD CCD and and the the image image<br />
processing processing function function [Pixel [Pixel Mapping] Mapping]<br />
d (Settings Menu 2) � Pixel Mapping<br />
This function has already been adjusted at factory<br />
shipping, and no adjustment is needed right<br />
after purchase. Approximately once a year is<br />
recommended.<br />
For best results, wait at least one minute after taking<br />
or viewing pictures before performing pixel mapping.<br />
If the camera is turned off during pixel mapping, be<br />
sure to perform it again.<br />
To adjust the CCD and the image<br />
processing function<br />
Press the Q button when [Start] (Submenu 2) is<br />
displayed.<br />
● The camera checks and adjusts the CCD and the<br />
image processing function at the same time.<br />
Adjusting Adjusting the the brightness brightness of of the the monitor monitor<br />
[[ss]]<br />
d (Settings Menu 2) � s<br />
Submenu 2 Application<br />
Selects the monitor brightness<br />
Bright/Normal depending on the surrounding<br />
brightness.
Selecting Selecting a a video video signal signal system system to to match match your your TV TV [NTSC/PAL]<br />
[NTSC/PAL]<br />
d (Settings Menu 2) � NTSC/PAL<br />
The TV video signal system varies depending on the countries and regions. Before viewing camera images on your<br />
TV, select the video output according to your TV’s video signal type.<br />
Submenu 2 Application<br />
NTSC Connecting the camera to a TV in North America, Taiwan, Korea, Japan, and so on.<br />
PAL Connecting the camera to a TV in European countries, China, and so on.<br />
The factory default settings differ according to the region where the camera is sold.<br />
To play back camera images on a TV<br />
1 Use the camera to select the same video signal system as the one of connected TV ([NTSC]/[PAL]).<br />
2 Connect the TV and camera.<br />
Multiconnector<br />
Connector cover<br />
AV cable<br />
(supplied)<br />
Connect to the TV video<br />
input jack (yellow) and<br />
audio input jack (white).<br />
3 Turn on the TV, and change “INPUT” to “VIDEO (an input jack connected to the camera).”<br />
For details on changing the input source of the TV, refer to the TV’s instruction manual.<br />
4 Press the q button, and use HI to select the image for playback.<br />
Depending on the TV’s settings, the displayed images and information may become cropped.<br />
EN<br />
41
Saving Saving battery battery power power between between shots shots<br />
[Power [Power Save] Save]<br />
d (Settings Menu 2) � Power Save<br />
42 EN<br />
Submenu 2 Application<br />
Off Cancels [Power Save].<br />
On<br />
To resume standby mode<br />
Press any button.<br />
When the camera is not being used<br />
for approx. 10 seconds, the monitor<br />
automatically turns off to save battery<br />
power.<br />
Changing Changing the the display display language language [ [WW]]<br />
d (Settings Menu 2) � W<br />
Submenu 2 Application<br />
Languages<br />
The language for the menus and<br />
error messages displayed on the<br />
monitor is selected.<br />
1 Use FGHI to select your language and press the<br />
Q button.<br />
Setting Setting the the date date and and time time [ [XX]]<br />
d (Settings Menu 2) � X<br />
“Language, date, time, and time zone” (p. 15)<br />
Switching Switching between between home home and and travel travel destination destination time time zones zones [World [World Time] Time]<br />
d (Settings Menu 2) � World Time<br />
You will not be able to select a time zone using [World Time] if the camera clock has not fi rst been set using [X].<br />
Submenu 2 Submenu 3 Application<br />
Home/Alternate<br />
x<br />
z<br />
The time in the home time zone (the time zone selected for x in<br />
submenu 2).<br />
The time in the travel destination time zone (the time selected for z in<br />
submenu 2).<br />
x *1 — Select the home time zone (x).<br />
z *1, 2 — Select the travel destination time zone (z).<br />
*1 In areas where daylight saving time is in effect, use FG to turn daylight saving time ([Summer]) on.<br />
*2 When you select a time zone, the camera automatically calculates the time difference between the selected zone and<br />
the home time zone (x) to display the time in the travel destination time zone (z).
Registering Registering the the settings settings for for Beauty Beauty Fix Fix<br />
[Beauty [Beauty Settings] Settings]<br />
d (Settings Menu 3) � Beauty Settings<br />
Depending on the picture, the editing may not be<br />
effective.<br />
1 Use FG to select a retouching setting, and press the<br />
Q button.<br />
2 Press the shutter button to take a portrait picture.<br />
Take a portrait picture.<br />
The image is not saved.<br />
3 Select a retouching item, and press the Q button.<br />
Eye Color Back MENU<br />
4 Press the Q button on the review screen to save the<br />
image.<br />
● Registration is complete.<br />
Off<br />
EN<br />
43
Printing<br />
Direct printing (PictBridge *1 )<br />
By connecting the camera to a PictBridge-compatible<br />
printer, you can print images directly without using a<br />
computer.<br />
To fi nd out if your printer supports PictBridge, refer to the<br />
printer’s instruction manual.<br />
*1 PictBridge is a standard for connecting digital cameras<br />
and printers of different makers and printing out pictures<br />
directly.<br />
The printing modes, paper sizes, and other<br />
parameters that can be set with the camera vary<br />
depending on the printer that is used. For details,<br />
refer to the printer’s instruction manual.<br />
For details on the available paper types, loading<br />
paper, and installing ink cassettes, refer to the<br />
printer’s instruction manual.<br />
Printing images at the printer’s<br />
standard settings [Easy Print]<br />
In the setup menu, set [USB Connection] (p. 39) to<br />
[Print].<br />
1 Display the image to be printed on the<br />
monitor.<br />
“Viewing images” (p. 20)<br />
44 EN<br />
2 Turn on the printer, and then connect the<br />
printer and camera.<br />
Open the connector cover<br />
in the direction of the arrow.<br />
Y button<br />
Easy Print Start<br />
Custom Print OK<br />
Multi-connector<br />
USB cable (supplied)<br />
Easy Print Back MENU<br />
3 Press I to start printing.<br />
4 To print another image, use HI to select an<br />
image, and press the Q button.<br />
To exit printing<br />
To exit printing<br />
After a selected image is displayed on the screen,<br />
disconnect the USB cable from the camera and printer.
Changing the printer’s settings for<br />
printing [Custom Print]<br />
1 Follow Steps 1 and 2 for [Easy Print] (p. 44),<br />
and press the Q button.<br />
2 Use FG to select the print mode, and press<br />
the Q button.<br />
Submenu 2 Application<br />
This prints the image selected in<br />
Print<br />
Step 5.<br />
This prints all images stored in the<br />
All Print<br />
internal memory or card.<br />
This prints one image in a multiple<br />
Multi Print<br />
layout format.<br />
This prints an index of all images<br />
All Index<br />
stored in the internal memory or card.<br />
Print Order *1 This prints images based on the print<br />
reservation data on the card.<br />
*1 [Print Order] is available only when print reservations<br />
have been made. “Print Reservations (DPOF)” (p. 47)<br />
3 Use FG to select [Size] (Submenu 3), and<br />
press I.<br />
If the [Printpaper] screen is not displayed, the [Size],<br />
[Borderless], and [Pics/Sheet] are set to the printer’s<br />
standard.<br />
Printpaper<br />
Back MENU<br />
Size Borderless<br />
Standard Standard<br />
4 Use FG to select the [Borderless] or [Pics/<br />
Sheet] settings, and press the Q button.<br />
Submenu 4 Application<br />
The image is printed with a border<br />
around it ([Off]).<br />
The image is printed to fi ll the entire<br />
paper ([On]).<br />
Off/On *1<br />
(The number of<br />
images per sheet<br />
varies depending<br />
on the printer.)<br />
The number of images per sheet<br />
([Pics/Sheet]) is selectable only when<br />
[Multi Print] is selected in Step 2.<br />
*1 The available settings for [Borderless] vary depending<br />
on the printer.<br />
If [Standard] is selected in Steps 3 and 4, the image<br />
is printed at the printer’s standard settings.<br />
5 Use HI to select an image.<br />
6 Press F to make a print reservation for the<br />
current image. Press G to make the detailed<br />
printer settings for the current image.<br />
EN<br />
45
To make the detailed printer settings<br />
1 Use FGHI to select the setting, and press the<br />
Q button.<br />
Submenu 5 Submenu 6 Application<br />
Print Reservations (DPOF *1 )<br />
In print reservations, the number of prints and date imprint<br />
option are saved in the image on the card. This enables<br />
easy printing at a printer or print shop supporting DPOF<br />
by using only the print reservations on the card without a<br />
computer or a camera.<br />
*1 DPOF is a standard for storing automatic printout<br />
information from digital cameras.<br />
Print reservations can be set only for the images<br />
stored on the card. Insert a card with recorded<br />
images before making print reservations.<br />
DPOF reservations set by another DPOF device<br />
cannot be changed by this camera. Make changes<br />
using the original device. Making new DPOF<br />
reservations with this camera will erase the<br />
reservations made by the other device.<br />
DPOF print reservations can be made for up to 999<br />
images per card.<br />
Single-frame print reservations [
Reserving one print each of all images<br />
on the card [U]<br />
1 Follow Steps 1 and 2 in [
Usage Tips<br />
If the camera does not work as intended, or if an error<br />
message is displayed on the screen, and you are unsure<br />
of what to do, refer to the information below to fi x the<br />
problem(s).<br />
Troubleshooting<br />
Battery Battery<br />
“The camera does not work even when batteries are<br />
installed”.<br />
● Insert recharged batteries in the correct direction.<br />
“Inserting the battery and card” (p. 11), “Charging the<br />
battery with the included USB-AC adapter” (p. 11)<br />
● Battery performance may have been reduced<br />
temporarily due to low temperature. Take the<br />
batteries out of the camera, and warm them by<br />
putting them in your pocket for a while.<br />
Card/Internal Card/Internal memory memory<br />
“An error message is displayed”.<br />
“Error message” (p. 50)<br />
Shutter Shutter button button<br />
“No picture is taken when the shutter button is<br />
pressed”.<br />
● Cancel sleep mode.<br />
To save battery power, the camera automatically<br />
goes into sleep mode and the monitor turns off<br />
if there is no operation for 3 minutes when the<br />
camera is turned on. No picture is taken even if<br />
the shutter button is fully pressed in this mode.<br />
Operate the zoom lever or other buttons to restore<br />
the camera from sleep mode before taking a<br />
picture. If the camera is left for another 12 minutes,<br />
it automatically turns off. Press the n button<br />
to turn the camera on.<br />
● Press the q button to switch to the shooting<br />
mode.<br />
● Wait until #(fl ash charge) stops blinking before<br />
taking pictures.<br />
Monitor Monitor<br />
“Diffi cult to see”.<br />
● Condensation may have occurred. Turn off the<br />
power, and wait for the camera body to become<br />
acclimated to the surrounding temperature and dry<br />
out before taking pictures.<br />
“Vertical lines appear on the monitor”.<br />
● This condition may occur when the camera is<br />
pointed at an extremely bright subject under a<br />
clear sky and so on. The lines may appear on the<br />
recorded movie.<br />
“The light is caught in the picture”.<br />
● Shooting with fl ash in dark situations results in an<br />
image with many fl ash refl ections on dust in the air.<br />
Date Date and and time time function function<br />
“Date and time settings return to the default setting”.<br />
● If the batteries are removed and left out of the<br />
camera for about a day *1 , the date and time<br />
settings return to the default setting, and must<br />
be reset.<br />
*1 The time until the date and time settings return to<br />
the default setting varies depending on how long<br />
the batteries have been loaded.<br />
“Language, date, time, and time zone” (p. 15)<br />
Miscellaneous<br />
Miscellaneous<br />
“The camera makes a noise when taking pictures”.<br />
● The camera may activate the lens and make a<br />
noise even if no operation is performed. This<br />
is because the camera automatically performs<br />
actions of auto focus as far as it is ready to shoot.<br />
EN<br />
49
Error message<br />
50 EN<br />
When one of the messages below is displayed on the<br />
monitor, check the corrective action.<br />
Error message Corrective action<br />
Card Error<br />
Write Protect<br />
Memory Full<br />
Card Full<br />
Card Setup Back MENU<br />
Power Off<br />
Format<br />
Memory Setup Back MENU<br />
Power Off<br />
Memory Format<br />
No Picture<br />
Picture Error<br />
Card problem<br />
Insert a new card.<br />
Card problem<br />
The card write-protect switch is<br />
set to the “LOCK” side. Release<br />
the switch.<br />
Internal memory problem<br />
• Insert a card.<br />
• Erase unwanted images. *1<br />
Card problem<br />
• Replace the card.<br />
• Erase unwanted images. *1<br />
Card problem<br />
Use FG to select [Format], and<br />
press the Q button. Next, use<br />
FG to select [Yes], and press the<br />
Q button. *2<br />
Internal memory problem<br />
Use FG to select [Memory<br />
Format], and press the Q button.<br />
Next, use FG to select [Yes], and<br />
press the Q button. *2<br />
Internal memory/Card problem<br />
Take pictures before viewing them.<br />
Problem with selected image<br />
Use photo retouch software, etc.<br />
to view the image on a computer.<br />
If the image still cannot be viewed,<br />
the image fi le is corrupted.<br />
Error message Corrective action<br />
The Image Cannot<br />
Be Edited<br />
Battery Empty<br />
No Connection<br />
No Paper<br />
No Ink<br />
Jammed<br />
Settings<br />
Changed *3<br />
Print Error<br />
Problem with selected image<br />
Use photo retouch software, etc. to<br />
edit the image on a computer.<br />
Battery problem<br />
Charge the battery.<br />
Connection problem<br />
Connect the camera and computer<br />
or printer correctly.<br />
Printer problem<br />
Load paper into the printer.<br />
Printer problem<br />
Refi ll the ink in the printer.<br />
Printer problem<br />
Remove the jammed paper.<br />
Printer problem<br />
Return to the status where the<br />
printer can be used.<br />
Printer problem<br />
Turn off the camera and printer,<br />
check the printer for any problems,<br />
and then turn the power on again.<br />
Cannot Print *4<br />
Problem with selected image<br />
Use a computer to print.<br />
*1 Before erasing important images, download them to a<br />
computer.<br />
*2 All data will be erased.<br />
*3 This is displayed, for instance, when the printer’s paper<br />
tray has been removed. Do not operate the printer while<br />
making the print settings on the camera.<br />
*4 This camera may be unable to print images taken by<br />
other cameras.
Shooting tips<br />
When you are unsure of how to take a picture that you<br />
envision, refer to the information below.<br />
Focusing<br />
“Focusing on the subject”<br />
● Taking a picture of a subject not in the center<br />
of the monitor<br />
After focusing on an object at the same distance<br />
as the subject, compose the shot, and take the<br />
picture.<br />
Pressing the shutter button halfway (p. 17)<br />
● Set [AF Mode] (p. 33) to [Face/iESP]<br />
● Taking a picture in [AF Tracking] mode (p. 33)<br />
The camera tracks the subject movement<br />
automatically to focus on it continuously.<br />
● Taking a picture of subjects where autofocus<br />
is diffi cult<br />
In the following cases, after focusing on an object<br />
(by pressing the shutter button halfway down) with<br />
high contrast at the same distance as the subject,<br />
compose the shot, and take the picture.<br />
Subjects with low contrast<br />
When extremely bright objects<br />
appear in the center of the monitor<br />
Object with no vertical lines *1<br />
*1 It is also effective to compose the shot by holding the<br />
camera vertically to focus, and then returning to the<br />
horizontal position to take the picture.<br />
When objects are at different<br />
distances<br />
Fast-moving object<br />
The subject is not in the center of<br />
the frame<br />
EN<br />
51
Camera shake<br />
“Taking pictures without camera shake”<br />
● Taking pictures using N mode (p. 23)<br />
● Select C (Sport) in � mode (p. 24)<br />
The C (Sport) mode uses a fast shutter speed<br />
and can reduce the blur incurred by a moving<br />
subject.<br />
● Taking pictures at a high ISO sensitivity<br />
If a high ISO sensitivity is selected, pictures can<br />
be taken at a high shutter speed even at locations<br />
where a fl ash cannot be used.<br />
“Selecting the ISO sensitivity” (p. 30)<br />
Exposure (brightness)<br />
“Taking pictures with the right brightness”<br />
● Taking pictures using [Fill In] (p. 19) fl ash<br />
A subject against backlight is brightened.<br />
● Taking pictures using exposure compensation<br />
(p. 29)<br />
Adjust the brightness while viewing the screen for<br />
taking the picture. Normally, taking pictures of white<br />
subjects (such as snow) results in images that are<br />
darker than the actual subject. Use the exposure<br />
compensation to adjust in the positive (+) direction<br />
to express whites as they appear. When taking<br />
pictures of black subjects, on the other hand, it is<br />
effective to adjust in the negative (-) direction.<br />
52 EN<br />
Color hue<br />
“Taking pictures with colors at the same shade as<br />
they appear”<br />
● Taking pictures by selecting white balance (p. 29)<br />
Best results in most environments can normally<br />
be obtained with the [WB Auto] setting, but for<br />
some subjects, you should try experimenting<br />
with different settings. (This is especially true for<br />
sunshade under a clear sky, mixed natural and<br />
artifi cial light settings, and so on.)<br />
Image quality<br />
“Taking sharper pictures”<br />
● Taking pictures with the optical zoom<br />
Avoid using digital zoom (p. 18, 33) to take pictures.<br />
● Taking pictures at a low ISO sensitivity<br />
If the picture is taken with a high ISO sensitivity,<br />
noise (small colored spots and color unevenness<br />
that were not in the original image) can occur, and<br />
the image can appear grainy. The resulting image<br />
is grainier than with low ISO sensitivity as well.<br />
“Selecting the ISO sensitivity” (p. 30)<br />
Batteries<br />
“Making batteries last longer”<br />
● Set [Power Save] (p. 42) to [On]
Playback/Editing tips<br />
Playback<br />
“Playing images in the internal memory and card”<br />
● Remove the card when playing pictures in the<br />
internal memory<br />
“To remove the card” (p. 11)<br />
Editing<br />
“Erasing the sound recorded to a still image”<br />
● Record over the sound with silence when<br />
playing back the image<br />
“Adding sound to still images [R]” (p. 35)<br />
EN<br />
53
Appendix<br />
Camera care<br />
Exterior<br />
• Wipe gently with a soft cloth. If the camera is very dirty,<br />
soak the cloth in mild soapy water and wring well. Wipe<br />
the camera with the damp cloth and then dry it with a<br />
dry cloth. If you have used the camera at the beach,<br />
use a cloth soaked in clean water and wrung well.<br />
Monitor<br />
• Wipe gently with a soft cloth.<br />
Lens<br />
• Blow dust off the lens with a commercial blower, then<br />
wipe gently with a lens cleaner.<br />
Do not use strong solvents such as benzene or<br />
alcohol, or chemically treated cloth.<br />
Mold may form on the lens surface if the lens is left<br />
dirty.<br />
Battery/USB-AC adapter<br />
• Wipe gently with a soft, dry cloth.<br />
Storage<br />
• When storing the camera for extended periods, remove<br />
the battery, USB-AC adapter and card, and keep in a<br />
cool, dry place that is well ventilated.<br />
• Periodically insert the battery and test the camera<br />
functions.<br />
Avoid leaving the camera in places where chemical<br />
products are handled since this may result in<br />
corrosion.<br />
54 EN<br />
Using a separately sold AC adapter<br />
The USB-AC adapter F-3AC (sold separately) can be<br />
used with this camera. Do not use any AC adapter other<br />
than the dedicated one. When using F-3AC, be sure to<br />
use the USB cable included with this camera.<br />
Do not use any other AC adapter with this camera.<br />
Shooting is not available when using the F-3AC.<br />
Using a separately sold charger<br />
A charger (UC-50: sold separately) can be used to charge<br />
the battery.<br />
Using your charger and USB-AC<br />
adapter abroad<br />
• The charger and USB-AC adapter can be used in<br />
most home electrical sources within the range of 100 V<br />
to 240 V AC (50/60Hz) around the world. However,<br />
depending on the country or area you are in, the AC<br />
wall outlet may be shaped differently and the charger<br />
and USB-AC adapter may require a plug adapter to<br />
match the wall outlet. For details, ask at your local<br />
electrical shop or travel agent.<br />
• Do not use travel voltage converters as they could<br />
damage your charger and USB-AC adapter.
Using the card<br />
Cards compatible with this camera<br />
SD/SDHC/SDXC/Eye-Fi card (commercially available) (for<br />
compatibility card details, visit the Olympus website.)<br />
• The Eye-Fi card may become hot during use.<br />
• When using an Eye-Fi card, the battery may run out faster.<br />
• When using an Eye-Fi card, the camera may function<br />
more slowly.<br />
SD/SDHC/SDXC card write-protect switch<br />
The SD/SDHC/SDXC card body has a write-protect<br />
switch.<br />
If you set the switch to the “LOCK” side, you will not be<br />
able to write to the card, delete data or format. Return the<br />
switch to enable writing.<br />
Checking the image saving location<br />
The memory indicator shows whether the internal memory<br />
or card is being used during shooting and playback.<br />
Current memory indicator<br />
v: Internal memory is being used<br />
w: Card is being used<br />
Even if [Memory Format]/[Format], [Erase], [Sel.<br />
Image], or [All Erase] is performed, the data in the<br />
card is not completely erased. When disposing of the<br />
card, damage the card to prevent the disclosure of<br />
personal data.<br />
LOCK<br />
Readout/recording process of the card<br />
Readout/recording process of the card<br />
During shooting, the current memory indicator lights up<br />
in red while the camera is writing data. Never open the<br />
battery/card compartment cover or unplug the USB cable.<br />
This can not only damage the image data but also render<br />
the internal memory or card unusable.<br />
EN<br />
55
Number of storable pictures (still images)/Recording length (movies) in the internal<br />
memory and cards<br />
56 EN<br />
The fi gures for the number of storable still pictures and recording length are approximate. The actual capacity varies<br />
with shooting conditions and the card used.<br />
Still images<br />
Image Size Compression<br />
6 4288×3216<br />
4 3264×2448<br />
n 2560×1920<br />
3 2048×1536<br />
2 1600×1200<br />
1 1280×960<br />
7 640×480<br />
0 1920×1080<br />
Number of storable still pictures<br />
Internal memory SD/SDHC/SDXC card (4 GB)<br />
L 4 506<br />
M 9 1,000<br />
L 7 867<br />
M 15 1,700<br />
L 12 1,394<br />
M 24 2,697<br />
L 20 2,216<br />
M 39 4,432<br />
L 32 3,650<br />
M 65 7,299<br />
L 50 5,640<br />
M 101 11,280<br />
L 202 20,677<br />
M 371 41,341<br />
L 30 3,354<br />
M 60 6,531
Movies<br />
Image Size Frame Rate<br />
� 1280×720<br />
8 640×480<br />
9 320×240<br />
Recording length<br />
Internal memory SD/SDHC/SDXC card (4 GB)<br />
With sound Without sound With sound Without sound<br />
30fps 10 sec. 10 sec. 18 min. 53 sec. 19 min. 22 sec.<br />
15fps 19 sec. 20 sec. 36 min. 52 sec. 38 min. 44 sec.<br />
30fps 18 sec. 18 sec. 33 min. 40 sec. 35 min. 13 sec.<br />
15fps 34 sec. 37 sec. 64 min. 30 sec. 70 min. 26 sec.<br />
30fps 47 sec. 53 sec. 87 min. 21 sec. 98 min. 37 sec.<br />
15fps 1 min. 24 sec. 1 min. 46 sec. 156 min. 48 sec. 197 min. 14 sec.<br />
The maximum fi le size of a single movie is 2 GB, regardless of the capacity of the card.<br />
Increasing the number of pictures that can be taken<br />
Increasing the number of pictures that can be taken<br />
Either erase unwanted images, or connect the camera to a computer or other device to save the images, and then erase<br />
the images in the internal memory or card.<br />
[Erase] (p. 21, 37), [Sel. Image] (p. 37), [All Erase] (p. 37), [Memory Format]/[Format] (p. 38)<br />
EN<br />
57
SAFETY PRECAUTIONS<br />
58 EN<br />
CAUTION<br />
RISK OF ELECTRIC SHOCK<br />
DO NOT OPEN<br />
CAUTION: TO REDUCE THE RISK OF ELECTRICAL<br />
SHOCK, DO NOT REMOVE COVER (OR BACK).<br />
NO USER-SERVICEABLE PARTS INSIDE.<br />
REFER SERVICING TO QUALIFIED OLYMPUS<br />
SERVICE PERSONNEL.<br />
An exclamation mark enclosed in a<br />
triangle alerts you to important operating<br />
and maintenance instructions in the<br />
documentation provided with the product.<br />
DANGER If the product is used without observing<br />
the information given under this symbol,<br />
serious injury or death may result.<br />
WARNING If the product is used without observing<br />
the information given under this symbol,<br />
injury or death may result.<br />
CAUTION If the product is used without observing<br />
the information given under this symbol,<br />
minor personal injury, damage to the<br />
equipment, or loss of valuable data may<br />
result.<br />
WARNING!<br />
TO AVOID THE RISK OF FIRE OR ELECTRICAL SHOCK,<br />
NEVER DISASSEMBLE, EXPOSE THIS PRODUCT<br />
TO WATER OR OPERATE IN A HIGH HUMIDITY<br />
ENVIRONMENT.<br />
General Precautions<br />
Read All <strong>Instruction</strong>s — Before you use the product, read all<br />
operating instructions. Save all manuals and documentation<br />
for future reference.<br />
Cleaning — Always unplug this product from the wall outlet<br />
before cleaning. Use only a damp cloth for cleaning. Never<br />
use any type of liquid or aerosol cleaner, or any type of<br />
organic solvent to clean this product.<br />
Attachments — For your safety, and to avoid damaging the<br />
product, use only accessories recommended by Olympus.<br />
Water and Moisture — For precautions on products with<br />
weatherproof designs, read the weatherproofi ng sections.<br />
Location — To avoid damage to the product, mount the product<br />
securely on a stable tripod, stand, or bracket.<br />
Power Source — Connect this product only to the power<br />
source described on the product label.<br />
Lightning — If a lightning storm occurs while using a USB-AC<br />
adapter, remove it from the wall outlet immediately.<br />
Foreign Objects — To avoid personal injury, never insert a<br />
metal object into the product.<br />
Heat — Never use or store this product near any heat source<br />
such as a radiator, heat register, stove, or any type of<br />
equipment or appliance that generates heat, including stereo<br />
amplifi ers.<br />
Handling the Camera<br />
WARNING<br />
• Do not use the camera near fl ammable or explosive gases.<br />
• Do not use the fl ash and LED (including AF illuminator) on<br />
people (infants, small children, etc.) at close range.<br />
• You must be at least 1 m (3 ft.) away from the faces of your<br />
subjects. Firing the fl ash too close to the subject’s eyes could<br />
cause a momentary loss of vision.<br />
• Keep young children and infants away from the camera.<br />
• Always use and store the camera out of the reach of young<br />
children and infants to prevent the following dangerous<br />
situations which could cause serious injury:<br />
• Becoming entangled in the camera strap, causing<br />
strangulation.<br />
• Accidentally swallowing the battery, cards or other small<br />
parts.<br />
• Accidentally fi ring the fl ash into their own eyes or those of<br />
another child.<br />
• Accidentally being injured by the moving parts of the<br />
camera.<br />
• Do not look at the sun or strong lights with the camera.<br />
• Do not use or store the camera in dusty or humid places.<br />
• Do not cover the fl ash with a hand while fi ring.<br />
• Use SD/SDHC/SDXC memory cards or Eye-Fi cards only.<br />
Never use other types of cards.<br />
If you accidently insert another type of card into the camera,<br />
contact an authorized distributor or service center. Do not try to<br />
remove the card by force.<br />
• If you fi nd that the USB-AC adapter is extremely hot or notice<br />
any unusual odors, noise, or smoke around it, unplug the<br />
power plug from wall outlet immediately and stop using it.<br />
Then, contact an authorized distributor or service center.
CAUTION<br />
• Stop using the camera immediately if you notice any unusual<br />
odors, noise, or smoke around it.<br />
• Never remove the batteries with bare hands, which may<br />
cause a fi re or burn your hands.<br />
• Never hold or operate the camera with wet hands.<br />
• Do not leave the camera in places where it may be subject<br />
to extremely high temperatures.<br />
• Doing so may cause parts to deteriorate and, in some<br />
circumstances, cause the camera to catch fi re. Do not use<br />
the charger or USB-AC adapter if it is covered (such as a<br />
blanket). This could cause overheating, resulting in fi re.<br />
• Handle the camera with care to avoid getting a low-temperature<br />
burn.<br />
• When the camera contains metal parts, overheating can<br />
result in a low-temperature burn. Pay attention to the<br />
following:<br />
• When used for a long period, the camera will get hot. If you<br />
hold on to the camera in this state, a low-temperature burn<br />
may be caused.<br />
• In places subject to extremely cold temperatures, the<br />
temperature of the camera’s body may be lower than the<br />
environmental temperature. If possible, wear gloves when<br />
handling the camera in cold temperatures.<br />
• Be careful with the strap.<br />
• Be careful with the strap when you carry the camera. It could<br />
easily catch on stray objects and cause serious damage.<br />
• To protect the high-precision technology contained in this<br />
product, never leave the camera in the places listed below, no<br />
matter if in use or storage:<br />
• Places where temperatures and/or humidity are high or go<br />
through extreme changes. Direct sunlight, beaches, locked cars,<br />
or near other heat sources (stove, radiator, etc.) or humidifi ers.<br />
• In sandy or dusty environments.<br />
• Near fl ammable items or explosives.<br />
• In wet places, such as bathrooms or in the rain. When using<br />
products with weatherproof designs, read their manuals as well.<br />
• In places prone to strong vibrations.<br />
• Never drop the camera or subject it to severe shocks or vibrations.<br />
• When attaching the camera to or removing it from a tripod,<br />
rotate the tripod screw, not the camera.<br />
• Before transporting the camera, remove a tripod and all other<br />
non-OLYMPUS accessories.<br />
• Do not touch electric contacts on cameras.<br />
• Do not leave the camera pointed directly at the sun. This may<br />
cause lens or shutter curtain damage, color failure, ghosting on<br />
the image pickup device, or may possibly cause fi res.<br />
• Do not push or pull severely on the lens.<br />
• Before storing the camera for a long period, remove the<br />
batteries. Select a cool, dry location for storage to prevent<br />
condensation or mold from forming inside the camera. After<br />
storage, test the camera by turning it on and pressing the<br />
shutter button to make sure that it is operating normally.<br />
• The camera may malfunction if it is used in a location where<br />
it is subject to a magnetic/electromagnetic fi eld, radio waves,<br />
or high voltage, such as near a TV set, microwave, video<br />
game, loud speakers, large screen unit, TV/radio tower, or<br />
transmission towers. In such cases, turn the camera off and on<br />
again before further operation.<br />
• Always observe the operating environment restrictions<br />
described in the camera’s manual.<br />
Battery Handling Precautions<br />
Follow these important guidelines to prevent batteries<br />
from leaking, overheating, burning, exploding, or causing<br />
electrical shocks or burns.<br />
DANGER<br />
• The camera uses a lithium ion battery specifi ed by Olympus.<br />
Charge the battery with the specifi ed USB-AC adapter or<br />
charger. Do not use any other USB-AC adapters or chargers.<br />
• Never heat or incinerate batteries.<br />
• Take precautions when carrying or storing batteries to prevent<br />
them from coming into contact with any metal objects such as<br />
jewelry, pins, fasteners, etc.<br />
• Never store batteries where they will be exposed to direct<br />
sunlight, or subjected to high temperatures in a hot vehicle,<br />
near a heat source, etc.<br />
• To prevent causing battery leaks or damaging their terminals,<br />
carefully follow all instructions regarding the use of batteries.<br />
Never attempt to disassemble a battery or modify it in any<br />
way, solder, etc.<br />
• If battery fl uid gets into your eyes, fl ush your eyes immediately<br />
with clear, cold running water and seek medical attention<br />
immediately.<br />
• Always store batteries out of the reach of small children. If a<br />
child accidentally swallows a battery, seek medical attention<br />
immediately.<br />
• If you cannot remove the battery from the camera, contact an<br />
authorized distributor or service center. Do not try to remove<br />
the battery by force.<br />
Damage to the battery exterior (scratches, etc.) may produce<br />
heat or an explosion.<br />
EN<br />
59
WARNING<br />
• Keep batteries dry at all times.<br />
• To prevent batteries from leaking, overheating, or causing a<br />
fi re or explosion, use only batteries recommended for use with<br />
this product.<br />
• Insert the battery carefully as described in the operating<br />
instructions.<br />
• If rechargeable batteries have not been recharged within the<br />
specifi ed time, stop charging them and do not use them.<br />
• Do not use a battery if it is cracked or broken.<br />
• If a battery leaks, becomes discolored or deformed, or<br />
becomes abnormal in any other way during operation, stop<br />
using the camera.<br />
• If a battery leaks fl uid onto your clothing or skin, remove the<br />
clothing and fl ush the affected area with clean, running cold<br />
water immediately. If the fl uid burns your skin, seek medical<br />
attention immediately.<br />
• Never subject batteries to strong shocks or continuous vibration.<br />
CAUTION<br />
• Before loading, always inspect the battery carefully for leaks,<br />
discoloration, warping, or any other abnormality.<br />
• The battery may become hot during prolonged use. To avoid<br />
minor burns, do not remove it immediately after using the camera.<br />
• Always unload the battery from the camera before storing the<br />
camera for a long period.<br />
• This camera uses one Olympus lithium ion battery<br />
(LI-50B). No other type of batteries can be used.<br />
There is a risk of explosion if the battery is replaced with<br />
the incorrect battery type.<br />
• Power consumption by the camera varies depending on which<br />
functions are used.<br />
• During the conditions described below, power is consumed<br />
continuously and the battery becomes exhausted quickly.<br />
• The zoom is used repeatedly.<br />
• The shutter button is pressed halfway repeatedly in shooting<br />
mode, activating the auto focus.<br />
• A picture is displayed on the screen for an extended period<br />
of time.<br />
• The camera is connected to a printer.<br />
• Using an exhausted battery may cause the camera to turn off<br />
without displaying the battery level warning.<br />
• The Olympus lithium ion battery is designed to be used only<br />
for the Olympus digital camera. Do not use the battery to<br />
other devices.<br />
• If the battery’s terminals get wet or greasy, camera contact failure<br />
may result. Wipe the battery well with a dry cloth before use.<br />
60 EN<br />
• Always charge a battery when using it for the fi rst time, or if it<br />
has not been used for a long period.<br />
• When operating the camera with battery power at low<br />
temperatures, try to keep the camera and spare battery<br />
as warm as possible. A battery that has run down at low<br />
temperatures may be restored after it is warmed at room<br />
temperature.<br />
• Before going on a long trip, and especially before traveling<br />
abroad, purchase extra batteries. A recommended battery may<br />
be diffi cult to obtain while traveling.<br />
• When storing the battery for a long period, select a cool<br />
location for storage.<br />
• Please recycle batteries to help save our planet’s resources.<br />
When you throw away dead batteries, be sure to cover their<br />
terminals and always observe local laws and regulations.<br />
USB-AC adapter<br />
• The included USB-AC adapter F-2AC is designed to be used<br />
only with this camera. Other cameras cannot be charged with<br />
this USB-AC adapter.<br />
• Do not connect the included USB-AC adapter F-2AC to<br />
equipment other than this camera.<br />
• For plug-in type USB-AC adapter:<br />
The included USB-AC adapter F-2AC is intended to be<br />
correctly orientated in a vertical or fl oor mount position.<br />
Use Only Dedicated Rechargeable Battery,<br />
Battery Charger and USB-AC adapter<br />
We strongly recommend that you use only the genuine Olympus<br />
dedicated rechargeable battery, battery charger and USB-AC<br />
adapter with this camera. Using a non-genuine rechargeable<br />
battery, battery charger and/or USB-AC adapter may result<br />
in fi re or personal injury due to leakage, heating, ignition or<br />
damage to the battery. Olympus does not assume any liability<br />
for accidents or damage that may result from the use of a<br />
battery, battery charger and/or USB-AC adapter that are not<br />
genuine Olympus accessories.<br />
Monitor<br />
• Do not push the monitor forcibly; otherwise the image may<br />
become vague, resulting in a playback mode failure or damage<br />
to the monitor.<br />
• A strip of light may appear on the top/bottom of the monitor, but<br />
this is not a malfunction.<br />
• When a subject is viewed diagonally in the camera, the<br />
edges may appear zigzagged on the monitor. This is not a<br />
malfunction; it will be less noticeable in playback mode.
• In places subject to low temperatures, the monitor may take a<br />
long time to turn on or its color may change temporarily. When<br />
using the camera in extremely cold places, it is a good idea to<br />
occasionally place it in a warm place. The monitor exhibiting<br />
poor performance due to low temperatures will recover in<br />
normal temperatures.<br />
• The monitor of this product is manufactured with high-quality<br />
accuracy, however, there may be a stuck or dead pixel on the<br />
monitor. These pixels do not have any infl uence on the image<br />
to be saved. Because of the characteristics, the unevenness<br />
of the color or brightness may also be found depending on the<br />
angle, but this is due to the structure of the monitor. This is not<br />
a malfunction.<br />
Legal and Other Notices<br />
• Olympus makes no representations or warranties regarding<br />
any damages, or benefi t expected by using this unit lawfully,<br />
or any request from a third person, which are caused by the<br />
inappropriate use of this product.<br />
• Olympus makes no representations or warranties regarding<br />
any damages or any benefi t expected by using this unit<br />
lawfully which are caused by erasing picture data.<br />
Disclaimer of Warranty<br />
• Olympus makes no representations or warranties, either<br />
expressed or implied, by or concerning any content of these<br />
written materials or software, and in no event shall be liable<br />
for any implied warranty of merchantability or fi tness for any<br />
particular purpose or for any consequential, incidental or<br />
indirect damages (including but not limited to damages for loss<br />
of business profi ts, business interruption and loss of business<br />
information) arising from the use or inability to use these<br />
written materials or software or equipment. Some countries do<br />
not allow the exclusion or limitation of liability for consequential<br />
or incidental damages or of the implied warranty, so the above<br />
limitations may not apply to you.<br />
• Olympus reserves all rights to this manual.<br />
Warning<br />
Unauthorized photographing or use of copyrighted material<br />
may violate applicable copyright laws. Olympus assumes no<br />
responsibility for unauthorized photographing, use or other acts<br />
that infringe upon the rights of copyright owners.<br />
Copyright Notice<br />
All rights reserved. No part of these written materials or this<br />
software may be reproduced or used in any form or by any<br />
means, electronic or mechanical, including photocopying<br />
and recording or the use of any type of information storage<br />
and retrieval system, without the prior written permission of<br />
Olympus. No liability is assumed with respect to the use of the<br />
information contained in these written materials or software, or<br />
for damages resulting from the use of the information contained<br />
therein. Olympus reserves the right to alter the features and<br />
contents of this publication or software without obligation or<br />
advance notice.<br />
FCC Notice<br />
• Radio and Television Interference<br />
• Changes or modifi cations not expressly approved by the<br />
manufacturer may void the user’s authority to operate this<br />
equipment. This equipment has been tested and found to<br />
comply with the limits for a Class B digital device, pursuant<br />
to Part 15 of the FCC Rules. These limits are designed to<br />
provide reasonable protection against harmful interference in a<br />
residential installation.<br />
• This equipment generates, uses, and can radiate radio<br />
frequency energy and, if not installed and used in accordance<br />
with the instructions, may cause harmful interference to radio<br />
communications.<br />
• However, there is no guarantee that interference will not<br />
occur in a particular installation. If this equipment does cause<br />
harmful interference to radio or television reception, which can<br />
be determined by turning the equipment off and on, the user is<br />
encouraged to try to correct the interference by one or more of<br />
the following measures:<br />
• Adjust or relocate the receiving antenna.<br />
• Increase the distance between the camera and receiver.<br />
• Connect the equipment to an outlet on a circuit different from<br />
that to which the receiver is connected.<br />
• Consult your dealer or an experienced radio/TV technician<br />
for help. Only the OLYMPUS-supplied USB cable should<br />
be used to connect the camera to USB enabled personal<br />
computers (PC).<br />
Any unauthorized changes or modifi cations to this equipment<br />
would void the user’s authority to operate it.<br />
EN<br />
61
For customers in North and South America<br />
For customers in USA<br />
Declaration of Conformity<br />
Model Number: <strong>VG</strong>-<strong>170</strong><br />
Trade Name: OLYMPUS<br />
Responsible Party:<br />
Address: 3500 Corporate Parkway, P.O. Box 610,<br />
Center Valley, PA 18034-0610, U.S.A.<br />
Telephone Number: 484-896-5000<br />
Tested To Comply With FCC Standards<br />
FOR HOME OR OFFICE USE<br />
This device complies with Part 15 of the FCC rules. Operation is<br />
subject to the following two conditions:<br />
(1) This device may not cause harmful interference.<br />
(2) This device must accept any interference received, including<br />
interference that may cause undesired operation.<br />
For customers in CANADA<br />
This Class B digital apparatus complies with Canadian ICES-<br />
003.<br />
62 EN<br />
OLYMPUS WORLDWIDE LIMITED WARRANTY -<br />
IMAGING PRODUCTS<br />
Olympus warrants that the enclosed Olympus® imaging<br />
product(s) and related Olympus® accessories (individually<br />
a “Product” and collectively the “Products”) will be free from<br />
defects in materials and workmanship under normal use and<br />
service for a period of one (1) year from the date of purchase.<br />
If any Product proves to be defective within the one-year<br />
warranty period, the customer must return the defective Product<br />
to any of Olympus Service Centers, following the procedure<br />
set forth below (See “WHAT TO DO WHEN SERVICE IS<br />
NEEDED”).<br />
Olympus, at its sole discretion, will repair, replace, or adjust<br />
the defective Product, provided that Olympus investigation and<br />
factory inspection disclose that (a) such defect developed under<br />
normal and proper use and (b) the Product is covered under this<br />
limited warranty.<br />
Repair, replacement, or adjustment of defective Products shall<br />
be Olympus’s sole obligation and the customer’s sole remedy<br />
hereunder.<br />
The customer is liable and shall pay for shipment of the<br />
Products to the Olympus Service Center.<br />
Olympus shall not be obligated to perform preventive<br />
maintenance, installation, deinstallation, or maintenance.<br />
Olympus reserves the right to (i) use reconditioned, refurbished,<br />
and/or serviceable used parts (that meet Olympus’s quality<br />
assurance standards) for warranty or any other repairs and (ii)<br />
make any internal or external design and/or feature changes<br />
on or to its products without any liability to incorporate such<br />
changes on or to the Products.
WHAT IS NOT COVERED BY THIS LIMITED<br />
WARRANTY<br />
Excluded from this limited warranty and not warranted by<br />
Olympus in any fashion, either express, implied, or by statute,<br />
are:<br />
(a) products and accessories not manufactured by Olympus<br />
and/or not bearing the “OLYMPUS” brand label (the<br />
warranty coverage for products and accessories of other<br />
manufacturers, which may be distributed by Olympus, is the<br />
responsibility of the manufacturers of such products and<br />
accessories in accordance with the terms and duration of<br />
such manufacturers’ warranties);<br />
(b) any Product which has been disassembled, repaired,<br />
tampered with, altered, changed, or modifi ed by persons<br />
other than Olympus’s own authorized service personnel<br />
unless repair by others is made with the written consent of<br />
Olympus;<br />
(c) defects or damage to the Products resulting from wear,<br />
tear, misuse, abuse, negligence, sand, liquids, impact,<br />
improper storage, nonperformance of scheduled operator<br />
and maintenance items, battery leakage, use of non-<br />
“OLYMPUS” brand accessories, consumables, or supplies,<br />
or use of the Products in combination with non-compatible<br />
devices;<br />
(d) software programs;<br />
(e) supplies and consumables (including but not limited to<br />
lamps, ink, paper, fi lm, prints, negatives, cables and<br />
batteries); and/or<br />
(f) Products which do not contain a validly placed and recorded<br />
Olympus serial number, unless they are a model on which<br />
Olympus does not place and record serial numbers.<br />
EXCEPT FOR THE LIMITED WARRANTY SET FORTH<br />
ABOVE, OLYMPUS MAKES NO AND DISCLAIMS ALL OTHER<br />
REPRESENTATIONS, GUARANTIES, CONDITIONS, AND<br />
WARRANTIES CONCERNING THE PRODUCTS, WHETHER<br />
DIRECT OR INDIRECT, EXPRESS OR IMPLIED, OR ARISING<br />
UNDER ANY STATUTE, ORDINANCE, COMMERCIAL<br />
USAGE OR OTHERWISE, INCLUDING BUT NOT LIMITED<br />
TO ANY WARRANTY OR REPRESENTATION AS TO THE<br />
SUITABILITY, DURABILITY, DESIGN, OPERATION, OR<br />
CONDITON OF THE PRODUCTS (OR ANY PART THEREOF)<br />
OR THE MERCHANTABILITY OF THE PRODUCTS OR THEIR<br />
FITNESS FOR A PARTICULAR PURPOSE, OR RELATING<br />
TO THE INFRINGEMENT OF ANY PATENT, COPYRIGHT,<br />
OR OTHER PROPRIETARY RIGHT USED OR INCLUDED<br />
THEREIN.<br />
IF ANY IMPLIED WARRANTIES APPLY AS A MATTER OF<br />
LAW, THEY ARE LIMITED IN DURATION TO THE LENGTH OF<br />
THIS LIMITED WARRANTY.<br />
SOME STATES MAY NOT RECOGNIZE A DISCLAIMER OR<br />
LIMITATION OF WARRANTIES AND/OR LIMITATION OF<br />
LIABILITY SO THE ABOVE DISCLAIMERS AND EXCLUSIONS<br />
MAY NOT APPLY.<br />
THE CUSTOMER MAY ALSO HAVE DIFFERENT AND/OR<br />
ADDITIONAL RIGHTS AND REMEDIES THAT VARY FROM<br />
STATE TO STATE.<br />
THE CUSTOMER ACKNOWLEDGES AND AGREES THAT<br />
OLYMPUS SHALL NOT BE RESPONSIBLE FOR ANY<br />
DAMAGES THAT THE CUSTOMER MAY INCUR FROM<br />
DELAYED SHIPMENT, PRODUCT FAILURE, PRODUCT<br />
DESIGN, SELECTION, OR PRODUCTION, IMAGE OR DATA<br />
LOSS OR IMPAIRMENT OR FROM ANY OTHER CAUSE,<br />
WHETHER LIABILITY IS ASSERTED IN CONTRACT, TORT<br />
(INCLUDING NEGLIGENCE AND STRICT PRODUCT<br />
LIABILITY) OR OTHERWISE. IN NO EVENT SHALL<br />
OLYMPUS BE LIABLE FOR ANY INDIRECT, INCIDENTAL,<br />
CONSEQUENTIAL OR SPECIAL DAMAGES OF ANY KIND<br />
(INCLUDING WITHOUT LIMITATION LOSS OF PROFITS OR<br />
LOSS OF USE), WHETHER OR NOT OLYMPUS SHALL BE<br />
OR SHOULD BE AWARE OF THE POSSIBILITY OF SUCH<br />
POTENTIAL LOSS OR DAMAGE.<br />
EN<br />
63
Representations and warranties made by any person, including<br />
but not limited to dealers, representatives, salespersons, or<br />
agents of Olympus, which are inconsistent or in confl ict with<br />
or in addition to the terms of this limited warranty, shall not be<br />
binding upon Olympus unless reduced to writing and approved<br />
by an expressly authorized offi cer of Olympus.<br />
This limited warranty is the complete and exclusive statement of<br />
warranty which Olympus agrees to provide with respect to the<br />
Products and it shall supersede all prior and contemporaneous<br />
oral or written agreements, understandings, proposals, and<br />
communications pertaining to the subject matter hereof.<br />
This limited warranty is exclusively for the benefi t of the original<br />
customer and cannot be transferred or assigned.<br />
WHAT TO DO WHEN SERVICE IS NEEDED<br />
The customer must transfer any image or other data saved on<br />
a Product to another image or data storage medium and/or<br />
remove any fi lm from the Product prior to sending the Product to<br />
Olympus for service.<br />
IN NO EVENT SHALL OLYMPUS BE RESPONSIBLE FOR<br />
SAVING, KEEPING OR MAINTAINING ANY IMAGE OR DATA<br />
SAVED ON A PRODUCT RECEIVED BY IT FOR SERVICE, OR<br />
ON ANY FILM CONTAINED WITHIN A PRODUCT RECEIVED BY<br />
IT FOR SERVICE, NOR SHALL OLYMPUS BE RESPONSIBLE<br />
FOR ANY DAMAGES IN THE EVENT ANY IMAGE OR DATA IS<br />
LOST OR IMPAIRED WHILE SERVICE IS BEING PERFORMED<br />
(INCLUDING, WITHOUT LIMITATION, DIRECT, INDIRECT,<br />
INCIDENTAL, CONSEQUENTIAL OR SPECIAL DAMAGES,<br />
LOSS OF PROFITS OR LOSS OF USE), WHETHER OR NOT<br />
OLYMPUS SHALL BE OR SHOULD BE AWARE OF THE<br />
POSSIBILITY OF SUCH POTENTIAL LOSS OR IMPAIRMENT.<br />
Package the Product carefully using ample padding material to<br />
prevent damage in transit and either deliver it to the Authorized<br />
Olympus Dealer that sold you the Product or ship it postage<br />
prepaid and insured to any of our Olympus Service Centers.<br />
When returning Products for service, your package should<br />
include the following:<br />
1 Sales receipt showing date and place of purchase.<br />
2 Copy of this limited warranty bearing the Product serial<br />
number corresponding to the serial number on the<br />
Product (unless it is a model on which Olympus does not<br />
place and record serial numbers).<br />
3 A detailed description of the problem.<br />
4 Sample prints, negatives, digital prints (or fi les on disk) if<br />
available and related to the problem.<br />
When service is completed, the Product will be returned to you<br />
postage prepaid.<br />
64 EN<br />
WHERE TO SEND PRODUCT FOR SERVICE<br />
See “WORLDWIDE WARRANTY” for the nearest service center.<br />
INTERNATIONAL WARRANTY SERVICE<br />
International warranty service is available under this warranty.<br />
For customers in Europe<br />
“CE” mark indicates that this product complies<br />
with the European requirements for safety,<br />
health, environment and customer protection.<br />
“CE” mark cameras are intended for sales in<br />
Europe.<br />
This symbol [crossed-out wheeled bin WEEE<br />
Annex IV] indicates separate collection of waste<br />
electrical and electronic equipment in the EU<br />
countries.<br />
Please do not throw the equipment into the<br />
domestic refuse.<br />
Please use the return and collection systems<br />
available in your country for the disposal of<br />
this product.<br />
This symbol [crossed-out wheeled bin<br />
Directive 2006/66/EC Annex II] indicates<br />
separate collection of waste batteries in the<br />
EU countries.<br />
Please do not throw the batteries into the<br />
domestic refuse. Please use the return and<br />
collection systems available in your country for<br />
the disposal of the waste batteries.
Provisions of warranty<br />
1 If this product proves to be defective, although it has been<br />
used properly (in accordance with the written Handling<br />
Care and Operating instructions supplied with it), during the<br />
applicable national warranty period and has been purchased<br />
from an authorized Olympus distributor within the business<br />
area of Olympus Europa Holding GmbH as stipulated on<br />
the website: http://www.olympus.com this product will be<br />
repaired, or at Olympus’s option replaced, free of charge. To<br />
claim under this warranty the customer must take the product<br />
before the end of the applicable national warranty period to<br />
the dealer where the product was purchased or any other<br />
Olympus service station within the business area of Olympus<br />
Europa Holding GmbH as stipulated on the website: http://<br />
www.olympus.com. During the one year period of the World<br />
Wide Guarantee the customer may turn the product in at<br />
any Olympus service station. Please notice that not in all<br />
countries such Olympus service station exists.<br />
2 The customer shall transport the product to the dealer or<br />
Olympus authorized service station at his own risk and shall<br />
be responsible for any costs incurred in transporting the<br />
product.<br />
Provisions of Guarantee<br />
1 “OLYMPUS IMAGING CORP., Shinjuku Monolith, 2-3-1<br />
Nishi-Shinjuku, Shinjuku-ku, Tokyo 163-0914, Japan grants a<br />
one year World Wide Guarantee. This worldwide Guarantee<br />
must be presented at an Olympus authorized repair service<br />
station before any repair can be made under conditions<br />
of this Guarantee. This Guarantee is valid only if the<br />
Guarantee Certifi cate and proof of purchase are presented<br />
at the Olympus repair service station. Please note that this<br />
Guarantee is in addition to and does not affect the customer’s<br />
legal warranty rights under the applicable national legislation<br />
governing the sale of consumer goods mentioned above.<br />
2 This Guarantee does not cover the following and the<br />
customer will be required to pay repair charge, even for<br />
defects occurring within the Guarantee period referred to<br />
above.<br />
a. Any defect that occurs due to mishandling (such as an<br />
operation performed that is not mentioned in the Handling<br />
Care or other sections of the instructions, etc.)<br />
b. Any defect that occurs due to repair, modifi cation, cleaning,<br />
etc. performed by anyone other than Olympus or an<br />
Olympus authorized service station.<br />
c. Any defect or damage that occurs due to transport, a fall,<br />
shock, etc. after purchase of the product.<br />
d. Any defect or damage that occurs due to fi re, earthquake,<br />
fl ood damage, thunderbolt, other natural disasters,<br />
environmental pollution and irregular voltage sources.<br />
e. Any defect that occurs due to careless or improper<br />
storage (such as keeping the product under conditions<br />
of high temperature and humidity, near insect repellents<br />
such as naphthalene or harmful drugs, etc.), improper<br />
maintenance, etc.<br />
f. Any defect that occurs due to exhausted batteries, etc.<br />
g. Any defect that occurs due to sand, mud, etc. entering the<br />
inside of the product casing.<br />
h. When the Guarantee Certifi cate is not returned with the<br />
product.<br />
i. When any alterations whatsoever are made to the<br />
Guarantee Certifi cate regarding the year, month and date<br />
of purchase, the customer’s name, the dealer’s name, and<br />
the serial number.<br />
j. When proof of purchase is not presented with this<br />
Guarantee Certifi cate.<br />
3 This Guarantee applies to the product only; the Guarantee<br />
does not apply to any other accessory equipment, such as<br />
the case, strap, lens cap and batteries.<br />
4 Olympus’s sole liability under this Guarantee shall be limited<br />
to repairing or replacing the product. Any liability under the<br />
Guarantee for indirect or consequential loss or damage of<br />
any kind incurred or suffered by the customer due to a defect<br />
of the product, and in particular any loss or damage caused<br />
to any lenses, fi lms, other equipment or accessories used<br />
with the product or for any loss resulting from a delay in repair<br />
or loss of data, is excluded. Compelling regulations by law<br />
remain unaffected by this.<br />
Notes regarding Guarantee maintenance<br />
1 This Guarantee will only be valid if the Guarantee Certifi cate<br />
is duly completed by Olympus or an authorized dealer or<br />
other documents contain suffi cient proof. Therefore, please<br />
make sure that your name, the name of the dealer, the<br />
serial number and the year, month and date of purchase<br />
are all completed or the original invoice or the sales receipt<br />
(indicating the dealer’s name, the date of purchase and<br />
product type) is attached to this Guarantee Certifi cate.<br />
Olympus reserves the right to refuse free-of-charge service<br />
if neither Guarantee Certifi cate is completed nor the above<br />
document is attached or if the information contained in it is<br />
incomplete or illegible.<br />
2 Since this Guarantee Certifi cate will not be re-issued, keep it<br />
in a safe place.<br />
* Please refer to the list on the web site: http://www.olympus.<br />
com for the authorized international Olympus service<br />
network.<br />
EN<br />
65
For customers in Asia<br />
Provisions of warranty<br />
1 lf this product proves to be defective, although it has been<br />
used properly (in accordance with the written Handling Care<br />
and Operating instructions supplied with it), during a period<br />
of up to one year from the date of purchase this product<br />
will be repaired, or at Olympus’s option replaced, free of<br />
charge. To claim under warranty the customer must take the<br />
product and this Warranty certifi cate before the end of the<br />
one year warranty period to the dealer where the product was<br />
purchased or any Olympus authorized service station listed in<br />
the instructions and request the necessary repairs.<br />
2 The customer shall transport the product to the dealer or<br />
Olympus authorized service station at his own risk and shall<br />
be responsible for any costs incurred in transporting the<br />
product.<br />
3 This warranty does not cover the following and the customer<br />
will be required to pay repair charge, even for defects<br />
occurring within the one year period referred to above.<br />
a. Any defect that occurs due to mishandling (such as an<br />
operation performed that is not mentioned in the Handling<br />
Care or other sections of the instructions, etc.)<br />
b. Any defect that occurs due to repair, modifi cation, cleaning,<br />
etc. performed by anyone other than Olympus or an<br />
Olympus authorized service station.<br />
c. Any defect or damage that occurs due to transport, a fall,<br />
shock, etc. after purchase of the product.<br />
d. Any defect or damage that occurs due to fi re, earthquake,<br />
fl ood damage, thunderbolt, other natural disasters,<br />
environmental pollution and irregular voltage sources.<br />
e. Any defect that occurs due to careless or improper<br />
storage (such as keeping the product under conditions<br />
of high temperature and humidity, near insect repellents<br />
such as naphthalene or harmful drugs, etc.), improper<br />
maintenance, etc.<br />
f. Any defect that occurs due to exhausted batteries, etc.<br />
g. Any defect that occurs due to sand, mud, etc. entering the<br />
inside of the product casing.<br />
h. When this Warranty Certifi cate is not returned with the<br />
product.<br />
i. When any alterations whatsoever are made to the<br />
Warranty Certifi cate regarding the year, month and date of<br />
purchase, the customer’s name, the dealer’s name, and<br />
the serial number.<br />
j. When proof of purchase is not presented with this<br />
Warranty Certifi cate.<br />
66 EN<br />
4 This Warranty applies to the product only; the Warranty does<br />
not apply to any other accessory equipment, such as the<br />
case, strap, lens cap and batteries.<br />
5 Olympus’ sole liability under this warranty shall be limited to<br />
repairing or replacing the product and any liability for indirect<br />
or consequential loss or damage of any kind incurred or<br />
suffered by the customer due to a defect in the product, and<br />
in particular any loss or damage caused to any fi lm or lenses<br />
or other equipment or accessories used with the product or<br />
for any loss resulting from delay in repair, is excluded.<br />
Notes;<br />
1 This Warranty is in addition to and does not affect the<br />
customer’s statutory right.<br />
2 lf you have any queries regarding this Warranty, call any<br />
of the Olympus authorized service stations listed in the<br />
instructions.<br />
Notes regarding warranty maintenance<br />
1 This Warranty will only be valid if the Warranty Certifi cate is<br />
duly completed by Olympus or the dealer. Make sure that<br />
your name, the name of the dealer, the serial number and the<br />
year, month and date of purchase are all completed.<br />
2 Since this Warranty Certifi cate will not be re-issued, keep it in<br />
a safe place.<br />
3 Any request for repair by a customer in same country where<br />
the product was purchased shall be subject to the terms<br />
of the warranty issued by the Olympus distributor in that<br />
country. Where the local Olympus distributor does not issue a<br />
separate warranty or where the customer is not in the country<br />
where the product was purchased the terms of this worldwide<br />
warranty shall apply.<br />
4 Where applicable, this Warranty is valid worldwide. The<br />
Olympus authorized service stations listed in this Warranty<br />
will gladly honor it.<br />
* Please refer to the appended list for the authorized<br />
international Olympus service network.<br />
Disclaimer of Warranty<br />
Olympus makes no representations or warranties, either<br />
expressed or implied, by or concerning any content if these<br />
written materials or software, and in no event shall be liable<br />
for any implied warranty of merchantability or fi tness for any<br />
particular purpose or for any consequential, incidental or<br />
indirect damages (including but not limited to damages for loss<br />
of business profi ts, business interruption and loss of business<br />
information) arising from the use of inability to use these written<br />
materials or software. Some states do not allow the exclusion or<br />
limitation of liability for consequential or incidental damages, so<br />
the above limitations may not apply to you.
Trademarks<br />
• IBM is a registered trademark of International Business<br />
Machines Corporation.<br />
• Microsoft and Windows are registered trademarks of Microsoft<br />
Corporation.<br />
• Macintosh is a trademark of Apple Inc.<br />
• The SDHC/SDXC logo is a trademark.<br />
• Eye-Fi is a registered trademark of Eye-Fi, Inc.<br />
• All other company and product names are registered<br />
trademarks and/or trademarks of their respective owners.<br />
• The standards for camera fi le systems referred to in this<br />
manual are the “Design rule for Camera File system/DCF”<br />
standards stipulated by the Japan Electronics and Information<br />
Technology Industries Association (JEITA).<br />
The software in this camera may include third party software. Any third<br />
party software is subject to the terms and conditions, imposed by the<br />
owners or licensors of that software, under which software is provided<br />
to you.<br />
Those terms and other third party software notices, if any, may be found in<br />
the software notice PDF fi le stored within the accompanying CD-ROM or at<br />
http://www.olympus.co.jp/en/support/imsg/digicamera/download/notice/<br />
notice.cfm<br />
Powered by ARCSOFT.<br />
EN<br />
67
SPECIFICATIONS<br />
Camera<br />
Product type : Digital camera (for shooting and displaying)<br />
Recording system<br />
Still pictures : Digital recording, JPEG (in accordance with Design rule for Camera File system<br />
(DCF)), 3D: Anaglyph<br />
Applicable standards : Exif 2.3, Digital Print Order Format (DPOF), PRINT Image Matching III, PictBridge<br />
Sound with still pictures : Wave format<br />
Movie : AVI Motion JPEG<br />
Memory : Internal memory, SD/SDHC/SDXC/Eye-Fi card<br />
No. of effective pixels : 14,000,000 pixels<br />
Image pickup device : 1/2.3” CCD (primary color fi lter)<br />
Lens : Olympus lens 4.7 to 23.5 mm, f2.8 to 6.5<br />
(equivalent to 26 to 130 mm on a 35 mm camera)<br />
Photometric system : Digital ESP metering system<br />
Shutter speed : 4 to 1/2000 sec.<br />
Shooting range : 0.6 m (2.0 ft.) to (W), 1.0 m (3.3 ft.) to (T) (normal)<br />
0.2 m (0.7 ft.) to (W), 0.6 m (2.0 ft.) to (T) (macro mode)<br />
0.05 m (0.16 ft.) to (super macro mode)<br />
Monitor : 3.0” TFT color LCD display, 460,800 dots<br />
Connector : Multi-connector (USB connector, A/V OUT jack)<br />
Automatic calendar system<br />
Operating environment<br />
: 2000 up to 2099<br />
Temperature : 0 °C to 40 °C (32 °F to 104 °F) (operation)/<br />
-20 °C to 60 °C (-4 °F to 140 °F) (storage)<br />
Humidity : 30 % to 90 % (operation)/10 % to 90 % (storage)<br />
Power supply : One Olympus lithium ion battery (LI-50B)<br />
Dimensions : 103.7 mm (W) × 62.5 mm (H) × 22.2 mm (D)<br />
(4.1 × 2.5 × 0.9 in.) (excluding protrusions)<br />
Weight : 147 g (5.2 oz) (including battery and card)<br />
68 EN
Lithium ion battery (LI-50B)<br />
Product type : Lithium ion rechargeable battery<br />
Model No. : LI-50BA/LI-50BB<br />
Standard voltage : DC 3.7 V<br />
Standard capacity : 925 mAh<br />
Battery life : Approx. 300 full charges (varies on usage)<br />
Operating environment<br />
Temperature : 0°C to 40°C (32°F to 104°F) (charging)<br />
USB-AC adapter (F-2AC)<br />
Model No. : F-2AC-2B/F-2AC-1C/F-2AC-3C/F-2AC-4C/F-2AC-5C/F-2AC-1D/F-2AC-3D/<br />
F-2AC-4D/F-2AC-5D/F-2AC-6D<br />
Power requirements : AC 100 to 240 V (50/60 Hz)<br />
Output<br />
Operating environment<br />
: F-2AC-2B: DC 5 V, 500 mA<br />
F-2AC-1C/F-2AC-3C/F-2AC-4C/F-2AC-5C/F-2AC-1D/F-2AC-3D/F-2AC-4D/<br />
F-2AC-5D/F-2AC-6D: DC 5 V, 550 mA<br />
Temperature : 0 °C to 40 °C (32 °F to 104 °F) (operation)/<br />
-20 °C to 60 °C (-4 °F to 140 °F) (storage)<br />
Design and specifi cations subject to change without notice.<br />
EN<br />
69
VM<strong>170</strong>501