Installation guide Radio tubular motor EWFS type WE ... - Warema
Installation guide Radio tubular motor EWFS type WE ... - Warema
Installation guide Radio tubular motor EWFS type WE ... - Warema

Create successful ePaper yourself
Turn your PDF publications into a flip-book with our unique Google optimized e-Paper software.
<strong>Installation</strong> <strong>guide</strong><br />
<strong>Radio</strong> <strong>tubular</strong> <strong>motor</strong> <strong>EWFS</strong> ® <strong>type</strong> <strong>WE</strong>/<strong>WE</strong>M/<strong>WE</strong>R<br />
Please save these instructions for future use!<br />
Valid as from December 6, 2004<br />
93290630•816827•7804K0•06.12.2004<br />
General remarks<br />
Tubular <strong>motor</strong><br />
Plug STAS 3<br />
Antenna<br />
Coupler STAK 3<br />
(Connected by customer)<br />
1<br />
1 2 3<br />
Plug connector STAS 3<br />
(Connected to drive)<br />
2 1<br />
3<br />
2<br />
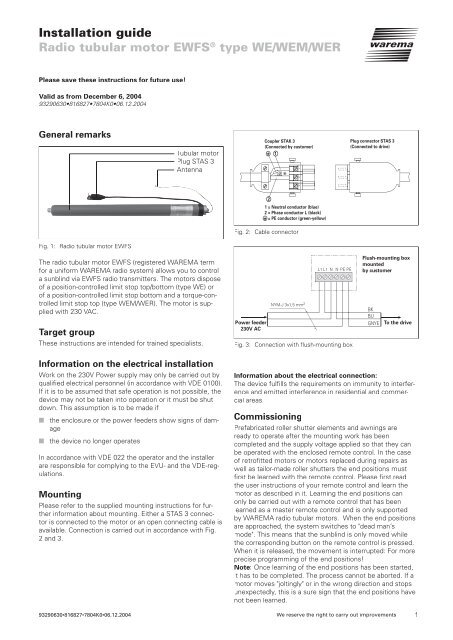
1 = Neutral conductor (blue)<br />
2 = Phase conductor L (black)<br />
= PE conductor (green-yellow)<br />
Fig. 2: Cable connector<br />
Fig. 1: <strong>Radio</strong> <strong>tubular</strong> <strong>motor</strong> <strong>EWFS</strong><br />
The radio <strong>tubular</strong> <strong>motor</strong> <strong>EWFS</strong> (registered WAREMA term<br />
for a uniform WAREMA radio system) allows you to control<br />
a sunblind via <strong>EWFS</strong> radio transmitters. The <strong>motor</strong>s dispose<br />
of a position-controlled limit stop top/bottom (<strong>type</strong> <strong>WE</strong>) or<br />
of a position-controlled limit stop bottom and a torque-controlled<br />
limit stop top (<strong>type</strong> <strong>WE</strong>M/<strong>WE</strong>R). The <strong>motor</strong> is supplied<br />
with 230 VAC.<br />
Target group<br />
These instructions are intended for trained specialists.<br />
Power feeder<br />
230V AC<br />
NYM-J 3x1,5 mm 2<br />
L1 L1 N N PE PE<br />
Fig. 3: Connection with flush-mounting box<br />
Flush-mounting box<br />
mounted<br />
by customer<br />
BK<br />
BU<br />
GNYE<br />
To the drive<br />
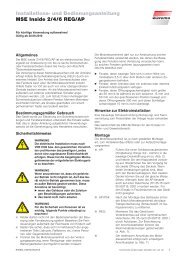
Information on the electrical installation<br />
Work on the 230V Power supply may only be carried out by<br />
qualified electrical personnel (in accordance with VDE 0100).<br />
If it is to be assumed that safe operation is not possible, the<br />
device may not be taken into operation or it must be shut<br />
down. This assumption is to be made if<br />
■ the enclosure or the power feeders show signs of damage<br />
■ the device no longer operates<br />
In accordance with VDE 022 the operator and the installer<br />
are responsible for complying to the EVU- and the VDE-regulations.<br />
Mounting<br />
Please refer to the supplied mounting instructions for further<br />
information about mounting. Either a STAS 3 connector<br />
is connected to the <strong>motor</strong> or an open connecting cable is<br />
available. Connection is carried out in accordance with Fig.<br />
2 and 3.<br />
Information about the electrical connection:<br />
The device fulfills the requirements on immunity to interference<br />
and emitted interference in residential and commercial<br />
areas.<br />
Commissioning<br />
Prefabricated roller shutter elements and awnings are<br />
ready to operate after the mounting work has been<br />
completed and the supply voltage applied so that they can<br />
be operated with the enclosed remote control. In the case<br />
of retrofitted <strong>motor</strong>s or <strong>motor</strong>s replaced during repairs as<br />
well as tailor-made roller shutters the end positions must<br />
first be learned with the remote control. Please first read<br />
the user instructions of your remote control and learn the<br />
<strong>motor</strong> as described in it. Learning the end positions can<br />
only be carried out with a remote control that has been<br />
learned as a master remote control and is only supported<br />
by WAREMA radio <strong>tubular</strong> <strong>motor</strong>s. When the end positions<br />
are approached, the system switches to "dead man’s<br />
mode". This means that the sunblind is only moved while<br />
the corresponding button on the remote control is pressed.<br />
When it is released, the movement is interrupted: For more<br />
precise programming of the end positions!<br />
Note: Once learning of the end positions has been started,<br />
it has to be completed. The process cannot be aborted. If a<br />
<strong>motor</strong> moves "joltingly" or in the wrong direction and stops<br />
unexpectedly, this is a sure sign that the end positions have<br />
not been learned.<br />
93290630•816827•7804K0•06.12.2004 We reserve the right to carry out improvements 1
Mode button "M"<br />
Learn button "L"<br />
Store button "S"<br />
Encoding switch<br />
Batteries<br />
L<br />
S<br />
-<br />
AAA<br />
+<br />
2x IEC LR03 AAA<br />
+<br />
AAA<br />
Fig. 4: Remote control (with battery compartment opened)<br />
Note:<br />
What about "waving" The sunblind carries out a series of<br />
defined movements in order to confirm a completed program<br />
procedure. We call this procedure "waving".<br />
Learning end positions (Type <strong>WE</strong>)<br />
■<br />
■<br />
■<br />
■<br />
■<br />
■<br />
■<br />
Press the mode button "M" (Fig. 4) of the remote control.<br />
The transmit LED begins to flash.<br />
Press the button "A" of the remote control for approx.<br />
2 seconds. This initiates learning of the end positions.<br />
Waving is not carried out!<br />
Move the sunblind to the lower end position. Keep<br />
the button pressed during moving. The movement is<br />
interrupted as soon as it is released. It is possible that<br />
a <strong>motor</strong> moves in the wrong direction, i.e. upwards,<br />
although you have pressed the "DOWN" button. In<br />
this case use the opposite button in order to move the<br />
sunblind downwards.<br />
When the lower end position has been reached, stop<br />
the movement and press the button "A" of the remote<br />
control for approx. 2 seconds. Waving is not carried out!<br />
Now move the sunblind to the upper end position. Keep<br />
the button pressed during moving. The movement is<br />
interrupted as soon as it is released.<br />
When the upper end position has been reached, stop<br />
the movement and press the button "A" of the remote<br />
control for approx. 2 seconds. The sunblind waves if the<br />
end position has been learned successfully.<br />
In Order to complete the learning process, press the<br />
mode button "M" (Fig. 4) of the remote control, the<br />
transmit LED extinguishes, the end positions and the<br />
direction of rotation have been learned.<br />
Learning end positions (Type <strong>WE</strong>M/<strong>WE</strong>R)<br />
■<br />
■<br />
■<br />
Press the mode button "M" (Fig. 4) of the remote control.<br />
The transmit LED begins to flash.<br />
Press the button "A" of the remote control for approx.<br />
2 seconds. This initiates learning of the end positions.<br />
Waving is not carried out!<br />
Move the sunblind to the lower end position. Keep the<br />
button pressed during moving. The movement is interrupted<br />
as soon as it is released. It is possible that a drive<br />
moves in the wrong direction, i.e. upwards, although<br />
you have pressed the "DOWN" button. In this case use<br />
the opposite button in order to move the sunblind downwards.<br />
-<br />
■<br />
When the lower end position has been reached, stop the<br />
movement and press the button "A" of the remote control<br />
for approx. 2 seconds. Waving is not carried out!<br />
■ Now move the sunblind upwards and stop it approx. 50<br />
mm before the upper end position is reached. Keep the<br />
button pressed during moving. The movement is interrupted<br />
as soon as it is released.<br />
■<br />
■<br />
Press the button "A" of the remote control for approx.<br />
2 seconds. The sunblind waves if the end position has<br />
been learned successfully.<br />
In Order to complete the learning process, press the<br />
mode button "M" (Fig. 4) of the remote control, the<br />
transmit LED extinguishes, the end positions and the<br />
direction of rotation have been learned.<br />
Safety instructions<br />
Never press the buttons on your remote control if you cannot<br />
see the sunblind!<br />
The range of radio control systems is limited by the statutory<br />
regulations on radio systems and by structures. When<br />
planning the system ensure that the radio reception is sufficient.<br />
This applies in particular if the transmitter and receiver<br />
and positioned in different rooms and the radio signal has<br />
to penetrate walls and ceilings. The control system should<br />
not be installed directly near metallic surfaces (steel girders,<br />
fire doors).<br />
■<br />
Therefore check the function of the receiver before finally<br />
carrying out mounting.<br />
Powerful local transmission systems (for example, baby<br />
intercom or neighboring transmitters) whose transmission<br />
frequencies are identical to that of the control system, can<br />
interfere with the reception.<br />
Group operation and special functions<br />
Manifold special functions are possible in WAREMA <strong>EWFS</strong>.<br />
Should you wish further information, your specialist dealer<br />
will be pleased to send you the <strong>EWFS</strong> application brochure.<br />
Maintenance<br />
There are no parts to be maintained within the device.<br />
Liability<br />
The manufacturer can reject the warranty for damage to the<br />
product if the product information given in these instructions<br />
is not observed, if it is used for purposes other than those<br />
specified or if used improperly. Liability for consequent damage<br />
to persons or property is also excluded in this case. Observe<br />
the specifications in the operating instructions of your<br />
sunblind. Liability for damage to the sunblind caused by operation<br />
during icing or icy conditions is also excluded.<br />
2<br />
We reserve the right to carry out improvements<br />
93290630•816827•7804K0•06.12.2004
Usage to the intended purpose<br />
The control system was developed for the control of sun<br />
protection drives. The approval of the manufacturer has to<br />
be obtained if the device is to be used to a purpose different<br />
to that described here.<br />
Disposal<br />
The device has to be disposed of or recycled in accordance<br />
with the statutory regulations.<br />
Housing<br />
Degree of protection<br />
Safety class<br />
Connection<br />
Power supply/Motor<br />
IP44<br />
I<br />
Terminals<br />
Power supply/Motor 0,5...2,5 mm 2<br />
Loop cable (230V) 0,5...2,5 mm 2<br />
Loop cable (CCU) 0,5...2,5 mm 2<br />
Cable connector or connection<br />
with flush-mounting box<br />
User information<br />
For use in:<br />
A, B, D, DK, E, F, FIN, GB, GR, I, IRL, L, NL, P, S, CH, IS, N.<br />
Transmitter and receiver for sunblind remote control.<br />
The device complies at intended use with the essential requirements,<br />
which are fixed in the following EC-Guidelines<br />
and harmonized standards:<br />
- Directive on radio equipment and telecommunications<br />
terminal equipment and the mutual recognition of their<br />
conformity 1999/5/EC(R&TTE)<br />
- Directive on electromagnetic compability 89/336 EEC<br />
- Low voltage directive 73/23/EWG<br />
Link to declaration of confirmity:<br />
http://www.warema.de<br />
Test standards<br />
EN55014-1<br />
EN61000-4-1...-11<br />
EN50081-1: 1992<br />
EN50082-1: 1997<br />
EN301489-3: 2001<br />
Other<br />
Conformity<br />
Technical data<br />
<strong>Radio</strong> <strong>tubular</strong> <strong>motor</strong><br />
<strong>EWFS</strong><br />
Supply 230 VAC/50 Hz<br />
min typ max unit<br />
Operating voltage 207 230 253 V AC<br />
HF-Receiver<br />
Receive frequency<br />
ASK (OOK)<br />
433,92 MHz<br />
Sensing range 30 m<br />
Ambient conditions<br />
Operating temperature -25 +25 +75 °C<br />
Storage temperature 0 20 50 °C<br />
Humidity<br />
(non-condensing)<br />
5 95 %RH<br />
93290630•816827•7804K0•06.12.2004<br />
We reserve the right to carry out improvements<br />
3