How to check the balance of an account and use FBL5N Transaction?
How to check the balance of an account and use FBL5N Transaction?
How to check the balance of an account and use FBL5N Transaction?

Create successful ePaper yourself
Turn your PDF publications into a flip-book with our unique Google optimized e-Paper software.
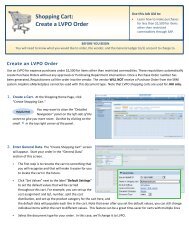
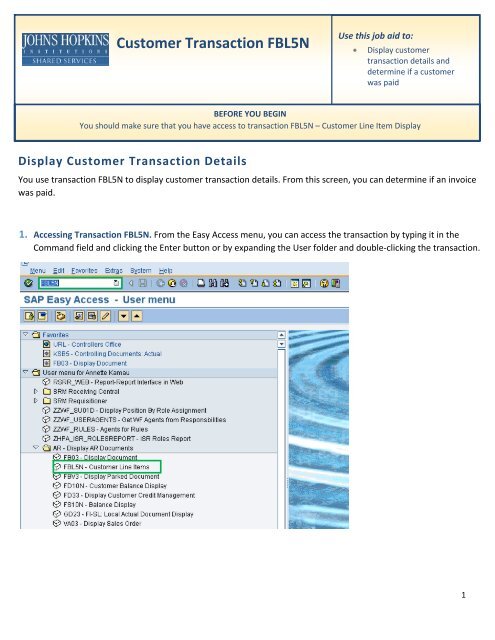
Cus<strong>to</strong>mer Tr<strong>an</strong>saction <strong>FBL5N</strong><br />
Use this job aid <strong>to</strong>:<br />
<br />
Display cus<strong>to</strong>mer<br />
tr<strong>an</strong>saction details <strong>an</strong>d<br />
determine if a cus<strong>to</strong>mer<br />
was paid<br />
BEFORE YOU BEGIN<br />
You should make sure that you have access <strong>to</strong> tr<strong>an</strong>saction <strong>FBL5N</strong> – Cus<strong>to</strong>mer Line Item Display<br />
Display Cus<strong>to</strong>mer Tr<strong>an</strong>saction Details<br />
You <strong>use</strong> tr<strong>an</strong>saction <strong>FBL5N</strong> <strong>to</strong> display cus<strong>to</strong>mer tr<strong>an</strong>saction details. From this screen, you c<strong>an</strong> determine if <strong>an</strong> invoice<br />
was paid.<br />
1. Accessing Tr<strong>an</strong>saction <strong>FBL5N</strong>. From <strong>the</strong> Easy Access menu, you c<strong>an</strong> access <strong>the</strong> tr<strong>an</strong>saction by typing it in <strong>the</strong><br />
Comm<strong>an</strong>d field <strong>an</strong>d clicking <strong>the</strong> Enter but<strong>to</strong>n or by exp<strong>an</strong>ding <strong>the</strong> User folder <strong>an</strong>d double‐clicking <strong>the</strong> tr<strong>an</strong>saction.<br />
1
2. Cus<strong>to</strong>mer Line Item Display screen. Below is <strong>the</strong> initial screen <strong>of</strong> <strong>the</strong> Cus<strong>to</strong>mer Line Item Display tr<strong>an</strong>saction. This<br />
screen is populated <strong>to</strong> limit <strong>the</strong> search you make on <strong>the</strong> cus<strong>to</strong>mer.<br />
The cus<strong>to</strong>mer selection box is where you enter information about <strong>the</strong> cus<strong>to</strong>mer. This is where you type <strong>the</strong><br />
cus<strong>to</strong>mer <strong>account</strong> number, a r<strong>an</strong>ge <strong>of</strong> <strong>account</strong> numbers, or several individual <strong>account</strong> numbers.<br />
The Selection using search help box is a search engine that you c<strong>an</strong> <strong>use</strong> <strong>to</strong> look‐up a cus<strong>to</strong>mer <strong>account</strong> number.<br />
The Line item selection box is where you c<strong>an</strong> enter information about Status <strong>an</strong>d Type. Enter information under<br />
Status <strong>to</strong> narrow your search <strong>to</strong> a specific line item (e.g., open items, cleared items, or all items). You c<strong>an</strong> input<br />
date parameters if you’re looking for a specific time period.<br />
Enter information under Type <strong>to</strong> limit <strong>the</strong> kinds <strong>of</strong> items that are displayed (e.g., parked items, items with notes,<br />
<strong>an</strong>d special general ledger <strong>account</strong> items).<br />
2
3. Selecting <strong>the</strong> display criteria. Type <strong>the</strong> cus<strong>to</strong>mer <strong>account</strong> number in <strong>the</strong> Cus<strong>to</strong>mer Account field. (You c<strong>an</strong> display<br />
several cus<strong>to</strong>mer <strong>account</strong> numbers at once by clicking on <strong>the</strong> arrow <strong>to</strong> <strong>the</strong> right <strong>of</strong> <strong>the</strong> Cus<strong>to</strong>mer Account field.<br />
The Multiple Selection for Cus<strong>to</strong>mer Account pop‐up window will appear. Type <strong>the</strong> cus<strong>to</strong>mer <strong>account</strong> numbers in<br />
<strong>the</strong> Single value column under <strong>the</strong> Select single values tab.)<br />
1. Enter <strong>the</strong> cus<strong>to</strong>mer <strong>account</strong> number(s).<br />
2. Under Status, select “all items.”<br />
3. Under Type, select all <strong>of</strong> <strong>the</strong> items by clicking inside each box.<br />
4. Click <strong>the</strong> Execute but<strong>to</strong>n once you are done making all your selections.<br />
4. Click <strong>the</strong><br />
Execute<br />
but<strong>to</strong>n<br />
1. Type in <strong>the</strong><br />
cus<strong>to</strong>mer<br />
number/s<br />
2. Click “All<br />
items” <strong>to</strong> select<br />
it t<br />
3. Choose all <strong>the</strong><br />
types <strong>of</strong> items by<br />
clicking inside each<br />
3
4. Turning Legend display on. When you first enter <strong>the</strong> Cus<strong>to</strong>mer Line Item Display screen, you might not see <strong>the</strong><br />
status keys appear at <strong>the</strong> <strong>to</strong>p. To turn <strong>the</strong>se on, click Settings on your menu bar. A drop‐down list will appear.<br />
Hover your mo<strong>use</strong> over Legend on/<strong>of</strong>f until a list appears <strong>to</strong> <strong>the</strong> right. Click Icons.<br />
5. Cus<strong>to</strong>mer Line Item Display. The Cus<strong>to</strong>mer Line Item Display screen reflects <strong>the</strong> cus<strong>to</strong>mer line item tr<strong>an</strong>sactions.<br />
To obtain more details on a particular line item, double click it.<br />
The Status keys appear in <strong>the</strong> status<br />
column below <strong>an</strong>d provide a quick<br />
view <strong>of</strong> <strong>the</strong> status <strong>of</strong> <strong>the</strong> line item<br />
The two cus<strong>to</strong>mer<br />
numbers are displayed<br />
4
6. Detail on line item. You c<strong>an</strong> obtain fur<strong>the</strong>r detail on a tr<strong>an</strong>saction by clicking <strong>the</strong> Overview but<strong>to</strong>n.<br />
Click <strong>the</strong><br />
Overview but<strong>to</strong>n<br />
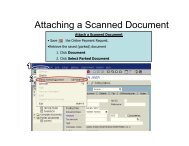
7. Display Document. Below is <strong>the</strong> Display Document view. You c<strong>an</strong> s<strong>to</strong>p at this view, or click Document on <strong>the</strong> SAP<br />
menu bar <strong>an</strong>d <strong>the</strong>n Print Preview.<br />
5
8. Fin<strong>an</strong>ce Document display. You’ll arrive at <strong>the</strong> Document Overview – Display screen. Here you c<strong>an</strong> view <strong>the</strong> debit<br />
<strong>an</strong>d credit line entries, G/L ledger <strong>account</strong>, cost object, <strong>an</strong>d fund number.<br />
9. Document Header details. If <strong>the</strong> Document Overview ‐ Display screen does not have <strong>the</strong> JHED ID <strong>of</strong> <strong>the</strong> staff<br />
member who entered or parked <strong>the</strong> document, this c<strong>an</strong> be obtained by clicking <strong>the</strong> Header but<strong>to</strong>n. The<br />
Document Header pop‐up window displays <strong>the</strong> JHED ID.<br />
Click <strong>the</strong><br />
Header but<strong>to</strong>n<br />
When you are done reviewing <strong>the</strong> information on <strong>the</strong> Document Overview ‐ Display screen, return <strong>to</strong> <strong>the</strong><br />
Cus<strong>to</strong>mer Line Item Display screen by clicking <strong>the</strong> Back but<strong>to</strong>n .<br />
6