Shopping Cart: Create an EMPO Order - Shared Services Home Page
Shopping Cart: Create an EMPO Order - Shared Services Home Page
Shopping Cart: Create an EMPO Order - Shared Services Home Page

Create successful ePaper yourself
Turn your PDF publications into a flip-book with our unique Google optimized e-Paper software.
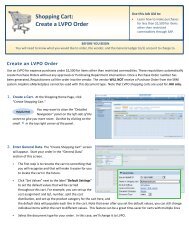
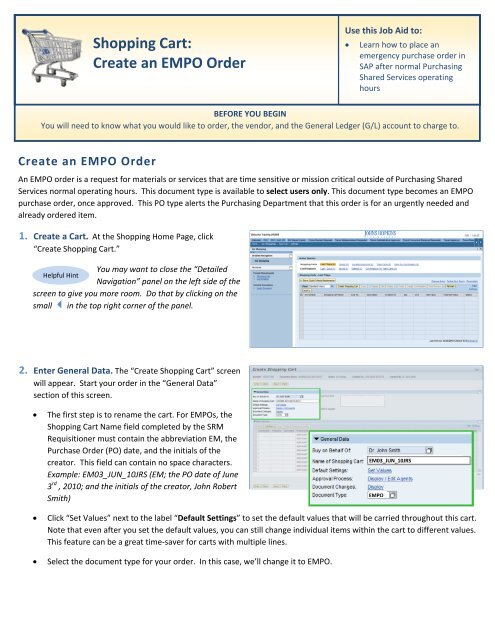
<strong>Shopping</strong> <strong>Cart</strong>:<strong>Create</strong> <strong>an</strong> <strong>EMPO</strong> <strong>Order</strong>Use this Job Aid to:• Learn how to place <strong>an</strong>emergency purchase order inSAP after normal Purchasing<strong>Shared</strong> <strong>Services</strong> operatinghoursBEFORE YOU BEGINYou will need to know what you would like to order, the vendor, <strong>an</strong>d the General Ledger (G/L) account to charge to.<strong>Create</strong> <strong>an</strong> <strong>EMPO</strong> <strong>Order</strong>An <strong>EMPO</strong> order is a request for materials or services that are time sensitive or mission critical outside of Purchasing <strong>Shared</strong><strong>Services</strong> normal operating hours. This document type is available to select users only. This document type becomes <strong>an</strong> <strong>EMPO</strong>purchase order, once approved. This PO type alerts the Purchasing Department that this order is for <strong>an</strong> urgently needed <strong>an</strong>dalready ordered item.1. <strong>Create</strong> a <strong>Cart</strong>. At the <strong>Shopping</strong> <strong>Home</strong> <strong>Page</strong>, click“<strong>Create</strong> <strong>Shopping</strong> <strong>Cart</strong>.”You may w<strong>an</strong>t to close the “DetailedHelpful HintNavigation” p<strong>an</strong>el on the left side of thescreen to give you more room. Do that by clicking on thesmall in the top right corner of the p<strong>an</strong>el.2. Enter General Data. The “<strong>Create</strong> <strong>Shopping</strong> <strong>Cart</strong>” screenwill appear. Start your order in the “General Data”section of this screen.• The first step is to rename the cart. For <strong>EMPO</strong>s, the<strong>Shopping</strong> <strong>Cart</strong> Name field completed by the SRMRequisitioner must contain the abbreviation EM, thePurchase <strong>Order</strong> (PO) date, <strong>an</strong>d the initials of thecreator. This field c<strong>an</strong> contain no space characters.Example: EM03_JUN_10JRS (EM; the PO date of June3 rd , 2010; <strong>an</strong>d the initials of the creator, John RobertSmith)EM03_JUN_10JRS<strong>EMPO</strong>• Click “Set Values” next to the label “Default Settings” to set the default values that will be carried throughout this cart.Note that even after you set the default values, you c<strong>an</strong> still ch<strong>an</strong>ge individual items within the cart to different values.This feature c<strong>an</strong> be a great time‐saver for carts with multiple lines.• Select the document type for your order. In this case, we’ll ch<strong>an</strong>ge it to <strong>EMPO</strong>.
When the “Ch<strong>an</strong>ge Default Settings” dialog boxHelpful Hintappears, you won’t see all of the tabs that areavailable to you. Either stretch the box horizontally so that all of thetabs appear, or just click on the white file folder to display a list of theavailable tabs.3. Enter Item Data. Go to the first line in the order <strong>an</strong>dstart entering the order information. You’ll work yourway across the line for each item before you press Enter.• Start with the “Description” field. In this case, we’veentered “Fuse” as the description.Fuses 20 EA 22.00• Next enter the “Product Category.” If you don’tknow the category, click in the box that says“SERVAGMT,” then select the file folder iconto search.The “Search Product Category” dialog box will appear. The easiestway to search is to click “Start Search” <strong>an</strong>d then select theappropriate category from the list.• Next, go back to the first line in the order <strong>an</strong>d enter the “Qu<strong>an</strong>tity.”In this case, we need 20 fuses, so enter 20.• Enter the “Unit” next. If you don’t know the appropriate unit toenter, select the file folder icon to look it up in a list.• Enter the “Price” in the Net Price/Limit field.• Ignore the field that says “Per.”• If you w<strong>an</strong>t to ch<strong>an</strong>ge the Currency or Delivery Date, do so now.Helpful Hint!Don’t forget to click“Enter” when you have completedthe line. That’s the only way tomake the order details appear!• When you are all done, click “Enter” to apply your selections.2
4. Item Details. After you click Enter, the “Details” buttonwill become active. Click it to display the details for thefirst line in your order. The first tab “Item Data” willautomatically be displayed.• Enter the catalog number (or product or itemnumber) in the field labeled “Supplier ProductNumber.”You c<strong>an</strong> expect to see errors at theHelpful Hinttop of the screen! You will resolvethem as you enter the details associated with thiscart.5. Account Assignment. After you click Enter, the“Details” button will become active. Click it to display thedetails for the first line in your order. Click on the tablabeled “Account Assignment.”• Check the cost object under the “AccountAssignment” header (this field could say Cost Center,Internal <strong>Order</strong>, or WBS Element) to make sure that itis correct for your order.• Click in the field under theheader that says “GeneralLedger Account.” Verify whichG/L account with your fin<strong>an</strong>cialadministrator, <strong>an</strong>d then enter itin this field.Helpful HintIf you w<strong>an</strong>t to copy the G/L account number to all of the items in your cart,click “Copy” <strong>an</strong>d “Ch<strong>an</strong>ge All Items” to apply the account number throughout the order.6. Select a Supplier. Next, click the tab labeled“Sources of Supply/Service Agents” (also under“Details”). This is where you’ll select thesupplier for the equipment that you wish toorder from the list of suppliers provided.• If no sources appear, click in the “PreferredSupplier” at the bottom of the screen. Tosearch for a supplier, select the file foldericon to look it up in a list. If you’re notsure how to search for a supplier, there is a Job Aid called “Searching for a Vendor” that c<strong>an</strong> help.3
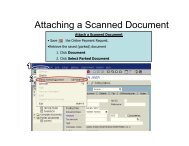
7. Check the <strong>Order</strong>. Your order is now complete. Click“Check” (either at the top or the bottom of the screen) toverify the order <strong>an</strong>d make sure that no error messagesappear at the top of the screen.8. Place the <strong>Order</strong>. Once you have verified the order, click“<strong>Order</strong>.” You will see a message at the top of the screenthat says “Actions performed successfully.”• In addition, you will see a message in the box at thetop of the screen that says that the shopping cart wasordered successfully.• When your order is complete, click “Close” to returnto the <strong>Shopping</strong> <strong>Cart</strong> <strong>Home</strong> <strong>Page</strong>.9. Print Preview. The “Print Preview” button will appearonce you have placed the order. Always print a copy ofyour order just in case there is a problem finding theshopping cart later.10. Refresh! On the <strong>Shopping</strong> <strong>Cart</strong> <strong>Home</strong> <strong>Page</strong>, click“Refresh.” This is necessary to see the new order in yourqueue.You’re all done! Your <strong>EMPO</strong> order has been successfullyentered in SAP.Always click “Refresh” when you get to the <strong>Shopping</strong> <strong>Cart</strong> <strong>Home</strong> <strong>Page</strong> to see your most recentorders. They will not appear until you have clicked “Refresh.”4