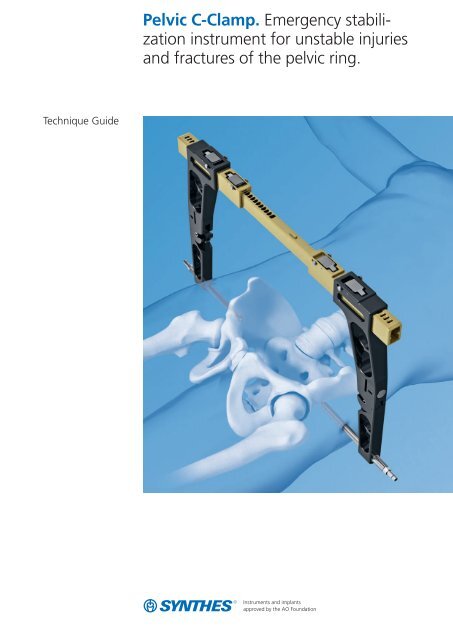
Pelvic C-Clamp. Emergency stabili- zation instrument for ... - Synthes
Pelvic C-Clamp. Emergency stabili- zation instrument for ... - Synthes
Pelvic C-Clamp. Emergency stabili- zation instrument for ... - Synthes

You also want an ePaper? Increase the reach of your titles
YUMPU automatically turns print PDFs into web optimized ePapers that Google loves.
Technique Guide<br />
<strong>Pelvic</strong> C-<strong>Clamp</strong>. <strong>Emergency</strong> <strong>stabili</strong><strong>zation</strong><br />
<strong>instrument</strong> <strong>for</strong> unstable injuries<br />
and fractures of the pelvic ring.
Table of Contents<br />
Introduction<br />
Surgical Technique<br />
Disassembly and Maintenance<br />
Product In<strong>for</strong>mation<br />
Bibliography<br />
Image intensifier control<br />
Warning<br />
This guide is not sufficient <strong>for</strong> an immediate application of<br />
the <strong>Pelvic</strong> C-<strong>Clamp</strong>. Instruction by an experienced surgeon in<br />
hand-ling the <strong>Pelvic</strong> C-<strong>Clamp</strong> is highly recommended.<br />
<strong>Pelvic</strong> C-<strong>Clamp</strong> 2<br />
Indications 4<br />
Implants and Instruments 14<br />
Set 15<br />
5<br />
12<br />
16<br />
<strong>Synthes</strong> 1
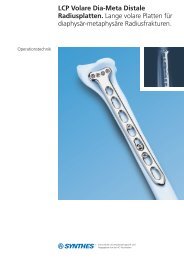
<strong>Pelvic</strong> C-<strong>Clamp</strong>. Permits rapid<br />
reduction and <strong>stabili</strong><strong>zation</strong> of<br />
the posterior pelvic ring.<br />
Description<br />
The <strong>Pelvic</strong> C-<strong>Clamp</strong> is an emergency stabli<strong>zation</strong> <strong>instrument</strong><br />
<strong>for</strong> unstable injuries and fractures of the pelvic ring. Unstable<br />
pelvic ring fractures can be associated with massive blood<br />
loss that can cause terminal shock. The <strong>Pelvic</strong> C-<strong>Clamp</strong> allows<br />
rapid reduc tion and <strong>stabili</strong><strong>zation</strong> of these unstable<br />
pelvic ring fractures. It is there<strong>for</strong>e an invaluable tool <strong>for</strong><br />
gaining control of the shock reaction, while neither delaying<br />
nor hindering subsequent diagnosis and therapy.<br />
The <strong>Pelvic</strong> C-<strong>Clamp</strong> does not control the rare cases of life<br />
threatening arterial bleeding. However, by mechanical <strong>stabili</strong>sation<br />
alone, or enhanced by additional pelvic packing, concomitant<br />
venous bleeding can be managed, thereby gaining<br />
enough time <strong>for</strong> definitive hemmorage or arterial embolisation<br />
control.<br />
The <strong>Pelvic</strong> C-<strong>Clamp</strong> is comprised of rails and arms with a<br />
locking mechanism. This allows a linear movement of the<br />
arms. The <strong>Pelvic</strong> C-<strong>Clamp</strong> should always be used in combination<br />
with the designated cannulated nails.<br />
Features and benefits<br />
– Permits quick and efficient compression and <strong>stabili</strong><strong>zation</strong> of<br />
fractures or luxations, and thus control of haemorrhaging<br />
in the unstable posterior pelvic ring.<br />
– Gains time <strong>for</strong> subsequent diagnostic or therapeutic<br />
procedures.<br />
– The patient can be passed through a CT-gantry without<br />
removing the device.<br />
– Provides unrestricted access to the abdomen, pelvis or<br />
proximal femur.<br />
– The <strong>Pelvic</strong> C-<strong>Clamp</strong> can be applied quickly outside the<br />
operating room, e.g. in the emergency room or on the<br />
X-ray table.
In cases of sacral fractures or disruptions of the sacroiliac<br />
joint, there is often concomitant blood loss from the fracture<br />
surface and from the veins of the presacral plexus. The use of<br />
the <strong>Pelvic</strong> C-<strong>Clamp</strong> in those settings can save lives.<br />
Direct transverse compression of the sacroiliac joint controls<br />
bleeding from the fracture surfaces and from the presacral<br />
plexus. With the <strong>Pelvic</strong> C-<strong>Clamp</strong> applied, there is still adequate<br />
access <strong>for</strong> a laporotomy or tamponade.<br />
Inner rail<br />
Outer rail<br />
Upper arm<br />
Lower arm<br />
Threaded tube<br />
Cannulated nail (190 mm or 210 mm)<br />
Side buttons<br />
Upper buttons<br />
Locking mechanism
Indications<br />
The <strong>Pelvic</strong> C-<strong>Clamp</strong> is intended <strong>for</strong> emergency <strong>stabili</strong><strong>zation</strong> of<br />
sacrum fractures or disruptions of the sacroiliac joint with associated<br />
circulatory in<strong>stabili</strong>ty.<br />
Caution:<br />
Avoid use where:<br />
– Fractures of the ilium are present as there is risk of pin per<strong>for</strong>ation<br />
through the fracture line<br />
– There are comminuted sacral fractures with the risk of<br />
compression of the sacral nerve plexus<br />
Note: In life threatening situations hemorrhage control takes<br />
priority over the potential risk of nerve root compression.<br />
4 <strong>Synthes</strong> <strong>Pelvic</strong> C-<strong>Clamp</strong> Technique Guide
Surgical Technique<br />
1<br />
Pre-operative preparation<br />
Instrument<br />
01.306.000 <strong>Pelvic</strong> C-<strong>Clamp</strong> complete set<br />
The <strong>Pelvic</strong> C-<strong>Clamp</strong> set consists of the <strong>instrument</strong>s and implants<br />
<strong>for</strong> the emergency treatment of the indicated fracture<br />
types. The bottom layer of the Vario Case houses the <strong>Pelvic</strong><br />
C-<strong>Clamp</strong> and the optional pliers. The upper layer houses the<br />
cannulated nails in two lengths and the remaining <strong>instrument</strong>s.<br />
The complete sterile <strong>Pelvic</strong> C-<strong>Clamp</strong> set should be kept ready<br />
<strong>for</strong> use in the resuscitation room. Depending on the type of<br />
injury, the orientation points in the pelvic region of the injured<br />
person may be unclear. Should there be doubts about<br />
the anatomic references, use an image intensifier during application<br />
of the <strong>Pelvic</strong>-C-<strong>Clamp</strong>.<br />
Pre-operative preparation<br />
– Anteroposterior (AP) plain pelvic radiograph if necessary,<br />
oblique views (Inlet and Outlet) or CT.<br />
– Patient positioning must allow <strong>for</strong> intraoperative fluoroscopic<br />
controls in AP, Inlet and Outlet Projections.<br />
– Have an image intensifier available.<br />
Positioning<br />
– Place the patient in a supine position.<br />
– To facilitate reduction, ensure free draping of the leg on<br />
the injured side. Strive <strong>for</strong> good draping coverage of the<br />
genital region.<br />
– To prepare the patient, disinfect the proximal femur and<br />
the buttocks and cover with sterile sheets.<br />
<strong>Synthes</strong> 5
Surgical Technique<br />
Preparation of the <strong>Pelvic</strong> C-<strong>Clamp</strong><br />
Open the lower side arms by depressing the buttons on the<br />
arms to prepare the <strong>Pelvic</strong> C-<strong>Clamp</strong> <strong>for</strong> use. (a)<br />
Note: Hold upper and lower arms with both hands and<br />
ensure that the lower arm is locked when fully extended.<br />
Extend the upper bars by depressing the buttons on the upper<br />
rails while simultaneously pulling on the side arms. (b)<br />
Note: Maximal extension of the <strong>Pelvic</strong> C-<strong>Clamp</strong> is advantageous<br />
<strong>for</strong> easy and safe positioning.<br />
With a light twist, place the cannulated nails of preferred<br />
length into the threaded tubes. (c)<br />
The little teeth on the tip of the nail allow a better grip onto<br />
the bone.<br />
The buttons on the top of the <strong>Pelvic</strong> C-<strong>Clamp</strong> can be locked.<br />
Ensure the buttons are not locked when applying the <strong>Pelvic</strong><br />
C-<strong>Clamp</strong> to the patient, otherwise no or insufficient compression<br />
can be achieved.<br />
6 <strong>Synthes</strong> <strong>Pelvic</strong> C-<strong>Clamp</strong> Technique Guide<br />
(a)<br />
(b)<br />
(c)<br />
1 Unlock<br />
2 Lock
2<br />
Identifying nail insertion point<br />
Instrument<br />
03.306.009 Guide Handle, <strong>for</strong> Kirschner Wire<br />
� 2.5 mm<br />
Make an incision at the intersection between the extension<br />
of the line of the femoral axis over the tip of the greater<br />
trochanter, and a vertical line from the anterior superior iliac<br />
spine in the dorsal direction (see illustration).<br />
If orientation is difficult, use an image intensifier.<br />
The surface reference point of the outer side of the ilium<br />
changes at the level of the sacroiliac joints. In emergency situations,<br />
the resulting “fossa” can be used as a relatively secure<br />
point of reference aid. For secure anchoring, the <strong>Pelvic</strong><br />
C-<strong>Clamp</strong> must be placed at the level of the sacroiliac joints.<br />
Palpation with a blunt <strong>instrument</strong>, such as the Guide Handle<br />
<strong>for</strong> Kirschner Wire, allows <strong>for</strong> easy identification of this site,<br />
even with severe soft-tissue swelling.<br />
Note<br />
– If the nails are placed too ventrally to the correct insertion<br />
point, there is a risk of per<strong>for</strong>ation of the ilium, which can<br />
result in organ injury.<br />
– Placement of the pins in an excessively dorsal position may<br />
result in injury to gluteal nerves and vessels.<br />
– Inserting the nail too distally endangers the sciatic nerve<br />
and the gluteal vessels in the sciatic notch. Malpositioning<br />
of the nail in osteoporotic bone, combined with excessive<br />
compression, can result in unwanted nail penetration.<br />
<strong>Synthes</strong> 7
Surgical Technique<br />
3<br />
Kirschner Wire placement<br />
Instruments<br />
03.306.009 Guide Handle, <strong>for</strong> Kirschner Wire<br />
� 2.5 mm<br />
292.260 Kirschner Wire � 2.5 mm with trocar tip,<br />
length 280 mm<br />
398.320 Socket Wrench � 11 mm with Hammer<br />
After having identified the insertion point, a Kirschner Wire<br />
can be placed through the Guide Handle (only on the uninjured<br />
side). Gently hammer the Kirschner Wire into the bone<br />
with the Socket Wrench with Hammer. This Kirschner Wire<br />
will ensure an exact placement of the cannulated nail and<br />
prevents the nail from slipping.<br />
Note: Malpositioned Kirschner wires can be removed with<br />
the optional pliers or the wire cutter.<br />
8 <strong>Synthes</strong> <strong>Pelvic</strong> C-<strong>Clamp</strong> Technique Guide
4<br />
Placement of the <strong>Pelvic</strong> C-<strong>Clamp</strong><br />
Instruments<br />
03.306.010 <strong>Pelvic</strong> C-<strong>Clamp</strong>, complete<br />
02.306.006 Nail <strong>for</strong> <strong>Pelvic</strong> C-<strong>Clamp</strong>, cannulated, short,<br />
or length 190 mm (2�)<br />
02.306.007 Nail <strong>for</strong> <strong>Pelvic</strong> C-<strong>Clamp</strong>, cannulated, long,<br />
length 210 mm (2�)<br />
321.200 Ratchet Wrench <strong>for</strong> Nut, hexagonal,<br />
11 mm<br />
391.930 Wire Cutter, large, with multiplication,<br />
length 220 mm<br />
Optional <strong>instrument</strong>s<br />
359.204 Pliers, flat nosed<br />
395.781 Cap<br />
Be sure the fracture is correctly reduced be<strong>for</strong>e<br />
placement of the <strong>Pelvic</strong> C-<strong>Clamp</strong>.<br />
After inserting the Kirschner Wire on the uninjured side, slide<br />
the clamp with cannulated nails over the wire and ensure<br />
that the tip of the nail grips the bone securely. Then place<br />
the second nail on the injured side (no Kirschner wire is necessary<br />
on this side).<br />
Note: In cases of severe dislocations of the pelvis, pulling on<br />
the leg, internal rotation and even lateral compression may<br />
improve reduction and facilitate application of the <strong>Pelvic</strong> C-<br />
<strong>Clamp</strong>.<br />
<strong>Synthes</strong> 9
Surgical Technique<br />
Alternative: Both nails can be placed at the same time. To<br />
do this take off one side arm. After both nails have been<br />
seated properly the arm can be placed over the rail again<br />
and compression can be achieved as described below.<br />
When both nails are correctly seated, manually compress the<br />
upper side arms (a) and ensure final fixation by tightening<br />
the threaded tubes with the Ratchet Wrench (b).<br />
The Kirschner wire must be cut off with the wire cutter or<br />
removed. If desired, place a protective cap on each end of<br />
the two cannulated nails.<br />
After complete application of the <strong>Pelvic</strong> C-<strong>Clamp</strong>, verify fixation<br />
with an image intensifier or X-ray (pelvic AP view) and<br />
pad the nails.<br />
Note: The locking mechanism locks the upper buttons, thus<br />
preventing unintended loss of compression during movement<br />
of the <strong>Pelvic</strong> C-<strong>Clamp</strong>.<br />
Once mounted, the <strong>Pelvic</strong> C-<strong>Clamp</strong> can be swung caudally<br />
and cranially, e.g. <strong>for</strong> a laparotomy or an angiography.<br />
Notes<br />
– It is recommended to place a drape cloth or lap sponges as<br />
a cushion between the <strong>Pelvic</strong> C-<strong>Clamp</strong> and the patient.<br />
– Do not use the <strong>Pelvic</strong> C-<strong>Clamp</strong> to lift the patient.<br />
10 <strong>Synthes</strong> <strong>Pelvic</strong> C-<strong>Clamp</strong> Technique Guide<br />
(a)<br />
(b)
5<br />
Postoperative management<br />
– AP plain radiograph, CT if required, rarely oblique view<br />
films after application of <strong>Pelvic</strong> C-<strong>Clamp</strong> and during follow-up.<br />
– Do not use the <strong>Pelvic</strong> C-<strong>Clamp</strong> to lift the patient.<br />
– Wound closure; extended incisions may require a coapting<br />
skin suture.<br />
– Continuing injury management according to polytrauma<br />
protocols.<br />
– The nail insertion sites must be meticulously disinfected<br />
and dressed.<br />
– Should the patient need to be moved, he/she should on no<br />
account be placed on his/her side as this could cause one<br />
of the nails to penetrate the bone excessively.<br />
6<br />
Removal<br />
The <strong>Pelvic</strong> C-<strong>Clamp</strong> is removed prior to definitive treatment<br />
of the posterior pelvic ring injury. Be sure to remove protective<br />
caps from cannulated nails and Kirschner wire from uninjured<br />
side.<br />
<strong>Synthes</strong> 11
Disassembly of the <strong>Pelvic</strong> C-<strong>Clamp</strong><br />
Note: Be<strong>for</strong>e cleaning, the <strong>Pelvic</strong> C-clamp should be<br />
disassembled.<br />
The lower arms can be raised (2) by pressing the side buttons<br />
(1) as depicted by the red arrows.<br />
To remove the lower arms completely, keep pushing the buttons<br />
(1) and slide the arms out (2).<br />
Unscrew the threaded tubes from the lower arms.<br />
12 <strong>Synthes</strong> <strong>Pelvic</strong> C-<strong>Clamp</strong> Technique Guide
Be<strong>for</strong>e removing the upper arms from the upper rails, make<br />
sure the locking mechanism is unlocked (1). The upper arms<br />
can then be removed by pressing the top buttons (2) while<br />
simultaneously pulling on the arms (3). Be sure to hold the<br />
rails during this procedure to prevent the rails from falling.<br />
The outer rails can be separated from the inner rail by pressing<br />
the buttons on the outer rails and pulling the two rails<br />
apart (3).<br />
After disassembly, clean the rails, arms and threaded tubes<br />
manually, e.g. by using a brush. The springs in the upper arm<br />
at button should be cleaned too. If necessary, broken or<br />
damaged parts should be exchanged.<br />
After cleaning, oil the thread of the threaded tube as well as<br />
the two holes next to the side buttons with <strong>Synthes</strong> special<br />
oil (see red circles) and reassemble the device.<br />
The <strong>Pelvic</strong> C-<strong>Clamp</strong> should be checked after every use/cleaning/sterili<strong>zation</strong><br />
to confirm correct function, i.e. that all parts<br />
move freely as intended.<br />
The complete sterile <strong>Pelvic</strong> C-<strong>Clamp</strong> should be kept ready <strong>for</strong><br />
use in the resuscitation room.<br />
Due to the fact that the <strong>Pelvic</strong> C-<strong>Clamp</strong> consists of stainless<br />
steel, aluminum and a few pieces of polymer, it should only<br />
be cleaned at temperatures below 140°C and at a pH level<br />
between 7 and 9.5 (detergents).<br />
Note: The cannulated nails are only <strong>for</strong> single use.<br />
<strong>Synthes</strong> Special Oil (519.970)<br />
<strong>Synthes</strong> 13
Implants and Instruments<br />
02.306.006 Nail <strong>for</strong> <strong>Pelvic</strong> C-<strong>Clamp</strong>, cannulated, short,<br />
length 190 mm<br />
02.306.007 Nail <strong>for</strong> <strong>Pelvic</strong> C-<strong>Clamp</strong>, cannulated, long,<br />
length 210 mm<br />
292.260 Kirschner Wire � 2.5 mm with trocar tip,<br />
length 280 mm<br />
03.306.009 Guide Handle, <strong>for</strong> Kirschner Wire � 2.5 mm<br />
321.200 Ratchet Wrench <strong>for</strong> Nut, hexagonal, 11 mm<br />
398.320 Socket Wrench � 11 mm with Hammer<br />
391.930 Wire Cutter, large, with multiplication,<br />
length 220 mm<br />
359.204 Pliers, flat-nosed<br />
395.781 Cap<br />
14 <strong>Synthes</strong> <strong>Pelvic</strong> C-<strong>Clamp</strong> Technique Guide
Set<br />
<strong>Pelvic</strong> C-<strong>Clamp</strong> Set<br />
01.306.000 <strong>Pelvic</strong> C-<strong>Clamp</strong> complete set<br />
This set contains:<br />
68.306.000 Vario Case <strong>for</strong> <strong>Pelvic</strong> C-<strong>Clamp</strong>,<br />
no contents 1<br />
03.306.010 <strong>Pelvic</strong> C-<strong>Clamp</strong> (assembled, complete<br />
without nails) 1<br />
02.306.006 Nail <strong>for</strong> <strong>Pelvic</strong> C-<strong>Clamp</strong>, cannulated, short,<br />
length 190 mm 2<br />
02.306.007 Nail <strong>for</strong> <strong>Pelvic</strong> C-<strong>Clamp</strong>, cannulated, long,<br />
length 210 mm 2<br />
321.200 Ratchet Wrench <strong>for</strong> Nut, hexagonal,<br />
11 mm 2<br />
398.320 Socket Wrench � 11 mm with Hammer 1<br />
391.930 Wire Cutter, large, with multiplication,<br />
length 220 mm 1<br />
03.306.009 Guide Handle, <strong>for</strong> Kirschner Wire<br />
� 2.5 mm 1<br />
292.260 Kirschner Wire � 2.5 mm with trocar tip,<br />
length 280 mm 10<br />
The <strong>Pelvic</strong> C-<strong>Clamp</strong> (03.306.010) is comprised of the<br />
following articles that can be ordered separately as<br />
replacement parts:<br />
03.306.000 Inner Rail <strong>for</strong> <strong>Pelvic</strong> C-<strong>Clamp</strong> (1)<br />
03.306.001 Outer Rail <strong>for</strong> <strong>Pelvic</strong> C-<strong>Clamp</strong> (2)<br />
03.306.002 Upper Side Arm <strong>for</strong> <strong>Pelvic</strong> C-<strong>Clamp</strong> (2)<br />
03.306.003 Lower Side Arm <strong>for</strong> <strong>Pelvic</strong> C-<strong>Clamp</strong> (2)<br />
03.306.008 Threaded Tube <strong>for</strong> <strong>Pelvic</strong> C-<strong>Clamp</strong> (2)<br />
Also available:<br />
519.970 Special Autoclavable Oil<br />
689.886 Container, extra-small, closable, without<br />
Contents, to accommodate<br />
Art. No. 395.781<br />
Optional <strong>instrument</strong>s:<br />
359.204 Pliers, flat nosed<br />
395.781 Cap<br />
<strong>Synthes</strong> 15
Bibliography<br />
Pohlemann T, Braune C, et al. (2004) <strong>Pelvic</strong> emergency<br />
clamps: anatomic landmarks <strong>for</strong> a safe primary application.<br />
J Orthop Trauma 18(2):102-5<br />
Heini PF, Witt J, Ganz R (1996) The <strong>Pelvic</strong> C-<strong>Clamp</strong> <strong>for</strong> the<br />
emergency treatment of unstable pelvic ring injuries. A report<br />
on clinical experience of 30 cases. Injury Vol. 27, Suppl. 1<br />
Schütz M, Stöckle U, Hoffmann R, Südkamp N, Haas N (1996)<br />
Clinical experience with two types of <strong>Pelvic</strong> C-<strong>Clamp</strong>s <strong>for</strong> unstable<br />
pelvic ring injuries. Injury Vol. 27, Suppl. 1<br />
Witschger P, Heini P, Ganz R (1992) Beckenzwinge zur<br />
Schockbekämpfung bei hinteren Beckenringverletzungen. Orthopäde<br />
21:393-399<br />
Pohlemann T, Culemann U, Gänsslen A, Tscherne H (1996)<br />
Die schwere Beckenverletzung mit pelviner Massenblutung:<br />
Ermitt lung der Blutungsschwere und klinische Erfahrung mit<br />
der Notfall<strong>stabili</strong>sierung. Unfallchirurg 99:734-743<br />
Pohlemann T, Gänsslen A, Hartung S (1997) Beckenverletzungen/<strong>Pelvic</strong><br />
Injuries, Ergebnisse der multizentrischen Studie der<br />
Arbeitsgruppe Becken der AO und DGU/Results of a German<br />
Multicentre Study Group. In: Schweiberer L and Tscherne H<br />
(ed.) Hefte zu der Unfallchirurgie, Berlin, Heidelberg, New<br />
York: Springer<br />
Tscherne H, Pohlemann T (1998) Tscherne Unfallchirurgie<br />
Becken und Acetabulum. Berlin, Heidelberg, New York:<br />
Springer<br />
Buckle R, Browner BD, Morandi M (1995) <strong>Emergency</strong> Reduction<br />
<strong>for</strong> <strong>Pelvic</strong> Ring Disruptions and Control of Associated<br />
Hemorrhage Using the <strong>Pelvic</strong> Stabilizer. Techniques in Orthopaedics<br />
9 (4):258-266<br />
Pohlemann T, Krettek C, Hoffmann R, Culemann U, Gänsslen<br />
(1994) Biomechanischer Vergleich verschiedener Notfall<strong>stabili</strong>sierungsmassnahmen<br />
am Beckenring. Unfallchirurg 97:503-<br />
510<br />
Gänsslen A, Krettek C, Pohlemann T (2004) <strong>Emergency</strong> Stabili<strong>zation</strong><br />
with the <strong>Pelvic</strong> C-<strong>Clamp</strong>. Eur J Trauma 30:412-9<br />
Rüedi Tp, Murphy WM (2000) AO Principles of Fracture Management.<br />
Berlin Heidelberg New York: Springer<br />
16 <strong>Synthes</strong> <strong>Pelvic</strong> C-<strong>Clamp</strong> Technique Guide
Ö036.000.899öACjä<br />
SE_015675<br />
<strong>Synthes</strong> GmbH<br />
Eimattstrasse 3<br />
CH-4436 Oberdorf<br />
www.synthes.com Presented by: 0123036.000.899<br />
AC 31070045 © <strong>Synthes</strong> 05/2008 <strong>Synthes</strong>, Inc. or its affiliates All rights reserved <strong>Synthes</strong> is a trademark of <strong>Synthes</strong>, Inc. or its affiliates