installation & maintenance manual maxim 3 - Pvi.com
installation & maintenance manual maxim 3 - Pvi.com
installation & maintenance manual maxim 3 - Pvi.com

You also want an ePaper? Increase the reach of your titles
YUMPU automatically turns print PDFs into web optimized ePapers that Google loves.
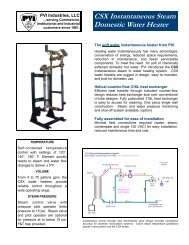
MAXIM 3 ® WATER HEATER<br />
10.2 The Following Describes The Functions Of Each Of These Terminals And The Factory-Installed Options<br />
Required To Activate The Terminals:<br />
Note: Terminals P1-P2 are functional only when the water heater is equipped with the factory installed options<br />
required to activate the terminals. Terminals R1-R2, A1-A2, C1-C2 and T1-T2 are standard pre-wired functions on<br />
all models.<br />
R1-R2: Used to activate /de-activate water heater from remote master control.<br />
Terminals are wired to a relay in a remote Energy Management System. When relay closes, circuit from R1 to R2 is<br />
<strong>com</strong>pleted and appliance controls are enabled. Appliance ships from factory with jumper between terminals<br />
Remove jumper when connecting to a remote controller.<br />
A1-A2: Used to activate a remote alarm, signaling shutdown of <strong>com</strong>bustion control.<br />
Provides a <strong>maxim</strong>um 10 amp relay contact closure when the flame safeguard terminates <strong>com</strong>bustion due to a<br />
tripped safety interlock (i.e.: air proving switch, high limit switch, low water flow switch or flame sensor, etc.).<br />
P1-P2: Activates remote equipment and requires confirmation signal back to the appliance.<br />
Provides a <strong>maxim</strong>um 10-amp relay contact closure to activate a remote device (i.e.: mechanical room air louvers,<br />
draft inducer or power vent, etc.). The remote device must send return signal via proving switch to confirming proper<br />
operation to terminals C1-C2, prior to the appliance being able to energize. Options Required - Consult Factory.<br />
C1-C2: Used for proving operation of remote device.<br />
Terminals are wired to a proving switch on a remote device such as a power venter. When relay closes, circuit from<br />
C1 to C2 is <strong>com</strong>pleted and appliance controls are enabled. This appliance ships form the factory with jumper<br />
between terminals.<br />
T1-T2: Used for external modulation control.<br />
To connect external modulation control, disconnect and cap the blue wire connected to terminal T2 and connect the<br />
external modulating signal to terminals T1 (positive) and T2 (negative).<br />
11 SEQUENCE OF OPERATION<br />
1. In<strong>com</strong>ing 120VAC<br />
a. Full time power to the Main Control Switch<br />
b. Full time power to the Variable Frequency Drive<br />
2. Power On - When the main control switch is turned on:<br />
a. 120v is applied to the step-down transformer (24v)<br />
b. 120v is applied to the L.W.C.O. terminal L1 (if used)<br />
c. 120v is applied to the Fenwal Flame Safeguard Control<br />
d. 24v is applied to the TempTrac operating temperature control terminal L1<br />
3. Call For Heat - If the TempTrac operating control senses a call-for-heat condition:<br />
a. The High Gas Pressure and Low Gas Pressure Switch (both optional) are energized and their safe<br />
condition is proved.<br />
b. The thermostat contact on the Fenwal Flame Safeguard Control is energized.<br />
c. The flame control will then verify the Airflow-Proving Switch is in the open position, which must exist before<br />
the blower is powered.<br />
d. Energizing the blower should close the airflow proving switch. If the airflow-proving switch is not in the<br />
closed position, the flame control’s fan terminals F1-F2 will power the Variable Frequency Drive (VFD)<br />
blower system at low speed for pre-purge.<br />
e. If the airflow-proving switch does not close following the blower being energized, the flame control will<br />
lockout.<br />
22<br />
PV500-51 03/14