
Create successful ePaper yourself
Turn your PDF publications into a flip-book with our unique Google optimized e-Paper software.
<strong>Plug</strong>-<strong>in</strong> Module Quick Start<br />
<strong>NetBeans</strong> API List (see l<strong>in</strong>ks) to cont<strong>in</strong>ue<br />
develop<strong>in</strong>g the module.<br />
Us<strong>in</strong>g the Action Wizard<br />
In the Projects w<strong>in</strong>dow, right-click the<br />
project node and choose New>File/Folder.<br />
In the New File wizard, choose <strong>NetBeans</strong><br />
Module Development under Categories,<br />
and Action under File Types. Click Next.<br />
In the Action Type panel, accept the<br />
defaults and aga<strong>in</strong> click Next. In the GUI<br />
Registration panel, select Global Menu<br />
Item, and then Global Toolbar Button. Set<br />
the follow<strong>in</strong>g values:<br />
• Category: Tools<br />
• Menu: Tools<br />
• Position: Tools - HERE - <br />
• Toolbar: Build<br />
• Position: Run Ma<strong>in</strong> Project - HERE<br />
- Debug Ma<strong>in</strong> Project<br />
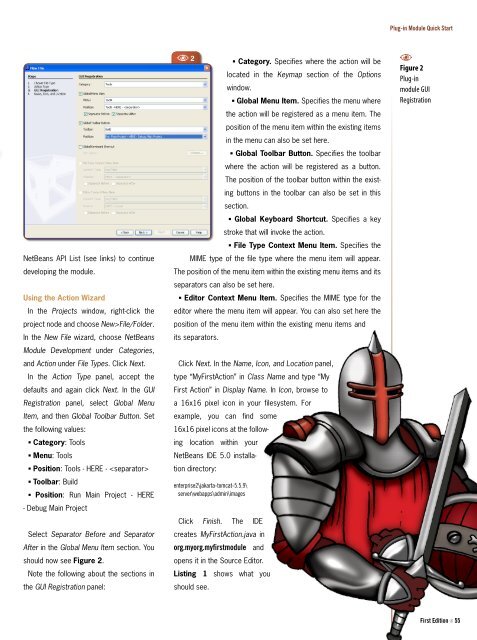
Select Separator Before and Separator<br />
After <strong>in</strong> the Global Menu Item section. You<br />
should now see Figure 2.<br />
Note the follow<strong>in</strong>g about the sections <strong>in</strong><br />
the GUI Registration panel:<br />
A 2<br />
• Category. Specifies where the action will be<br />
located <strong>in</strong> the Keymap section of the Options<br />
w<strong>in</strong>dow.<br />
• Global Menu Item. Specifies the menu where<br />
the action will be registered as a menu item. The<br />
position of the menu item with<strong>in</strong> the exist<strong>in</strong>g items<br />
<strong>in</strong> the menu can also be set here.<br />
• Global Toolbar Button. Specifies the toolbar<br />
where the action will be registered as a button.<br />
The position of the toolbar button with<strong>in</strong> the exist<strong>in</strong>g<br />
buttons <strong>in</strong> the toolbar can also be set <strong>in</strong> this<br />
section.<br />
• Global Keyboard Shortcut. Specifies a key<br />
stroke that will <strong>in</strong>voke the action.<br />
• File Type Context Menu Item. Specifies the<br />
MIME type of the file type where the menu item will appear.<br />
The position of the menu item with<strong>in</strong> the exist<strong>in</strong>g menu items and its<br />
separators can also be set here.<br />
• Editor Context Menu Item. Specifies the MIME type for the<br />
editor where the menu item will appear. You can also set here the<br />
position of the menu item with<strong>in</strong> the exist<strong>in</strong>g menu items and<br />
its separators.<br />
Click Next. In the Name, Icon, and Location panel,<br />
type “MyFirstAction” <strong>in</strong> Class Name and type “My<br />
First Action” <strong>in</strong> Display Name. In Icon, browse to<br />
a 16x16 pixel icon <strong>in</strong> your filesystem. For<br />
example, you can f<strong>in</strong>d some<br />
16x16 pixel icons at the follow<strong>in</strong>g<br />
location with<strong>in</strong> your<br />
<strong>NetBeans</strong> IDE 5.0 <strong>in</strong>stallation<br />
directory:<br />
enterprise2\jakarta-tomcat-5.5.9\<br />
server\webapps\adm<strong>in</strong>\images<br />
Click F<strong>in</strong>ish. The IDE<br />
creates MyFirstAction.java <strong>in</strong><br />
org.myorg.myfirstmodule and<br />
opens it <strong>in</strong> the Source Editor.<br />
List<strong>in</strong>g 1 shows what you<br />
should see.<br />
A<br />
Figure 2<br />
<strong>Plug</strong>-<strong>in</strong><br />
module GUI<br />
Registration<br />
First Edition N 55