

Instruction Manual - GME
Instruction Manual - GME
Instruction Manual - GME

You also want an ePaper? Increase the reach of your titles
YUMPU automatically turns print PDFs into web optimized ePapers that Google loves.
e.g. Sending Ident 145A5 will call radios 14505, 14515,<br />
14525, 14535.. --> 14595<br />
Call acknowledge in Group mode<br />
There is no call acknowledge when sending group calls. This is<br />
to prevent all the radios in your group from trying to respond<br />
to your Selcall transmission at the same time.<br />
Storing Group Call Idents<br />
Group Call Idents can be stored in memory in the same way as<br />
a standard Selcall Ident.<br />
Receiving Group Calls<br />
Receiving a Group Call is identical to receiving a normal Selcall<br />
except that the alarm sound is a LOW tone beep instead of the<br />
normal HIGH tone beep. The Callers’ Ident or ALPHA Name<br />
appears on the display in the usual way.<br />
INSTALLATION<br />
The TX3345 main unit is supplied with a slim, U-shaped<br />
mounting cradle. The cradle can be screwed or bolted in any<br />
convenient location in your vehicle (under or above the dash,<br />
on the centre console, etc.) using the mounting slots provided<br />
in the cradle. The TX3345 contains a built-in speaker, and<br />
should be installed in a convenient location in the vehicle’s<br />
cabin as the radio’s loud speaker. Alternatively it can be<br />
installed in a less audible location and an extension speaker<br />
used instead.<br />
The LCD Controller Microphone comes complete with a<br />
mounting clip. Its small size and light weight design allows it<br />
to be mounted in almost any convenient position accessible to<br />
the driver.<br />
When installing the radio, avoid mounting it close to heaters<br />
or air conditioners. Screw the LCD Controller Microphone’s clip<br />
to a firm surface. Fit the TX3345 into the cradle and tighten<br />
the gimbal knobs. Place the LCD Controller Microphone in its<br />
mounting clip. Finally, plug the LCD Controller Microphone<br />
into the front panel of the TX3345 and the power and antenna<br />
leads to the sockets provided on the rear of the radio.<br />
Antenna Installation<br />
It is essential to select a good quality, high efficiency, 477 MHz<br />
antenna. A poor quality antenna or one not designed for the<br />
specific frequency band you are using will give very<br />
poor performance.<br />
<strong>GME</strong> have a wide range of suitable 477 MHz UHF CB antennas<br />
to suit most installations and applications. We recommend<br />
contacting your local <strong>GME</strong> retailer for advice.<br />
Connect to the antenna cable to the rear antenna socket using<br />
a PL259 coaxial connector.<br />
Noise Suppression<br />
The inherent design of FM transceivers result in a high level<br />
of resistance to ignition and electrical interference. However<br />
in some installations it may be necessary to take additional<br />
steps to help reduce or eliminate noise interference. During<br />
installation, try to route the DC battery leads, the antenna lead<br />
or any accessory wires away from the engine compartment,<br />
ignition or alternator wiring. If the noise continues, try fitting<br />
a suppression kit in which case we recommend you consult an<br />
auto electrician for advice specific to your installation.<br />
Higher frequency electrical interference caused by electric<br />
motors can be suppressed directly at the motor terminals.<br />
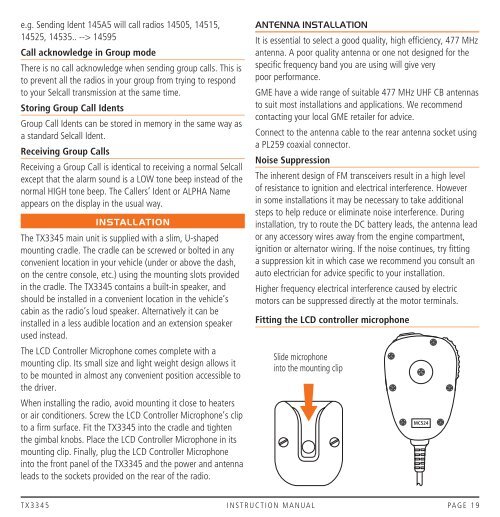
Fitting the LCD controller microphone<br />
Slide microphone<br />
into the mounting clip<br />
MC524<br />
TX3345 instruction manual PAGE 19


