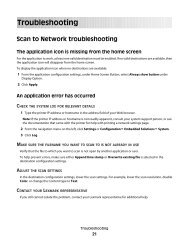
Unpack printer - Lexmark
Unpack printer - Lexmark
Unpack printer - Lexmark

Create successful ePaper yourself
Turn your PDF publications into a flip-book with our unique Google optimized e-Paper software.
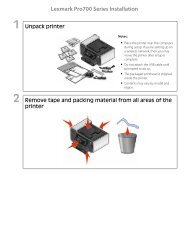
<strong>Lexmark</strong> Pro200 Series Installation<br />
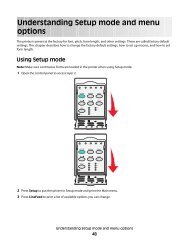
17 Set date and time<br />
1 Using the keypad on the <strong>printer</strong><br />
control panel, set the date. Press<br />
or to scroll between the month, day,<br />
and year. Date format varies<br />
depending on selected country or<br />
region.<br />
2 Press OK.<br />
3 Using the keypad on the <strong>printer</strong><br />
control panel, set the time. Press<br />
or to scroll between the hours,<br />
minutes, and time format. Press<br />
or to choose a time format.<br />
4 Press OK to save.<br />
18 Enter fax number and fax name for your <strong>printer</strong><br />
1 Using the keypad on the <strong>printer</strong><br />
control panel, enter your fax number.<br />
2 Press OK to save.<br />
3 Using the keypad on the <strong>printer</strong><br />
control panel, enter the fax name for<br />
your <strong>printer</strong>.<br />
4 Press OK to save.<br />
19 Open <strong>printer</strong> and remove any tape from latch<br />
Note: The carriage moves to the<br />
printhead installation position as shown.