Unpack printer - Lexmark
Unpack printer - Lexmark
Unpack printer - Lexmark

Create successful ePaper yourself
Turn your PDF publications into a flip-book with our unique Google optimized e-Paper software.
<strong>Lexmark</strong> Pro700 Series Installation<br />
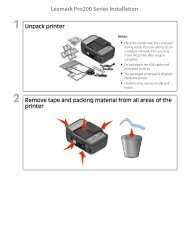
1 <strong>Unpack</strong> <strong>printer</strong><br />
Notes:<br />
• Place the <strong>printer</strong> near the computer<br />
during setup. If you're setting up on<br />
a wireless network, then you may<br />
move the <strong>printer</strong> after setup is<br />
complete.<br />
• Do not attach the USB cable until<br />
prompted to do so.<br />
• The packaged printhead is shipped<br />
inside the <strong>printer</strong>.<br />
• Contents may vary by model and<br />
region.<br />
2 Remove tape and packing material from all areas of the<br />
<strong>printer</strong>
<strong>Lexmark</strong> Pro700 Series Installation<br />
3 Open <strong>printer</strong> and remove packaged printhead<br />
4 If necessary, insert correct (1) language overlay and install<br />
(2) protective cover
<strong>Lexmark</strong> Pro700 Series Installation<br />
5 Lock the protective cover in place<br />
6 Close <strong>printer</strong>
<strong>Lexmark</strong> Pro700 Series Installation<br />
7 Pull paper tray completely out of <strong>printer</strong><br />
8 Move paper guides to the sides<br />
9 For A4 or Legal, extend paper tray
<strong>Lexmark</strong> Pro700 Series Installation<br />
10 Load paper and adjust paper guides<br />
Note: Do not load paper past the<br />
maximum height indicator line as shown<br />
in step 2.<br />
11 Insert paper tray
<strong>Lexmark</strong> Pro700 Series Installation<br />
12 Connect power cord only<br />
Note: DO NOT attach the USB cable yet.<br />
CAUTION—POTENTIAL INJURY: Read the safety information included with this product before connecting<br />
power or making any cabling connections.<br />
13 Make sure <strong>printer</strong> is on<br />
14 Follow prompts on the <strong>printer</strong> control panel<br />
1 Follow the prompts on the <strong>printer</strong><br />
control panel.<br />
2 After following the prompts, click<br />
Continue below.
<strong>Lexmark</strong> Pro700 Series Installation<br />
15 Install printhead and ink cartridges<br />
If you need to install the printhead and<br />
cartridges, click Continue.<br />
If not, you can close this window.<br />
16 Open <strong>printer</strong> and remove any tape from latch<br />
Note: The carriage moves to the<br />
printhead installation position as shown.<br />
17 Squeeze and lift latch
<strong>Lexmark</strong> Pro700 Series Installation<br />
18 Remove printhead from disposable container<br />
19 Insert printhead and close latch until it clicks<br />
20 Close <strong>printer</strong>
<strong>Lexmark</strong> Pro700 Series Installation<br />
21 Open <strong>printer</strong><br />
Note: The printhead moves to the<br />
cartridge installation position as shown.<br />
22 First, insert each color ink cartridge. Then, use two hands<br />
to install black cartridge.
<strong>Lexmark</strong> Pro700 Series Installation<br />
23 Close <strong>printer</strong><br />
24 Flip and extend exit tray paper stop<br />
Notes:<br />
• Extend the paper exit tray for<br />
A4/Legal.<br />
• The paper stop holds paper as it exits<br />
the <strong>printer</strong>.<br />
25 Press OK to print alignment page<br />
Notes:<br />
• Do not remove the page until<br />
printing stops. The alignment page<br />
may take a while to print and will<br />
move in and out during the process.<br />
• Streaks on the alignment page are<br />
normal and not an indication of a<br />
problem.<br />
• The alignment page that prints may<br />
differ from the one shown.<br />
• Recycle the alignment page.