

weider club 560 - Fitness Equipment
weider club 560 - Fitness Equipment
weider club 560 - Fitness Equipment

You also want an ePaper? Increase the reach of your titles
YUMPU automatically turns print PDFs into web optimized ePapers that Google loves.
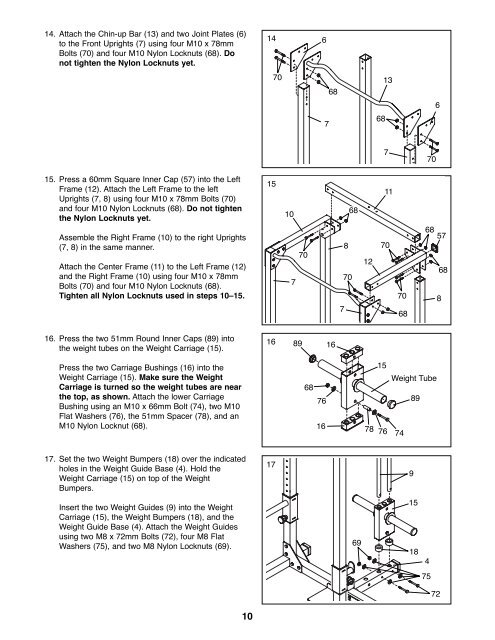
14. Attach the Chin-up Bar (13) and two Joint Plates (6)<br />
to the Front Uprights (7) using four M10 x 78mm<br />
Bolts (70) and four M10 Nylon Locknuts (68). Do<br />
not tighten the Nylon Locknuts yet.<br />
14<br />
6<br />
70<br />
68<br />
13<br />
6<br />
7<br />
68<br />
7<br />
70<br />
15. Press a 60mm Square Inner Cap (57) into the Left<br />
Frame (12). Attach the Left Frame to the left<br />
Uprights (7, 8) using four M10 x 78mm Bolts (70)<br />
and four M10 Nylon Locknuts (68). Do not tighten<br />
the Nylon Locknuts yet.<br />
Assemble the Right Frame (10) to the right Uprights<br />
(7, 8) in the same manner.<br />
Attach the Center Frame (11) to the Left Frame (12)<br />
and the Right Frame (10) using four M10 x 78mm<br />
Bolts (70) and four M10 Nylon Locknuts (68).<br />
Tighten all Nylon Locknuts used in steps 10Ð15.<br />
15<br />
10<br />
7<br />
70<br />
68<br />
8<br />
70<br />
7<br />
12<br />
11<br />
70<br />
70<br />
68<br />
68<br />
57<br />
68<br />
8<br />
16. Press the two 51mm Round Inner Caps (89) into<br />
the weight tubes on the Weight Carriage (15).<br />
16<br />
89<br />
16<br />
Press the two Carriage Bushings (16) into the<br />
Weight Carriage (15). Make sure the Weight<br />
Carriage is turned so the weight tubes are near<br />
the top, as shown. Attach the lower Carriage<br />
Bushing using an M10 x 66mm Bolt (74), two M10<br />
Flat Washers (76), the 51mm Spacer (78), and an<br />
M10 Nylon Locknut (68).<br />
68<br />
76<br />
16<br />
78<br />
15<br />
76<br />
Weight Tube<br />
74<br />
89<br />
17. Set the two Weight Bumpers (18) over the indicated<br />
holes in the Weight Guide Base (4). Hold the<br />
Weight Carriage (15) on top of the Weight<br />
Bumpers.<br />
17<br />
9<br />
Insert the two Weight Guides (9) into the Weight<br />
Carriage (15), the Weight Bumpers (18), and the<br />
Weight Guide Base (4). Attach the Weight Guides<br />
using two M8 x 72mm Bolts (72), four M8 Flat<br />
Washers (75), and two M8 Nylon Locknuts (69).<br />
69<br />
15<br />
18<br />
4<br />
75<br />
72<br />
10


