SignaLink SL-1+ Installation & Operation Manual - Tigertronics
SignaLink SL-1+ Installation & Operation Manual - Tigertronics
SignaLink SL-1+ Installation & Operation Manual - Tigertronics

Create successful ePaper yourself
Turn your PDF publications into a flip-book with our unique Google optimized e-Paper software.
• To begin recording, click the Record button. If<br />
everything is working correctly, you will see the position<br />
slider moving from left to right and the Position display<br />
incrementing. You should also see the scope display in<br />
the center of the program window track the audio<br />
signal. If nothing happens, or if you get an error<br />
message, then see the "Sound Card Problems" section<br />
below.<br />
• If everything appears to be working, then let the<br />
program record for a few seconds and then click the<br />
Stop button. We now have a test sound recorded that<br />
we can play back through the speakers.<br />
• To play the sound, click the Play button. You should<br />
hear the sound through your computer speakers. If you<br />
do, then you can close the Sound Recorder program.<br />
Your sound card is functioning correctly. If you don’t<br />
hear the sound playback, then you need to proceed to the<br />
"Sound Card Problems" section below.<br />
Sound Card Problems<br />
While <strong>Tigertronics</strong> does NOT provide support for sound<br />
card problems, we have listed a few troubleshooting tips here<br />
to help you with some of the most common problems. If you<br />
are unable to resolve a problem with your sound card, then<br />
you will need to contact your computer’s manufacturer or a<br />
computer repair shop for help.<br />
• If the record and playback features of the Sound<br />
Recorder program seem to work, but no sound is ever<br />
heard (or seen on the scope display), then check the<br />
level controls. You might have one of the volume<br />
controls muted, de-selected or set too low. If the<br />
volume controls look ok, then check your cabling.<br />
Verify that the cables have the right type of connector<br />
installed (3.5mm stereo) and are plugged into the right<br />
jacks. If you are using amplified speakers, verify that<br />
they are turned ON.<br />
buttons to be disabled until after you have recorded a<br />
sound.<br />
- SETTING THE AUDIO LEVELS -<br />
(DETAILED PROCEDURE)<br />
This is a “Step-By-Step” procedure to assist those who are<br />
not already familiar with setting sound card levels using the<br />
Windows Volume Control Panel. Before you operate your<br />
<strong>SignaLink</strong> on the air, you will need to adjust the Receive and<br />
Transmit Audio levels. Incorrect adjustment of these levels<br />
can cause poor reception, over-modulation, or improper<br />
operation. This procedure will show you how to adjust your<br />
sound card and radio audio levels for optimum performance.<br />
Before you can adjust the audio levels, the <strong>SignaLink</strong> must<br />
be connected to the sound card and radio. Both the<br />
<strong>SignaLink</strong> and the radio should be powered ON and a<br />
communications program that you have selected should<br />
already be installed on your computer. Note that we will be<br />
using the communications program to generate the audio<br />
tones that are used to adjust the level controls, so CW<br />
programs should NOT be used unless they have a continuous<br />
"Tune" mode. A program like DigiPan is ideal.<br />
Transmit Audio<br />
Follow the steps below to set your transmit audio level.<br />
• Start the communication program and leave it in<br />
Receive mode.<br />
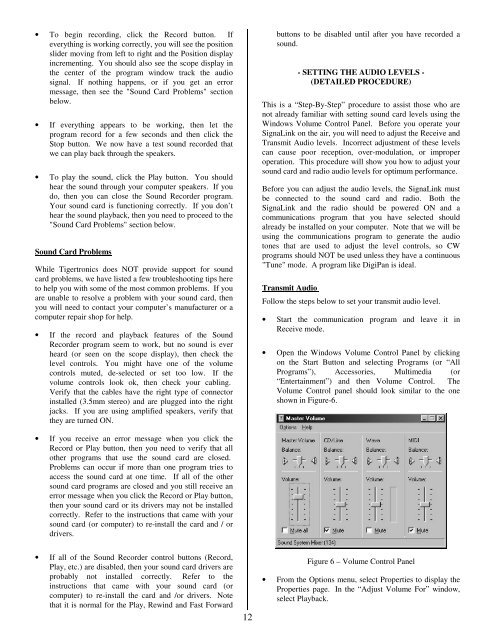
• Open the Windows Volume Control Panel by clicking<br />
on the Start Button and selecting Programs (or “All<br />
Programs”), Accessories, Multimedia (or<br />
“Entertainment”) and then Volume Control. The<br />
Volume Control panel should look similar to the one<br />
shown in Figure-6.<br />
• If you receive an error message when you click the<br />
Record or Play button, then you need to verify that all<br />
other programs that use the sound card are closed.<br />
Problems can occur if more than one program tries to<br />
access the sound card at one time. If all of the other<br />
sound card programs are closed and you still receive an<br />
error message when you click the Record or Play button,<br />
then your sound card or its drivers may not be installed<br />
correctly. Refer to the instructions that came with your<br />
sound card (or computer) to re-install the card and / or<br />
drivers.<br />
• If all of the Sound Recorder control buttons (Record,<br />
Play, etc.) are disabled, then your sound card drivers are<br />
probably not installed correctly. Refer to the<br />
instructions that came with your sound card (or<br />
computer) to re-install the card and /or drivers. Note<br />
that it is normal for the Play, Rewind and Fast Forward<br />
12<br />
Figure 6 – Volume Control Panel<br />
• From the Options menu, select Properties to display the<br />
Properties page. In the “Adjust Volume For” window,<br />
select Playback.