E-Mail set up - US Cellular
E-Mail set up - US Cellular
E-Mail set up - US Cellular

Create successful ePaper yourself
Turn your PDF publications into a flip-book with our unique Google optimized e-Paper software.
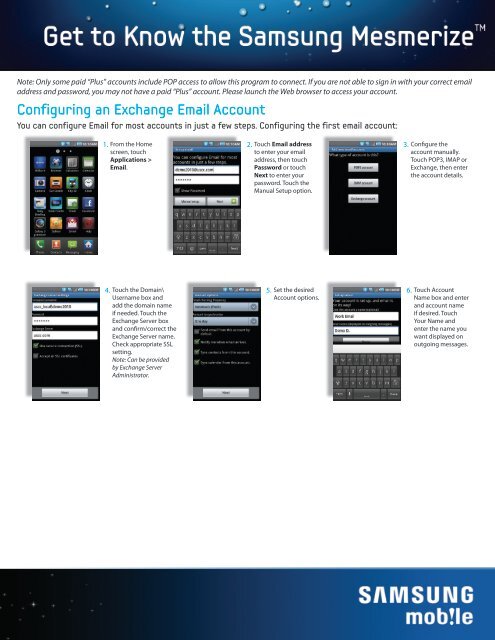
Note: Only some paid “Plus” accounts include POP access to allow this program to connect. If you are not able to sign in with your correct email<br />
address and password, you may not have a paid “Plus” account. Please launch the Web browser to access your account.<br />
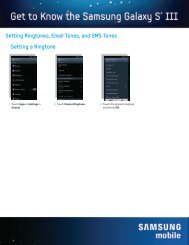
Configuring an Exchange Email Account<br />
You can configure Email for most accounts in just a few steps. Configuring the first email account:<br />
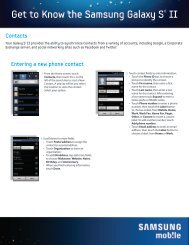
1. From the Home<br />
2. Touch Email address<br />
screen, touch<br />
to enter your email<br />
Applications ><br />
address, then touch<br />
Email.<br />
Password or touch<br />
Next to enter your<br />
password. Touch the<br />
Manual Set<strong>up</strong> option.<br />
3.<br />
Configure the<br />
account manually.<br />
Touch POP3, IMAP or<br />
Exchange, then enter<br />
the account details.<br />
4.<br />
Touch the Domain\<br />
Username box and<br />
add the domain name<br />
if needed. Touch the<br />
Exchange Server box<br />
and confirm/correct the<br />
Exchange Server name.<br />
Check appropriate SSL<br />
<strong>set</strong>ting.<br />
Note: Can be provided<br />
by Exchange Server<br />
Administrator.<br />
5.<br />
Set the desired<br />
Account options.<br />
6.<br />
Touch Account<br />
Name box and enter<br />
and account name<br />
if desired. Touch<br />
Your Name and<br />
enter the name you<br />
want displayed on<br />
outgoing messages.
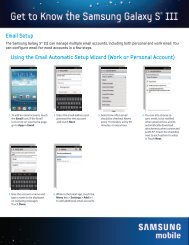
Configuring Additional Email Accounts<br />
1. From the Home screen, touch 2. Touch Menu > Accounts.<br />
Applications > Email.<br />
3. Touch Menu > Add account. 4. Touch the Email address<br />
field to enter your email<br />
address. Touch the Password<br />
field or touch Next to enter<br />
your password. Touch Next:<br />
Connect to the server to <strong>set</strong> <strong>up</strong><br />
the account automatically.<br />
Note: If the device is able to<br />
automatically download server<br />
<strong>set</strong>tings jump to Step 8.<br />
5. If the server <strong>set</strong>tings can not be<br />
automatically found you may need<br />
to <strong>set</strong> <strong>up</strong> the account manually.<br />
Note: Customers may have to contact<br />
their e-mail provider for the <strong>set</strong>tings<br />
that are needed for either POP3 or<br />
IMAP accounts. Yahoo! customers<br />
need to either contact Yahoo! to<br />
<strong>set</strong> <strong>up</strong> a Yahoo! <strong>Mail</strong> Plus account<br />
or download the free Yahoo! <strong>Mail</strong><br />
application from Android Market.”<br />
6. Manually enter information<br />
for a POP3 account.<br />
7. Manually enter information<br />
for an IMAP account.<br />
8. Enter a name for the account<br />
and a name for the account<br />
owner.
Composing and Sending Email<br />
1.<br />
From the Home screen, touch<br />
Applications > Email.<br />
2.<br />
Touch and hold on an account,<br />
then touch Compose.<br />
3.<br />
Touch the To field to enter recipients. As you<br />
enter names or numbers, matching contacts<br />
display. Touch a contact to add it to the field.<br />
4.<br />
Touch the Subject field to enter<br />
a subject.<br />
5.<br />
Touch the text field to enter the<br />
text of your email.<br />
6.<br />
While composing a message, touch Menu for<br />
these options:<br />
• Add Cc/Bcc: Create Cc (copy) and Bcc (blind<br />
copy) fields to the message. After creating the<br />
fields, touch to enter recipients.<br />
• Save as draft: Close the message and save it<br />
in Drafts.<br />
• Add text: Add text from a Contact record,<br />
from the Calendar, or from a Memo.<br />
• Discard: Close the message without saving.<br />
• Add attachment: Launch Gallery to select a<br />
picture to add to the message.<br />
7.<br />
Touch Attach to add a file to the<br />
message.<br />
8. Touch Send to send the message.