
Create successful ePaper yourself
Turn your PDF publications into a flip-book with our unique Google optimized e-Paper software.
Feb,1999<br />
MC-80<br />
♦ Caution:<br />
• When exiting the test mode and turning off the power, after<br />
holding down [SHIFT] and [STOP] at the same time and<br />
checking that display shows "The MC-80 may now be shut<br />
down safety.", turn off the power for the MC-80.<br />
<br />
<br />
[SHIFT]+[STOP] "The MC-80 may now be<br />
shut down safety." <br />
<br />
Format HDP-88.<br />
HDP-88 <br />
• Be sure to remove products, a floppy disk and a ZIP disk<br />
for the test mode from customer’s MC-80.<br />
<br />
ZIP MC-80 <br />
<br />
Install VS4S-1 in the MC-80.<br />
VS4S-1 <br />
♦ Details of the each test<br />
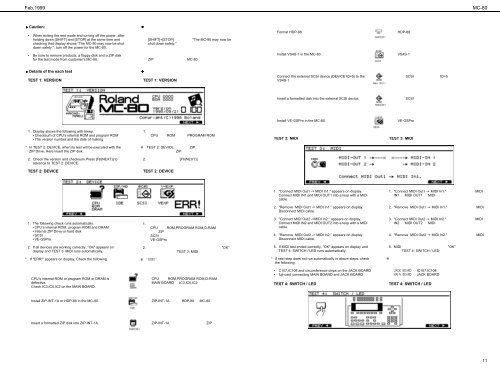
TEST 1: VERSION<br />
<br />
TEST 1: VERSION<br />
Connect the external SCSI device (DEVICE ID=5) to the<br />
VS4S-1.<br />
SCSI ID=5<br />
Insert a formatted disk into the external SCSI device.<br />
SCSI <br />
<br />
Install VE-GSPro in the MC-80.<br />
VE-GSPro <br />
1. Display shows the following with bleep.<br />
• Checksum of CPU’s internal ROM and program ROM<br />
• The version number and the date of making<br />
1. <br />
CPU ROM PROGRAM ROM <br />
<br />
TEST 3: MIDI<br />
TEST 3: MIDI<br />
* In TEST 2: DEVICE, when its test will be executed with the<br />
ZIP Drive, Here insert the ZIP disk.<br />
TEST 2: DEVICE ZIP <br />
ZIP <br />
2. Check the version and checksum.Press [F6(NEXT)] to<br />
advance to TEST 2: DEVICE.<br />
2. [F6(NEXT)] <br />
TEST 2: DEVICE<br />
TEST 2: DEVICE<br />
1. "Connect MIDI Out1 -> MIDI In1." appears on display.<br />
Connect MIDI IN1 and MIDI OUT1 into a loop with a MIDI<br />
cable.<br />
1. "Connect MIDI Out1 MIDI In1." MIDI<br />
IN1 MIDI OUT1 MIDI <br />
2. "Remove MIDI Out1 -> MIDI In1." appears on display.<br />
Disconnect MIDI cable.<br />
2. "Remove MIDI Out1 MIDI In1." MIDI<br />
<br />
1. The following check runs automatically.<br />
• CPU’s internal ROM, program ROM and DRAM<br />
• Internal ZIP Drive or hard disk<br />
•SCSI<br />
• VE-GSPro<br />
1. <br />
CPU ROM,PROGRAM ROM,D-RAM<br />
ZIP <br />
SCSI<br />
VE-GSPro<br />
3. "Connect MIDI Out2 ->MIDI In2." appears on display.<br />
Connect MIDI IN2 and MIDI OUT2 into a loop with a MIDI<br />
cable.<br />
4. "Remove MIDI Out2 -> MIDI In2." appears on display.<br />
Disconnect MIDI cable.<br />
3. "Connect MIDI Out2 MIDI In2." MIDI<br />
IN2 MIDI OUT2 MIDI <br />
4. "Remove MIDI Out2 MIDI In2." MIDI<br />
<br />
2. If all devices are working correctly, "OK" appears on<br />
display and TEST 3: MIDI runs automatically.<br />
2. "OK" <br />
TEST 3: MIDI <br />
5. If MIDI test ended correctly, "OK" appears on display and<br />
TEST 4: SWITCH / LED runs automatically.<br />
5. MIDI "OK" <br />
TEST 4: SWITCH / LED <br />
* If "ERR!" appears on display, Check the following.<br />
<br />
<br />
<br />
* If next step does not run automatically in above steps, check<br />
the following.<br />
<br />
<br />
<br />
CPU’s internal ROM or program ROM or DRAM is<br />
defective.<br />
Check IC3,IC5,IC2 on the MAIN BOARD.<br />
CPU ROM,PROGRAM ROM,D-RAM <br />
MAIN BOARD IC3,IC5,IC2 <br />
• C107,IC108 and circumference chips on the JACK BOARD<br />
• fuji-card connecting MAIN BOARD and JACK BOARD<br />
TEST 4: SWITCH / LED<br />
IC107,IC108 <br />
JACK BOARD <br />
TEST 4: SWITCH / LED<br />
Install ZIP-INT-1A or HDP-88 in the MC-80.<br />
ZIP-INT-1A HDP-88 MC-80 <br />
<br />
Insert a formatted ZIP disk into ZIP-INT-1A.<br />
ZIP-INT-1A ZIP <br />
<br />
11