
Create successful ePaper yourself
Turn your PDF publications into a flip-book with our unique Google optimized e-Paper software.
MC-80<br />
Feb,1999<br />
12.Checking operation:<br />
12.<br />
♦ Procedure:<br />
<br />
a. Connect the AC cord to the MC-80.<br />
b. Turn on the MC-80 power while holding down [CHAIN<br />
PLAY],[REC] and [ARPEGGIATOR] at the same time.<br />
c. Insert a formatted ZIP disk into the ZIP drive after<br />
entering the test mode.<br />
d. After pressing [F6(next)], MC-80 automatically executes<br />
the device checking.<br />
e. The system properly operates, when the ZIP/HD icon is<br />
NOT displayed.<br />
Make sure of the following, when the ZIP/HD icon is<br />
displayed.<br />
a. MC-80 <br />
b. [CHAIN PLAY]+[REC]+[ARPEGGIATOR] <br />
MC-80 <br />
c. ZIP <br />
ZIP <br />
d. [F6(NEXT)] <br />
e. ZIP/HD <br />
<br />
ZIP/HD <br />
<br />
1. Turn off the power for the MC-80 and any connected<br />
devices, and disconnect any cables connected to the MC-<br />
80.<br />
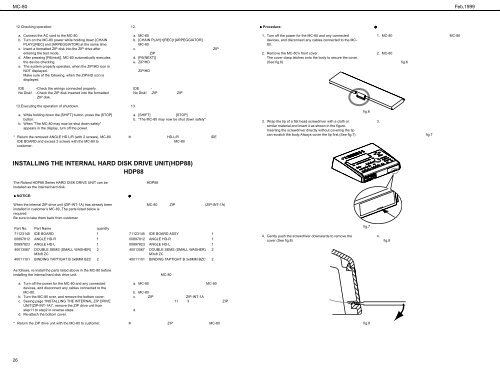
2. Remove the MC-80’s front cover.<br />
The cover clasp latches onto the body to secure the cover.<br />
(See fig.6)<br />
1. MC-80 MC-80 <br />
<br />
2. MC-80 <br />
<br />
fig.6 <br />
IDE<br />
No Disk!<br />
-Check the wirings connected properly.<br />
-Check the ZIP disk inserted into the formatted<br />
ZIP disk.<br />
IDE<br />
No Disk!<br />
- <br />
-ZIP ZIP <br />
13.Executing the operation of shutdown.<br />
a. While holding down the [SHIFT] button, press the [STOP]<br />
button.<br />
b. When "The MC-80 may now be shut down safely"<br />
appears in the display, turn off the power.<br />
* Return the removed ANGLE HD L/R (with 2 screws), MC-80<br />
IDE BOARD and excess 2 screws with the MC-80 to<br />
customer.<br />
<br />
13.<br />
a. [SHIFT] [STOP] <br />
b. "The MC-80 may now be shut down safely" <br />
<br />
HD-L/R IDE <br />
MC-80 <br />
<br />
3. Wrap the tip of a flat head screwdriver with a cloth or<br />
similar material and insert it as shown in the figure.<br />
Inserting the screwdriver directly without covering the tip<br />
can scratch the body.Always cover the tip first.(See fig.7)<br />
fig.6<br />
3. <br />
<br />
<br />
fig.7 <br />
INSTALLING THE INTERNAL HARD DISK DRIVE UNIT(HDP88) <br />
HDP88<br />
The Roland HDP88 Series HARD DISK DRIVE UNIT can be<br />
installed as the internal hard disk.<br />
HDP88 <br />
♦ NOTICE:<br />
<br />
When the internal ZIP drive unit (ZIP-INT-1A) has already been<br />
installed in customer’s MC-80, The parts listed below is<br />
required.<br />
Be sure to take them back from customer.<br />
MC-80 ZIP (ZIP-INT-1A)<br />
<br />
<br />
Part No. Part Name quantity<br />
71123145 IDE BOARD 1<br />
00897812 ANGLE HD-R 1<br />
00897823 ANGLE HD-L 1<br />
40013067 DOUBLE SEMS (SMALL WASHER) 2<br />
M3x8 ZC<br />
40011101 BINDING TAPTIGHT B 3x8MM BZC 2<br />
<br />
71123145 IDE BOARD ASSY 1<br />
00897812 ANGLE HD-R 1<br />
00897823 ANGLE HD-L 1<br />
40013067 DOUBLE SEMS (SMALL WASHER) 2<br />
M3x8 ZC<br />
40011101 BINDING TAPTIGHT B 3x8MM BZC 2<br />
4. Gently push the screwdriver downwards to remove the<br />
cover.(See fig.8)<br />
fig.7<br />
4. <br />
fig.8 <br />
As follows, re-install the parts listed above in the MC-80 before<br />
installing the internal hard disk drive unit.<br />
<br />
MC-80 <br />
a. Turn off the power for the MC-80 and any connected<br />
devices, and disconnect any cables connected to the<br />
MC-80.<br />
b. Turn the MC-80 over, and remove the bottom cover.<br />
c. Seeing page "INSTALLING THE INTERNAL ZIP DRIVE<br />
UNIT(ZIP-INT-1A)", remove the ZIP drive unit from<br />
step11 to step2 in reverse steps.<br />
d. Re-attach the bottom cover.<br />
a. MC-80 MC-80 <br />
<br />
b. MC-80 <br />
c. ZIP ZIP-INT-1A<br />
11 3 ZIP<br />
<br />
d. <br />
* Return the ZIP drive unit with the MC-80 to customer.<br />
<br />
ZIP MC-80 <br />
<br />
fig.8<br />
26