
You also want an ePaper? Increase the reach of your titles
YUMPU automatically turns print PDFs into web optimized ePapers that Google loves.
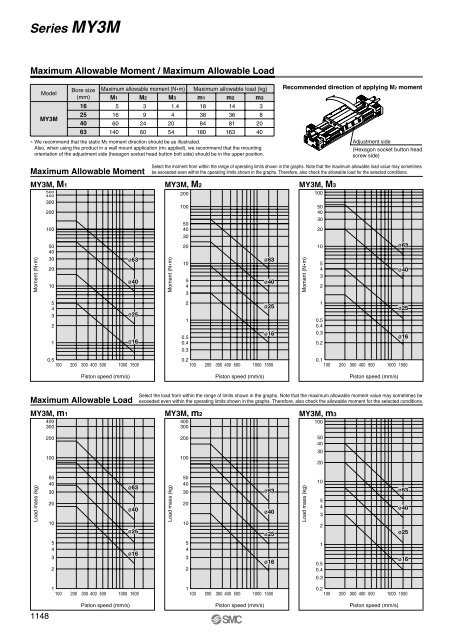
Series MY3M<br />
Maximum Allowable Moment / Maximum Allowable Load<br />
Bore size Maximum allowable moment (Nm) Maximum allowable load (kg)<br />
Model<br />
(mm) M1 M2 M3 m1 m2 m3<br />
16<br />
5 3 1.4 18 14 3<br />
25 16 9 4 38 36 8<br />
MY3M<br />
40 60 24 20 84 81 20<br />
63 140 60 54 180 163 40<br />
∗ We recommend that the static M2 moment direction should be as illustrated.<br />
Also, when using the product in a wall mount application (m3 applied), we recommend that the mounting<br />
orientation of the adjustment side (hexagon socket head button bolt side) should be in the upper position.<br />
Recommended direction of applying M2 moment<br />
Adjustment side<br />
(Hexagon socket button head<br />
screw side)<br />
Maximum Allowable Moment<br />
Select the moment from within the range of operating limits shown in the graphs. Note that the maximum allowable load value may sometimes<br />
be exceeded even within the operating limits shown in the graphs. Therefore, also check the allowable load for the selected conditions.<br />
MY3M, M1 MY3M, M2 MY3M, M3<br />
Moment (Nm)<br />
500<br />
400<br />
300<br />
200<br />
100<br />
50<br />
40<br />
30<br />
20<br />
10<br />
5<br />
4<br />
3<br />
2<br />
1<br />
0.5<br />
100<br />
200 300 400 500<br />
ø63<br />
ø40<br />
ø25<br />
ø16<br />
1000 1500<br />
Moment (Nm)<br />
200<br />
100<br />
50<br />
40<br />
30<br />
20<br />
10<br />
5<br />
4<br />
3<br />
2<br />
1<br />
ø63<br />
ø40<br />
ø25<br />
ø16<br />
0.5<br />
0.4<br />
0.3<br />
0.2<br />
100 200 300 400 500 1000 1500<br />
Moment (Nm)<br />
100<br />
50<br />
40<br />
30<br />
20<br />
10<br />
5<br />
4<br />
3<br />
2<br />
1<br />
0.5<br />
0.4<br />
0.3<br />
0.2<br />
ø63<br />
ø40<br />
ø25<br />
ø16<br />
0.1<br />
100 200 300 400 500 1000 1500<br />
Piston speed (mm/s)<br />
Piston speed (mm/s)<br />
Piston speed (mm/s)<br />
Maximum Allowable Load<br />
Select the load from within the range of limits shown in the graphs. Note that the maximum allowable moment value may sometimes be<br />
exceeded even within the operating limits shown in the graphs. Therefore, also check the allowable moment for the selected conditions.<br />
MY3M, m1 MY3M, m2 MY3M, m3<br />
400<br />
300<br />
400<br />
300<br />
100<br />
200<br />
100<br />
200<br />
100<br />
50<br />
40<br />
30<br />
20<br />
Load mass (kg)<br />
50<br />
40<br />
30<br />
20<br />
10<br />
ø63<br />
ø40<br />
ø25<br />
Load mass (kg)<br />
50<br />
40<br />
30<br />
20<br />
10<br />
ø63<br />
ø40<br />
ø25<br />
Load mass (kg)<br />
10<br />
5<br />
4<br />
3<br />
2<br />
ø63<br />
ø40<br />
ø25<br />
5<br />
4<br />
3<br />
2<br />
ø16<br />
5<br />
4<br />
3<br />
2<br />
ø16<br />
1<br />
0.5<br />
0.4<br />
0.3<br />
ø16<br />
1<br />
100 200 300 400 500 1000 1500<br />
1<br />
100 200 300 400 500 1000 1500<br />
0.2<br />
100 200 300 400 500 1000 1500<br />
1148<br />
Piston speed (mm/s)<br />
Piston speed (mm/s)<br />
Piston speed (mm/s)