User Manual - RFID Shop
User Manual - RFID Shop
User Manual - RFID Shop
- No tags were found...

You also want an ePaper? Increase the reach of your titles
YUMPU automatically turns print PDFs into web optimized ePapers that Google loves.
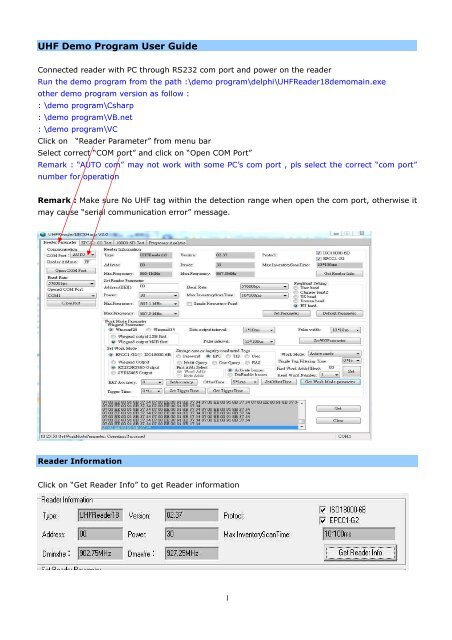
UHF Demo Program <strong>User</strong> Guide<br />
Connected reader with PC through RS232 com port and power on the reader<br />
Run the demo program from the path :\demo program\delphi\UHFReader18demomain.exe<br />
other demo program version as follow :<br />
: \demo program\Csharp<br />
: \demo program\VB.net<br />
: \demo program\VC<br />
Click on “Reader Parameter” from menu bar<br />
Select correct “COM port” and click on “Open COM Port”<br />
Remark : “AUTO com” may not work with some PC’s com port , pls select the correct “com port”<br />
number for operation<br />
Remark : Make sure No UHF tag within the detection range when open the com port, otherwise it<br />
may cause “serial communication error” message.<br />
Reader Information<br />
Click on “Get Reader Info” to get Reader information<br />
1
Set Reader Parameter<br />
Address : Reader address<br />
Power : reader power from 0-30 level<br />
Dminxfre : select Min. UHF frequency<br />
Dminxfre : select Max UHF frequency<br />
Baud : select com port baud rate<br />
Max InventoryScanTime : select Scan time (e.g. 10*100ms = 1 second / scan)<br />
Single Freq. : set single Frequency<br />
FreqBand :<br />
<strong>User</strong> Band – can be defined by user (902.6Mhz to 927.4Mhz)<br />
Chinese Band2 – 920Mhz – 925Mhz<br />
US Band – 902.75Mhz - 927.75Mhz<br />
Korean band – 917.1Mhz – 923.3Mhz<br />
EU band – 865.1Mhz – 867.9Mhz<br />
Remark :<br />
US reader version can define the freq. range from 902.6Mhz to 927.4Mhz<br />
EU reader version can select the “EU band” only and define the freq. range from 865.1Mhz to<br />
867.9Mhz<br />
Set Parameter<br />
: save parameter value<br />
Default Parameter : restore factory default setting<br />
2
Set Work Mode<br />
Function : Select wiegand interface and parameter .<br />
SetWGParamter – Save setting<br />
Select UHF Tag type - EPC-G2 or ISO18000-6B<br />
Select Output Interface - wiegand , RS232 output or SYRIS485<br />
Storage area or inquiry conducted Tags<br />
Select data memory (Password , EPC ,TID , <strong>User</strong> or Inventory )<br />
Activate or Disable buzzer<br />
Work Mode :<br />
Answer Mode :<br />
Need send command to the reader for operation , select this mode for tag read/write testing<br />
Active Mode (default setting) : read Tag automatically and output data as the parameter setting<br />
Trigger Mode (Low) : reader is trigged by Trigger pin (Low)<br />
Trigger Mode (high) : reader is trigged by Trigger pin (Low)<br />
SET : save work mode parameter<br />
Get Work Mode Parameter : Get current work mode parameter<br />
EPC – G2 Testing under Active Mode<br />
[1] Select the work mode to “Active mode” and click on “Set” to save the parameter<br />
[2] click on the “GetWork Mode parameter”<br />
[3] click on “Start” to start the tag reading / click on “Stop” to stop the tag reading<br />
[4] place the EPC G2 card on the reader then the tag ID will be shown as follow :<br />
3
EPC – G2 Testing under Answer Mode<br />
[1] Select the work mode to “answer mode” and click on “Set” to save the parameter<br />
[2] click on “EPCC1-G2 Test”<br />
[3] Click on “Query Tag” to start Tag reading<br />
[4] place the EPC G2 card on the reader then the tag ID will be shown as follow :<br />
Click on “Query Tag” once again to stop Tag reading<br />
Similar operation for other button (Press once start and Press again to stop)<br />
Other read/write operation , pls refer to EPC-G2 datasheet<br />
ISO18000-6B Testing under Answer mode<br />
[1] Select the work mode to “answer mode” and click on “Set” to save the parameter<br />
[2] click on “18000 6B Test”<br />
[3] Click on “Query by once” to start Tag reading<br />
[4] place the 18000-6B card on the reader then the tag ID will be shown as follow :<br />
Click on “Query by once” once again to stop Tag reading<br />
4
Reader installation<br />
Reader unit<br />
Adjustable bracket<br />
Horizontal installation<br />
Vertical Installation<br />
Adjust the reader to get the best detection performance<br />
When measuring or testing the reader’s read range, make sure that the tag is properly oriented to<br />
the reader antenna, and for optimum performance, be sure the operator’s finger is not within three<br />
inches of the tag’s antenna surface.<br />
Environment Interference will affect the reading distance.<br />
5