Working with Data in ASP.NET 2.0 :: Batch Updating Introduction
Working with Data in ASP.NET 2.0 :: Batch Updating Introduction
Working with Data in ASP.NET 2.0 :: Batch Updating Introduction

Create successful ePaper yourself
Turn your PDF publications into a flip-book with our unique Google optimized e-Paper software.
1 of 22<br />
This tutorial is part of a set. F<strong>in</strong>d out more about data access <strong>with</strong> <strong>ASP</strong>.<strong>NET</strong> <strong>in</strong> the <strong>Work<strong>in</strong>g</strong> <strong>with</strong> <strong>Data</strong><br />
<strong>in</strong> <strong>ASP</strong>.<strong>NET</strong> <strong>2.0</strong> section of the <strong>ASP</strong>.<strong>NET</strong> site at http://www.asp.net/learn/dataaccess/default.aspx.<br />
<strong>Work<strong>in</strong>g</strong> <strong>with</strong> <strong>Data</strong> <strong>in</strong> <strong>ASP</strong>.<strong>NET</strong> <strong>2.0</strong> :: <strong>Batch</strong><br />
Updat<strong>in</strong>g<br />
<strong>Introduction</strong><br />
In the preced<strong>in</strong>g tutorial we saw how to extend the <strong>Data</strong> Access Layer to add support for database transactions.<br />
<strong>Data</strong>base transactions guarantee that a series of data modification statements will be treated as one atomic<br />
operation, which ensures that all modifications will fail or all will succeed. With this lowlevel DAL functionality<br />
out of the way, we’re ready to turn our attention to creat<strong>in</strong>g batch data modification <strong>in</strong>terfaces.<br />
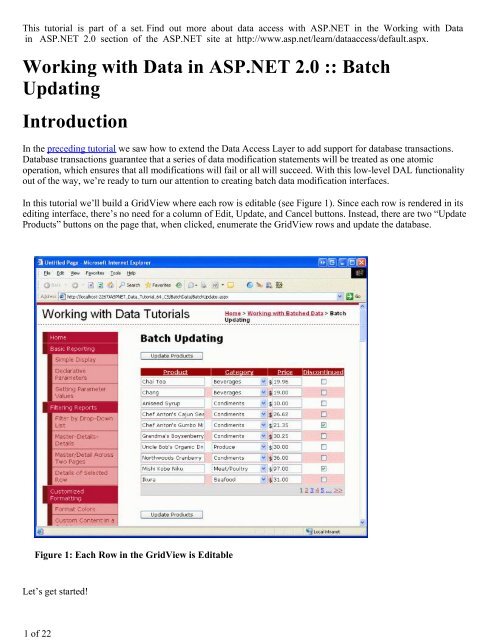
In this tutorial we’ll build a GridView where each row is editable (see Figure 1). S<strong>in</strong>ce each row is rendered <strong>in</strong> its<br />
edit<strong>in</strong>g <strong>in</strong>terface, there’s no need for a column of Edit, Update, and Cancel buttons. Instead, there are two “Update<br />
Products” buttons on the page that, when clicked, enumerate the GridView rows and update the database.<br />
Figure 1: Each Row <strong>in</strong> the GridView is Editable<br />
Let’s get started!
2 of 22<br />
Note: In the Perform<strong>in</strong>g <strong>Batch</strong> Updates tutorial we created a batch edit<strong>in</strong>g <strong>in</strong>terface us<strong>in</strong>g the <strong>Data</strong>List<br />
control. This tutorial differs from the previous one <strong>in</strong> that is uses a GridView and the batch update is<br />
performed <strong>with</strong><strong>in</strong> the scope of a transaction. After complet<strong>in</strong>g this tutorial I encourage you to return to the<br />
earlier tutorial and update it to use the database transactionrelated functionality added <strong>in</strong> the preced<strong>in</strong>g<br />
tutorial.<br />
Exam<strong>in</strong><strong>in</strong>g the Steps for Mak<strong>in</strong>g All GridView Rows Editable<br />
As discussed <strong>in</strong> the An Overview of Insert<strong>in</strong>g, Updat<strong>in</strong>g, and Delet<strong>in</strong>g <strong>Data</strong> tutorial, the GridView offers built<strong>in</strong><br />
support for edit<strong>in</strong>g its underly<strong>in</strong>g data on a perrow basis. Internally, the GridView notes what row is editable<br />
through its EditIndex property. As the GridView is be<strong>in</strong>g bound to its data source, it checks each row to see if the<br />
<strong>in</strong>dex of the row equals the value of EditIndex. If so, that row’s fields are rendered us<strong>in</strong>g their edit<strong>in</strong>g <strong>in</strong>terfaces.<br />
For BoundFields, the edit<strong>in</strong>g <strong>in</strong>terface is a TextBox whose Text property is assigned the value of the data field<br />
specified by the BoundField’s <strong>Data</strong>Field property. For TemplateFields, the EditItemTemplate is used <strong>in</strong> place of<br />
the ItemTemplate.<br />
Recall that the edit<strong>in</strong>g workflow starts when a user clicks a row’s Edit button. This causes a postback, sets the<br />
GridView’s EditIndex property to the clicked row’s <strong>in</strong>dex, and reb<strong>in</strong>ds the data to the grid. When a row’s Cancel<br />
button is clicked, on postback the EditIndex is set to a value of 1 before reb<strong>in</strong>d<strong>in</strong>g the data to the grid. S<strong>in</strong>ce the<br />
GridView’s rows start <strong>in</strong>dex<strong>in</strong>g at zero, sett<strong>in</strong>g EditIndex to 1 has the effect of display<strong>in</strong>g the GridView <strong>in</strong> readonly<br />
mode.<br />
The EditIndex property works well for perrow edit<strong>in</strong>g, but is not designed for batch edit<strong>in</strong>g. To make the entire<br />
GridView editable, we need to have each row render us<strong>in</strong>g its edit<strong>in</strong>g <strong>in</strong>terface. The easiest way to accomplish this<br />
is to create where each editable field is implemented as a TemplateField <strong>with</strong> its edit<strong>in</strong>g <strong>in</strong>terface def<strong>in</strong>ed <strong>in</strong> the<br />
ItemTemplate.<br />
Over the next several steps we’ll create a completely editable GridView. In Step 1 we’ll start by creat<strong>in</strong>g the<br />
GridView and its Object<strong>Data</strong>Source and convert its BoundFields and CheckBoxField <strong>in</strong>to TemplateFields. In<br />
Steps 2 and 3 we’ll move the edit<strong>in</strong>g <strong>in</strong>terfaces from the TemplateFields’ EditItemTemplates to their<br />
ItemTemplates.<br />
Step 1: Display<strong>in</strong>g Product Information<br />
Before we worry about creat<strong>in</strong>g a GridView where are rows are editable, let’s start by simply display<strong>in</strong>g the<br />
product <strong>in</strong>formation. Open the <strong>Batch</strong>Update.aspx page <strong>in</strong> the <strong>Batch</strong><strong>Data</strong> folder and drag a GridView from the<br />
Toolbox onto the Designer. Set the GridView’s ID to ProductsGrid and, from its smart tag, choose to b<strong>in</strong>d it to a<br />
new Object<strong>Data</strong>Source named Products<strong>Data</strong>Source. Configure the Object<strong>Data</strong>Source to retrieve its data from the<br />
ProductsBLL class’s GetProducts method.
Figure 2: Configure the Object<strong>Data</strong>Source to Use the ProductsBLL Class<br />
3 of 22
4 of 22<br />
Figure 3: Retrieve the Product <strong>Data</strong> Us<strong>in</strong>g the GetProducts Method<br />
Like the GridView, the Object<strong>Data</strong>Source’s modification features are designed to work on a perrow basis. In order<br />
to update a set of records, we’ll need to write a bit of code <strong>in</strong> the <strong>ASP</strong>.<strong>NET</strong> page’s codebeh<strong>in</strong>d class that batches<br />
the data and passes it to the BLL. Therefore, set the dropdown lists <strong>in</strong> the Object<strong>Data</strong>Source’s UPDATE,<br />
INSERT, and DELETE tabs to “(None)”. Click F<strong>in</strong>ish to complete the wizard.
5 of 22<br />
Figure 4: Set the DropDown Lists <strong>in</strong> the UPDATE, INSERT, and DELETE Tabs to “(None)”<br />
After complet<strong>in</strong>g the Configure <strong>Data</strong> Source wizard, the Object<strong>Data</strong>Source’s declarative markup should look like<br />
the follow<strong>in</strong>g:<br />
<br />
<br />
Complet<strong>in</strong>g the Configure <strong>Data</strong> Source wizard also causes Visual Studio to create BoundFields and a<br />
CheckBoxField for the product data fields <strong>in</strong> the GridView. For this tutorial, let’s only allow the user to view and<br />
edit the product’s name, category, price, and discont<strong>in</strong>ued status. Remove all but the ProductName, CategoryName,<br />
UnitPrice, and Discont<strong>in</strong>ued fields and rename the HeaderText properties of the first three fields to “Product”,<br />
“Category”, and “Price”, respectively. Lastly, check the “Enable Pag<strong>in</strong>g” and “Enable Sort<strong>in</strong>g” checkboxes <strong>in</strong> the<br />
GridView’s smart tag.<br />
At this po<strong>in</strong>t the GridView has three BoundFields (ProductName, CategoryName, and UnitPrice) and a<br />
CheckBoxField (Discont<strong>in</strong>ued). We need to convert these four fields <strong>in</strong>to TemplateFields and then move the<br />
edit<strong>in</strong>g <strong>in</strong>terface from the TemplateField’s EditItemTemplate to its ItemTemplate.<br />
Note: We explored creat<strong>in</strong>g and customiz<strong>in</strong>g TemplateFields <strong>in</strong> the Customiz<strong>in</strong>g the <strong>Data</strong> Modification<br />
Interface tutorial. We’ll walk through the steps of convert<strong>in</strong>g the BoundFields and CheckBoxField <strong>in</strong>to<br />
TemplateFields and def<strong>in</strong><strong>in</strong>g their edit<strong>in</strong>g <strong>in</strong>terfaces <strong>in</strong> their ItemTemplates, but if you get stuck or need a<br />
refresher, don’t hesitate to refer back to this earlier tutorial.
6 of 22<br />
From the GridView’s smart tag, click the “Edit Columns” l<strong>in</strong>k to open the Fields dialog box. Next, select each field<br />
and click the “Convert this field <strong>in</strong>to a TemplateField” l<strong>in</strong>k.<br />
Figure 5: Convert the Exist<strong>in</strong>g BoundFields and CheckBoxField Into TemplateFields<br />
Now that each field is a TemplateField, we’re ready to move the edit<strong>in</strong>g <strong>in</strong>terface from the EditItemTemplates to<br />
the ItemTemplates.<br />
Step 2: Creat<strong>in</strong>g the ProductName, UnitPrice, and Discont<strong>in</strong>ued Edit<strong>in</strong>g<br />
Interfaces<br />
Creat<strong>in</strong>g the ProductName, UnitPrice, and Discont<strong>in</strong>ued edit<strong>in</strong>g <strong>in</strong>terfaces are the topic of this step and are<br />
pretty straightforward, as each <strong>in</strong>terface is already def<strong>in</strong>ed <strong>in</strong> the TemplateField’s EditItemTemplate. Creat<strong>in</strong>g the<br />
CategoryName edit<strong>in</strong>g <strong>in</strong>terface is a bit more <strong>in</strong>volved s<strong>in</strong>ce we need to create a DropDownList of the applicable<br />
categories. This CategoryName edit<strong>in</strong>g <strong>in</strong>terface is tackled <strong>in</strong> Step 3.<br />
Let’s start <strong>with</strong> the ProductName TemplateField. Click on the “Edit Templates” l<strong>in</strong>k from the GridView’s smart<br />
tag and drill down to the ProductName TemplateField’s EditItemTemplate. Select the TextBox, copy it to the<br />
clipboard, and then paste it to the ProductName TemplateField’s ItemTemplate. Change the TextBox’s ID<br />
property to ProductName.<br />
Next, add a RequiredFieldValidator to the ItemTemplate to ensure that the user provides a value for each<br />
product’s name. Set the ControlToValidate property to “ProductName”, the ErrorMessage property to “You<br />
must provide the product's name.” and the Text property to “*”. After mak<strong>in</strong>g these additions to the<br />
ItemTemplate, your screen should look similar to Figure 6.
7 of 22<br />
Figure 6: The ProductName TemplateField Now Includes a TextBox and a RequiredFieldValidator<br />
For the UnitPrice edit<strong>in</strong>g <strong>in</strong>terface, start by copy<strong>in</strong>g the TextBox from the EditItemTemplate to the<br />
ItemTemplate. Next, place a “$” <strong>in</strong> front of the TextBox and set its ID property to “UnitPrice” and its Columns<br />
property to “8”.<br />
Also add a CompareValidator to the UnitPrice’s ItemTemplate to ensure that the value entered by the user is a<br />
valid currency value greater than or equal to $0.00. Set the validator’s ControlToValidate property to<br />
“UnitPrice”, its ErrorMessage property to “You must enter a valid currency value. Please omit any currency<br />
symbols.”, its Text property to “*”, its Type property to Currency, its Operator property to GreaterThanEqual,<br />
and its ValueToCompare property to “0”.
8 of 22<br />
Figure 7: Add a CompareValidator to Ensure the Price Entered is a NonNegative Currency Value<br />
For the Discont<strong>in</strong>ued TemplateField you can use the CheckBox already def<strong>in</strong>ed <strong>in</strong> the ItemTemplate. Simply set<br />
its ID to “Discont<strong>in</strong>ued” and its Enabled property to True.<br />
Step 3: Creat<strong>in</strong>g the CategoryName Edit<strong>in</strong>g Interface<br />
The edit<strong>in</strong>g <strong>in</strong>terface <strong>in</strong> the CategoryName TemplateField’s EditItemTemplate conta<strong>in</strong>s a TextBox that displays<br />
the value of the CategoryName data field. We need to replace this <strong>with</strong> a DropDownList that lists the possible<br />
categories.<br />
Note: The Customiz<strong>in</strong>g the <strong>Data</strong> Modification Interface tutorial conta<strong>in</strong>s a more thorough and complete<br />
discussion on customiz<strong>in</strong>g a template to <strong>in</strong>clude a DropDownList as opposed to a TextBox. While the steps<br />
here are complete, they are presented tersely. For a more <strong>in</strong>depth look at creat<strong>in</strong>g and configur<strong>in</strong>g the<br />
categories DropDownList, refer back to the Customiz<strong>in</strong>g the <strong>Data</strong> Modification Interface tutorial.<br />
Drag a DropDownList from the Toolbox onto the CategoryName TemplateField’s ItemTemplate, sett<strong>in</strong>g its ID to<br />
Categories. At this po<strong>in</strong>t we would usually def<strong>in</strong>e the DropDownLists’s data source through its smart tag,<br />
creat<strong>in</strong>g a new Object<strong>Data</strong>Source. However, this will add the Object<strong>Data</strong>Source <strong>with</strong><strong>in</strong> the ItemTemplate, which<br />
will result <strong>in</strong> an Object<strong>Data</strong>Source <strong>in</strong>stance created for each GridView row. Instead, let’s create the<br />
Object<strong>Data</strong>Source outside of the GridView’s TemplateFields. End the template edit<strong>in</strong>g and drag an<br />
Object<strong>Data</strong>Source from the Toolbox onto the Designer beneath the Products<strong>Data</strong>Source Object<strong>Data</strong>Source.<br />
Name the new Object<strong>Data</strong>Source Categories<strong>Data</strong>Source and configure it to use the CategoriesBLL class’s<br />
GetCategories method.
Figure 8: Configure the Object<strong>Data</strong>Source to Use the CategoriesBLL Class<br />
9 of 22
10 of 22<br />
Figure 9: Retrieve the Category <strong>Data</strong> Us<strong>in</strong>g the GetCategories Method<br />
S<strong>in</strong>ce this Object<strong>Data</strong>Source is used merely to retrieve data, set the dropdown lists <strong>in</strong> the UPDATE and DELETE<br />
tabs to “(None)”. Click F<strong>in</strong>ish to complete the wizard.
11 of 22<br />
Figure 10: Set the DropDown Lists <strong>in</strong> the UPDATE and DELETE Tabs to “(None)”<br />
After complet<strong>in</strong>g the wizard, the Categories<strong>Data</strong>Source’s declarative markup should look like the follow<strong>in</strong>g:<br />
<br />
<br />
With the Categories<strong>Data</strong>Source created and configured, return to the CategoryName TemplateField’s<br />
ItemTemplate and, from the DropDownList’s smart tag, click on the “Choose <strong>Data</strong> Source” l<strong>in</strong>k. In the <strong>Data</strong><br />
Source Configuration wizard, select the Categories<strong>Data</strong>Source option from the first dropdown list and choose to<br />
have CategoryName used for the display and CategoryID as the value.
12 of 22<br />
Figure 11: B<strong>in</strong>d the DropDownList to the Categories<strong>Data</strong>Source<br />
At this po<strong>in</strong>t the Categories DropDownList lists all of the categories, but it does not yet automatically select the<br />
appropriate category for the product bound to the GridView row. To accomplish this we need to set the<br />
Categories DropDownList’s SelectedValue to the product’s CategoryID value. Click on the “Edit<br />
<strong>Data</strong>B<strong>in</strong>d<strong>in</strong>gs” l<strong>in</strong>k from the DropDownList’s smart tag and associate the SelectedValue property <strong>with</strong> the<br />
CategoryID data field as shown <strong>in</strong> Figure 12.
13 of 22<br />
Figure 12: B<strong>in</strong>d the Product’s CategoryID Value to the DropDownList’s SelectedValue Property<br />
One last problem rema<strong>in</strong>s: if the product doesn’t have a CategoryID value specified then the datab<strong>in</strong>d<strong>in</strong>g statement<br />
on SelectedValue will result <strong>in</strong> an exception. This is because the DropDownList conta<strong>in</strong>s only items for the<br />
categories and does not offer an option for those products that have a NULL database value for CategoryID. To<br />
remedy this, set the DropDownList’s Append<strong>Data</strong>BoundItems property to True and add a new item to the<br />
DropDownList, omitt<strong>in</strong>g the Value property from the declarative syntax. That is, make sure that the Categories<br />
DropDownList’s declarative syntax looks like the follow<strong>in</strong>g:<br />
<br />
Select One <br />
<br />
Note how the “ Select One ” has its Value attribute explicitly set to an empty<br />
str<strong>in</strong>g. Refer back to the Customiz<strong>in</strong>g the <strong>Data</strong> Modification Interface tutorial for a more thorough discussion on<br />
why this additional DropDownList item is needed to handle the NULL case and why assignment of the Value<br />
property to an empty str<strong>in</strong>g is essential.<br />
Note: There is a potential performance and scalability issue here that is worth mention<strong>in</strong>g. S<strong>in</strong>ce each row<br />
has a DropDownList that uses the Categories<strong>Data</strong>Source as its data source, the CategoriesBLL class’s<br />
GetCategories method will be called n times per page visit, where n is the number of rows <strong>in</strong> the<br />
GridView. These n calls to GetCategories result <strong>in</strong> n queries to the database. This impact on the database<br />
could be lessened by cach<strong>in</strong>g the returned categories either <strong>in</strong> a perrequest cache or through the Cach<strong>in</strong>g<br />
Layer us<strong>in</strong>g a SQL cach<strong>in</strong>g dependency or a very short timebased expiry. For more <strong>in</strong>formation on the perrequest<br />
cach<strong>in</strong>g option, see HttpContext.Items – a PerRequest Cache Store.<br />
Step 4: Complet<strong>in</strong>g the Edit<strong>in</strong>g Interface
14 of 22<br />
We’ve made a number of changes to the GridView’s templates <strong>with</strong>out paus<strong>in</strong>g to view our progress. Take a<br />
moment to view our progress through a browser. As Figure 13 shows, each row is rendered us<strong>in</strong>g its<br />
ItemTemplate, which conta<strong>in</strong>s the cell’s edit<strong>in</strong>g <strong>in</strong>terface.<br />
Figure 13: Each GridView Row is Editable<br />
There are a few m<strong>in</strong>or formatt<strong>in</strong>g issues that we should take care of at this po<strong>in</strong>t. First, note that the UnitPrice<br />
value conta<strong>in</strong>s four decimal po<strong>in</strong>ts. To fix this, return to the UnitPrice TemplateField’s ItemTemplate and, from<br />
the TextBox’s smart tag, click on the “Edit <strong>Data</strong>B<strong>in</strong>d<strong>in</strong>gs” l<strong>in</strong>k. Next, specify that the Text property should be<br />
formatted as a number.
15 of 22<br />
Figure 14: Format the Text Property as a Number<br />
Second, let’s center the checkbox <strong>in</strong> the Discont<strong>in</strong>ued column (rather than hav<strong>in</strong>g it leftaligned). Click on “Edit<br />
Columns” from the GridView’s smart tag and select the Discont<strong>in</strong>ued TemplateField from the list of fields <strong>in</strong> the<br />
bottom left corner. Drill down <strong>in</strong>to ItemStyle and set the HorizontalAlign property to Center as shown <strong>in</strong><br />
Figure 15.
16 of 22<br />
Figure 15: Center the Discont<strong>in</strong>ued CheckBox<br />
Next, add a ValidationSummary control to the page and set its ShowMessageBox property to True and its<br />
ShowSummary property to False. Also add the Button Web controls that, when clicked, will update the user’s<br />
changes. Specifically, add two Button Web controls, one above the GridView and one below it, sett<strong>in</strong>g both<br />
controls’ Text properties to “Update Products”.<br />
S<strong>in</strong>ce the GridView’s edit<strong>in</strong>g <strong>in</strong>terface is def<strong>in</strong>ed <strong>in</strong> its TemplateFields’ ItemTemplates, the EditItemTemplates<br />
are superfluous and may be deleted.<br />
After mak<strong>in</strong>g the above mentioned formatt<strong>in</strong>g changes, add<strong>in</strong>g the Button controls, and remov<strong>in</strong>g the unnecessary<br />
EditItemTemplates, your page’s declarative syntax should look like the follow<strong>in</strong>g:<br />
<br />
<br />
<br />
<br />
<br />
<br />
<br />
<br />
<br />
17 of 22<br />
ErrorMessage="You must provide the product's name."<br />
runat="server">*<br />
<br />
<br />
<br />
<br />
<br />
Select One <br />
<br />
<br />
<br />
<br />
<br />
$<br />
*<br />
<br />
<br />
<br />
<br />
<br />
<br />
<br />
<br />
<br />
<br />
<br />
<br />
<br />
<br />
<br />
<br />
<br />
<br />
18 of 22<br />
Figure 16 shows this page when viewed through a browser after the Button Web controls have been added and the<br />
formatt<strong>in</strong>g changes made.<br />
Figure 16: The Page Now Includes Two “Update Products” Buttons<br />
Step 5: Updat<strong>in</strong>g the Products<br />
When a user visits this page they will make their modifications and then click one of the two “Update Products”<br />
buttons. At that po<strong>in</strong>t we need to somehow save the userentered values for each row <strong>in</strong>to a Products<strong>Data</strong>Table<br />
<strong>in</strong>stance and then pass that to a BLL method that will then pass that Products<strong>Data</strong>Table <strong>in</strong>stance to the DAL’s<br />
UpdateWithTransaction method. The UpdateWithTransaction method, which we created <strong>in</strong> the preced<strong>in</strong>g<br />
tutorial, ensures that the batch of changes will be updated as an atomic operation.<br />
Create a method named <strong>Batch</strong>Update <strong>in</strong> <strong>Batch</strong>Update.aspx.vb and add the follow<strong>in</strong>g code:<br />
Private Sub <strong>Batch</strong>Update()<br />
' Enumerate the GridView's Rows collection and create a ProductRow<br />
Dim productsAPI As New ProductsBLL()<br />
Dim products As Northw<strong>in</strong>d.Products<strong>Data</strong>Table = productsAPI.GetProducts()<br />
For Each gvRow As GridViewRow In ProductsGrid.Rows<br />
' F<strong>in</strong>d the ProductsRow <strong>in</strong>stance <strong>in</strong> products that maps to gvRow<br />
Dim productID As Integer = _<br />
Convert.ToInt32(ProductsGrid.<strong>Data</strong>Keys(gvRow.RowIndex).Value)
19 of 22<br />
Dim product As Northw<strong>in</strong>d.ProductsRow = products.F<strong>in</strong>dByProductID(productID)<br />
If product IsNot Noth<strong>in</strong>g Then<br />
' Programmatically access the form field elements <strong>in</strong> the<br />
' current GridViewRow<br />
Dim productName As TextBox = _<br />
CType(gvRow.F<strong>in</strong>dControl("ProductName"), TextBox)<br />
Dim categories As DropDownList = _<br />
CType(gvRow.F<strong>in</strong>dControl("Categories"), DropDownList)<br />
Dim unitPrice As TextBox = _<br />
CType(gvRow.F<strong>in</strong>dControl("UnitPrice"), TextBox)<br />
Dim discont<strong>in</strong>ued As CheckBox = _<br />
CType(gvRow.F<strong>in</strong>dControl("Discont<strong>in</strong>ued"), CheckBox)<br />
' Assign the userentered values to the current ProductRow<br />
product.ProductName = productName.Text.Trim()<br />
If categories.SelectedIndex = 0 Then<br />
product.SetCategoryIDNull()<br />
Else<br />
product.CategoryID = Convert.ToInt32(categories.SelectedValue)<br />
End If<br />
If unitPrice.Text.Trim().Length = 0 Then<br />
product.SetUnitPriceNull()<br />
Else<br />
product.UnitPrice = Convert.ToDecimal(unitPrice.Text)<br />
End If<br />
product.Discont<strong>in</strong>ued = discont<strong>in</strong>ued.Checked<br />
End If<br />
Next<br />
' Now have the BLL update the products data us<strong>in</strong>g a transaction<br />
productsAPI.UpdateWithTransaction(products)<br />
End Sub<br />
This method starts out by gett<strong>in</strong>g all of the products back <strong>in</strong> a Products<strong>Data</strong>Table via a call to the BLL’s<br />
GetProducts method. It then enumerates the ProductGrid GridView’s Rows collection. The Rows collection<br />
conta<strong>in</strong>s a GridViewRow <strong>in</strong>stance for each row displayed <strong>in</strong> the GridView. S<strong>in</strong>ce we are show<strong>in</strong>g at most ten rows<br />
per page, the GridView’s Rows collection will have no more than ten items.<br />
For each row the ProductID is grabbed from the <strong>Data</strong>Keys collection and the appropriate ProductsRow is selected<br />
from the Products<strong>Data</strong>Table. The four TemplateField <strong>in</strong>put controls are programmatically referenced and their<br />
values assigned to the ProductsRow <strong>in</strong>stance’s properties. After each GridView row’s values have been used to<br />
update the Products<strong>Data</strong>Table, it’s passed to the BLL’s UpdateWithTransaction method which, as we saw <strong>in</strong><br />
the preced<strong>in</strong>g tutorial, simply calls down <strong>in</strong>to the DAL’s UpdateWithTransaction method.<br />
The batch update algorithm used for this tutorial updates each row <strong>in</strong> the Products<strong>Data</strong>Table that corresponds to<br />
a row <strong>in</strong> the GridView, regardless of whether the product’s <strong>in</strong>formation has been changed. While such bl<strong>in</strong>d<br />
updates aren’t usually a performance issue, they can lead to superfluous records if you’re audit<strong>in</strong>g changes to the<br />
database table. Back <strong>in</strong> the Perform<strong>in</strong>g <strong>Batch</strong> Updates tutorial we explored a batch updat<strong>in</strong>g <strong>in</strong>terface <strong>with</strong> the<br />
<strong>Data</strong>List and added code that would only update those records that were actually modified by the user. Feel free to<br />
use the techniques from Perform<strong>in</strong>g <strong>Batch</strong> Updates to update the code <strong>in</strong> this tutorial, if desired.<br />
Note: When b<strong>in</strong>d<strong>in</strong>g the data source to the GridView through its smart tag, Visual Studio automatically<br />
assigns the data source’s primary key value(s) to the GridView’s <strong>Data</strong>KeyNames property. If you did not b<strong>in</strong>d<br />
the Object<strong>Data</strong>Source to the GridView through the GridView’s smart tag as outl<strong>in</strong>ed <strong>in</strong> Step 1, then you will
20 of 22<br />
need to manually set the GridView’s <strong>Data</strong>KeyNames property to “ProductID” <strong>in</strong> order to access the<br />
ProductID value for each row through the <strong>Data</strong>Keys collection.<br />
The code used <strong>in</strong> <strong>Batch</strong>Update is similar to that used <strong>in</strong> the BLL’s UpdateProduct methods, the ma<strong>in</strong> difference<br />
be<strong>in</strong>g that <strong>in</strong> the UpdateProduct methods only a s<strong>in</strong>gle ProductRow <strong>in</strong>stance is retrieved from the architecture.<br />
The code that assigns the properties of the ProductRow is the same between the UpdateProducts methods and the<br />
code <strong>with</strong><strong>in</strong> the For Each loop <strong>in</strong> <strong>Batch</strong>Update, as is the overall pattern.<br />
To complete this tutorial, we need to have the <strong>Batch</strong>Update method <strong>in</strong>voked when either of the “Update Products”<br />
buttons is clicked. Create event handlers for the Click events of these two Button controls and add the follow<strong>in</strong>g<br />
code <strong>in</strong> the event handlers:<br />
<strong>Batch</strong>Update()<br />
ClientScript.RegisterStartupScript(Me.GetType(), "message", _<br />
"alert('The products have been updated.');", True)<br />
First a call is made to <strong>Batch</strong>Update. Next, the ClientScript property is used to <strong>in</strong>ject JavaScript that will display<br />
a messagebox that reads “The products have been updated.”<br />
Take a m<strong>in</strong>ute to test out this code. Visit <strong>Batch</strong>Update.aspx through a browser, edit a number of rows, and click<br />
one of the “Update Products” buttons. Assum<strong>in</strong>g there are no <strong>in</strong>put validation errors, you should see a messagebox<br />
that reads “The products have been updated.” To verify the atomicity of the update, consider add<strong>in</strong>g a random<br />
CHECK constra<strong>in</strong>t, like one that disallows UnitPrice values of “1234.56”. Then from <strong>Batch</strong>Update.aspx, edit a<br />
number of records, mak<strong>in</strong>g sure to set one of the product’s UnitPrice value to the forbidden value (“1234.56”).<br />
This should result <strong>in</strong> an error when click<strong>in</strong>g “Update Products” <strong>with</strong> the other changes dur<strong>in</strong>g that batch operation<br />
rolled back to their orig<strong>in</strong>al values.<br />
An Alternative <strong>Batch</strong>Update Method<br />
The <strong>Batch</strong>Update method we just exam<strong>in</strong>ed retrieves all of the products from the BLL’s GetProducts method and<br />
then updates just those records that appear <strong>in</strong> the GridView. This approach is ideal if the GridView does not use<br />
pag<strong>in</strong>g, but if it does, there may be hundreds, thousands, or tens of thousands of products, but only ten rows <strong>in</strong> the<br />
GridView. In such a case, gett<strong>in</strong>g all of the products from the database only to modify 10 of them is less than ideal.<br />
For those types of situations, consider us<strong>in</strong>g the follow<strong>in</strong>g <strong>Batch</strong>UpdateAlternate method <strong>in</strong>stead:<br />
Private Sub <strong>Batch</strong>UpdateAlternate()<br />
' Enumerate the GridView's Rows collection and create a ProductRow<br />
Dim productsAPI As New ProductsBLL()<br />
Dim products As New Northw<strong>in</strong>d.Products<strong>Data</strong>Table()<br />
For Each gvRow As GridViewRow In ProductsGrid.Rows<br />
' Create a new ProductRow <strong>in</strong>stance<br />
Dim productID As Integer = _<br />
Convert.ToInt32(ProductsGrid.<strong>Data</strong>Keys(gvRow.RowIndex).Value)<br />
Dim currentProduct<strong>Data</strong>Table As Northw<strong>in</strong>d.Products<strong>Data</strong>Table = _<br />
productsAPI.GetProductByProductID(productID)<br />
If currentProduct<strong>Data</strong>Table.Rows.Count > 0 Then<br />
Dim product As Northw<strong>in</strong>d.ProductsRow = currentProduct<strong>Data</strong>Table(0)<br />
Dim productName As TextBox = _<br />
CType(gvRow.F<strong>in</strong>dControl("ProductName"), TextBox)
21 of 22<br />
Dim categories As DropDownList = _<br />
CType(gvRow.F<strong>in</strong>dControl("Categories"), DropDownList)<br />
Dim unitPrice As TextBox = _<br />
CType(gvRow.F<strong>in</strong>dControl("UnitPrice"), TextBox)<br />
Dim discont<strong>in</strong>ued As CheckBox = _<br />
CType(gvRow.F<strong>in</strong>dControl("Discont<strong>in</strong>ued"), CheckBox)<br />
' Assign the userentered values to the current ProductRow<br />
product.ProductName = productName.Text.Trim()<br />
If categories.SelectedIndex = 0 Then<br />
product.SetCategoryIDNull()<br />
Else<br />
product.CategoryID = Convert.ToInt32(categories.SelectedValue)<br />
End If<br />
If unitPrice.Text.Trim().Length = 0 Then<br />
product.SetUnitPriceNull()<br />
Else<br />
product.UnitPrice = Convert.ToDecimal(unitPrice.Text)<br />
End If<br />
product.Discont<strong>in</strong>ued = discont<strong>in</strong>ued.Checked<br />
' Import the ProductRow <strong>in</strong>to the products <strong>Data</strong>Table<br />
products.ImportRow(product)<br />
End If<br />
Next<br />
' Now have the BLL update the products data us<strong>in</strong>g a transaction<br />
productsAPI.UpdateProductsWithTransaction(products)<br />
End Sub<br />
<strong>Batch</strong>MethodAlternate starts by creat<strong>in</strong>g a new empty Products<strong>Data</strong>Table named products. It then steps<br />
through the GridView’s Rows collection and for each row gets the particular product <strong>in</strong>formation us<strong>in</strong>g the BLL’s<br />
GetProductByProductID(productID) method. The retrieved ProductsRow <strong>in</strong>stance has its properties updated <strong>in</strong><br />
the same fashion as <strong>Batch</strong>Update, but after updat<strong>in</strong>g the row it is imported <strong>in</strong>to the products<br />
Products<strong>Data</strong>Table via the <strong>Data</strong>Table’s ImportRow(<strong>Data</strong>Row) method.<br />
After the For Each loop completes, products conta<strong>in</strong>s one ProductsRow <strong>in</strong>stance for each row <strong>in</strong> the GridView.<br />
S<strong>in</strong>ce each of the ProductsRow <strong>in</strong>stances have been added to the products (<strong>in</strong>stead of updated), if we bl<strong>in</strong>dly pass<br />
it to the UpdateWithTransaction method the ProductsTableAdatper will try to <strong>in</strong>sert each of the records <strong>in</strong>to<br />
the database. Instead, we need to specify that each of these rows has been modified (not added).<br />
This can be accomplished by add<strong>in</strong>g a new method to the BLL named UpdateProductsWithTransaction.<br />
UpdateProductsWithTransaction, shown below, sets the RowState of each of the ProductsRow <strong>in</strong>stances <strong>in</strong> the<br />
Products<strong>Data</strong>Table to Modified and then passes the Products<strong>Data</strong>Table to the DAL’s<br />
UpdateWithTransaction method.<br />
Public Function UpdateProductsWithTransaction _<br />
(ByVal products As Northw<strong>in</strong>d.Products<strong>Data</strong>Table) As Integer<br />
' Mark each product as Modified<br />
products.AcceptChanges()<br />
For Each product As Northw<strong>in</strong>d.ProductsRow In products<br />
product.SetModified()<br />
Next<br />
' Update the data via a transaction
22 of 22<br />
Return UpdateWithTransaction(products)<br />
End Function<br />
Summary<br />
The GridView provides built<strong>in</strong> perrow edit<strong>in</strong>g capabilities, but lacks support for creat<strong>in</strong>g fully editable <strong>in</strong>terfaces.<br />
As we saw <strong>in</strong> this tutorial, such <strong>in</strong>terfaces are possible, but require a bit of work. To create a GridView where every<br />
row is editable, we need to convert the GridView’s fields <strong>in</strong>to TemplateFields and def<strong>in</strong>e the edit<strong>in</strong>g <strong>in</strong>terface<br />
<strong>with</strong><strong>in</strong> the ItemTemplates. Additionally, “Update All”type Button Web controls must be added to the page,<br />
separate from the GridView. These Buttons’ Click event handlers need to enumerate the GridView’s Rows<br />
collection, store the changes <strong>in</strong> a Products<strong>Data</strong>Table, and pass the updated <strong>in</strong>formation <strong>in</strong>to the appropriate BLL<br />
method.<br />
In the next tutorial we’ll see how to create an <strong>in</strong>terface for batch delet<strong>in</strong>g. In particular, each GridView row will<br />
<strong>in</strong>clude a checkbox and <strong>in</strong>stead of “Update All”type buttons, we’ll have “Delete Selected Rows” buttons.<br />
Happy Programm<strong>in</strong>g!<br />
About the Author<br />
Scott Mitchell, author of seven <strong>ASP</strong>/<strong>ASP</strong>.<strong>NET</strong> books and founder of 4GuysFromRolla.com, has been work<strong>in</strong>g <strong>with</strong><br />
Microsoft Web technologies s<strong>in</strong>ce 1998. Scott works as an <strong>in</strong>dependent consultant, tra<strong>in</strong>er, and writer. His latest<br />
book is Sams Teach Yourself <strong>ASP</strong>.<strong>NET</strong> <strong>2.0</strong> <strong>in</strong> 24 Hours. He can be reached at mitchell@4GuysFromRolla.com. or<br />
via his blog, which can be found at http://ScottOnWrit<strong>in</strong>g.<strong>NET</strong>.<br />
Special Thanks To…<br />
This tutorial series was reviewed by many helpful reviewers. Lead reviewers for this tutorial were Teresa Murphy<br />
and David Suru. Interested <strong>in</strong> review<strong>in</strong>g my upcom<strong>in</strong>g MSDN articles If so, drop me a l<strong>in</strong>e at<br />
mitchell@4GuysFromRolla.com.