Installation instructions: AKRAPOVIC EVOLUTION EXHAUST ...
Installation instructions: AKRAPOVIC EVOLUTION EXHAUST ...
Installation instructions: AKRAPOVIC EVOLUTION EXHAUST ...

You also want an ePaper? Increase the reach of your titles
YUMPU automatically turns print PDFs into web optimized ePapers that Google loves.
<strong>Installation</strong> <strong>instructions</strong>:<br />
*350157*<br />
<strong>AKRAPOVIC</strong> <strong>EVOLUTION</strong> <strong>EXHAUST</strong> SYSTEM<br />
for the<br />
YAMAHA YZ, WR 250 F (2004, 2005)<br />
Congratulations on purchasing an Akrapovic exhaust system. Please read these installation <strong>instructions</strong> carefully. If<br />
you have any trouble installing the system please contact your authorized dealer!<br />
IMPORTANT INFORMATION<br />
Exclusion of Certain Liability<br />
1. The manufacturer, importer or dealer shall not be liable for any incidental damage including personal injury or any<br />
other damages caused by improper installation or operation of the Akrapovic exhaust system. When installing the<br />
Akrapovic exhaust system be careful that the exhaust system does not touch other parts sensitive to high<br />
temperature.<br />
2. Akrapovic makes no representation or warranties with regard to damage caused by the improper installation, use and<br />
maintenance of the Akrapovic exhaust system. The warranty is limited to defects recognized by our technical<br />
department and to normal use, and excludes items subject to normal wear (gaskets and damping wool). The<br />
guarantee is void in case of accident, modification, improper or competition use.<br />
3. Do not attempt to install the Akrapovic exhaust system on a motorcycle for which it was not made or tested by<br />
Akrapovic.<br />
4. When the exhaust system gets very hot during operation, be careful not to burn yourself on the exhaust system or<br />
parts which are in direct contact with it, even when the motor is not running. Also protect other people, especially<br />
children, from the injuries mentioned above.<br />
5. In some cases Akrapovic exhaust system kits contain chemical products (ceramic anti-seizing grease; bolt sealant).<br />
Handle with care, do not inhale or swallow. Avoid excessive contact with skin, eyes or mucous membranes. Keep out<br />
of reach of children.<br />
6. Technical specifications of Akrapovic exhaust systems and related products subject to change without notice.<br />
Trademarks<br />
Akrapovic website<br />
Copyright<br />
Symbols<br />
The Akrapovic Exhaust System Technology logo is a registered trademark of Akrapovic d. d.<br />
Information about Akrapovic exhaust systems and related products is available on the Akrapovic website at:<br />
http://www.akrapovic-exhaust.com/<br />
No part of the Akrapovic exhaust system or its documentation may be reproduced or distributed in any form or by any<br />
means without the prior written authorization of the Akrapovic company.<br />
Akrapovic d. d. All rights reserved.<br />
The following symbols are used throughout these installation <strong>instructions</strong>:<br />
! CAUTION OR WARNING INSTALLATION TIP<br />
NAV - 155 1
INSTALLATION INSTRUCTIONS<br />
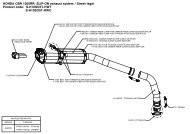
BEFORE INSTALLING CHECK SCHEMATIC OF THE <strong>EXHAUST</strong> SYSTEM!<br />
!<br />
!<br />
!<br />
IF ANY ITEMS IN THE <strong>AKRAPOVIC</strong> <strong>EXHAUST</strong> SYSTEM PACKAGE ARE MISSING PLEASE CONTACT YOUR<br />
AUTHORIZED DEALER. KEEP THE SCHEMATIC FOR FUTURE REFERENCE.<br />
THESE INSTALLATION INSTRUCTIONS MUST BE READ CAREFULLY IN ORDER TO ENSURE PROPER<br />
INSTALLATION AND OPERATION OF THE <strong>AKRAPOVIC</strong> <strong>EXHAUST</strong> SYSTEM.<br />
THE <strong>EXHAUST</strong> SYSTEM CAN BE EXTREMELY HOT. ALLOW THE MOTORCYCLE TO COOL DOWN<br />
BEFORE BEGINNING INSTALLATION.<br />
WE ADVISE YOU TO LEAVE INSTALLATION TO A QUALIFIED SERVICEMAN. IMPROPER INSTALLATION MAY<br />
RESULT IN A SHORTER LIFETIME OF THE <strong>EXHAUST</strong> SYSTEM AND/OR DAMAGE TO THE MOTORCYCLE.<br />
REMOVAL OF STOCK <strong>EXHAUST</strong> SYSTEM<br />
1. put the motorcycle on a side stand, we recommend a racing stand<br />
2. for easier access to the muffler remove the rear right panel (Figure 1)<br />
3. unscrew the bolt from the metal clamp at the link pipe – header tube joint (Figure 2)<br />
4. unscrew and remove the bolt from the metal bracket for the link pipe (Figure 3)<br />
5. unscrew and remove the bolt from the muffler metal bracket (Figure 4)<br />
6. remove the muffler together with the link pipe (Figure 5)<br />
7. unscrew and remove the bolts on the flange of header tube and remove the stock header tube (Figure 6, 7)<br />
INSTALLATION OF THE <strong>AKRAPOVIC</strong> <strong>EVOLUTION</strong> <strong>EXHAUST</strong> SYSTEM<br />
installing the header tube:<br />
1. set up the inner sleeve together with the flange and springs; make sure they are correctly oriented; use stock gasket; hand<br />
tighten the flange; (Figure 8, 9)<br />
2. correctly position and install the Akrapovic carbon-fiber heat shield onto the header tube; make sure the heat / distance<br />
washers are correctly installed (if Akrapovic carbon-fiber heat shield is optional) (Figure 10, 11, 12)<br />
3. install the header tube (Figure 13)<br />
4. attach the springs (Figure 14)<br />
installing the link pipe with welded muffler:<br />
1. coat the interior side of the input of the titanium link pipe with Akrapovic ceramic anti-seizing grease (white tube)<br />
2. correctly position the muffler with the link pipe and slide them onto the header tube (Figure 15)<br />
3. hand tighten the bolt from the link pipe bracket (Figure 16)<br />
4. attach the spring at the link pipe – header tube joint (Figure 17)<br />
5. correctly position the carbon-fiber clamp and slide it onto the muffler - bear in mind the left offset of the carbon-fiber clamp<br />
viewed from the rear. WARNING: open the clamp to slightly wider than the diameter of the outer sleeve of the muffler – do<br />
not scrape it along the muffler outer sleeve! (Figure 18)<br />
6. attach the carbon-fiber clamp to the stock chassis hanging bracket – use the bolts, washer and spacers supplied in the<br />
Akrapovic kit. Do not fully tighten. Make sure the additional parts from the Akrapovic kit are correctly installed. (Figure 19)<br />
7. make sure the link pipe and header tubes are not touching the engine or frame<br />
final installation:<br />
1. tighten fully the bolts of the muffler clamp, link pipe bracket and header tube flange (Figure 20, 21, 22, 23)<br />
2. clean grease spots:<br />
a. muffler – titanium outer sleeve, titanium header tube and titanium link pipe: use a soft cloth sprayed with a multipurpose<br />
spray lubricant (WD-40 or equivalent)<br />
Cleaning will prevent spots from burning onto the surface. Do not use aggressive chemical cleaners, because they can<br />
damage the sticker.<br />
3. reattach the rear panel (Figure 24)<br />
4. WARNING: after running engine for 30 minutes, tighten the bolts on the Akrapovic carbon-fiber heat shield !<br />
5. position of the correctly installed Akrapovic <strong>EVOLUTION</strong> system (Figure 25)<br />
6. Check the operation of the brakes and suspension. Make sure all the bolts are sufficiently tightened. In case the<br />
exhaust system touches the cowling or other parts repeat the adjustment of the exhaust system or contact your<br />
authorized dealer.<br />
! IT IS NORMAL IF WHITE SMOKE COMES OUT OF THE MUFFLER ON FIRST OPERATION.<br />
! DO NOT STAND BEHIND THE MUFFLER ON FIRST OPERATION.<br />
!<br />
DO NOT USE AUTOMOTIVE WHEEL CLEANERS OR ANY CLEANING PRODUCTS WHICH CONTAIN ACIDIC<br />
ADDITIVES TO CLEAN <strong>AKRAPOVIC</strong> <strong>EXHAUST</strong> SYSTEMS.<br />
NAV - 155 2
MAINTENANCE OF THE <strong>AKRAPOVIC</strong> <strong>EXHAUST</strong> SYSTEM<br />
1. Clean the titanium muffler outer sleeve with a multi-purpose spray lubricant (WD-40 or equivalent ). Do not use aggressive<br />
chemical cleaners, because they can damage the sticker. A change in the color of the exhaust system is normal due to the<br />
high temperatures.<br />
2. The wearing out of the muffler silencing material depends on the type of the motor and riding style. Contact your<br />
dealer/serviceman if visible changes appear on muffler's outer sleeve or the noise level is increased.<br />
3. Periodically make sure all the bolts and springs are sufficiently tight.<br />
Photos:<br />
Figure 1 Figure 2<br />
Figure3 Figure 4<br />
Figure 5 Figure 6<br />
NAV - 155 3
Figure 7 Figure 8<br />
Figure 9<br />
Figure 10<br />
Figure 11 Figure 12<br />
Figure 13 Figure 14<br />
NAV - 155 4
Figure 15<br />
Figure 16<br />
Figure 17<br />
Figure 18<br />
Figure 19<br />
Figure 20<br />
Figure 21 Figure 22<br />
NAV - 155 5
Figure 23 Figure 24<br />
Figure 25<br />
NAV - 155 6
Figure 23 Figure 24<br />
Figure 25<br />
NAV - 155 6