Installation Instructions
Installation Instructions
Installation Instructions
- No tags were found...

Create successful ePaper yourself
Turn your PDF publications into a flip-book with our unique Google optimized e-Paper software.
<strong>Installation</strong><br />
<strong>Instructions</strong><br />
Dynarail ®<br />
Modular<br />
Handrail<br />
System<br />
Corrosion Resistant<br />
Nonconductive<br />
Fire Retardant<br />
High Strength-To-Weight Ratio<br />
Long, Low Maintenance Life<br />
Meets OSHA, BOCA & Other<br />
Building Code Requirements<br />
High Performance Composite Solutions
Simplified Handrail <strong>Instructions</strong><br />
TOOLS REQUIRED<br />
The Dynarail ® Modular Handrail System<br />
<strong>Installation</strong> <strong>Instructions</strong> have been<br />
designed to combine the best in fiberglass<br />
reinforced plastic (FRP) handrail with<br />
simplicity of installation. Fibergrate has<br />
made every attempt to provide clear and<br />
thorough instructions for installing this<br />
product. If you have any further questions, or<br />
need additional information, do not hesitate<br />
to contact Fibergrate at 800/527-4043.<br />
By following these simple instructions, you<br />
should find installation of your handrail<br />
system quick and easy.<br />
□ Drill □ Wrenches -<br />
□ Bits -<br />
▫ 7/16” (2 each)<br />
▫ 1/8” (for rivets)<br />
▫ 9/16” (2 each)<br />
▫ 3/16” (for kickplate screws)<br />
□ Hack Saw<br />
▫ 9/16” & 11/16” (for connection bolts)<br />
□ 25’ Tape Measure<br />
□ Level<br />
□ Sealing Kit<br />
□ Bonding (Epoxy) Kit(s) (one for every 15 posts)<br />
□ Stir Sticks<br />
□ “C” Clamps<br />
□ Sandpaper (80 grit)<br />
NOTE: Cuts and drilled holes must be sealed to maintain corrosion protection.<br />
QUICK TIPS FOR INSTALLING HANDRAIL<br />
1. Layout posts and post installation kits as required. Post installation drawings for various conditions<br />
are shown under Section I - Post <strong>Installation</strong> Methods. Install posts.<br />
2. After installation of the posts, follow the instructions shown in Section II - Rail <strong>Installation</strong> for<br />
installation of toprails, midrails and kickplates. If installing rail extensions or returns, see Section III<br />
- Splices & Connections. Take care at the rail-to-post, rail splice and turns (see Section III - Splices<br />
& Connections for details) to correctly prepare the material surface and to correctly mix and apply<br />
the epoxy. Correct bond joints are important to enable the handrail to carry the required loads.<br />
3. Attach endpost and rail endcaps at the required locations. (See Section III - Splices & Connections<br />
for details).<br />
IMPORTANT<br />
It is the installer’s responsibility to carefully follow fabrication and installation plans and instructions to<br />
ensure design performance characteristics of the Dynarail ® handrail system. The installer could be liable for<br />
claims that result from improper installation.
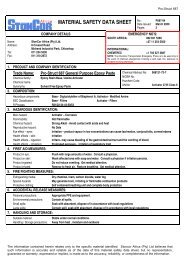
Section I - Post <strong>Installation</strong> Methods<br />
FOR INSTALLATION CONDITIONS NOT SHOWN - CONTACT FIBERGRATE<br />
DRAWING A - POST TO<br />
FRP OR STEEL CHANNEL<br />
DRAWING B - POST TO<br />
STEEL PLATE ON STEEL BEAM<br />
DRAWING C - POST TO FRP OR<br />
STEEL BEAM OR CHANNEL WITH<br />
FRP SPACERS<br />
DRAWING D - POST TO STEEL<br />
ANGLE ON FRP OR STEEL BEAM<br />
DRAWING E - REMOVABLE POST<br />
TO HLU ANGLE ON FRP OR<br />
STEEL BEAM<br />
DRAWING F -<br />
SIDE-MOUNTED POST<br />
DRAWING G -<br />
EMBEDDED POST<br />
DRAWING H - TOP MOUNT<br />
STEEL STANCHION BASE<br />
DRAWING I - TOP MOUNT<br />
FRP STANCHION BASE<br />
CONCRETE ANCHOR BOLT LOADS<br />
Drawing F Drawing H Drawing I<br />
OSHA (200 lb) 1886 lb 2584 lb 2688 lb<br />
UBC (50 lb/ft) 2829 lb 3876 lb 4032 lb
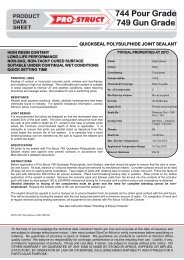
Section II - Rail <strong>Installation</strong><br />
INSTALLING HORIZONTAL RAILS TO POSTS<br />
1. Cut rails and kickplate to length.<br />
2. Use level to make posts vertical and tighten attachment bolts.<br />
3. Dry fit toprail into tops of posts and adjust to proper location.<br />
Mark all post/rail intersections on sides of toprail.<br />
4. Slide toprail to the side enough to sand off glossy surfaces of<br />
marked post/rail intersections using an 80 grit sandpaper.<br />
5. Apply properly mixed epoxy to sanded surfaces of toprail<br />
and reinstall toprail into post tops.<br />
6. Drill a hole using a 1/8” bit through the center of the toprail/<br />
post intersections. Install 2 rivets (one on each side) at all<br />
posts to secure the toprail while epoxy cures.<br />
7. Dry fit midrail into square holes of posts and slide into<br />
position. Mark all rail/post intersections on all sides of<br />
midrail.<br />
8. Slide rail to side and sand off glossy surfaces of marked post/<br />
rail intersections using an 80 grit sandpaper.<br />
9. Apply epoxy to the sanded surfaces of midrail and return the<br />
rail to its proper location.<br />
10. Drill a hole using a 1/8” bit through the center of the midrail/<br />
post intersections. Install 2 rivets (one on each side) at all<br />
posts to secure the midrail while epoxy cures.<br />
11. Align bottom of kickplate 1/4” above walking surface.<br />
12. Drill 3/16” hole through center of kickplate at posts.<br />
13. Install kickplate to posts using 1/4” self-tapping screws. Be<br />
careful not to overtorque and strip the screws.<br />
DRAWING J - HORIZONTAL RAIL<br />
INSTALLATION<br />
DRAWING K - STAIRWAY WORK LINE (OSHA)<br />
INSTALLING INCLINED RAILS TO POSTS<br />
1. Cut rails to length.<br />
2. Slide midrail through inclined posts.<br />
3. Mount post(s) to stairway stringer with toprail 32” high as<br />
measured from the work line (see Drawing K).<br />
4. Use level to make posts vertical and tighten attachment bolts.<br />
5. Slide toprail down into tops of posts. Rails should make<br />
contact with cutout in posts as shown in Drawing L.<br />
6. With rails in proper location, mark area in contact with posts.<br />
7. Slide rails to one side and sand contact areas with 80 grit<br />
sandpaper to remove glossy surface on toprail and midrail.<br />
8. Apply epoxy to midrail and toprail.<br />
9. Replace toprail onto post tops and slide midrail through<br />
posts to proper location.<br />
10. Tighten post attachment bolts.<br />
11. Drill hole using 1/8” drillbit through posts at toprail and<br />
midrail.<br />
12. Install 2 rivets (supplied) to each rail/post intersection, apply<br />
epoxy to tip of each rivet.<br />
13. Mark area of posts covered by gap cover plates and sand.<br />
14. Apply epoxy to sanded area of posts and inside of gap cover<br />
plates.<br />
15. C-clamp gap cover plates to posts until epoxy has cured.<br />
Check Codes for Specific Requirements<br />
DRAWING L - INCLINED RAIL<br />
INSTALLATION
Section III - Splices & Connections<br />
DRAWING M - RAIL SPLICE<br />
DRAWING N - ADJUSTABLE RETURN<br />
DRAWING O -<br />
HORIZONTAL RETURN<br />
DRAWING P -<br />
INCLINED RETURN<br />
DRAWING Q -<br />
90° TURN<br />
DRAWING R - ENDPOST<br />
DRAWING S - KICKPLATE SPLICE
Fibergrate Products & Services<br />
©Fibergrate Inc. 2003 883300-07/03-5.0<br />
Made in the USA<br />
Fibergrate ® Molded Grating<br />
Fibergrate molded gratings are designed to provide the ultimate in reliable performance,<br />
even in the most demanding conditions. Fibergrate offers the widest selection in the<br />
market with more than ten resins including Chemgrate CP-84 and more than twenty<br />
grating configurations available in many panel sizes and surfaces.<br />
RIGIDEX ® Moltruded ® Grating<br />
RIGIDEX Moltruded gratings are the first fiberglass gratings to combine the corrosion<br />
resistance of molded grating with the longer span capacity of pultruded grating, all at<br />
the low cost of metal gratings.<br />
Safe-T-Span ® Pultruded Industrial and Pedestrian Gratings<br />
Combining corrosion resistance, long-life and low-maintenance designs, Safe-T-Span<br />
provides unidirectional strength for industrial and pedestrian pultruded grating applications.<br />
Dynarail ® Handrail<br />
Easily assembled from durable prefabricated components or engineered to your<br />
specifications, Dynarail handrail meets or exceeds OSHA and strict building code<br />
requirements for safety and design.<br />
Dynarail ® Safety Ladder System<br />
Easily assembled on site, Dynarail safety ladder systems meet or exceed OSHA<br />
requirements. Though less costly than prefabricated ladder systems, these safety ladders<br />
provide a custom fit to the supporting structure.<br />
Dynaform ® Structural Shapes<br />
Fibergrate offers a wide range of pultruded structural components for industrial use,<br />
including bars, rods, tubes, beams, channels, leg angles and plates.<br />
Stair Solutions<br />
Fibergrate offers a wide range of slip-resistant products to meet your stair safety needs.<br />
These durable products which include treads, tread covers and covered stair treads are a<br />
long-term, cost-efficient solution for your facility.<br />
Grating Pedestals<br />
Uniquely designed adjustable single and quad head pedestals for square mesh molded<br />
grating are manufactured to provide safe and economical support for elevated flooring.<br />
Engineering and Fabrication Services<br />
Combining engineering expertise with an understanding of fiberglass applications,<br />
Fibergrate provides turnkey design and fabrication of fiberglass structures, including<br />
platforms, catwalks, stairways and test racks.<br />
Fibergrate Composite Structures Inc. believes the information contained here to be true<br />
and accurate. Fibergrate makes no warranty, expressed or implied based on this<br />
literature and assumes no responsibility for consequential or incidental damages in the<br />
use of these products and systems described, including any warranty of merchantability or<br />
fitness. Information contained here is for evaluation only.<br />
Fibergrate Composite Structures Inc.<br />
4285 Kellway Circle, Suite 224, Addison, TX 75001<br />
Phone: 800-527-4043 • Fax: 972-250-1530<br />
www.fibergrate.com • Email: info@fibergrate.com