9840 Tape Drive User's Reference Manual - Shrubbery.net
9840 Tape Drive User's Reference Manual - Shrubbery.net
9840 Tape Drive User's Reference Manual - Shrubbery.net

You also want an ePaper? Increase the reach of your titles
YUMPU automatically turns print PDFs into web optimized ePapers that Google loves.
Part Number: 95739<br />
<strong>9840</strong> <strong>Tape</strong> <strong>Drive</strong><br />
User’s <strong>Reference</strong> <strong>Manual</strong>
<strong>9840</strong> <strong>Tape</strong> <strong>Drive</strong><br />
User’s <strong>Reference</strong> <strong>Manual</strong>
Information contained in this publication is subject to change without notice. Comments concerning<br />
the contents of this publication should be directed to:<br />
Technical Information Services<br />
Storage Technology Corporation<br />
One StorageTek <strong>Drive</strong><br />
Louisville, CO 80028-2201<br />
USA<br />
© 1998, 2000 by Storage Technology Corporation, Louisville, Colorado, USA. All rights<br />
reserved. Printed in the USA.<br />
StorageTek, the signature, and Information Made Powerful are trademarks of Storage<br />
Technology Corporation. Other product names, features, and terms used in this publication are<br />
for informational purposes only and might be trademarks of Storage Technology Corporation<br />
or of other companies.<br />
ii Ninth Edition 95739
List of Pages<br />
Document Title:<br />
<strong>9840</strong> <strong>Tape</strong> <strong>Drive</strong> User’s <strong>Reference</strong> <strong>Manual</strong><br />
<strong>Manual</strong> Part Number: 95739<br />
Assembly Part Number:<br />
First Edition: November 1998, EC 112188<br />
Ninth Edition: August 2000, EC 111542<br />
This document has 176 pages, consisting of:<br />
Pages<br />
Cover<br />
Blank page<br />
Title page<br />
Copyright page (ii)<br />
iii through xxvi<br />
1-1 through 1-16<br />
2-1 through 2-8<br />
3-1 through 3-8<br />
4-1 through 4-32<br />
5-1 through 5-14<br />
6-1 through 6-36<br />
A-1 through A-8<br />
B-1 through B-2<br />
Glossary-1 through Glossary-6<br />
Index-1 through Index-14<br />
Reader’s Comment Form<br />
Business Reply Mailer<br />
Blank Page<br />
Back Cover<br />
Disposition<br />
95739 Ninth Edition iii
Summary of Changes<br />
The following table shows the revision history and summary of the changes for this<br />
publication.<br />
EC # Date Edition Description<br />
112188 10/98 First Initial release.<br />
113499 02/99 Second See this edition for a description of changes.<br />
112275 04/99 Third See this edition for a description of changes.<br />
112338 09/99 Fourth See this edition for a description of changes.<br />
112350 11/99 Fifth See this edition for a description of changes.<br />
111457 03/00 Sixth See this edition for a description of changes.<br />
111488 05/00 Seventh See this edition for a description of changes.<br />
111523 08/00 Eighth Updated menu illustrations.<br />
Updated firmware information for VolSafe.<br />
111542 08/00 Ninth Added a warranty statement for VolSafe.<br />
iv Ninth Edition 95739
Contents<br />
List of Pages . . . . . . . . . . . . . . . . . . . . . . . . . . . . . . . . . . . . . . . . . . . . iii<br />
Summary of Changes . . . . . . . . . . . . . . . . . . . . . . . . . . . . . . . . . . . . . iv<br />
Contents . . . . . . . . . . . . . . . . . . . . . . . . . . . . . . . . . . . . . . . . . . . . . . . . v<br />
Figures . . . . . . . . . . . . . . . . . . . . . . . . . . . . . . . . . . . . . . . . . . . . . . . . xi<br />
Tables . . . . . . . . . . . . . . . . . . . . . . . . . . . . . . . . . . . . . . . . . . . . . . . . xiii<br />
Preface . . . . . . . . . . . . . . . . . . . . . . . . . . . . . . . . . . . . . . . . . . . . . . . .xv<br />
Organization . . . . . . . . . . . . . . . . . . . . . . . . . . . . . . . . . . . . . . . . . . . . . . . . . . . . . . . .xv<br />
Comments and Suggestions . . . . . . . . . . . . . . . . . . . . . . . . . . . . . . . . . . . . . . . . . . . . xvi<br />
Alert Messages . . . . . . . . . . . . . . . . . . . . . . . . . . . . . . . . . . . . . . . . . . . . . . . . . . . . . xvi<br />
Conventions . . . . . . . . . . . . . . . . . . . . . . . . . . . . . . . . . . . . . . . . . . . . . . . . . . . . . . . xvii<br />
Additional Information . . . . . . . . . . . . . . . . . . . . . . . . . . . . . . . . . . . . . . . . . . . . . . . xviii<br />
StorageTek’s External Web Site . . . . . . . . . . . . . . . . . . . . . . . . . . . . . . . . . . . . . . xviii<br />
Customer Resource Center . . . . . . . . . . . . . . . . . . . . . . . . . . . . . . . . . . . . . . . . . xviii<br />
Channels Site . . . . . . . . . . . . . . . . . . . . . . . . . . . . . . . . . . . . . . . . . . . . . . . . . . . xviii<br />
Hard-copy Publications . . . . . . . . . . . . . . . . . . . . . . . . . . . . . . . . . . . . . . . . . . . xviii<br />
Customer Support Services . . . . . . . . . . . . . . . . . . . . . . . . . . . . . . . . . . . . . . . . . . . . . xix<br />
Customer-Initiated Maintenance . . . . . . . . . . . . . . . . . . . . . . . . . . . . . . . . . . . . . . . . xix<br />
Safety . . . . . . . . . . . . . . . . . . . . . . . . . . . . . . . . . . . . . . . . . . . . . . . . . xxi<br />
Fiber Optic Safety . . . . . . . . . . . . . . . . . . . . . . . . . . . . . . . . . . . . . . . . . . . . . . . . . . . xxi<br />
Laser Product Label . . . . . . . . . . . . . . . . . . . . . . . . . . . . . . . . . . . . . . . . . . . . . . . . . .xxii<br />
Notices . . . . . . . . . . . . . . . . . . . . . . . . . . . . . . . . . . . . . . . . . . . . . . xxiii<br />
FCC Compliance Statement . . . . . . . . . . . . . . . . . . . . . . . . . . . . . . . . . . . . . . . . . . . xxiii<br />
Japanese Compliance Statement . . . . . . . . . . . . . . . . . . . . . . . . . . . . . . . . . . . . . . . . xxiv<br />
Taiwan Warning Label Statement . . . . . . . . . . . . . . . . . . . . . . . . . . . . . . . . . . . . . . . xxiv<br />
Internal Code License Statement . . . . . . . . . . . . . . . . . . . . . . . . . . . . . . . . . . . . . . . . . xxv<br />
1: Overview . . . . . . . . . . . . . . . . . . . . . . . . . . . . . . . . . . . . . . . . . . . 1-1<br />
<strong>9840</strong> <strong>Tape</strong> <strong>Drive</strong> . . . . . . . . . . . . . . . . . . . . . . . . . . . . . . . . . . . . . . . . . . . . . . . . . . . . 1-1<br />
Configuration Details . . . . . . . . . . . . . . . . . . . . . . . . . . . . . . . . . . . . . . . . . . . . . . 1-2<br />
Display and Indicators . . . . . . . . . . . . . . . . . . . . . . . . . . . . . . . . . . . . . . . . . . . . . 1-2<br />
95739 Ninth Edition v
Contents<br />
Operator Panel . . . . . . . . . . . . . . . . . . . . . . . . . . . . . . . . . . . . . . . . . . . . . . . . . . . . . 1-4<br />
Standard Operator Panel . . . . . . . . . . . . . . . . . . . . . . . . . . . . . . . . . . . . . . . . . . . 1-4<br />
CSL Operator Panel . . . . . . . . . . . . . . . . . . . . . . . . . . . . . . . . . . . . . . . . . . . . . . . 1-5<br />
Operator Display . . . . . . . . . . . . . . . . . . . . . . . . . . . . . . . . . . . . . . . . . . . . . . . . . 1-6<br />
Cartridge <strong>Tape</strong>s . . . . . . . . . . . . . . . . . . . . . . . . . . . . . . . . . . . . . . . . . . . . . . . . . . . . . 1-7<br />
Design . . . . . . . . . . . . . . . . . . . . . . . . . . . . . . . . . . . . . . . . . . . . . . . . . . . . . . . . 1-7<br />
Models . . . . . . . . . . . . . . . . . . . . . . . . . . . . . . . . . . . . . . . . . . . . . . . . . . . . . . . . . . . 1-9<br />
Library <strong>Drive</strong>s . . . . . . . . . . . . . . . . . . . . . . . . . . . . . . . . . . . . . . . . . . . . . . . . . . . 1-9<br />
StorageTek Libraries . . . . . . . . . . . . . . . . . . . . . . . . . . . . . . . . . . . . . . . . . . . . . . 1-10<br />
L180 Library . . . . . . . . . . . . . . . . . . . . . . . . . . . . . . . . . . . . . . . . . . . . . . . . . 1-10<br />
L700 Library . . . . . . . . . . . . . . . . . . . . . . . . . . . . . . . . . . . . . . . . . . . . . . . . . 1-10<br />
Cartridge Scratch Loader (CSL) . . . . . . . . . . . . . . . . . . . . . . . . . . . . . . . . . . . . . . 1-11<br />
Shipment . . . . . . . . . . . . . . . . . . . . . . . . . . . . . . . . . . . . . . . . . . . . . . . . . . . 1-11<br />
Model Numbers . . . . . . . . . . . . . . . . . . . . . . . . . . . . . . . . . . . . . . . . . . . . . . 1-11<br />
Rack-mountable CSLs . . . . . . . . . . . . . . . . . . . . . . . . . . . . . . . . . . . . . . . . . . 1-12<br />
Rack-mountable <strong>Drive</strong>s . . . . . . . . . . . . . . . . . . . . . . . . . . . . . . . . . . . . . . . . . . . 1-13<br />
Configurations . . . . . . . . . . . . . . . . . . . . . . . . . . . . . . . . . . . . . . . . . . . . . . . . . . . . . 1-14<br />
Host Environments . . . . . . . . . . . . . . . . . . . . . . . . . . . . . . . . . . . . . . . . . . . . . . . . . 1-15<br />
Host Interfaces . . . . . . . . . . . . . . . . . . . . . . . . . . . . . . . . . . . . . . . . . . . . . . . . . . . . 1-15<br />
ESCON . . . . . . . . . . . . . . . . . . . . . . . . . . . . . . . . . . . . . . . . . . . . . . . . . . . . . . . 1-16<br />
Fibre Channel . . . . . . . . . . . . . . . . . . . . . . . . . . . . . . . . . . . . . . . . . . . . . . . . . . 1-16<br />
SCSI . . . . . . . . . . . . . . . . . . . . . . . . . . . . . . . . . . . . . . . . . . . . . . . . . . . . . . . . . 1-16<br />
2: Operator Panel Details . . . . . . . . . . . . . . . . . . . . . . . . . . . . . . . . 2-1<br />
Standard Operator Panel Switches . . . . . . . . . . . . . . . . . . . . . . . . . . . . . . . . . . . . . . . 2-2<br />
IPL Switch . . . . . . . . . . . . . . . . . . . . . . . . . . . . . . . . . . . . . . . . . . . . . . . . . . . . . . 2-2<br />
Menu Switch . . . . . . . . . . . . . . . . . . . . . . . . . . . . . . . . . . . . . . . . . . . . . . . . . . . . 2-3<br />
Select Switch . . . . . . . . . . . . . . . . . . . . . . . . . . . . . . . . . . . . . . . . . . . . . . . . . . . . 2-3<br />
Unload Switch . . . . . . . . . . . . . . . . . . . . . . . . . . . . . . . . . . . . . . . . . . . . . . . . . . . 2-3<br />
Standard Operator Panel Indicators . . . . . . . . . . . . . . . . . . . . . . . . . . . . . . . . . . . . . . 2-4<br />
Activity Indicator . . . . . . . . . . . . . . . . . . . . . . . . . . . . . . . . . . . . . . . . . . . . . . . . . 2-4<br />
Clean Indicator . . . . . . . . . . . . . . . . . . . . . . . . . . . . . . . . . . . . . . . . . . . . . . . . . . 2-4<br />
Power Indicator . . . . . . . . . . . . . . . . . . . . . . . . . . . . . . . . . . . . . . . . . . . . . . . . . . 2-5<br />
Service Indicator . . . . . . . . . . . . . . . . . . . . . . . . . . . . . . . . . . . . . . . . . . . . . . . . . 2-5<br />
Operator Display . . . . . . . . . . . . . . . . . . . . . . . . . . . . . . . . . . . . . . . . . . . . . . . . . . . . 2-6<br />
CSL Operator Panel Switches . . . . . . . . . . . . . . . . . . . . . . . . . . . . . . . . . . . . . . . . . . . 2-7<br />
Autoload Mode Switch . . . . . . . . . . . . . . . . . . . . . . . . . . . . . . . . . . . . . . . . . . . . . 2-7<br />
Start Switch . . . . . . . . . . . . . . . . . . . . . . . . . . . . . . . . . . . . . . . . . . . . . . . . . . . . . 2-8<br />
CSL Operator Panel Indicators . . . . . . . . . . . . . . . . . . . . . . . . . . . . . . . . . . . . . . . . . . 2-8<br />
Automatic Indicator . . . . . . . . . . . . . . . . . . . . . . . . . . . . . . . . . . . . . . . . . . . . . . . 2-8<br />
<strong>Manual</strong> Indicator . . . . . . . . . . . . . . . . . . . . . . . . . . . . . . . . . . . . . . . . . . . . . . . . . 2-8<br />
Operator Indicator . . . . . . . . . . . . . . . . . . . . . . . . . . . . . . . . . . . . . . . . . . . . . . . . 2-8<br />
System Indicator . . . . . . . . . . . . . . . . . . . . . . . . . . . . . . . . . . . . . . . . . . . . . . . . . 2-8<br />
vi Ninth Edition 95739
Contents<br />
3: Operator Tasks . . . . . . . . . . . . . . . . . . . . . . . . . . . . . . . . . . . . . . . 3-1<br />
Powering On a <strong>Drive</strong> . . . . . . . . . . . . . . . . . . . . . . . . . . . . . . . . . . . . . . . . . . . . . . . . . 3-1<br />
Power Switch . . . . . . . . . . . . . . . . . . . . . . . . . . . . . . . . . . . . . . . . . . . . . . . . . . . 3-1<br />
Process . . . . . . . . . . . . . . . . . . . . . . . . . . . . . . . . . . . . . . . . . . . . . . . . . . . . . . . . 3-2<br />
Write-Protecting a Cartridge . . . . . . . . . . . . . . . . . . . . . . . . . . . . . . . . . . . . . . . . . . . . 3-3<br />
Switch Positions . . . . . . . . . . . . . . . . . . . . . . . . . . . . . . . . . . . . . . . . . . . . . . . . . . 3-3<br />
Process . . . . . . . . . . . . . . . . . . . . . . . . . . . . . . . . . . . . . . . . . . . . . . . . . . . . . . . . 3-4<br />
Loading a <strong>Drive</strong> . . . . . . . . . . . . . . . . . . . . . . . . . . . . . . . . . . . . . . . . . . . . . . . . . . . . . 3-5<br />
Unloading a <strong>Drive</strong> . . . . . . . . . . . . . . . . . . . . . . . . . . . . . . . . . . . . . . . . . . . . . . . . . . . 3-5<br />
Cleaning a <strong>Drive</strong> . . . . . . . . . . . . . . . . . . . . . . . . . . . . . . . . . . . . . . . . . . . . . . . . . . . . 3-6<br />
Powering Off a <strong>Drive</strong> . . . . . . . . . . . . . . . . . . . . . . . . . . . . . . . . . . . . . . . . . . . . . . . . 3-7<br />
Identifying Unrecoverable <strong>Tape</strong>s . . . . . . . . . . . . . . . . . . . . . . . . . . . . . . . . . . . . . . . . 3-8<br />
Reformatting (Reclaiming) a Cartridge <strong>Tape</strong> . . . . . . . . . . . . . . . . . . . . . . . . . . . . . . . . 3-8<br />
4: Menus . . . . . . . . . . . . . . . . . . . . . . . . . . . . . . . . . . . . . . . . . . . . . . 4-1<br />
Main Menu Summary . . . . . . . . . . . . . . . . . . . . . . . . . . . . . . . . . . . . . . . . . . . . . . . . . 4-2<br />
Menu Operations . . . . . . . . . . . . . . . . . . . . . . . . . . . . . . . . . . . . . . . . . . . . . . . . . . . . 4-4<br />
Online Menus . . . . . . . . . . . . . . . . . . . . . . . . . . . . . . . . . . . . . . . . . . . . . . . . . . . 4-4<br />
Offline Menus . . . . . . . . . . . . . . . . . . . . . . . . . . . . . . . . . . . . . . . . . . . . . . . . . . . 4-4<br />
Online Main Menus and Submenus . . . . . . . . . . . . . . . . . . . . . . . . . . . . . . . . . . . 4-5<br />
Offline Menu Operations . . . . . . . . . . . . . . . . . . . . . . . . . . . . . . . . . . . . . . . . . . . 4-6<br />
View Fibre Channel Configuration Status . . . . . . . . . . . . . . . . . . . . . . . . . . . . . . . . . . 4-7<br />
View SCSI Configuration Status . . . . . . . . . . . . . . . . . . . . . . . . . . . . . . . . . . . . . . . . 4-10<br />
View ESCON Configuration Status . . . . . . . . . . . . . . . . . . . . . . . . . . . . . . . . . . . . . . 4-13<br />
<strong>Drive</strong> Operations Menu . . . . . . . . . . . . . . . . . . . . . . . . . . . . . . . . . . . . . . . . . . . . . . 4-16<br />
Online/Offline Main Menu Tasks . . . . . . . . . . . . . . . . . . . . . . . . . . . . . . . . . . . . . . . 4-22<br />
Online . . . . . . . . . . . . . . . . . . . . . . . . . . . . . . . . . . . . . . . . . . . . . . . . . . . . . . . . 4-22<br />
Offline . . . . . . . . . . . . . . . . . . . . . . . . . . . . . . . . . . . . . . . . . . . . . . . . . . . . . . . 4-23<br />
View Configuration Main Menu Task . . . . . . . . . . . . . . . . . . . . . . . . . . . . . . . . . . . . 4-24<br />
View Configuration Information . . . . . . . . . . . . . . . . . . . . . . . . . . . . . . . . . . . . . 4-24<br />
Select a Language . . . . . . . . . . . . . . . . . . . . . . . . . . . . . . . . . . . . . . . . . . . . . . . . . . 4-25<br />
Select <strong>Tape</strong> Bar Task . . . . . . . . . . . . . . . . . . . . . . . . . . . . . . . . . . . . . . . . . . . . . . . . 4-25<br />
Reclaim Cartridge <strong>Tape</strong> . . . . . . . . . . . . . . . . . . . . . . . . . . . . . . . . . . . . . . . . . . . . . . 4-25<br />
Firmware Release Main Menu Task . . . . . . . . . . . . . . . . . . . . . . . . . . . . . . . . . . . . . 4-27<br />
View Firmware Release Level . . . . . . . . . . . . . . . . . . . . . . . . . . . . . . . . . . . . . . . 4-27<br />
CSL Code Level Main Menu Task . . . . . . . . . . . . . . . . . . . . . . . . . . . . . . . . . . . . . . . 4-28<br />
View CSL Code Level . . . . . . . . . . . . . . . . . . . . . . . . . . . . . . . . . . . . . . . . . . . . . 4-28<br />
Exit Main Menu Tasks . . . . . . . . . . . . . . . . . . . . . . . . . . . . . . . . . . . . . . . . . . . . . . . 4-29<br />
Exit the Menu System . . . . . . . . . . . . . . . . . . . . . . . . . . . . . . . . . . . . . . . . . . . . . 4-29<br />
Return to Online/Offline Main Menu . . . . . . . . . . . . . . . . . . . . . . . . . . . . . . . . . 4-29<br />
Return to the Menu System . . . . . . . . . . . . . . . . . . . . . . . . . . . . . . . . . . . . . . . . 4-30<br />
95739 Ninth Edition vii
Contents<br />
<strong>Tape</strong> Bar-Chart Explanation . . . . . . . . . . . . . . . . . . . . . . . . . . . . . . . . . . . . . . . . . . . 4-31<br />
Media Information Region . . . . . . . . . . . . . . . . . . . . . . . . . . . . . . . . . . . . . . . . . 4-31<br />
Displayed Bars . . . . . . . . . . . . . . . . . . . . . . . . . . . . . . . . . . . . . . . . . . . . . . . . . 4-31<br />
Segment . . . . . . . . . . . . . . . . . . . . . . . . . . . . . . . . . . . . . . . . . . . . . . . . . . . . . . 4-31<br />
Dots . . . . . . . . . . . . . . . . . . . . . . . . . . . . . . . . . . . . . . . . . . . . . . . . . . . . . . . . . 4-31<br />
Write Bar . . . . . . . . . . . . . . . . . . . . . . . . . . . . . . . . . . . . . . . . . . . . . . . . . . . . . . 4-31<br />
Read Bar . . . . . . . . . . . . . . . . . . . . . . . . . . . . . . . . . . . . . . . . . . . . . . . . . . . . . . 4-31<br />
5: <strong>Drive</strong> Errors and Messages . . . . . . . . . . . . . . . . . . . . . . . . . . . . . 5-1<br />
Power and Service Indicator Errors . . . . . . . . . . . . . . . . . . . . . . . . . . . . . . . . . . . . . . . 5-2<br />
Clean Indicator Error . . . . . . . . . . . . . . . . . . . . . . . . . . . . . . . . . . . . . . . . . . . . . . . . . 5-3<br />
Operator Panel Messages . . . . . . . . . . . . . . . . . . . . . . . . . . . . . . . . . . . . . . . . . . . . . . 5-3<br />
Language Translated Messages . . . . . . . . . . . . . . . . . . . . . . . . . . . . . . . . . . . . . . . . . . 5-7<br />
Specific Error Recovery Procedures . . . . . . . . . . . . . . . . . . . . . . . . . . . . . . . . . . . . . . 5-8<br />
DumpAgain Condition . . . . . . . . . . . . . . . . . . . . . . . . . . . . . . . . . . . . . . . . . . . . 5-8<br />
Save Fails Condition . . . . . . . . . . . . . . . . . . . . . . . . . . . . . . . . . . . . . . . . . . . . . . . 5-8<br />
UnWr Condition . . . . . . . . . . . . . . . . . . . . . . . . . . . . . . . . . . . . . . . . . . . . . . . . . . 5-8<br />
Shipping Insert . . . . . . . . . . . . . . . . . . . . . . . . . . . . . . . . . . . . . . . . . . . . . . . . . . . . . 5-9<br />
Jammed Cartridge . . . . . . . . . . . . . . . . . . . . . . . . . . . . . . . . . . . . . . . . . . . . . . . . . . 5-12<br />
Fiber-Optic Problems . . . . . . . . . . . . . . . . . . . . . . . . . . . . . . . . . . . . . . . . . . . . . . . . 5-14<br />
6: Cartridge Scratch Loader . . . . . . . . . . . . . . . . . . . . . . . . . . . . . . 6-1<br />
Overview . . . . . . . . . . . . . . . . . . . . . . . . . . . . . . . . . . . . . . . . . . . . . . . . . . . . . . . . . 6-1<br />
Component Locations . . . . . . . . . . . . . . . . . . . . . . . . . . . . . . . . . . . . . . . . . . . . . 6-2<br />
Cartridge Routing . . . . . . . . . . . . . . . . . . . . . . . . . . . . . . . . . . . . . . . . . . . . . . . . . 6-3<br />
Rack . . . . . . . . . . . . . . . . . . . . . . . . . . . . . . . . . . . . . . . . . . . . . . . . . . . . . . . . . . . . . 6-4<br />
Rack-mount CSL Tray . . . . . . . . . . . . . . . . . . . . . . . . . . . . . . . . . . . . . . . . . . . . . . . . 6-5<br />
Operator Panel . . . . . . . . . . . . . . . . . . . . . . . . . . . . . . . . . . . . . . . . . . . . . . . . . . . . . 6-6<br />
CSL Switches . . . . . . . . . . . . . . . . . . . . . . . . . . . . . . . . . . . . . . . . . . . . . . . . . . . . 6-7<br />
CSL Indicators . . . . . . . . . . . . . . . . . . . . . . . . . . . . . . . . . . . . . . . . . . . . . . . . . . . 6-8<br />
Power On/Off CSL . . . . . . . . . . . . . . . . . . . . . . . . . . . . . . . . . . . . . . . . . . . . . . . . . 6-10<br />
Power On . . . . . . . . . . . . . . . . . . . . . . . . . . . . . . . . . . . . . . . . . . . . . . . . . . . . . 6-11<br />
Power Off . . . . . . . . . . . . . . . . . . . . . . . . . . . . . . . . . . . . . . . . . . . . . . . . . . . . . 6-11<br />
CSL Cartridge Loading/Unloading . . . . . . . . . . . . . . . . . . . . . . . . . . . . . . . . . . . . . . . 6-12<br />
Cartridge Loading . . . . . . . . . . . . . . . . . . . . . . . . . . . . . . . . . . . . . . . . . . . . . . . 6-12<br />
Cartridge Unloading . . . . . . . . . . . . . . . . . . . . . . . . . . . . . . . . . . . . . . . . . . . . . . 6-13<br />
Modes of Operation . . . . . . . . . . . . . . . . . . . . . . . . . . . . . . . . . . . . . . . . . . . . . . . . 6-14<br />
System Mode . . . . . . . . . . . . . . . . . . . . . . . . . . . . . . . . . . . . . . . . . . . . . . . . . . . 6-14<br />
Mount Message . . . . . . . . . . . . . . . . . . . . . . . . . . . . . . . . . . . . . . . . . . . . . . 6-14<br />
Unload Message . . . . . . . . . . . . . . . . . . . . . . . . . . . . . . . . . . . . . . . . . . . . . . 6-15<br />
Place CSL in System Mode . . . . . . . . . . . . . . . . . . . . . . . . . . . . . . . . . . . . . . 6-15<br />
Automatic Mode . . . . . . . . . . . . . . . . . . . . . . . . . . . . . . . . . . . . . . . . . . . . . . . . 6-16<br />
viii Ninth Edition 95739
Contents<br />
Unload Message . . . . . . . . . . . . . . . . . . . . . . . . . . . . . . . . . . . . . . . . . . . . . . 6-16<br />
Example . . . . . . . . . . . . . . . . . . . . . . . . . . . . . . . . . . . . . . . . . . . . . . . . . . . 6-16<br />
Place CSL in Automatic Mode . . . . . . . . . . . . . . . . . . . . . . . . . . . . . . . . . . . . 6-16<br />
<strong>Manual</strong> Mode . . . . . . . . . . . . . . . . . . . . . . . . . . . . . . . . . . . . . . . . . . . . . . . . . . 6-17<br />
Unload . . . . . . . . . . . . . . . . . . . . . . . . . . . . . . . . . . . . . . . . . . . . . . . . . . . . 6-17<br />
Place CSL in <strong>Manual</strong> Mode . . . . . . . . . . . . . . . . . . . . . . . . . . . . . . . . . . . . . . 6-17<br />
Priority Mount Mode . . . . . . . . . . . . . . . . . . . . . . . . . . . . . . . . . . . . . . . . . . . . . 6-18<br />
CSL in System Mode . . . . . . . . . . . . . . . . . . . . . . . . . . . . . . . . . . . . . . . . . . . 6-18<br />
CSL in Automatic Mode . . . . . . . . . . . . . . . . . . . . . . . . . . . . . . . . . . . . . . . . 6-19<br />
CSL in <strong>Manual</strong> Mode . . . . . . . . . . . . . . . . . . . . . . . . . . . . . . . . . . . . . . . . . . 6-19<br />
Cartridge Removal from Feed Channel . . . . . . . . . . . . . . . . . . . . . . . . . . . . . . . . 6-20<br />
Error and Recovery . . . . . . . . . . . . . . . . . . . . . . . . . . . . . . . . . . . . . . . . . . . . . . . . . 6-21<br />
Operator Indicator . . . . . . . . . . . . . . . . . . . . . . . . . . . . . . . . . . . . . . . . . . . . . . . 6-21<br />
<strong>Drive</strong> Failure to Load . . . . . . . . . . . . . . . . . . . . . . . . . . . . . . . . . . . . . . . . . . . . . 6-21<br />
Incorrect Load Process . . . . . . . . . . . . . . . . . . . . . . . . . . . . . . . . . . . . . . . . . 6-22<br />
Recovery Process . . . . . . . . . . . . . . . . . . . . . . . . . . . . . . . . . . . . . . . . . . . . . 6-22<br />
Clearing CSL Errors . . . . . . . . . . . . . . . . . . . . . . . . . . . . . . . . . . . . . . . . . . . . . . 6-23<br />
Fault Symptom Codes . . . . . . . . . . . . . . . . . . . . . . . . . . . . . . . . . . . . . . . . . . . . 6-24<br />
Jammed Cartridge . . . . . . . . . . . . . . . . . . . . . . . . . . . . . . . . . . . . . . . . . . . . . . . . . . 6-26<br />
Shipping Insert . . . . . . . . . . . . . . . . . . . . . . . . . . . . . . . . . . . . . . . . . . . . . . . . . . . . 6-30<br />
Removal . . . . . . . . . . . . . . . . . . . . . . . . . . . . . . . . . . . . . . . . . . . . . . . . . . . . . . 6-31<br />
Install and Lock . . . . . . . . . . . . . . . . . . . . . . . . . . . . . . . . . . . . . . . . . . . . . . . . . 6-32<br />
CSL Model Numbers . . . . . . . . . . . . . . . . . . . . . . . . . . . . . . . . . . . . . . . . . . . . . . . . 6-35<br />
A: Product Specifications . . . . . . . . . . . . . . . . . . . . . . . . . . . . . . . . A-1<br />
Power Requirements . . . . . . . . . . . . . . . . . . . . . . . . . . . . . . . . . . . . . . . . . . . . . . . . . A-1<br />
Environmental Requirements . . . . . . . . . . . . . . . . . . . . . . . . . . . . . . . . . . . . . . . . . . . A-2<br />
<strong>Drive</strong> and Power Supply . . . . . . . . . . . . . . . . . . . . . . . . . . . . . . . . . . . . . . . . . . . A-2<br />
Cartridge <strong>Tape</strong>s and Media . . . . . . . . . . . . . . . . . . . . . . . . . . . . . . . . . . . . . . . . . . A-3<br />
Cartridge <strong>Tape</strong> Specifications . . . . . . . . . . . . . . . . . . . . . . . . . . . . . . . . . . . . . . . . . . . A-4<br />
<strong>Drive</strong> Performance . . . . . . . . . . . . . . . . . . . . . . . . . . . . . . . . . . . . . . . . . . . . . . . . . . A-5<br />
Host Interfaces and Device Modes . . . . . . . . . . . . . . . . . . . . . . . . . . . . . . . . . . . . . . . A-6<br />
Library Attachments . . . . . . . . . . . . . . . . . . . . . . . . . . . . . . . . . . . . . . . . . . . . . . . . . . A-7<br />
Non-Library Installations . . . . . . . . . . . . . . . . . . . . . . . . . . . . . . . . . . . . . . . . . . . . . . A-8<br />
B: Client Programmer Information . . . . . . . . . . . . . . . . . . . . . . . . B-1<br />
Unmarked Firmware-Update Files . . . . . . . . . . . . . . . . . . . . . . . . . . . . . . . . . . . . . . . B-1<br />
Enterprise ESCON Updates . . . . . . . . . . . . . . . . . . . . . . . . . . . . . . . . . . . . . . . . . . . . B-1<br />
Multi-Platform SCSI Updates . . . . . . . . . . . . . . . . . . . . . . . . . . . . . . . . . . . . . . . . . . . . B-2<br />
Firmware-File Format . . . . . . . . . . . . . . . . . . . . . . . . . . . . . . . . . . . . . . . . . . . . . . . . B-2<br />
Data Transfer Limitations . . . . . . . . . . . . . . . . . . . . . . . . . . . . . . . . . . . . . . . . . . . . . . B-2<br />
95739 Ninth Edition ix
Contents<br />
Glossary . . . . . . . . . . . . . . . . . . . . . . . . . . . . . . . . . . . . . . . . Glossary-1<br />
Index . . . . . . . . . . . . . . . . . . . . . . . . . . . . . . . . . . . . . . . . . . . . . Index-1<br />
Reader’s Comment Form<br />
x Ninth Edition 95739
Figures<br />
Figure 1-1. <strong>9840</strong> <strong>Tape</strong> <strong>Drive</strong> Desktop Configuration . . . . . . . . . . . . . . . . . . . . . . . . . . . . . 1-1<br />
Figure 1-2. Standard Operator Panel . . . . . . . . . . . . . . . . . . . . . . . . . . . . . . . . . . . . . . . . 1-3<br />
Figure 1-3. Standard Operator Panel . . . . . . . . . . . . . . . . . . . . . . . . . . . . . . . . . . . . . . . . 1-5<br />
Figure 1-4. CSL Operator Panel . . . . . . . . . . . . . . . . . . . . . . . . . . . . . . . . . . . . . . . . . . . . 1-6<br />
Figure 1-5. Standard Cartridge <strong>Tape</strong> . . . . . . . . . . . . . . . . . . . . . . . . . . . . . . . . . . . . . . . . . 1-8<br />
Figure 1-6. VolSafe Cartridge <strong>Tape</strong> . . . . . . . . . . . . . . . . . . . . . . . . . . . . . . . . . . . . . . . . . . 1-8<br />
Figure 1-7. <strong>9840</strong> <strong>Tape</strong> <strong>Drive</strong> Assembly for a 9310 or 9740 Library . . . . . . . . . . . . . . . . . . . 1-9<br />
Figure 1-8. L180 and L700 Libraries . . . . . . . . . . . . . . . . . . . . . . . . . . . . . . . . . . . . . . . . 1-10<br />
Figure 1-9. CSL in Tray . . . . . . . . . . . . . . . . . . . . . . . . . . . . . . . . . . . . . . . . . . . . . . . . . 1-11<br />
Figure 1-10. Rack-mountable CSL . . . . . . . . . . . . . . . . . . . . . . . . . . . . . . . . . . . . . . . . . . 1-12<br />
Figure 1-11. Rack-mountable <strong>Drive</strong>s . . . . . . . . . . . . . . . . . . . . . . . . . . . . . . . . . . . . . . . . 1-13<br />
Figure 2-1. Operator Panels . . . . . . . . . . . . . . . . . . . . . . . . . . . . . . . . . . . . . . . . . . . . . . . 2-1<br />
Figure 2-2. Standard Operator Panel Switches . . . . . . . . . . . . . . . . . . . . . . . . . . . . . . . . . . 2-2<br />
Figure 2-3. Standard Operator Panel Indicators . . . . . . . . . . . . . . . . . . . . . . . . . . . . . . . . . 2-4<br />
Figure 2-4. CSL Operator Panel . . . . . . . . . . . . . . . . . . . . . . . . . . . . . . . . . . . . . . . . . . . . 2-7<br />
Figure 3-1. L180 or L700 Library <strong>9840</strong> <strong>Tape</strong> <strong>Drive</strong> . . . . . . . . . . . . . . . . . . . . . . . . . . . . . . . 3-1<br />
Figure 3-2. Operator Display . . . . . . . . . . . . . . . . . . . . . . . . . . . . . . . . . . . . . . . . . . . . . . 3-2<br />
Figure 3-3. Cartridges . . . . . . . . . . . . . . . . . . . . . . . . . . . . . . . . . . . . . . . . . . . . . . . . . . . 3-4<br />
Figure 4-1. Operator Panels . . . . . . . . . . . . . . . . . . . . . . . . . . . . . . . . . . . . . . . . . . . . . . . 4-1<br />
Figure 4-2. Main Menus Available When <strong>Drive</strong> is Online . . . . . . . . . . . . . . . . . . . . . . . . . . 4-3<br />
Figure 4-3. Online View CFG Menus . . . . . . . . . . . . . . . . . . . . . . . . . . . . . . . . . . . . . . . . 4-5<br />
Figure 4-4. Offline Configuration Menus . . . . . . . . . . . . . . . . . . . . . . . . . . . . . . . . . . . . . . 4-6<br />
Figure 4-5. View Fibre Channel Configuration . . . . . . . . . . . . . . . . . . . . . . . . . . . . . . . . . 4-7<br />
Figure 4-6. View SCSI Configuration . . . . . . . . . . . . . . . . . . . . . . . . . . . . . . . . . . . . . . . . 4-10<br />
Figure 4-7. View ESCON Configuration . . . . . . . . . . . . . . . . . . . . . . . . . . . . . . . . . . . . . 4-13<br />
Figure 4-8. <strong>Drive</strong> Operations (ESCON) . . . . . . . . . . . . . . . . . . . . . . . . . . . . . . . . . . . . . . 4-16<br />
Figure 4-9. <strong>Tape</strong> Write/Read Bar Chart . . . . . . . . . . . . . . . . . . . . . . . . . . . . . . . . . . . . . . 4-32<br />
Figure 5-1. <strong>9840</strong> <strong>Tape</strong> <strong>Drive</strong> . . . . . . . . . . . . . . . . . . . . . . . . . . . . . . . . . . . . . . . . . . . . . . . 5-1<br />
Figure 5-2. Shipping Insert . . . . . . . . . . . . . . . . . . . . . . . . . . . . . . . . . . . . . . . . . . . . . . . . 5-9<br />
Figure 5-3. <strong>9840</strong> <strong>Tape</strong> <strong>Drive</strong> <strong>Manual</strong> Unload Device (MUD) . . . . . . . . . . . . . . . . . . . . . . 5-12<br />
Figure 6-1. CSL . . . . . . . . . . . . . . . . . . . . . . . . . . . . . . . . . . . . . . . . . . . . . . . . . . . . . . . . 6-1<br />
Figure 6-2. CSL Component Locations . . . . . . . . . . . . . . . . . . . . . . . . . . . . . . . . . . . . . . . 6-2<br />
Figure 6-3. Cartridge Routing . . . . . . . . . . . . . . . . . . . . . . . . . . . . . . . . . . . . . . . . . . . . . 6-3<br />
Figure 6-4. RACK001 for CSL Trays . . . . . . . . . . . . . . . . . . . . . . . . . . . . . . . . . . . . . . . . . 6-4<br />
Figure 6-5. Rack Mount CSL . . . . . . . . . . . . . . . . . . . . . . . . . . . . . . . . . . . . . . . . . . . . . . . 6-5<br />
Figure 6-6. CSL Operator Panel . . . . . . . . . . . . . . . . . . . . . . . . . . . . . . . . . . . . . . . . . . . . 6-6<br />
95739 Ninth Edition xi
Figures<br />
Figure 6-7. CSL Operator Panel Indicators . . . . . . . . . . . . . . . . . . . . . . . . . . . . . . . . . . . . 6-8<br />
Figure 6-8. SCSI CSL Power . . . . . . . . . . . . . . . . . . . . . . . . . . . . . . . . . . . . . . . . . . . . . . 6-10<br />
Figure 6-9. ESCON CSL Power . . . . . . . . . . . . . . . . . . . . . . . . . . . . . . . . . . . . . . . . . . . . 6-10<br />
Figure 6-10. Cartridge Loading . . . . . . . . . . . . . . . . . . . . . . . . . . . . . . . . . . . . . . . . . . . . 6-12<br />
Figure 6-11. Cartridge Unloading . . . . . . . . . . . . . . . . . . . . . . . . . . . . . . . . . . . . . . . . . . 6-13<br />
Figure 6-12. CSL Modes of Operation . . . . . . . . . . . . . . . . . . . . . . . . . . . . . . . . . . . . . . . 6-14<br />
Figure 6-13. Priority Mounting a Cartridge . . . . . . . . . . . . . . . . . . . . . . . . . . . . . . . . . . . 6-18<br />
Figure 6-14. Cartridge Stop Mechanism/First Index Rod . . . . . . . . . . . . . . . . . . . . . . . . . 6-19<br />
Figure 6-15. Cartridge Removal . . . . . . . . . . . . . . . . . . . . . . . . . . . . . . . . . . . . . . . . . . . 6-20<br />
Figure 6-16. CSL Operator Panel . . . . . . . . . . . . . . . . . . . . . . . . . . . . . . . . . . . . . . . . . . 6-21<br />
Figure 6-17. Ejected Cartridge (Failure to Load) . . . . . . . . . . . . . . . . . . . . . . . . . . . . . . . 6-22<br />
Figure 6-18. CSL Rear View . . . . . . . . . . . . . . . . . . . . . . . . . . . . . . . . . . . . . . . . . . . . . . 6-23<br />
Figure 6-19. <strong>9840</strong> <strong>Tape</strong> <strong>Drive</strong> <strong>Manual</strong> Unload Device (MUD) . . . . . . . . . . . . . . . . . . . . . 6-26<br />
Figure 6-20. Shipping Insert . . . . . . . . . . . . . . . . . . . . . . . . . . . . . . . . . . . . . . . . . . . . . . 6-30<br />
Figure 6-21. MUD Screw in CSL . . . . . . . . . . . . . . . . . . . . . . . . . . . . . . . . . . . . . . . . . . . 6-32<br />
Figure 6-22. Rack Enclosure . . . . . . . . . . . . . . . . . . . . . . . . . . . . . . . . . . . . . . . . . . . . . . 6-35<br />
xii Ninth Edition 95739
Tables<br />
Table 1-1. <strong>9840</strong> Configurations . . . . . . . . . . . . . . . . . . . . . . . . . . . . . . . . . . . . . . . . . . . . . 1-2<br />
Table 1-2. Standard and VolSafe Cartridges . . . . . . . . . . . . . . . . . . . . . . . . . . . . . . . . . . . . 1-7<br />
Table 1-3. CSL Configurations . . . . . . . . . . . . . . . . . . . . . . . . . . . . . . . . . . . . . . . . . . . . 1-11<br />
Table 1-4. Configurations of the <strong>9840</strong> <strong>Tape</strong> <strong>Drive</strong> . . . . . . . . . . . . . . . . . . . . . . . . . . . . . . 1-14<br />
Table 1-5. Products and <strong>9840</strong> <strong>Tape</strong> <strong>Drive</strong> Interfaces . . . . . . . . . . . . . . . . . . . . . . . . . . . . 1-15<br />
Table 3-1. Write Protect Switch . . . . . . . . . . . . . . . . . . . . . . . . . . . . . . . . . . . . . . . . . . . . 3-3<br />
Table 4-1. Summary of Main Menus . . . . . . . . . . . . . . . . . . . . . . . . . . . . . . . . . . . . . . . . . 4-2<br />
Table 4-2. Menu Table - View Fibre Channel Configuration . . . . . . . . . . . . . . . . . . . . . . . 4-8<br />
Table 4-3. Menu Table—View SCSI Configuration . . . . . . . . . . . . . . . . . . . . . . . . . . . . . . 4-11<br />
Table 4-4. Menu Table - View ESCON Configuration . . . . . . . . . . . . . . . . . . . . . . . . . . . 4-14<br />
Table 4-5. Menu Table—<strong>Drive</strong> Operations . . . . . . . . . . . . . . . . . . . . . . . . . . . . . . . . . . . 4-17<br />
Table 5-1. Power and Service Indicators . . . . . . . . . . . . . . . . . . . . . . . . . . . . . . . . . . . . . . 5-2<br />
Table 5-2. Operator Display Messages . . . . . . . . . . . . . . . . . . . . . . . . . . . . . . . . . . . . . . . 5-3<br />
Table 5-3. Language Translated Messages . . . . . . . . . . . . . . . . . . . . . . . . . . . . . . . . . . . . . 5-7<br />
Table 6-1. CSL Component Descriptions . . . . . . . . . . . . . . . . . . . . . . . . . . . . . . . . . . . . . . 6-2<br />
Table 6-2. Rack Mount CSL Tray Dimensions . . . . . . . . . . . . . . . . . . . . . . . . . . . . . . . . . . 6-5<br />
Table 6-3. CSL Operator Panel Switches . . . . . . . . . . . . . . . . . . . . . . . . . . . . . . . . . . . . . . 6-7<br />
Table 6-4. CSL Operator Panel Indicators . . . . . . . . . . . . . . . . . . . . . . . . . . . . . . . . . . . . . 6-8<br />
Table 6-5. CSL FSCs . . . . . . . . . . . . . . . . . . . . . . . . . . . . . . . . . . . . . . . . . . . . . . . . . . . . 6-24<br />
Table 6-6. CSL Configurations . . . . . . . . . . . . . . . . . . . . . . . . . . . . . . . . . . . . . . . . . . . . 6-35<br />
Table A-1. Power Requirements . . . . . . . . . . . . . . . . . . . . . . . . . . . . . . . . . . . . . . . . . . . A-1<br />
Table A-2. <strong>Drive</strong> and Power Supply Requirements. . . . . . . . . . . . . . . . . . . . . . . . . . . . . . A-2<br />
Table A-3. Cartridge <strong>Tape</strong>s and Media Requirements . . . . . . . . . . . . . . . . . . . . . . . . . . . . A-3<br />
Table A-4. Cartridge <strong>Tape</strong> Specifications . . . . . . . . . . . . . . . . . . . . . . . . . . . . . . . . . . . . . A-4<br />
Table A-5. <strong>Drive</strong> Performance. . . . . . . . . . . . . . . . . . . . . . . . . . . . . . . . . . . . . . . . . . . . . A-5<br />
Table A-6. Host Interfaces. . . . . . . . . . . . . . . . . . . . . . . . . . . . . . . . . . . . . . . . . . . . . . . . A-6<br />
Table A-7. Library Attachments . . . . . . . . . . . . . . . . . . . . . . . . . . . . . . . . . . . . . . . . . . . . A-7<br />
Table A-8. Non-Library <strong>Drive</strong> Installations . . . . . . . . . . . . . . . . . . . . . . . . . . . . . . . . . . . . A-8<br />
95739 Ninth Edition xiii
Tables<br />
This page intentionally left blank.<br />
xiv Ninth Edition 95739
Preface<br />
■ Organization<br />
This manual contains information about the <strong>9840</strong> <strong>Tape</strong> <strong>Drive</strong>. It helps you use<br />
the <strong>9840</strong> <strong>Tape</strong> <strong>Drive</strong> and respond to operator panel messages or other<br />
conditions that occur while operating the <strong>9840</strong> <strong>Tape</strong> <strong>Drive</strong>.<br />
Use this information as a reference for on-site operators and users of the <strong>9840</strong><br />
<strong>Tape</strong> <strong>Drive</strong>.<br />
This manual contains:<br />
Chapter 1<br />
Chapter 2<br />
Chapter 3<br />
Chapter 4<br />
“Overview” describes the <strong>9840</strong> <strong>Tape</strong> <strong>Drive</strong> and lists some of its<br />
features and capabilities.<br />
“Operator Panel Details” shows the switches, indicators, and<br />
message display that comprise the <strong>9840</strong> operator panel.<br />
“Operator Tasks” provides several procedures for operating the<br />
<strong>9840</strong> <strong>Tape</strong> <strong>Drive</strong>.<br />
“Menus” lists the menus and sub-menus that you use to view<br />
configurations and the software release of the <strong>9840</strong> <strong>Tape</strong> <strong>Drive</strong>.<br />
Chapter 5 “<strong>Drive</strong> Errors and Messages” lists problems that might occur<br />
while using the <strong>9840</strong> <strong>Tape</strong> <strong>Drive</strong> and describes recovery<br />
actions.<br />
Chapter 6 “Cartridge Scratch Loader” provides an overview of the CSL,<br />
information on the rack model, operator panel, modes of<br />
operation, and error and recovery procedures.<br />
Appendix A<br />
Appendix B<br />
Glossary<br />
Index<br />
“Product Specifications” provides requirements and<br />
specifications for the <strong>9840</strong> <strong>Tape</strong> <strong>Drive</strong>.<br />
“Client Programmer Information” includes information about<br />
applying firmware updates to the <strong>9840</strong> <strong>Tape</strong> <strong>Drive</strong>.<br />
The Glossary defines terms used in this manual.<br />
The Index allows you to locate information in this manual.<br />
95739 Ninth Edition xv
Preface<br />
■ Comments and Suggestions<br />
A Reader’s Comment Form at the back of this publication lets you communicate<br />
suggestions or requests for change. StorageTek encourages and appreciates<br />
reader feedback.<br />
StorageTek employees with access to Portal may complete an online Reader’s<br />
Comment Form. Point your browser to:<br />
■ Alert Messages<br />
http://sts.stortek.com/sts/tis/tisrcf.htm<br />
Alert messages in this manual signal the reader to special information about a<br />
concept, a procedure, or other topics.<br />
Note: Provides additional information that might be of special interest. A note<br />
can point out exceptions to rules or procedures. A note usually, but not<br />
always, follows the information to which it pertains.<br />
CAUTION:<br />
Informs the user of conditions that might result in damage to hardware,<br />
corruption of customer data or application software, or long-term health<br />
hazard to people. A caution always precedes the information to which it<br />
pertains.<br />
WARNING:<br />
Alerts the user to conditions that might result in injury or death. A<br />
warning always precedes the information to which it pertains.<br />
xvi Ninth Edition 95739
Preface<br />
■ Conventions<br />
Typographical conventions highlight special words, phrases, and actions used<br />
in this publication.<br />
Item Example Description<br />
Button MENU Physical buttons or switches, onscreen<br />
buttons, and softkeys appear in Helvetica font<br />
and in all capital letters.<br />
Emphasized<br />
text<br />
not or must<br />
Important or emphasized words and phrases<br />
appear in italics.<br />
Filenames dictionary.txt Filenames appear in Courier font.<br />
Indicators/<br />
LEDs<br />
Keyboard keys<br />
Screen<br />
captures or<br />
messages<br />
Parameters or<br />
input<br />
Pathnames<br />
Positions for<br />
switches,<br />
jumpers, and<br />
circuit<br />
breakers<br />
URLs and<br />
hypertext links<br />
Open<br />
[Y],<br />
[Enter] or<br />
[Ctrl+Alt+Delete]<br />
downloading<br />
Device = xx<br />
C:/programs/<br />
StorageTek<br />
ON<br />
www.stortek.com/techpubs<br />
Indicators and LEDs appear with initial<br />
capital letters and in italics.<br />
Keyboard keys appear within brackets, in<br />
Helvetica font, with initial capital letters or as<br />
the key appears on the keyboard.<br />
Screen captures or messages appear in<br />
Courier font.<br />
Names of variables that require values<br />
assigned appear in italics.<br />
Pathnames appear in Courier font.<br />
Switch, jumper, and circuit breaker positions<br />
appear in default font and all capital letters.<br />
Universal Resource Locator (URL) and<br />
hypertext links appear in blue text and<br />
underlined.<br />
95739 Ninth Edition xvii
Preface<br />
■ Additional Information<br />
StorageTek offers several methods for you to obtain additional information.<br />
Please use one of these methods when you want to obtain the latest edition of<br />
this or any other StorageTek customer publication.<br />
StorageTek’s External Web Site<br />
StorageTek’s external web site provides marketing, product, event, corporate,<br />
and service information. In addition, the external web site serves as an entry<br />
point to the Customer Resource Center (CRC) and to the Channel site. The<br />
external web site is accessible to anyone with a web browser and an Inter<strong>net</strong><br />
connection.<br />
The URL for the StorageTek external web site is http://www.storagetek.com<br />
Customer Resource Center<br />
Channels Site<br />
StorageTek’s Customer Resource Center (CRC) is a web site that enables<br />
members to resolve technical issues by searching code fixes and technical<br />
documentation. CRC membership entitles you to other proactive services, such<br />
as HIPER subscriptions, technical tips, answers to frequently asked questions,<br />
and online product support contact information. Customers who have a current<br />
warranty or a current maintenance service agreement may apply for<br />
membership by clicking on the Request Password button on the CRC home<br />
page.<br />
The URL for the CRC is http://www.support.storagetek.com.<br />
StorageTek’s Channels site is a web site that provides information about<br />
products, services, customer support, upcoming events, training programs, and<br />
sales tools to support StorageTek’s channel partners. (This site was formerly<br />
known as the Partners Page.) Access to this site, beyond the Channels Login<br />
page, is restricted. On the Channels Login page, current partners who do not<br />
have access can request a login ID and password and prospective partners can<br />
apply to become StorageTek resellers.<br />
The URL for the Channels site is http://channels.stortek.com.<br />
Hard-copy Publications<br />
Contact a StorageTek sales or marketing representative to order additional<br />
paper copies of this publication or to order other StorageTek customer<br />
publications in paper format.<br />
xviii Ninth Edition 95739
Preface<br />
■ Customer Support Services<br />
The Call Center for Customer Support Services (CSS) is available 24 hours a day,<br />
seven days a week, to customers with StorageTek maintenance contracts and to<br />
StorageTek employees. You can find additional information about the CSS on<br />
StorageTek’s external Web site at:<br />
http://www.storagetek.com/StorageTek/css<br />
■ Customer-Initiated Maintenance<br />
Customer-initiated maintenance begins with a telephone call from you to the<br />
StorageTek CSS. You receive immediate attention from qualified StorageTek<br />
personnel, who record problem information and respond with the appropriate<br />
level of support.<br />
To contact the CSS about a problem:<br />
1. Use the telephone to call the StorageTek Customer Support Services at:<br />
☎1-800-735-2778 (from within the United States)<br />
☎303-673-4056 (from outside the United States)<br />
2. Describe the problem to the call taker. The call taker will ask several<br />
questions and will either route your call to or dispatch a customer services<br />
engineer (CSE).<br />
If you have the following information when placing a service call, the process<br />
will be much easier:<br />
Account name<br />
Site location number<br />
Contact name<br />
Telephone number<br />
Equipment model number<br />
Device address<br />
Device serial number (if known)<br />
Urgency of problem<br />
Fault Symptom Code (FSC)<br />
Problem description<br />
95739 Ninth Edition xix
Preface<br />
This page intentionally left blank.<br />
xx Ninth Edition 95739
Safety<br />
Operators of the <strong>9840</strong> <strong>Tape</strong> <strong>Drive</strong> should follow these safety guidelines:<br />
■ Fiber Optic Safety<br />
WARNING:<br />
Eye hazard. Never look directly into a fiber-optic cable, a fiber-optic<br />
connector, or a laser transceiver module. Hazardous conditions might<br />
exist from laser power levels that are capable of causing injury to the<br />
eye.<br />
Be especially careful when using optical instruments with this<br />
equipment. Such instruments might increase the likelihood of eye injury.<br />
The laser transceivers in fiber-optic equipment can pose dangers to personal<br />
safety. Ensure that anyone who works with this StorageTek equipment<br />
understands these dangers and follows safety procedures. Ensure that the<br />
optical ports of every laser transceiver module are terminated with an optical<br />
connector, a dust plug, or a cover.<br />
Each fiber-optic interface in this StorageTek Fibre Channel equipment contains<br />
a laser transceiver that is a Class 1 Laser Product. Each laser transceiver has an<br />
output of less than 70 µW and a wavelength of 850 nm. StorageTek’s Class 1<br />
Laser Products comply with EN60825-1(+A-11) and with sections 21 CFR<br />
1040.10 and 1040.11 of the Food and Drug Administration (FDA) regulations.<br />
The following translations are for users in Finland and Sweden who wish to<br />
identify laser safety and classification:<br />
CLASS 1 LASER<br />
LUOKAN 1 LASERLAITE<br />
KLASSE 1 LASER APPARAT<br />
95739 Ninth Edition xxi
Safety<br />
■ Laser Product Label<br />
In accordance with safety regulations, a label on each StorageTek Fibre Channel<br />
product identifies the laser class of the product and the place and date of the<br />
manufacturer. The label appears on top of a Fibre Channel tape drive and near<br />
the Fibre Channel connectors on a Fibre Channel tape library. A copy of the<br />
label is shown here:<br />
CLASS 1 LASER PRODUCT<br />
LASER KLASSE 1<br />
APPAREIL A LASER DE CLASSE 1<br />
COMPLIES WITH 21 CFR 1040.10 AND 1040.11<br />
xxii Ninth Edition 95739
Notices<br />
Please read the following compliance and warning statements for this product.<br />
CAUTION:<br />
Potential equipment damage: Cables that connect peripherals must be<br />
shielded and grounded; refer to cable descriptions in the instruction<br />
manuals. Operation of this equipment with cables that are not shielded<br />
and not correctly grounded might result in interference to radio and TV<br />
reception.<br />
Changes or modifications to this equipment that are not expressly<br />
approved in advance by StorageTek will void the warranty. In addition,<br />
changes or modifications to this equipment might cause it to create<br />
harmful interference.<br />
■ FCC Compliance Statement<br />
The following compliance statement pertains to Federal Communications<br />
Commission Rules 47 CFR 15.105:<br />
Note: This equipment has been tested and found to comply to the limits for<br />
Class A digital devices pursuant to Part 15 of the FCC Rules. These limits<br />
are designed to provide reasonable protection against harmful<br />
interference when the equipment is operated in a commercial<br />
environment. This equipment generates, uses, and can radiate radio<br />
frequency energy and, if not installed in accordance with the instruction<br />
manual, may cause harmful interference to radio communications.<br />
Operation of this equipment in a residential area is likely to cause<br />
harmful interference, in which case the user will be required to correct<br />
the interference at his or her own expense.<br />
95739 Ninth Edition xxiii
Notices<br />
■ Japanese Compliance Statement<br />
The following compliance statement in Japanese pertains to VCCI EMI<br />
regulations:<br />
English translation: This is a Class A product based on the standard of the<br />
Voluntary Control Council for Interference by Information Technology<br />
Equipment (VCCI). If this equipment is used in a domestic environment, radio<br />
disturbance may occur, in which case, the user may be required to take<br />
corrective actions.<br />
■ Taiwan Warning Label Statement<br />
The following warning label statement pertains to BSMI regulations in Taiwan,<br />
R.O.C.:<br />
English translation: This is a Class A product. In a domestic environment, this<br />
product may cause radio interference, in which case, the user may be required<br />
to take adequate measures.<br />
xxiv Ninth Edition 95739
Notices<br />
■ Internal Code License Statement<br />
The following is the Internal Code License Agreement from StorageTek:<br />
NOTICE<br />
INTERNAL CODE LICENSE<br />
PLEASE READ THIS NOTICE CAREFULLY BEFORE INSTALLING AND OPERATION THIS EQUIPMENT. THIS<br />
NOTICE IS A LEGAL AGREEMENT BETWEEN YOU (EITHER AN INDIVIDUAL OR ENTITY), THE END USER, AND<br />
STORAGE TECHNOLOGY CORPORATION (“STORAGETEK”), THE MANUFACTURER OF THE EQUIPMENT. BY<br />
OPENING THE PACKAGE AND ACCEPTING AND USING ANY UNIT OF EQUIPMENT DESCRIBED IN THIS<br />
DOCUMENT, YOU AGREE TO BECOME BOUND BY THE TERMS OF THIS AGREEMENT. IF YOU DO NOT<br />
AGREE WITH THE TERMS OF THIS AGREEMENT, DO NOT OPEN THE PACKAGE AND USE THE EQUIPMENT. IF<br />
YOU DO NOT HAVE THE AUTHORITY TO BIND YOUR COMPANY, DO NOT OPEN THE PACKAGE AND USE<br />
THE EQUIPMENT. IF YOU HAVE ANY QUESTIONS, CONTACT THE AUTHORIZED STORAGETEK DISTRIBUTOR<br />
OR RESELLER FROM WHOM YOU ACQUIRED THIS EQUIPMENT. IF THE EQUIPMENT WAS OBTAINED BY YOU<br />
DIRECTLY FROM STORAGETEK, CONTACT YOUR STORAGETEK REPRESENTATIVE.<br />
1. Definitions: The following terms are defined as<br />
follows:<br />
a. “Derivative works” are defined as works based<br />
upon one or more preexisting works, such as a<br />
translation or a musical arrangement, or any<br />
other form in which a work may be recast,<br />
transformed, or adapted. A work consisting of<br />
editorial revision, annotations, elaboration, or<br />
other modifications which, as a whole,<br />
represent an original work of authorship, is a<br />
Derivative work.<br />
b. “Internal Code” is Microcode that (i) is an<br />
integral part of Equipment, (ii) is required by<br />
such Equipment to perform its data storage and<br />
retrieval functions, and (iii) executes below the<br />
user interface of such Equipment. Internal code<br />
does not include other Microcode or software,<br />
including data files, which may reside or<br />
execute in or be used by or in connection with<br />
such Equipment, including, without limitation,<br />
Maintenance Code.<br />
c. “Maintenance Code” is defined as Microcode<br />
and other software, including data files, which<br />
may reside or execute in or be used by or in<br />
connection with Equipment, and which<br />
detects, records, displays, and/or analyzes<br />
malfunctions in the Equipment.<br />
d. “Microcode” is defined as a set of instructions<br />
(software) that is either imbedded into or is to<br />
be loaded into the Equipment and executes<br />
below the external user interface of such<br />
Equipment. Microcode includes both Internal<br />
Code and Maintenance Code, and may be in<br />
mag<strong>net</strong>ic or other storage media, integrated<br />
circuitry, or other media.<br />
2. The Equipment you have acquired by purchase or<br />
lease is manufactured by or for StorageTek and<br />
contains Microcode. By accepting and operating this<br />
Equipment you acknowledge that StorageTek or its<br />
licensor(s) retain(s) ownership of all Microcode, as<br />
well as all copies thereof, that may execute in or be<br />
used in the operation or servicing of the Equipment<br />
and that such Microcode is copyrighted by<br />
StorageTek or its licensor(s).<br />
3. StorageTek hereby grants you, the end user of the<br />
Equipment, a personal, nontransferable (except as<br />
permitted in the transfer terms in paragraph 7<br />
below), nonexclusive license to use each copy of<br />
the Internal Code (or any replacement provided by<br />
StorageTek or your authorized StorageTek<br />
distributor or reseller) which license authorizes you,<br />
the end user, to execute the Internal Code solely to<br />
enable the specific unit of Equipment for which the<br />
copy of Internal Code is provided to perform its<br />
data storage and retrieval functions in accordance<br />
with StorageTek’s (or its licensor’s) official<br />
published specifications.<br />
4. Your license is limited to the use of the Internal<br />
Code as set forth in paragraph 3 above. You may<br />
not use the Internal Code for any other purpose.<br />
You may not, for example, do any of the following:<br />
(i) access copy, display, print, adapt, alter, modify,<br />
patch, prepare Derivative works of, transfer, or<br />
distribute (electronically or otherwise) or otherwise<br />
use the Internal Code;<br />
(ii) reverse assemble, decode, translate, decompile,<br />
or otherwise reverse engineer the Internal Code<br />
(except as decompilation may be expressly<br />
permitted under applicable European law solely for<br />
the purpose of gaining information that will allow<br />
95739 Ninth Edition xxv
Notices<br />
interoperability when such information is not<br />
otherwise readily available); or<br />
(iii) sublicense, assign, or lease the Internal Code or<br />
permit another person to use such Internal Code, or<br />
any copy of it.<br />
If you need a backup or archival copy of the<br />
Internal Code, StorageTek, or your authorized<br />
StorageTek distributor or reseller, will make one<br />
available to you, it being acknowledged and agreed<br />
that you have no right to make such a copy.<br />
5. Nothing in the license set forth in paragraph 3<br />
above or in this entire Notice shall convey, in any<br />
manner, to you any license to or title to or other<br />
right to use any Maintenance code, or any copy of<br />
such Maintenance Code. Maintenance Code and<br />
StorageTek’s service tools and manuals may be kept<br />
at your premises, or they may be supplied with a<br />
unit of Equipment sent to you and/or included on<br />
the same media as Internal Code, but they are to be<br />
used only by StorageTek’s customer service<br />
personnel or those of an entity licensed by<br />
StorageTek, all rights in and to such Maintenance<br />
Code, service tools and manuals being reserved by<br />
StorageTek or its licensors. You agree that you shall<br />
not use or attempt to use the Maintenance Code or<br />
permit any other third party to use and access such<br />
Maintenance Code.<br />
6. You, the end user, agree to take all appropriate<br />
steps to ensure that all of your obligations set forth<br />
in this Notice, particularly in paragraphs 4 and 5,<br />
are extended to any third party having access to the<br />
Equipment.<br />
7. You may transfer possession of the Internal Code to<br />
another party only with the transfer of the<br />
Equipment on which its use is authorized, and your<br />
license to use the Internal Code is discontinued<br />
when you are no longer an owner or a rightful<br />
possessor of the Equipment. You must give such<br />
transferee all copies of the Internal Code for the<br />
transferred Equipment that are in your possession,<br />
along with a copy of all provisions of this Notice.<br />
Any such transfer by you is automatically (without<br />
further action on the part of either party) expressly<br />
subject to all the terms and conditions of this Notice<br />
passing in full to the party to whom such<br />
Equipment is transferred, and such transferee<br />
accepts the provisions of this license by initial use<br />
of the Internal Code. You cannot pass to the<br />
transferee of the Equipment any greater rights than<br />
granted under this Notice, and shall hold<br />
StorageTek harmless from any claim to the contrary<br />
by your transferee or its successors or assigns. In<br />
addition, the terms and conditions of this Notice<br />
apply to any copies of Internal Code now in your<br />
possession or use or which you hereafter acquire<br />
from either StorageTek or another party.<br />
8. You acknowledge that copies of both Internal Code<br />
and Maintenance Code may be installed on the<br />
Equipment before shipment or included with the<br />
Equipment and other material shipped to you, all<br />
for the convenience of StorageTek’s service<br />
personnel or service providers licensed by<br />
StorageTek, and that during the warranty period, if<br />
any, associated with the Equipment, and during<br />
periods in which the Equipment is covered under a<br />
maintenance contract with StorageTek or service<br />
providers licensed by StorageTek, both Internal<br />
Code and Maintenance Code may reside and be<br />
executed in or used in connection with such<br />
Equipment, and you agree that no rights to<br />
Maintenance Code are conferred upon you by such<br />
facts. StorageTek or the licensed service provider<br />
may keep Maintenance Code and service tools and<br />
manuals on your premises but they are to be used<br />
only by StorageTek’s customer service personnel or<br />
those of service providers licensed by StorageTek.<br />
You further agree that upon (i) any termination of<br />
such warranty period or maintenance contract<br />
period; or (ii) transfer of possession of the<br />
Equipment to another party, StorageTek and its<br />
authorized service providers shall have the right<br />
with respect to the affected Equipment to remove<br />
all service tools and manuals and to remove or<br />
disable all Maintenance Code and/or replace<br />
Microcode which includes both Internal Code and<br />
Maintenance Code with Microcode that consists<br />
only of Internal Code.<br />
xxvi Ninth Edition 95739
Overview<br />
1<br />
This chapter provides general information about the <strong>9840</strong> <strong>Tape</strong> <strong>Drive</strong>:<br />
• “<strong>9840</strong> <strong>Tape</strong> <strong>Drive</strong>”<br />
• “Operator Panel” on page 1-4<br />
• “Cartridge <strong>Tape</strong>s” on page 1-7<br />
• “Models” on page 1-9<br />
• “Configurations” on page 1-14<br />
• “Host Environments” on page 1-15<br />
• “Host Interfaces” on page 1-15<br />
■ <strong>9840</strong> <strong>Tape</strong> <strong>Drive</strong><br />
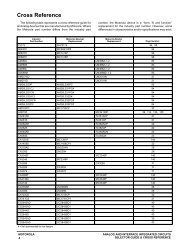
The StorageTek <strong>9840</strong> <strong>Tape</strong> <strong>Drive</strong> is a small, modular, high-performance tape<br />
drive designed for the enterprise and multi-platform environments. It operates<br />
in a variety of software, hardware, host, and input/output channel<br />
environments.<br />
The <strong>9840</strong> is available in desktop, rack-mount, and library-attached<br />
configurations. The desktop and rack-mount configurations have the options of<br />
manual cartridge tape loading or the automatic cartridge scratch loader (CSL).<br />
Host interfaces for the <strong>9840</strong> include Enterprise Systems Connection (ESCON),<br />
Fibre Channel, or small computer system interface (SCSI).<br />
Figure 1-1. <strong>9840</strong> <strong>Tape</strong> <strong>Drive</strong> Desktop Configuration<br />
C53190<br />
95739 Ninth Edition 1-1
<strong>9840</strong> <strong>Tape</strong> <strong>Drive</strong><br />
Configuration Details<br />
Table 1-1 shows the details of the <strong>9840</strong> <strong>Tape</strong> <strong>Drive</strong> configurations.<br />
Table 1-1. <strong>9840</strong> Configurations<br />
Configuration<br />
Desktop<br />
(manual-load)<br />
Desktop (CSL)<br />
Rack-mount<br />
(manual-load)<br />
Note 1<br />
Rack-mount (CSL)<br />
Display and Indicators<br />
Interface<br />
Fibre Channel or<br />
SCSI<br />
ESCON, Fibre<br />
Channel, or SCSI<br />
ESCON, Fibre<br />
Channel, or SCSI<br />
ESCON , Fibre<br />
Channel, or SCSI<br />
Number of<br />
<strong>Drive</strong>s<br />
Figure and Page<br />
1 Figure 1-1 on<br />
page 1-1<br />
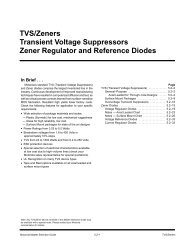
The <strong>9840</strong> <strong>Tape</strong> <strong>Drive</strong> operator panel display and indicators (Figure 1-2) help<br />
you isolate problems and inform you of routine maintenance procedures. You<br />
do not need to interrupt library operation for routine maintenance, such as<br />
cleaning the drive. Other problems, such as those described in Chapter 5,<br />
“<strong>Drive</strong> Errors and Messages,” may require other actions.<br />
Note: Figure 1-2 illustrates a standard operator panel. Figure 1-4 on page 1-6<br />
illustrates the Cartridge Scratch Loader (CSL) operator panel.<br />
1<br />
1-12 Figure 1-11 on<br />
page 1-13<br />
1-6 Figure 1-9 on<br />
page 1-11<br />
Library-attached Note 2 Note 3 Figure 1-7 on<br />
page 1-9<br />
Notes:<br />
1. <strong>Manual</strong>-load and CSL drives may be intermixed in a single rack.<br />
Refer to Table 1-4 on page 1-14 for specific number of CSL and<br />
drives installed within each rack.<br />
2. Interfaces vary with each library. Refer to Table 1-4 on page 1-14<br />
for specific interfaces.<br />
3. The number of drives in each library varies. Refer to Table 1-4 on<br />
page 1-14 for specific number of drives installed within each<br />
library.<br />
1-2 Ninth Edition 95739
<strong>9840</strong> <strong>Tape</strong> <strong>Drive</strong><br />
Figure 1-2. Standard Operator Panel<br />
POWER<br />
INDICATOR<br />
ACTIVITY<br />
INDICATOR<br />
SERVICE<br />
INDICATOR<br />
CLEAN<br />
INDICATOR<br />
IPL<br />
SWITCH<br />
MANUAL<br />
UNLOAD<br />
DEVICE<br />
UNLOAD<br />
SWITCH<br />
OPERATOR<br />
DISPLAY<br />
MENU<br />
SWITCH<br />
SELECT<br />
SWITCH<br />
DATA<br />
CARTRIDGE<br />
C53117<br />
Authorized service personnel must resolve some problems, such as those<br />
internal to the <strong>9840</strong> <strong>Tape</strong> <strong>Drive</strong>, by replacing the tape drive. Chapter 5, “<strong>Drive</strong><br />
Errors and Messages,” provides additional information about contacting<br />
StorageTek service.<br />
Note: Refer to Chapter 6, “Cartridge Scratch Loader,” to resolve CSL specific<br />
problems.<br />
95739 Ninth Edition 1-3
Operator Panel<br />
■ Operator Panel<br />
The operator panel is the interface between the operator and the <strong>9840</strong> <strong>Tape</strong><br />
<strong>Drive</strong>.<br />
Two types of operator panels are available for the <strong>9840</strong> <strong>Tape</strong> <strong>Drive</strong> equipment:<br />
• Standard<br />
• CSL<br />
Figure 1-3 shows the standard operator panel, used in the desktop, rack-mount,<br />
and library configurations.<br />
Figure 1-4 on page 1-6 shows the CSL operator panel, used in the desktop or<br />
rack-mount CSL configuratons.<br />
Notes:<br />
Standard Operator Panel<br />
• The standard and CSL operator panels use small push-button<br />
switches. The term switch or switches is used to identify them<br />
throughout this manual.<br />
• The standard <strong>9840</strong> <strong>Tape</strong> <strong>Drive</strong> operator panel switches and<br />
indicators are replicated on the CSL panel. See Figure 1-4 on<br />
page 1-6.<br />
The standard operator panel (Figure 1-3) has a 10-digit display, four switches,<br />
and four indicators.<br />
The standard <strong>9840</strong> <strong>Tape</strong> <strong>Drive</strong> (Figure 1-3) operator panel switches, indicators,<br />
and a display are described in Chapter 2, “Operator Panel Details.”<br />
1-4 Ninth Edition 95739
Operator Panel<br />
Figure 1-3. Standard Operator Panel<br />
POWER<br />
INDICATOR<br />
ACTIVITY<br />
INDICATOR<br />
SERVICE<br />
INDICATOR<br />
CLEAN<br />
INDICATOR<br />
IPL<br />
SWITCH<br />
MANUAL<br />
UNLOAD<br />
DEVICE<br />
UNLOAD<br />
SWITCH<br />
OPERATOR<br />
DISPLAY<br />
MENU<br />
SWITCH<br />
SELECT<br />
SWITCH<br />
DATA<br />
CARTRIDGE<br />
C53117<br />
Note: A qualified service person can configure the <strong>9840</strong> <strong>Tape</strong> <strong>Drive</strong> from the<br />
operator panel using instructions provided in the <strong>9840</strong> <strong>Tape</strong> <strong>Drive</strong><br />
Service <strong>Reference</strong> <strong>Manual</strong> (part number 95740).<br />
When the <strong>9840</strong> <strong>Tape</strong> <strong>Drive</strong> is installed in some libraries, a duplicate operator<br />
panel is mounted behind the drive for use by service personnel.<br />
CSL Operator Panel<br />
The CSL operator panel (Figure 1-4) allows a human interface to the subsystem.<br />
When the <strong>9840</strong> <strong>Tape</strong> <strong>Drive</strong> is installed in a CSL, the front operator panel<br />
switches and indicators are replicated on the CSL panel. See Chapter 6,<br />
“Cartridge Scratch Loader,” for CSL switch usage and indicator information.<br />
The right half of the operator panel contains the indicators and switches<br />
specifically for the CSL. They are:<br />
• Operator Indicator (6)<br />
• System Indicator (7)<br />
• Automatic Indicator (8)<br />
• <strong>Manual</strong> Indicator (9)<br />
• START Switch (14)<br />
• AUTOLOAD MODE Switch (15)<br />
95739 Ninth Edition 1-5
Operator Panel<br />
Figure 1-4. CSL Operator Panel<br />
1 2 3 4 5 6 7 8 9<br />
service<br />
10 11 12 13 14 15<br />
1. Power Indicator<br />
2. Activity Indicator<br />
3. Clean Indicator<br />
4. Service Indicator<br />
5. IPL Switch<br />
6. Operator Indicator<br />
7. System Indicator<br />
8. Automatic Indicator<br />
9. <strong>Manual</strong> Indicator<br />
10. Unload Switch<br />
11. Menu Switch<br />
12. Select Switch<br />
13. Operator Display<br />
14. Start Switch<br />
15. Autoload Mode Switch<br />
C53362<br />
Operator Display<br />
This operator display allows you to view the status of the <strong>9840</strong> <strong>Tape</strong> <strong>Drive</strong> and<br />
CSL. It allows you to view selections such as:<br />
• <strong>Drive</strong> configuration settings<br />
• <strong>Drive</strong> firmware release level<br />
• Compression status<br />
• Security<br />
• Interface type and settings<br />
• <strong>Tape</strong> bar usage<br />
• Language<br />
• VolSafe<br />
• Emulation<br />
• Library addresses (if applicable)<br />
• CSL settings<br />
Chapter 4, “Menus,” provides specific operations of the standard operator<br />
panel. Chapter 6, “Cartridge Scratch Loader,” provides specific operations of the<br />
CSL operator panel.<br />
1-6 Ninth Edition 95739
Cartridge <strong>Tape</strong>s<br />
■ Cartridge <strong>Tape</strong>s<br />
Design<br />
Three types of <strong>9840</strong> <strong>Tape</strong> <strong>Drive</strong> cartridge tapes are available..<br />
• The standard data cartridge tape has white labels. The media ID label has a<br />
capital “R.” When write-enbaled, the standard cartridge tape allows new<br />
data to overwrite existing data. See Figure 1-5 on page 1-8 and Table 1-2.<br />
• The VolSafe data cartridge tape has yellow labels (shaded areas in Figure 1-6<br />
on page 1-8). The media ID label has a capital “R.” When write-enabled, the<br />
VolSafe cartridge tape prevents existing data from being overwritten; it<br />
allows new data to be appended only. SeeFigure 1-6 on page 1-8 and<br />
Table 1-2.<br />
Note: VolSafe is certified at <strong>9840</strong> firmware level 1.28.106. There is no<br />
warranty for VolSafe in drives with a firmware level lower than<br />
1.28.106.<br />
Contact your CSE to update your firmware and enable the VolSafe feature.<br />
• The <strong>9840</strong> cleaning cartridge dry-cleans the <strong>9840</strong> tape path with nonmag<strong>net</strong>ic<br />
media. The media ID label has a capital “U.”<br />
<strong>9840</strong> cartridge tapes have the same dimensions as 18- and 36-track cartridges<br />
and thus can coexist with them in libraries. <strong>9840</strong> cartridge tapes have the supply<br />
and takeup hubs in the cartridge. This permits midpoint loading and fast access.<br />
See Appendix A, Product Specifications, for more information about cartridge<br />
tapes.<br />
Table 1-2 shows compares the standard and VolSafe cartridge tapess.<br />
Table 1-2. Standard and VolSafe Cartridges<br />
Feature Standard VolSafe<br />
Manufacturer Label Area White Yellow<br />
Customer Label Area White White<br />
Access Door Same Same<br />
Write Protect Switch White Yellow<br />
Finger Grips Same Same<br />
Volser Label Area Same Same<br />
Media ID<br />
(human or barcode identifiable)<br />
White<br />
Yellow<br />
95739 Ninth Edition 1-7
Cartridge <strong>Tape</strong>s<br />
Table 1-2. Standard and VolSafe Cartridges (Continued)<br />
Feature Standard VolSafe<br />
Media ID<br />
(four machine-identifiable<br />
dimples in the plastic case)<br />
All four dimples are<br />
the same depth.<br />
Manufacturer Part ID White White<br />
Figure 1-5. Standard Cartridge <strong>Tape</strong><br />
The first dimple is<br />
deeper than the rest.<br />
MANUFACTURER<br />
LABEL<br />
AREA<br />
CUSTOMER<br />
LABEL<br />
AREA<br />
MEDIA ID<br />
LABEL<br />
VOLSER<br />
LABEL<br />
FINGER<br />
GRIPS<br />
WRITE<br />
PROTECT<br />
SWITCH<br />
(FORWARD<br />
POSITION IS<br />
WRITE PROTECTED)<br />
REAR VIEW<br />
C53069<br />
Figure 1-6. VolSafe Cartridge <strong>Tape</strong><br />
MANUFACTURER<br />
LABEL<br />
AREA<br />
CUSTOMER<br />
LABEL<br />
AREA<br />
MEDIA ID<br />
LABEL<br />
VOLSER<br />
LABEL<br />
FINGER<br />
GRIPS<br />
WRITE<br />
PROTECT<br />
SWITCH<br />
(FORWARD<br />
POSITION IS<br />
WRITE PROTECTED)<br />
REAR VIEW<br />
C53623<br />
1-8 Ninth Edition 95739
Models<br />
Appendix A, “Product Specifications.” provides specifications for <strong>9840</strong> cartridge<br />
tapes. For additional information about cartridge tapes and labels, contact the<br />
Atlanta Media Service Center at 1-800-905-8502 (voice) or 1-877-888-0609 (fax).<br />
■ Models<br />
Library <strong>Drive</strong>s<br />
This section covers <strong>9840</strong> <strong>Tape</strong> <strong>Drive</strong>s installed within a library, rack-mountable<br />
drives, and rack-mountable CSLs. Library, desktop, and rack-mountable<br />
configurations are identified in Table 1-4 on page 1-14.<br />
The <strong>9840</strong> <strong>Tape</strong> <strong>Drive</strong> installs in many StorageTek libraries. Refer to Figure 1-7 to<br />
see a typical drive configured for a library. The drive is normally attached to a<br />
tray allowing easy installation into a library.<br />
Figure 1-7. <strong>9840</strong> <strong>Tape</strong> <strong>Drive</strong> Assembly for a 9310 or 9740 Library<br />
C53070<br />
95739 Ninth Edition 1-9
Models<br />
StorageTek Libraries<br />
Table 1-4 on page 1-14 provides all of the current library configurations. The<br />
L180 and L700 libraries (Figure 1-8) are new StorageTek libraries.<br />
Figure 1-8. L180 and L700 Libraries<br />
L180 Libary<br />
L700 Libary<br />
C53490<br />
L180 Library<br />
This library has four major internal components:<br />
L700 Library<br />
• A robot, which mounts and dismounts cartridges<br />
• Storage cells for 84 to 174 data cartridge tapes<br />
• A cartridge access port (CAP) that holds up to 10 cartridge tapes in two<br />
magazines<br />
• <strong>Drive</strong>s, which perform read/write operations<br />
Note: Up to six <strong>9840</strong> <strong>Tape</strong> <strong>Drive</strong>s may be installed in the L180 Library.<br />
This library also has four major internal components:<br />
• A robot, which mounts and dismounts cartridges<br />
• Storage cells for 156 to 678 data cartridge tapes<br />
• A CAP that holds up to 20 cartridges in four magazines with an optional<br />
second CAP that holds the same number or cartridges<br />
• <strong>Drive</strong>s, which perform read/write operations<br />
Note: Up to twelve <strong>9840</strong> <strong>Tape</strong> <strong>Drive</strong>s may be installed in the L700<br />
Library.<br />
1-10 Ninth Edition 95739
Models<br />
Cartridge Scratch Loader (CSL)<br />
Shipment<br />
Figure 1-9. CSL in Tray<br />
The CSL consists of a <strong>9840</strong> <strong>Tape</strong> <strong>Drive</strong>, a power supply, and a scratch loader.<br />
The CSL is an electromechanical device that can load and unload up to seven<br />
cartridge tapes. It also has a feed channel to mount a priority cartridge into the<br />
tape drive.<br />
The CSL has three modes of operation. They are:<br />
• Automatic: allows the CSL to operate automatically.<br />
• <strong>Manual</strong>: allows the CSL to operate manually only.<br />
• System: allows the host to control the CSL.<br />
The CSL ships as a 19 inch tray (Figure 1-9) that can be mounted into a rack.<br />
One to six CSLs may be installed within the rack enclosure.<br />
FEED<br />
CHANNEL<br />
INPUT<br />
BIN<br />
OUTPUT<br />
BIN<br />
OP<br />
PANEL<br />
C53614<br />
Model Numbers<br />
Refer to Table 1-3 for rack mount model numbers.<br />
Table 1-3. CSL Configurations<br />
CSL Configuration<br />
Model Number<br />
Rack Mount, SCSI<br />
<strong>9840</strong>S01<br />
Rack Mount, ESCON<br />
<strong>9840</strong>S02<br />
Note: Refer to the System Assurance Guide (SAG) for feature codes.<br />
95739 Ninth Edition 1-11
Models<br />
Rack-mountable CSLs<br />
Refer to Figure 1-10 for the Rack-mountable CSLs. This rack contains 6 CSLs.<br />
The rack-mountable CSL ships as a SCSI or ESCON interface. The rack may<br />
contain a combination of <strong>9840</strong> <strong>Tape</strong> <strong>Drive</strong>s and CSLs.<br />
The rack can have up to six CSLs with one per tray, up to 12 manual drives with<br />
two per tray, or a combination of CSLs and manual drives to fill the six slots.<br />
Different trays may have different interfaces.<br />
Figure 1-10. Rack-mountable CSL<br />
C53615<br />
1-12 Ninth Edition 95739
Models<br />
Rack-mountable <strong>Drive</strong>s<br />
Refer to Figure 1-11 to view the <strong>9840</strong> <strong>Tape</strong> <strong>Drive</strong> rack-mountable drives. Fibre<br />
Channel, ESCON, and SCSI <strong>9840</strong> <strong>Tape</strong> <strong>Drive</strong>s may be installed in the rack.<br />
Figure 1-11. Rack-mountable <strong>Drive</strong>s<br />
Stand-Alone<br />
Rack<br />
C53408<br />
The rack (Figure 1-11) may contain up to twelve <strong>9840</strong> <strong>Tape</strong> <strong>Drive</strong>s. The <strong>9840</strong><br />
<strong>Tape</strong> <strong>Drive</strong> is a field replaceable unit (FRU). It is comprised of:<br />
• A drive, which is 8.255 cm (3.25 in.) high, 14.605 cm (5.75 in.) wide, and<br />
38.10 cm (15 in.) deep.<br />
• A power supply.<br />
Note: The rack can have up to six CSLs with one per tray, up to 12 manual<br />
drives with two per tray, or a combination of CSLs and manual drives to<br />
fill the six slots. Different trays may have different interfaces.<br />
95739 Ninth Edition 1-13
Configurations<br />
■ Configurations<br />
Table 1-4. shows the configurations in which the <strong>9840</strong> is available. In each case,<br />
the drive and power supply are attached with installation-unique hardware.<br />
Table 1-4. Configurations of the <strong>9840</strong> <strong>Tape</strong> <strong>Drive</strong><br />
Library Type Description<br />
9310 Library The StorageTek PowderHorn library. It holds up to 6,000<br />
cartridge tapes and up to 80 drives in up to four 20-drive<br />
9741 cabi<strong>net</strong>s. ESCON, Fibre Channel, and SCSI interfaces<br />
are available.<br />
9360 Library The StorageTek WolfCreek library. It holds up to 1,000<br />
cartridge tapes and up to 20 drives in two 10-drive 9741<br />
cabi<strong>net</strong>s. ESCON, Fibre Channel, and SCSI interfaces are<br />
available.<br />
9710 Library A StorageTek TimberWolf family library, it holds from 224 to<br />
588 cartridge tapes and up to 10 drives. Fibre Channel and<br />
SCSI interfaces are available.<br />
9738 Library A StorageTek TimberWolf family library. It holds 30 cartridge<br />
tapes and up to 3 drives. Fibre Channel and SCSI interfaces<br />
are available.<br />
9740 Library A StorageTek TimberWolf family library. It holds 326 or 494<br />
cartridge tapes and up to 10 drives. Up to six 9740 libraries<br />
can be interconnected in the Enterprise environment.<br />
ESCON, Fibre Channel, and SCSI interfaces are available.<br />
L180 Library A new StorageTek library. It holds 84 to 174 cartridge tapes<br />
and up to 6 drives. Fibre Channel and SCSI interfaces are<br />
available.<br />
L700 Library A new StorageTek library. It holds 156 to 678 cartridge tapes<br />
and up to 12 drives. Fibre Channel and SCSI interfaces are<br />
available.<br />
Rack-mount<br />
(manual-load<br />
and CSL)<br />
Desktop<br />
(manual-load)<br />
Desktop (CSL)<br />
One manual-load drive, two manual-load drives side-byside,<br />
or one CSL drive, come mounted on a rack-mount tray.<br />
StorageTek’s equipment rack holds up to six trays. ESCON,<br />
Fibre Channel, SCSI interfaces are available.<br />
The desktop manual-load configuration consists of a <strong>9840</strong><br />
<strong>Tape</strong> <strong>Drive</strong> and a power supply. Fibre Channel and SCSI<br />
interfaces are available.<br />
The Desktop CSL configuration consists of a <strong>9840</strong> <strong>Tape</strong><br />
<strong>Drive</strong>, a CSL mechanism, and a power supply. ESCON, Fibre<br />
Channel, and SCSI interfaces are available.<br />
1-14 Ninth Edition 95739
Host Environments<br />
■ Host Environments<br />
The <strong>9840</strong> <strong>Tape</strong> <strong>Drive</strong> integrates with both Enterprise and multi-platform host<br />
environments, depending on the platform and interface options.<br />
• Enterprise host environment: An example of this environment include<br />
the following components as used in a StorageTek 9310 library:<br />
• An IBM ES/9000 host<br />
• An MVS/ESA operating system (version 5.2.2 or higher) with the<br />
StorageTek Host Software Component (HSC) library manager software<br />
(version 2.1 or higher)<br />
• Third-party media management software<br />
• ESCON data interface (to the drives) and RS-232 control interface (to the<br />
library)<br />
• Multi-platform host environment: The <strong>9840</strong> <strong>Tape</strong> <strong>Drive</strong> uses Fibre<br />
Channel or a standard SCSI interface to facilitate operation with UNIX, NT,<br />
and many other platforms. Certification with new platforms and host-based<br />
applications is an ongoing process.<br />
■ Host Interfaces<br />
For an up-to-date list of certified platforms and applications, contact either<br />
your StorageTek marketing representative or the StorageTek Sales Support<br />
Desk at 1-800-275-4785.<br />
The <strong>9840</strong> <strong>Tape</strong> <strong>Drive</strong> uses a Fibre Channel, SCSI, or an ESCON host interface.<br />
Each type of interface requires its own factory-installed interface card. Refer to<br />
Table 1-5 for products and <strong>9840</strong> <strong>Tape</strong> <strong>Drive</strong> interfaces offered by StorageTek.<br />
Table 1-5. Products and <strong>9840</strong> <strong>Tape</strong> <strong>Drive</strong> Interfaces<br />
Product<br />
<strong>9840</strong> <strong>Tape</strong> <strong>Drive</strong> Interface<br />
9310 Library (PowderHorn) ESCON, Fibre Channel, or SCSI<br />
9710 Library (a TimberWolf model) Fibre Channel or SCSI<br />
9738 Library (a TimberWolf model) Fibre Channel or SCSI<br />
9740 Library (a TimberWolf model) ESCON, Fibre Channel, or SCSI<br />
L180 Library<br />
Fibre Channel or SCSI<br />
L700 Library<br />
Fibre Channel or SCSI<br />
Desktop (manual-mount)<br />
Fibre Channel or SCSI<br />
Desktop (CSL)<br />
ESCON, Fibre Channel, or SCSI<br />
Rack-mount (<strong>Manual</strong>-mount and CSL) ESCON, Fibre Channel, or SCSI<br />
95739 Ninth Edition 1-15
Host Interfaces<br />
ESCON<br />
Fibre Channel<br />
The ESCON <strong>9840</strong> <strong>Tape</strong> <strong>Drive</strong> has one ESCON interface port, which supports<br />
128 logical paths. ESCON subsystem performance and data availability vary<br />
according to the installation.<br />
The Fibre-Channel (FC) configuration of the <strong>9840</strong> <strong>Tape</strong> drive has dual fiberoptic<br />
ports to allow for point-to-point, arbitrated-loop (including redundantloop),<br />
and fabric topology. The FC interface for the <strong>9840</strong> <strong>Tape</strong> <strong>Drive</strong> uses Fibre<br />
Channel protocol for SCSI (FCP-2).<br />
The FC configuration of the <strong>9840</strong> <strong>Tape</strong> <strong>Drive</strong> connects to other devices with the<br />
following equipment:<br />
Bridge<br />
Hub<br />
Switch<br />
Connects SCSI devices to an FC <strong>net</strong>work<br />
Connects FC devices to each other in a logical loop<br />
Connects FC devices to each other in a fabric<br />
SCSI<br />
The SCSI <strong>9840</strong> <strong>Tape</strong> <strong>Drive</strong> has one SCSI port. The drive supports all SCSI<br />
variants, which the operator sets. The connector accepts a 68-pin SCSI P-cable.<br />
SCSI enables <strong>9840</strong> <strong>Tape</strong> <strong>Drive</strong>s to connect to the host either directly, in a daisychain<br />
configuration, or in a combination of direct and daisy-chain<br />
configurations. SCSI subsystem performance and data availability vary<br />
according to the installation.<br />
1-16 Ninth Edition 95739
Operator Panel Details<br />
2<br />
This chapter describes the operator panel switches, indicators, and the operator<br />
display for the <strong>9840</strong> <strong>Tape</strong> <strong>Drive</strong>. There are two operator panels (Figure 2-1) for<br />
the <strong>9840</strong> <strong>Tape</strong> <strong>Drive</strong>. They are:<br />
• Standard Operator Panel<br />
• Cartridge Scratch Loader (CSL) Operator Panel<br />
Either operator panel enables you to view the configuration of the <strong>9840</strong> <strong>Tape</strong><br />
<strong>Drive</strong>, and notifies you when further support is required.<br />
Figure 2-1. Operator Panels<br />
Note: The <strong>9840</strong> <strong>Tape</strong> <strong>Drive</strong> and CSL operator panel use small push-button<br />
switches. The term switch or switches is used to identify them<br />
throughout this manual.<br />
Standard Operator Panel<br />
CSL Operator Panel<br />
service<br />
C53639<br />
95739 Ninth Edition 2-1
Standard Operator Panel Switches<br />
■ Standard Operator Panel Switches<br />
The <strong>9840</strong> <strong>Tape</strong> <strong>Drive</strong> operator panel has four switches (Figure 2-2). This section<br />
presents the operator switches in alphabetical order. CSL switches (Figure 2-4<br />
on page 2-7) are discussed later in this chapter.<br />
Figure 2-2. Standard Operator Panel Switches<br />
UNLOAD<br />
SWITCH<br />
MENU<br />
SWITCH<br />
SELECT<br />
SWITCH<br />
IPL<br />
SWITCH<br />
C53641<br />
IPL Switch<br />
Pressing the IPL switch causes an Initial Program Load (IPL) to occur and resets<br />
the <strong>9840</strong> <strong>Tape</strong> <strong>Drive</strong>. This process is identical to the program initiation that<br />
takes place automatically after the power-on sequencing completes. In addition,<br />
the operator panel briefly displays the “IPLPend” (IPL Pending) message when<br />
this switch is pressed.<br />
During the IPL process, the <strong>9840</strong> <strong>Tape</strong> <strong>Drive</strong> operator panel displays the<br />
following messages:<br />
Load CC<br />
Load common controller code.<br />
Load Servo<br />
Load servo code.<br />
Load xxxx<br />
Load interface code, where xxxx is “ESCN” (ESCON), FIBRE<br />
(Fibre Channel), or “SCSI,” which is the type of host interface.<br />
Start Init Start Initialization.<br />
CC Diags<br />
Start the controller diagnostics.<br />
ASIA Diags Start additional diagnostics.<br />
2-2 Ninth Edition 95739
Standard Operator Panel Switches<br />
Menu Switch<br />
Select Switch<br />
Unload Switch<br />
xxxx:Dmp y This message alternates with the preceding message if<br />
unretrieved dumps in the EEPROM exist. xxxx is the fault<br />
symptom code of the most recent diagnostic data dump and y is<br />
the number of uncollected diagnostic data dumps.<br />
The Menu switch is one of the two switches used to manipulate the <strong>9840</strong> <strong>Tape</strong><br />
<strong>Drive</strong> menu. Use the Menu switch and Select switch to access applicable menus.<br />
Pressing the Menu switch accesses the menu system, the menus, and submenus.<br />
The menu system enables the operator to perform a limited set of<br />
operations on the <strong>9840</strong> <strong>Tape</strong> <strong>Drive</strong>.<br />
Pressing the Menu switch in normal operation mode causes the Online/Offline<br />
menu to appear. For most operator operations, such as viewing the <strong>9840</strong> <strong>Tape</strong><br />
<strong>Drive</strong> configuration or its software release level, the <strong>9840</strong> <strong>Tape</strong> <strong>Drive</strong> can<br />
remain online. For other operations, including those performed by authorized<br />
service personnel, the <strong>9840</strong> <strong>Tape</strong> <strong>Drive</strong> must be placed offline. See Chapter 4,<br />
“Menus,” for more details.<br />
The Select switch is one of the two switches used to manipulate the <strong>9840</strong> <strong>Tape</strong><br />
<strong>Drive</strong> menu. Use the Select switch and Menu switch to access applicable menus.<br />
Pressing the Select switch while in the main menu selects one of the following<br />
choices depending on the structure of the main menu:<br />
• A direct configuration or action choice in the main menu itself<br />
• An underlying sub-menu<br />
See Chapter 4, “Menus,” for more details.<br />
Pressing the Unload switch rewinds the tape in the cartridge. The cartridge tape<br />
then ejects from the drive so you can retrieve it.<br />
Pressing the Unload switch during a write operation causes the <strong>9840</strong> <strong>Tape</strong> <strong>Drive</strong><br />
to try to write the remaining data before the cartridge tape unloads. If the<br />
operator panel displays the “UnWr xxxx” (Unwritten Data) message (where<br />
xxxx is the fault symptom code), the attempt failed and some data is not<br />
written to the tape.<br />
At this point, do not press Unload again before you have read the instructions in<br />
Chapter 5, “<strong>Drive</strong> Errors and Messages,” about recovering from an Unwritten<br />
Data condition, see “UnWr Condition” in Chapter 5, “<strong>Drive</strong> Errors and<br />
Messages.”<br />
95739 Ninth Edition 2-3
Standard Operator Panel Indicators<br />
■ Standard Operator Panel Indicators<br />
This section describes the standard operator panel indicators (Figure 2-3),<br />
which are presented in alphabetical order. CSL indicators (Figure 2-4 on<br />
page 2-7) are discussed later in this chapter.<br />
Figure 2-3. Standard Operator Panel Indicators<br />
POWER<br />
INDICATOR<br />
ACTIVITY<br />
INDICATOR<br />
CLEAN<br />
INDICATOR<br />
SERVICE<br />
INDICATOR<br />
C53642<br />
Notes:<br />
Activity Indicator<br />
• A combined display of some operator panel indicators may mean<br />
that you must perform corrective procedures. For more information,<br />
see Chapter 5, “<strong>Drive</strong> Errors and Messages.”<br />
• Specific CSL errors and messages are located in Chapter 6,<br />
“Cartridge Scratch Loader.”<br />
The green Activity indicator signifies the following conditions:<br />
Off<br />
Flashing<br />
On<br />
The cartridge tape is not loaded or it has ejected.<br />
The tape in the cartridge is moving.<br />
The cartridge tape is loaded and the <strong>9840</strong> <strong>Tape</strong> <strong>Drive</strong> is ready.<br />
Clean Indicator<br />
The amber Clean indicator signifies the following conditions:<br />
On<br />
Off<br />
The <strong>9840</strong> <strong>Tape</strong> <strong>Drive</strong> requires cleaning because either<br />
intermittent media errors are detected or a specific length of<br />
tape has passed over the read/write heads.<br />
The <strong>9840</strong> <strong>Tape</strong> <strong>Drive</strong> does not require cleaning.<br />
2-4 Ninth Edition 95739
Standard Operator Panel Indicators<br />
Power Indicator<br />
The green Power indicator signifies the following conditions:<br />
Off<br />
Flashing<br />
The power is off.<br />
The <strong>9840</strong> <strong>Tape</strong> <strong>Drive</strong> is non-operational. The <strong>9840</strong> <strong>Tape</strong> <strong>Drive</strong><br />
may be experiencing one of the following symptoms:<br />
- It is performing a power on or an IPL.<br />
- It is collecting diagnostic data.<br />
- It failed a power-on diagnostic.<br />
See Table 5-2 in Chapter 5, “<strong>Drive</strong> Errors and Messages,” for<br />
more information about these operator panel messages.<br />
On<br />
The power on and IPL completed successfully.<br />
Service Indicator<br />
The red Service indicator signifies the following conditions:<br />
Off<br />
Flashing<br />
An error was not detected.<br />
An error was detected and diagnostic data may have been<br />
collected.<br />
Following a successful IPL and if diagnostic dump data are<br />
available, the operator panel alternates the “*” (asterisk) and the<br />
“xxxx:Dmp y” message (where xxxx is the fault symptom<br />
code of the last diagnostic dump data and y is the number of<br />
uncollected diagnostic data dumps in the EEPROM). See<br />
Table 5-2 in Chapter 5, “<strong>Drive</strong> Errors and Messages,” for more<br />
information about these messages.<br />
The flashing stops, and the messages disappear when you insert<br />
any cartridge tape into the <strong>9840</strong> <strong>Tape</strong> <strong>Drive</strong> or you press a<br />
switch.<br />
If the <strong>9840</strong> <strong>Tape</strong> <strong>Drive</strong> detects the same fault symptom code<br />
again, the operator panel displays the “DumpAgain” message,<br />
which requires authorized service personnel to resolve the<br />
problem.<br />
On constant<br />
A hardware error was detected because a <strong>9840</strong> <strong>Tape</strong> <strong>Drive</strong> is not<br />
functional. If an IPL does not resolve the situation, authorized<br />
service personnel may need to replace the <strong>9840</strong> <strong>Tape</strong> <strong>Drive</strong>.<br />
95739 Ninth Edition 2-5
Operator Display<br />
■ Operator Display<br />
The standard and CSL operator panel has a single-line 10-digit alphanumeric<br />
display that links to the <strong>9840</strong> <strong>Tape</strong> <strong>Drive</strong> and to the host. The operator display<br />
indicates the following:<br />
• The state of the <strong>9840</strong> <strong>Tape</strong> <strong>Drive</strong><br />
• Fault symptom codes, when applicable<br />
• Menu selections and configuration states when the <strong>9840</strong> <strong>Tape</strong> <strong>Drive</strong> is in<br />
Menu mode<br />
Depending on host software support, the display also indicates a cartridge tape<br />
with a particular volume serial number (VOLSER) needs to be loaded. Other<br />
host-generated messages may also appear.<br />
The messages in the <strong>9840</strong> <strong>Tape</strong> <strong>Drive</strong> operator display appear constant or<br />
flashing. In addition, the <strong>9840</strong> <strong>Tape</strong> <strong>Drive</strong> operator display sometimes alternates<br />
messages. This manual provides further information in Chapter 5, “<strong>Drive</strong> Errors<br />
and Messages,” and as specific messages are described throughout this manual.<br />
2-6 Ninth Edition 95739
CSL Operator Panel Switches<br />
■ CSL Operator Panel Switches<br />
The CSL operator panel switches (Figure 2-4) are described in this section.<br />
Note: Refer to Figure 2-1 on page 2-1 to see the standard operator panel and<br />
explanation of its switches.<br />
Figure 2-4. CSL Operator Panel<br />
1 2 3 4 5 6 7 8 9<br />
service<br />
10 11 12 13 14 15<br />
1. Power Indicator<br />
2. Activity Indicator<br />
3. Clean Indicator<br />
4. Service Indicator<br />
5. IPL Switch<br />
6. Operator Indicator<br />
7. System Indicator<br />
8. Automatic Indicator<br />
9. <strong>Manual</strong> Indicator<br />
10. Unload Switch<br />
11. Menu Switch<br />
12. Select Switch<br />
13. Operator Display<br />
14. Start Switch<br />
15. Autoload Mode Switch<br />
C53362<br />
Note: The IPL, Unload, Menu, and Select switches are identical to the switches<br />
located on the standard operator panel. They are not covered in this<br />
section. Only the CSL Autoload Mode and Start switches are covered.<br />
Autoload Mode Switch<br />
The Autoload Mode switch changes the operation of the CSL to one of three<br />
modes: System, Automatic, or <strong>Manual</strong>.<br />
The CSL powers on in the default mode selected in the drive configuration<br />
menu. The default mode is overridden when the switch is used to select a new<br />
setting. The CSL remains in the selected mode while the drive is powered on.<br />
This does not change the IPL default mode in the drive configuration menu.<br />
System Mode It allows the host to control CSL.<br />
Autoload ModeIt allows the CSL to operate automatically.<br />
<strong>Manual</strong> Mode It allows manual operations only.<br />
95739 Ninth Edition 2-7
CSL Operator Panel Indicators<br />
Start Switch<br />
The Start switch restarts CSL operation after the operator empties a full output<br />
bin or replenishes an empty input bin. It is also used to restart CSL operation<br />
after clearing a misfed cartridge.<br />
■ CSL Operator Panel Indicators<br />
The CSL operator panel indicators (Figure 2-4) are described in this section.<br />
They are described in alphabetical order. Refer to Figure 2-1 on page 2-1 to see<br />
the standard operator panel and explanation of its indicators.<br />
Note: The CSL Power, Activity, Clean, and Service indicators are identical to the<br />
indicators located on the <strong>9840</strong> <strong>Tape</strong> <strong>Drive</strong> operator panel. They are not<br />
covered in this section. Only the CSL Automatic, <strong>Manual</strong>, Operator, and<br />
System indicators are covered here.<br />
Automatic Indicator<br />
<strong>Manual</strong> Indicator<br />
The Automatic indicator is green. This indicator illuminates identifying that the<br />
CSL is in the Automatic mode. This mode allows the CSL to operate<br />
automatically.<br />
The <strong>Manual</strong> indicator is green. This indicator illuminates identifying that the<br />
CSL is in the <strong>Manual</strong> mode. This mode allows for manual operation only.<br />
Operator Indicator<br />
System Indicator<br />
The Operator indicator is red. The indicator flashes when the CSL detects an<br />
operator-intervention condition. An operator must inspect the CSL and clear the<br />
malfunction.<br />
When the indicator flashes and the operator panel displays xxxx xxxx, this<br />
indicates a specific tape has been requested from the host.<br />
When the indicator is constantly on, this indicates an error condition. An<br />
operator must correct the obvious malfunction and press the Start switch to IPL<br />
the CSL.<br />
The System indicator is green. This indicator illuminates identifying the CSL is in<br />
the System mode. This mode allows for full host control of the CSL.<br />
2-8 Ninth Edition 95739
Operator Tasks<br />
3<br />
This chapter describes the tasks that you perform with the <strong>9840</strong> <strong>Tape</strong> <strong>Drive</strong>:<br />
• “Powering On a <strong>Drive</strong>” on page 3-1<br />
• “Write-Protecting a Cartridge” on page 3-3<br />
• “Loading a <strong>Drive</strong>” on page 3-5<br />
• “Unloading a <strong>Drive</strong>” on page 3-5<br />
• “Cleaning a <strong>Drive</strong>” on page 3-6<br />
• “Powering Off a <strong>Drive</strong>” on page 3-7<br />
• “Identifying Unrecoverable <strong>Tape</strong>s” on page 3-8<br />
Note: This chapter does not include instructions for using the <strong>9840</strong> <strong>Tape</strong> <strong>Drive</strong><br />
menus; see Chapter 4, “Menus,” for more information.<br />
■ Powering On a <strong>Drive</strong><br />
Power Switch<br />
Follow the instructions in this section to power on a <strong>9840</strong> <strong>Tape</strong> <strong>Drive</strong>.<br />
Note: Refer to Chapter 6, “Cartridge Scratch Loader,” to power on a Cartridge<br />
Scratch Loader (CSL).<br />
The <strong>9840</strong> <strong>Tape</strong> <strong>Drive</strong> might or might not have a power switch when it is<br />
installed in a library. Figure 3-1 illustrates a <strong>9840</strong> <strong>Tape</strong> <strong>Drive</strong> for an L180 or L700<br />
Library. It does have a power switch on the power supply.<br />
Figure 3-1. L180 or L700 Library <strong>9840</strong> <strong>Tape</strong> <strong>Drive</strong><br />
POWER<br />
SWITCH<br />
E53415<br />
95739 Ninth Edition 3-1
Powering On a <strong>Drive</strong><br />
Process<br />
To power on the <strong>9840</strong> <strong>Tape</strong> <strong>Drive</strong> with an IPL, follow these steps:<br />
1. Power on the drive:<br />
a. If the drive has a power switch in the back (Figure 3-1), ensure that the<br />
power cord is plugged in between the drive and the library or rack<br />
power strip and turn the switch to ON.<br />
b. If the drive does not have a power switch in the back, plug in the drive<br />
power cord between the drive and the power strip in the library or rack.<br />
2. Wait until the <strong>9840</strong> <strong>Tape</strong> <strong>Drive</strong> completes the IPL procedure. The green<br />
power indicator illuminates steadily.<br />
Figure 3-2. Operator Display<br />
POWER<br />
INDICATOR<br />
ACTIVITY<br />
INDICATOR<br />
SERVICE<br />
INDICATOR<br />
CLEAN<br />
INDICATOR<br />
IPL<br />
SWITCH<br />
MANUAL<br />
UNLOAD<br />
DEVICE<br />
UNLOAD<br />
SWITCH<br />
OPERATOR<br />
DISPLAY<br />
MENU<br />
SWITCH<br />
SELECT<br />
SWITCH<br />
DATA<br />
CARTRIDGE<br />
C53117<br />
3. Observe for the following indications on the operator display (Figure 3-2):<br />
• The messages “CC DIAGS” and “ASIA DIAGS” indicate that the IPL<br />
diagnostics are active. These messages require no action on your part.<br />
• <strong>Drive</strong> powers on automatically to Online if drive is operable and no<br />
configuration error was encountered.<br />
• <strong>Drive</strong> powers on to Offline if a configuration error was encountered and<br />
the message “Fix_CfgErr” is displayed: see note.<br />
3-2 Ninth Edition 95739
Write-Protecting a Cartridge<br />
• “Memory Err” or “Boot Fail” may be displayed if an error occurs early in<br />
the IPL sequence. These errors will cause the drive to hang.<br />
Note: If any error is displayed, go to Chapter 5, “<strong>Drive</strong> Errors and<br />
Messages,” for problem resolution.<br />
■ Write-Protecting a Cartridge<br />
Switch Positions<br />
The <strong>9840</strong> <strong>Tape</strong> <strong>Drive</strong> uses a standard and VolSafe cartridge (Figure 3-3 on<br />
page 3-4). The VolSafe cartridge can be distinguished from the standard<br />
cartridge by its yellow markings. Refer to Figure 3-3 on page 3-4 to locate the<br />
yellow markings (shaded areas).<br />
Refer to Table 3-1 for explanation of the write protect switch positions. The<br />
switch (Figure 3-3 on page 3-4) is located on the right side of the cartridge.<br />
Table 3-1. Write Protect Switch<br />
Write<br />
Protect<br />
Switch<br />
Unlocked<br />
Locked<br />
Standard Cartridge<br />
Data can be written or<br />
overwritten on the cartridge.<br />
Data can be read from the<br />
cartridge.<br />
Cartridge is write protected.<br />
Data can only be read from<br />
the cartridge.<br />
VolSafe Cartridge<br />
Data can be written but not<br />
overwritten (appended only)<br />
to the data on the cartridge.<br />
Data can be read from the<br />
cartridge.<br />
Cartridge is write protected.<br />
Data can only be read from<br />
the cartridge.<br />
95739 Ninth Edition 3-3
Write-Protecting a Cartridge<br />
Process<br />
Figure 3-3. Cartridges<br />
Follow these instructions to write protect a standard or VolSafe cartridge:<br />
1. Hold the cartridge with the customer label side up and rear volser label<br />
towards you.<br />
2. Locate the write protect switch on the right side of the cartridge<br />
(Figure 3-3).<br />
3. Move the switch to the front of the cartridge (away from you) to the writeprotect<br />
position.<br />
STARDARD CARTRIDGE<br />
VOLSAFE CARTRIDGE<br />
1<br />
2<br />
1<br />
2<br />
WRITE<br />
PROTECT<br />
WRITE<br />
PROTECT<br />
6<br />
5<br />
4<br />
3<br />
6<br />
5<br />
4<br />
3<br />
REAR VIEW<br />
REAR VIEW<br />
C53605<br />
1. Manufacturer Label Area (yellow on VolSafe Cartridge)<br />
2. Customer Label<br />
3. Write Protect Switch (yellow on VolSafe Cartridge)<br />
4. Finger Grips<br />
5. VOLSER Label Area<br />
6. Media Id (machine identifiable-yellow on VolSafe Cartridge)<br />
3-4 Ninth Edition 95739
Loading a <strong>Drive</strong><br />
■ Loading a <strong>Drive</strong><br />
Note: Refer to “CSL Cartridge Loading/Unloading” in Chapter 6, “Cartridge<br />
Scratch Loader” to load a CSL.<br />
To load a cartridge tape, follow these steps:<br />
1. Insert the cartridge tape into the <strong>9840</strong> <strong>Tape</strong> <strong>Drive</strong> in the direction shown in<br />
Figure 3-3 on page 3-4.<br />
2. Wait for the operator panel to display one of the following messages and<br />
take the appropriate action, if necessary:<br />
■ Unloading a <strong>Drive</strong><br />
• A “Ready F” (File Protected) message indicates that a write-protected<br />
cartridge tape loaded successfully.<br />
• A “Ready U” (File Unprotected) message indicates that a write-enabled<br />
cartridge tape loaded successfully.<br />
• A “Ready A” message means that a write-enabled VolSafe cartridge<br />
tape loaded successfully in a VolSafe-enabled drive.<br />
• The “Load xxxx” message indicates that the cartridge tape<br />
unsuccessfully loaded, where the xxxx is the fault symptom code. To<br />
resolve this condition, follow the instructions in Table 5-2 in Chapter 5,<br />
“<strong>Drive</strong> Errors and Messages.”<br />
Note: Refer to “CSL Cartridge Loading/Unloading” in Chapter 6, “Cartridge<br />
Scratch Loader” to unload a CSL.<br />
To unload a cartridge tape, follow these steps:<br />
1. Ensure that the <strong>9840</strong> <strong>Tape</strong> <strong>Drive</strong> is not selected from the host (see “Offline”<br />
in Chapter 4, “Menus”).<br />
Note: If the Unload switch is pressed during a write operation, the <strong>9840</strong> <strong>Tape</strong><br />
<strong>Drive</strong> tries to write the remaining data before the cartridge tape unloads.<br />
If the operator panel displays the “UnWr xxxx” (Unwritten Data)<br />
message (where xxxx is the fault symptom code), the attempt failed and<br />
some data remains unwritten on the tape. For more information about<br />
recovering from an Unwritten Data condition, see “UnWr Condition” in<br />
Chapter 5, “<strong>Drive</strong> Errors and Messages.”<br />
2. Press the Unload switch. One of the following conditions will occur:<br />
• After the tape rewinds, the cartridge tape ejects from the <strong>9840</strong> <strong>Tape</strong><br />
<strong>Drive</strong>. Remove the cartridge tape from the <strong>9840</strong> <strong>Tape</strong> <strong>Drive</strong>.<br />
• The cartridge tape fails to eject after the tape rewinds. See “Jammed<br />
Cartridge” in Chapter 5, “<strong>Drive</strong> Errors and Messages,” for information.<br />
95739 Ninth Edition 3-5
Cleaning a <strong>Drive</strong><br />
■ Cleaning a <strong>Drive</strong><br />
When the amber-colored Clean indicator appears, you must clean the <strong>9840</strong><br />
<strong>Tape</strong> <strong>Drive</strong>. The Clean indicator signifies that particular tape errors occurred or<br />
a specific length of tape passed over the read/write heads. Perform the cleaning<br />
procedure with the <strong>9840</strong> <strong>Tape</strong> <strong>Drive</strong> offline or online.<br />
Note: Use this procedure to clean the drive in a CSL. To load the cleaning<br />
cartridge, follow the load procedures in “CSL Cartridge Loading/<br />
Unloading” in Chapter 6, “Cartridge Scratch Loader.”<br />
You use a dry-cleaning cartridge for this procedure.<br />
Note: Do not clean with the cleaning cartridge unless the Clean indicator<br />
illuminates. Cleaning more frequently may damage the head.<br />
CAUTION:<br />
Do not wet-clean the <strong>9840</strong> <strong>Tape</strong> <strong>Drive</strong>: no chemical cleaning is allowed.<br />
To clean the <strong>9840</strong> <strong>Tape</strong> <strong>Drive</strong>, follow these steps:<br />
1. If applicable, unload the cartridge tape from the drive.<br />
2. Insert a cleaning cartridge into the drive.<br />
Note: If the drive immediately ejects the cleaning cartridge and the<br />
operator panel displays the “Exp ClCart” message, then the<br />
cleaning cartridge is used up. Discard the worn cleaning cartridge<br />
and insert a new cleaning cartridge. The cleaning cartridge can only<br />
be used for about 100 times before you must discard it.<br />
The green Activity indicator flashes to indicate that cleaning is occurring.<br />
When the Clean indicator turns off, cleaning is complete and the cleaning<br />
cartridge ejects.<br />
Note: If the operator panel displays the “Chk xxxx” message, a cleaning<br />
cartridge failure occurred (where xxxx is the fault symptom code).<br />
Try the procedure again with a different cleaning cartridge. If the<br />
problem persists, contact authorized service personnel.<br />
3. Remove the ejected cleaning cartridge from the drive.<br />
3-6 Ninth Edition 95739
Powering Off a <strong>Drive</strong><br />
■ Powering Off a <strong>Drive</strong><br />
To perform a power-off procedure, follow these steps:<br />
Note: Refer to “Power On/Off CSL” in Chapter 6, “Cartridge Scratch Loader” to<br />
power off a CSL.<br />
1. Ensure that the <strong>9840</strong> <strong>Tape</strong> <strong>Drive</strong> is not selected from the host (see “Offline”<br />
in Chapter 4, “Menus”).<br />
2. Unload the cartridge tape from the drive.<br />
3. Remove power from the drive or power supply:<br />
a. If the drive or drive tray has a power switch on the back, turn the switch<br />
to OFF.<br />
b. For library attached drives, turn the power supply switch to OFF<br />
(Figure 3-1 on page 3-1).<br />
c. If the library drive power supply does not have a power switch, unplug<br />
the black-power cord from the power supply. See warning below.<br />
WARNING:<br />
Do not unplug the yellow and black power connector on a library<br />
attached drive. The line is hot and you may be shocked if you touch bare<br />
wires or pins.<br />
95739 Ninth Edition 3-7
Identifying Unrecoverable <strong>Tape</strong>s<br />
■ Identifying Unrecoverable <strong>Tape</strong>s<br />
CAUTION:<br />
Do not degauss <strong>9840</strong> <strong>Tape</strong> <strong>Drive</strong> tapes. Servo tracks are written on the<br />
tape at the factory. When these tracks are mistakenly erased as by<br />
degaussing, the cartridge tape must be discarded.<br />
Defective and degaussed tapes fail in all or most operations. Test failing tapes<br />
on two different drives. This testing process verifies you have a bad tape.<br />
Note: You may wish to take a good tape and test it on the original drive using<br />
the same operation that previously failed. If the operation does not fail<br />
with the good tape, the drive is good and the previous tape is defective.<br />
A degaussed tape has no servo tracks and cannot be written on or formatted.<br />
You must discard the tape. If you attempt to load a degaussed tape, a Load-<br />
(FSC) error message appears on the operator panel.<br />
■ Reformatting (Reclaiming) a Cartridge <strong>Tape</strong><br />
Use the Reclaim menu to reformat the tape. If the Reclaim menu accepts and<br />
reformats the tape, the tape can be reused.<br />
Note: See Chapter 4, “Menus,” and refer to Table 4-5 on page 4-17 to reformat<br />
a tape.<br />
If the Reclaim menu rejects the tape, then the tape is by definition<br />
unrecoverable and it must be discarded.<br />
3-8 Ninth Edition 95739
Menus<br />
4<br />
This chapter describes the menu system for the <strong>9840</strong> <strong>Tape</strong> <strong>Drive</strong> and how to<br />
perform specific operations using the menus and submenus. You must use the<br />
Menu switch, Select switch, and the operator panel (Figure 4-1) to access all<br />
menus and submenus.<br />
Figure 4-1. Operator Panels<br />
Note: Refer to Figure 4-1 for the Menu switch and Select switch used on the<br />
standard and cartridge scratch loader (CSL) operator panels.<br />
Standard Operator Panel<br />
OPERATOR<br />
DISPLAY<br />
MENU<br />
SWITCH<br />
SELECT<br />
SWITCH<br />
CSL Operator Panel<br />
service<br />
Menu Switch<br />
Select Switch<br />
Operator Display<br />
C53416<br />
Press the Menu switch to navigate from one main menu item to the next. Press<br />
the Select switch to enter a submenu and navigate through the options in the<br />
submenu.<br />
CAUTION:<br />
Pressing the Select switch when the <strong>9840</strong> <strong>Tape</strong> <strong>Drive</strong> is offline may alter<br />
the drive configuration. Follow the directions in this chapter exactly to<br />
avoid configuration problems.<br />
95739 Ninth Edition 4-1
Main Menu Summary<br />
This chapter describes the following topics:<br />
• “Main Menu Summary”<br />
• “Menu Operations” on page 4-4<br />
• “View Fibre Channel Configuration Status” on page 4-7<br />
• “View SCSI Configuration Status” on page 4-10<br />
• “View ESCON Configuration Status” on page 4-13<br />
• “<strong>Drive</strong> Operations Menu” on page 4-16<br />
• “Online/Offline Main Menu Tasks” on page 4-22<br />
• “View Configuration Main Menu Task” on page 4-24<br />
• “Select a Language” on page 4-25<br />
• “Select <strong>Tape</strong> Bar Task” on page 4-25<br />
• “Reclaim Cartridge <strong>Tape</strong>” on page 4-25<br />
• “Firmware Release Main Menu Task” on page 4-27<br />
• “CSL Code Level Main Menu Task” on page 4-28<br />
• “Exit Main Menu Tasks” on page 4-29<br />
• “<strong>Tape</strong> Bar-Chart Explanation” on page 4-31<br />
Note: This chapter includes only operator procedures. Procedures that require<br />
the help of authorized service personnel are not included.<br />
■ Main Menu Summary<br />
Table 4-1 describes the <strong>9840</strong> <strong>Tape</strong> <strong>Drive</strong> main menus.<br />
Table 4-1. Summary of Main Menus<br />
Main Menu<br />
Online/Offline<br />
ESCON Port<br />
Enable/Disable<br />
View<br />
Configuration<br />
Description<br />
Use this main menu to place the <strong>9840</strong> <strong>Tape</strong> <strong>Drive</strong> offline<br />
for some procedures and online for other procedures.<br />
After the <strong>9840</strong> <strong>Tape</strong> <strong>Drive</strong> is set offline or online, use this<br />
main menu as the entry point to other main menus.<br />
Use this menu to enable or disable the ESCON port if the<br />
<strong>9840</strong> <strong>Tape</strong> <strong>Drive</strong> uses an ESCON interface. If the <strong>9840</strong><br />
<strong>Tape</strong> <strong>Drive</strong> does not use an ESCON interface, this main<br />
menu does not display. Menus are different for Fibre<br />
Channel, SCSI, and ESCON.<br />
Use this main menu to view the configuration of the <strong>9840</strong><br />
<strong>Tape</strong> <strong>Drive</strong>. When the <strong>9840</strong> <strong>Tape</strong> <strong>Drive</strong> is online (As in<br />
Figure 4-2 on page 4-3), this main menu shows the values<br />
of the configuration submenus shown in Figure 4-4 on<br />
page 4-6, for Fibre Channel, SCSI, or ESCON, depending<br />
on the host interface.<br />
4-2 Ninth Edition 95739
Main Menu Summary<br />
Table 4-1. Summary of Main Menus (Continued)<br />
Main Menu<br />
<strong>Drive</strong><br />
Firmware<br />
Release<br />
Exit<br />
Description<br />
Use this menu to create different types of tapes. When the<br />
<strong>9840</strong> <strong>Tape</strong> <strong>Drive</strong> is offline, this main menu contains the<br />
submenus shown in Figure 4-4 on page 4-6, depending on<br />
the host interface. Any action you specify in the submenu<br />
takes place immediately.<br />
Use this menu to view the current release of the firmware<br />
running on the <strong>9840</strong> <strong>Tape</strong> <strong>Drive</strong>.<br />
Use this menu to exit the <strong>9840</strong> <strong>Tape</strong> <strong>Drive</strong> menu system.<br />
Figure 4-2 shows an overview of the menu system, including the content of the<br />
menus, depending on the state of the <strong>9840</strong> <strong>Tape</strong> <strong>Drive</strong>. Main menus are shown<br />
across the top of the figure and the appropriate submenus are listed below each<br />
main menu.<br />
Figure 4-2. Main Menus Available When <strong>Drive</strong> is Online<br />
Online Main Menu<br />
Configuration View<br />
Main Menu<br />
<strong>Drive</strong> Firmware<br />
Main Menu<br />
CSL Code<br />
Main Menu<br />
Main Exit Menu<br />
Entry Point to Other<br />
Menu when Online.<br />
Shows <strong>Drive</strong><br />
Configuration<br />
No Submenus<br />
Shows <strong>Drive</strong><br />
Firmware<br />
Release Level<br />
No Submenus<br />
Shows CSL<br />
Firmware<br />
Release Level<br />
No Submenus<br />
Exits Menu System<br />
C53158<br />
95739 Ninth Edition 4-3
Menu Operations<br />
■ Menu Operations<br />
Online Menus<br />
Offline Menus<br />
You may view online menus and offline menus. However, operators should<br />
only view online menus. Offline menus are for configuration and should only<br />
be used by qualified technicians. Figure 4-3 on page 4-5 provides viewing<br />
menus online only. Figure 4-4 on page 4-6 provides offline configuration<br />
menus.<br />
WARNING:<br />
Changing configurations may disable drive communication to the host.<br />
Only qualified technicians should change any configurations.<br />
When the drive is online and the VIEW CFG submenu is invoked, the current<br />
configuration settings are displayed. Figure 4-3 on page 4-5 provides an<br />
overview of the information available in this submenu.<br />
Note: The information in this submenu is display only.<br />
Specific information for online menus is also available as follows:<br />
• Fibre Channel Menus in Figure 4-5 on page 4-7<br />
• SCSI Menus in Figure 4-6 on page 4-10<br />
• ESCON Menu in Figure 4-7 on page 4-13<br />
When the drive is offline, the menus shown in Figure 4-4 on page 4-6 are<br />
available.<br />
WARNING:<br />
Offline menus are for qualified technicians only. Operators should not<br />
access offline menus.<br />
• The CHG CFG submenu enables you to change configuration options. The<br />
options vary depending on the type of channel interface in the drive.<br />
• The DRV MENU submenu allows you to IPL from tape, create a dump tape,<br />
create a code tape, or create a data tape. See the menu tree (Figure 4-8 on<br />
page 4-16) for additional information.<br />
4-4 Ninth Edition 95739
Menu Operations<br />
Online Main Menus and Submenus<br />
Figure 4-3 provides online menus. These menus are used by operators and<br />
qualified technians.<br />
Figure 4-3. Online View CFG Menus<br />
Online<br />
View CFG<br />
View Config.<br />
Main Menu for<br />
Fibre Channel<br />
<strong>Drive</strong>s<br />
View Config.<br />
Main Menu for<br />
SCSI <strong>Drive</strong>s<br />
View Config.<br />
Main Menu for<br />
ESCON <strong>Drive</strong>s<br />
View <strong>Drive</strong><br />
Firmware Level<br />
Main Menu<br />
View CSL<br />
Firmware Level<br />
Main Menu<br />
Exit Main<br />
Menu<br />
Entry Point to<br />
Configuration<br />
Settings<br />
Press Menu<br />
Switch to<br />
Access<br />
View CFG<br />
Compress<br />
Mode<br />
DSE Mode<br />
(Data<br />
Security<br />
Erase)<br />
Compress<br />
Mode<br />
DSE Mode<br />
(Data<br />
Security<br />
Erase)<br />
Compress<br />
Mode<br />
DSE mode<br />
(Data<br />
Security<br />
Erase)<br />
No<br />
Submenus<br />
View <strong>Drive</strong><br />
Firmware<br />
Release Level<br />
No<br />
Submenus<br />
View CSL<br />
Firmware<br />
Release Level<br />
No<br />
Submenus<br />
Exits Menu<br />
System<br />
Port A and B<br />
Attributes<br />
<strong>Tape</strong> Bar<br />
Usage<br />
SCSI ID<br />
SCSI Target<br />
Negotiation<br />
Mode<br />
ESCON<br />
Logical<br />
<strong>Drive</strong><br />
Address<br />
Language<br />
Selection<br />
VolSafe<br />
Usage<br />
Full Code<br />
Emulation<br />
Mode<br />
Library<br />
Address<br />
CSL<br />
Power Up<br />
Mode<br />
WWN Name<br />
Displays<br />
SCSI<br />
Ultra/Fast/Slow<br />
Mode<br />
SCSI<br />
8/16 Bit Mode<br />
<strong>Tape</strong> Bar<br />
Usage<br />
Language<br />
Selection<br />
VolSafe<br />
Usage<br />
Full Code<br />
Emulation<br />
Mode<br />
Standard<br />
Label Protect<br />
<strong>Tape</strong> Bar<br />
Usage<br />
Language<br />
Selection<br />
VolSafe<br />
Usage<br />
Full Code<br />
Emulation<br />
Mode<br />
Library<br />
Address<br />
Serial Number<br />
Exit or Loop<br />
Library<br />
Address<br />
CSL<br />
Power Up<br />
Mode<br />
CSL<br />
Power Up<br />
Mode<br />
Serial Number<br />
WWN Name<br />
Displays<br />
Exit or Loop<br />
Serial Number<br />
Exit or Loop<br />
C53493<br />
95739 Ninth Edition 4-5
Menu Operations<br />
Offline Menu Operations<br />
Figure 4-4 provides offline configuration menus (for qualified technicians only).<br />
Figure 4-4. Offline Configuration Menus<br />
Offline<br />
Chng CFG<br />
Configure<br />
Main Menu for<br />
Fibre Channel<br />
<strong>Drive</strong>s<br />
Configure<br />
Main Menu for<br />
SCSI <strong>Drive</strong>s<br />
Configure<br />
Main Menu for<br />
ESCON <strong>Drive</strong>s<br />
<strong>Drive</strong><br />
Main Menu<br />
View <strong>Drive</strong><br />
Firmware Level<br />
Main Menu<br />
View CSL<br />
Firmware Level<br />
Main Menu<br />
Main Exit<br />
Menu<br />
Entry Point to<br />
Configuration<br />
Menus<br />
Press Menu<br />
Switch to<br />
Access<br />
Chng CFG<br />
Compress<br />
Mode<br />
DSE Mode<br />
(Data<br />
Security<br />
Erase)<br />
Compress<br />
Mode<br />
DSE Mode<br />
(Data<br />
Security<br />
Erase)<br />
Compress<br />
Mode<br />
DSE Mode<br />
(Data<br />
Security<br />
Erase)<br />
IPL from <strong>Tape</strong><br />
(Update MC)<br />
Make Dump<br />
<strong>Tape</strong><br />
No<br />
Submenus<br />
View <strong>Drive</strong><br />
Firmware<br />
Release Level<br />
No<br />
Submenus<br />
View CSL<br />
Firmware<br />
Release Level<br />
No<br />
Submenus<br />
Exits Menu<br />
System<br />
Port A and B<br />
Attributes<br />
<strong>Tape</strong> Bar<br />
Usage<br />
Language<br />
Selection<br />
VolSafe<br />
Usage<br />
Full Code<br />
Emulation<br />
Mode<br />
SCSI ID<br />
SCSI Target<br />
Negotiation<br />
Mode<br />
SCSI<br />
Ultra/Fast/Slow<br />
Mode<br />
SCSI<br />
8/16 Bit Mode<br />
<strong>Tape</strong> Bar<br />
Usage<br />
ESCON<br />
Logical<br />
<strong>Drive</strong><br />
Address<br />
<strong>Tape</strong> Bar<br />
Usage<br />
Language<br />
Selection<br />
VolSafe<br />
Usage<br />
Full Code<br />
Make Code<br />
<strong>Tape</strong><br />
Make Data<br />
<strong>Tape</strong><br />
Exit or Loop<br />
Library<br />
Address<br />
Language<br />
Selection<br />
Emulation<br />
Mode<br />
CSL<br />
Power Up<br />
Mode<br />
VolSafe<br />
Usage<br />
Library<br />
Address<br />
Save if<br />
Needed<br />
Exit or Loop<br />
Full Code<br />
Emulation<br />
Mode<br />
Library<br />
Address<br />
CSL<br />
Power Up<br />
Mode<br />
3590<br />
Emulation<br />
Password XXX<br />
CSL<br />
Power Up<br />
Mode<br />
Save if<br />
Needed<br />
Save if<br />
Needed<br />
Exit or Loop<br />
Exit or Loop<br />
C53411<br />
4-6 Ninth Edition 95739
View Fibre Channel Configuration<br />
■ View Fibre Channel Configuration Status<br />
Figure 4-5 provides a flowchart for viewing a Fibre Channel configuration.<br />
Table 4-2 on page 4-8 provides the Fibre Channel menus and displays used to<br />
view the drive when it is online.<br />
Figure 4-5. View Fibre Channel Configuration<br />
BEGIN<br />
Menu<br />
Select<br />
ONLINE<br />
OFFLINE<br />
CMPRSS<br />
(YES/ON/OFF)<br />
FULL CODE<br />
(Y/N)<br />
Menu<br />
Menu<br />
Menu<br />
Menu<br />
Select<br />
Online<br />
PORT A ENA<br />
PORT A DIS<br />
FULL DSE<br />
(Y/N)<br />
EMUL XXXX<br />
Menu<br />
PORT B ENA<br />
PORT B DIS<br />
Menu<br />
LIB ADR XY<br />
Menu<br />
VIEW PORT A<br />
Menu<br />
VIEW CFG<br />
Select<br />
Menu<br />
FIRMW REL<br />
ONLINE<br />
ONLY<br />
Menu<br />
VIEW PORT B<br />
CSL<br />
(SYS/AUTO/MAN)<br />
Menu<br />
Menu<br />
CSL X.Y.ZZ<br />
CSL NONE<br />
Menu<br />
TAPE BAR<br />
(Y/N)<br />
H=XXXXXXXX<br />
Menu<br />
Menu<br />
Select<br />
Menu<br />
L=YYYYYYYY<br />
Menu<br />
EXIT MENU<br />
NO<br />
LANGUAGE<br />
S/N=ZZZZZZ<br />
YES<br />
Menu<br />
Menu<br />
Select<br />
*<br />
VOLSAFE<br />
(Y/N)<br />
Menu<br />
EXIT CFG<br />
YES<br />
NO<br />
Select Menu<br />
C53628<br />
95739 Ninth Edition 4-7
View Fibre Channel Configuration<br />
Table 4-2. Menu Table - View Fibre Channel Configuration<br />
Options Notes Procedure<br />
Online/Offline Main Menu<br />
Online Defaults to online.<br />
1. If applicable, press Menu to access.<br />
Offline For viewing the configuration,<br />
the drive must be online.<br />
View Configuration Main Menu<br />
View CFG<br />
(View<br />
Configuration)<br />
To bypass this menu and view<br />
only the firmware release level,<br />
press Menu twice; otherwise,<br />
follow the instructions.<br />
2. If Online does not display, press<br />
Select to toggle to online.<br />
1. If applicable, press Menu once to<br />
display the menu.<br />
2. Press Select to access.<br />
The compression status displays.<br />
3. Press Select or Menu repeatedly to<br />
view the rest of the configuration<br />
status:<br />
Data Security Erase (DSE)<br />
<strong>Drive</strong> Attributes (Port A/B)<br />
<strong>Drive</strong> Address<br />
<strong>Tape</strong> Bar<br />
Language<br />
ESCON Emulation Mode<br />
Library Address<br />
CSL Mode<br />
World Wide Name (WWN)<br />
Serial Number (S/N)<br />
4. Press Menu or Select to go to the<br />
Exit menu.<br />
Firmware Level View Menu<br />
None<br />
Display shows Rx.yy.zzzc,<br />
where x = major revision<br />
number, yy = minor revision<br />
number, zzz = integration<br />
number, c = channel type<br />
(s-SCSI, e-ESCON, f-Fibre)<br />
5. Press Menu to repeat viewing or<br />
Select to go to next firmware<br />
release level menu.<br />
1. If applicable, press Menu once to<br />
display the firmware level.<br />
2. Press Menu again to go to the Exit<br />
menu.<br />
4-8 Ninth Edition 95739
View Fibre Channel Configuration<br />
Table 4-2. Menu Table - View Fibre Channel Configuration (Continued)<br />
Options Notes Procedure<br />
Main Exit Menu<br />
Exit Menu<br />
This menu gives you the<br />
opportunity to repeat the<br />
operation.<br />
1. If applicable, press Menu to access.<br />
2. To repeat the operation, press<br />
Menu.<br />
This takes you to the beginning.<br />
3. To exit the operation, press Select.<br />
95739 Ninth Edition 4-9
View SCSI Configuration Status<br />
■ View SCSI Configuration Status<br />
Figure 4-6 provides a flowchart for viewing a SCSI configuration.<br />
Figure 4-6. View SCSI Configuration<br />
BEGIN<br />
CMPRSS<br />
(YES/NO/OFF)<br />
LANGUAGE<br />
Menu<br />
Menu<br />
Select<br />
ONLINE<br />
OFFLINE<br />
Menu<br />
VOLSAFE<br />
Menu<br />
VIEW CFG<br />
Select<br />
Online<br />
Select<br />
FULL DSE<br />
(Y/N)<br />
Menu<br />
Menu<br />
FULL CODE<br />
(Y/N)<br />
Menu<br />
Menu<br />
ONLINE<br />
ONLY<br />
SCSI ID X<br />
EMUL XXXX<br />
Menu<br />
Menu<br />
Menu<br />
FIRMW REL<br />
CSL X.Y.ZZ<br />
CSL NONE<br />
TARG NEG<br />
(Y/N)<br />
Menu<br />
LIB ADR XY<br />
Menu<br />
CSL<br />
(SYS/AUTO/MAN)<br />
SCSI<br />
(ULTRA/ SLOW/ FAST)<br />
Menu<br />
Menu<br />
Select<br />
H=XXXXXXXX<br />
EXIT MENU<br />
NO<br />
YES<br />
Menu<br />
SCSI<br />
(8/16 BIT)<br />
Menu<br />
L=YYYYYYYY<br />
Menu<br />
Select<br />
*<br />
Menu<br />
TAPE BAR<br />
(Y/N)<br />
Menu<br />
S/N=ZZZZZZ<br />
Menu<br />
EXIT CFG<br />
YES<br />
NO<br />
Select Menu<br />
C53629<br />
4-10 Ninth Edition 95739
View SCSI Configuration Status<br />
Table 4-3 provides the SCSI menus and displays used to view the drive when it<br />
is online.<br />
Table 4-3. Menu Table—View SCSI Configuration<br />
Options Notes Procedure<br />
Online/Offline Main Menu<br />
Online Defaults to online.<br />
1. If applicable, press Menu to access.<br />
Offline For viewing the configuration,<br />
the drive must be online.<br />
View Configuration Main Menu<br />
View CFG<br />
(View<br />
Configuration)<br />
To bypass this menu and view<br />
only the firmware release level,<br />
press Menu twice; otherwise,<br />
follow these instructions.<br />
2. If Online does not display, press<br />
Select to toggle to online.<br />
1. If applicable, press Menu once to<br />
display the menu.<br />
2. Press Select to access.<br />
The compression status displays.<br />
3. Press Select or Menu repeatedly to<br />
view the rest of the configuration<br />
status:<br />
Data Security Erase (DSE)<br />
SCSI ID<br />
Target Negotiation<br />
SCSI Bus Speed<br />
SCSI Bus Width<br />
<strong>Tape</strong> Bar<br />
Language<br />
SCSI Emulation Mode<br />
Library Address<br />
CSL Mode<br />
World Wide Name (WWN)<br />
Serial Number (S/N)<br />
4. Press Menu or Select to go to the<br />
Exit menu.<br />
Press Menu to repeat viewing or Select<br />
to go to next firmware release level<br />
menu.<br />
95739 Ninth Edition 4-11
View SCSI Configuration Status<br />
Table 4-3. Menu Table—View SCSI Configuration (Continued)<br />
Options Notes Procedure<br />
Firmware Level View Menu<br />
None<br />
Display shows Rx.yy.zzzc,<br />
where: x =major revision<br />
number, yy = minor revision<br />
number, zzz =the integration<br />
number, c = channel type<br />
(s-SCSI, e-ESCON, f-Fibre)<br />
Main Exit Menu<br />
Exit Menu<br />
This menu gives you the<br />
opportunity to repeat the<br />
operation.<br />
1. If applicable, press Menu once to<br />
display the firmware level.<br />
2. Press Menu again to go to the Exit<br />
menu.<br />
1. If applicable, press Menu to access.<br />
2. To repeat the operation, press<br />
Menu.<br />
This takes you to the beginning.<br />
3. To exit the operation, press Select.<br />
4-12 Ninth Edition 95739
View ESCON Configuration Status<br />
■ View ESCON Configuration Status<br />
Figure 4-7 provides a flowchart for viewing a ESCON configuration. Table 4-4<br />
on page 4-14 provides the ESCON menus and displays used to view the drive<br />
when it is online.<br />
Figure 4-7. View ESCON Configuration<br />
BEGIN<br />
Menu<br />
Menu<br />
Select<br />
Select<br />
ONLINE<br />
OFFLINE<br />
Select<br />
Online<br />
PORT A ENA<br />
PORT A DIS<br />
CMPRSS<br />
(YES/NO/OFF)<br />
Menu<br />
FULL DSE<br />
(Y/N)<br />
VOLSAFE<br />
Menu<br />
FULL CODE<br />
(Y/N)<br />
Menu<br />
Menu<br />
Menu<br />
VIEW CFG<br />
FIRMW REL<br />
Select<br />
ONLINE<br />
ONLY<br />
Menu<br />
DR ADR XYZ<br />
EMUL XXXX<br />
Menu<br />
LIB ADR XY<br />
Menu<br />
CSL X.Y.ZZ<br />
CSL NONE<br />
Menu<br />
SL PROT<br />
Menu<br />
CSL<br />
(SYS/AUTO/MAN)<br />
Menu<br />
Menu<br />
Select<br />
Menu<br />
EXIT MENU<br />
TAPE BAR<br />
(Y/N)<br />
S/N=ZZZZZZ<br />
NO<br />
YES<br />
Menu<br />
Menu<br />
EXIT CFG<br />
Select<br />
LANGUAGE<br />
YES<br />
NO<br />
*<br />
Menu<br />
Select<br />
Menu<br />
C53630<br />
95739 Ninth Edition 4-13
View ESCON Configuration Status<br />
Table 4-4. Menu Table - View ESCON Configuration<br />
Options Notes Procedure<br />
Online/Offline Main Menu<br />
Online Defaults to online.<br />
1. If applicable, press Menu to access.<br />
Offline<br />
For viewing the configuration,<br />
the drive must be online.<br />
View Configuration Main Menu<br />
View CFG<br />
(View<br />
Configuration)<br />
To bypass this menu and view<br />
only the firmware release level,<br />
press Menu twice; otherwise,<br />
follow the instructions.<br />
2. If Online does not display, press<br />
Select to toggle to online.<br />
1. If applicable, press Menu once to<br />
display the menu.<br />
2. Press Select to access.<br />
The compression status displays.<br />
3. Press Select or Menu repeatedly to<br />
view the rest of the configuration<br />
status:<br />
Data Security Erase (DSE)<br />
SCSI ID<br />
<strong>Drive</strong> Address<br />
Standard Label Protect<br />
<strong>Tape</strong> Bar<br />
Language<br />
ESCON Emulation Mode<br />
Library Address<br />
CSL Mode<br />
4. Press Menu or Select to go to the<br />
Exit menu.<br />
Firmware Level View Menu<br />
None<br />
Display shows Rx.yy.zzzc,<br />
where x = major revision<br />
number, yy = minor revision<br />
number, zzz = integration<br />
number, c = channel type<br />
(s-SCSI, e-ESCON, f-Fibre)<br />
5. Press Menu to repeat viewing or<br />
Select to go to next firmware<br />
release level menu.<br />
1. If applicable, press Menu once to<br />
display the firmware level.<br />
2. Press Menu again to go to the Exit<br />
menu.<br />
4-14 Ninth Edition 95739
View ESCON Configuration Status<br />
Table 4-4. Menu Table - View ESCON Configuration (Continued)<br />
Options Notes Procedure<br />
Main Exit Menu<br />
Exit Menu<br />
This menu gives you the<br />
opportunity to repeat the<br />
operation.<br />
1. If applicable, press Menu to access.<br />
2. To repeat the operation, press<br />
Menu.<br />
This takes you to the beginning.<br />
3. To exit the operation, press Select.<br />
95739 Ninth Edition 4-15
<strong>Drive</strong> Operations Menu<br />
■ <strong>Drive</strong> Operations Menu<br />
Figure 4-8 provides a menu tree for ESCON drive operations. The Port<br />
Enable and Port Disable selection is for ESCON only (not available in<br />
Fibre Channel and SCSI menu).<br />
Figure 4-8. <strong>Drive</strong> Operations (ESCON)<br />
BEGIN<br />
Menu<br />
Select<br />
ONLINE<br />
OFFLINE<br />
Menu<br />
Select<br />
IPL FROM TAPE MENU.<br />
INSERT TAPE WHEN LD<br />
IPL TP IS DISPLAYED<br />
Menu<br />
Menu<br />
Select<br />
PORT ENA<br />
PORT DIS<br />
Menu<br />
Select<br />
MAKE DUMP TAPE MENU.<br />
INSERT TAPE WHEN LD<br />
DUMP TP IS DISPLAYED.<br />
CHG CFG<br />
Menu<br />
DRV MENU<br />
Select<br />
Menu<br />
Select<br />
MAKE CODE TAPE MENU.<br />
INSERT TAPE WHEN LD<br />
CODE T.P. IS DISPLAYED.<br />
NOTE:<br />
FOR TECHNICIANS ONLY.<br />
Menu<br />
Menu<br />
FIRMW REL<br />
OFFLINE<br />
ONLY<br />
Menu<br />
Select<br />
MAKE DATA TAPE MENU.<br />
INSERT TAPE WHEN LD<br />
DATA TP IS DISPLAYED.<br />
EXIT MENU<br />
NO<br />
YES<br />
Select<br />
Menu<br />
Select<br />
BUILD MIR<br />
INSERT CUSTOMER TAPE<br />
WHEN LD CUST<br />
TP IS DISPLAYED.<br />
*<br />
NO<br />
EXIT DRV<br />
YES<br />
Menu<br />
Select<br />
C53631<br />
4-16 Ninth Edition 95739
<strong>Drive</strong> Operations Menu<br />
Table 4-5 provides the drive menus and displays to:<br />
• Enter the <strong>Drive</strong> submenus<br />
• Initial program load (IPL) drive from new firmware tape<br />
• Make dump tape<br />
• Make code tape (for qualified technicians only)<br />
• Make data tape<br />
• Build media information region (MIR)<br />
Table 4-5. Menu Table—<strong>Drive</strong> Operations<br />
Options Notes Procedure<br />
Online/Offline Main Menu<br />
Online Defaults to Online.<br />
1. If applicable, press Menu to access.<br />
Offline<br />
OffLn Pend, OnLn Pend,<br />
and TIPS Pend (ESCON only)<br />
may display while waiting for a<br />
system response or diagnostics<br />
completion.<br />
2. To go online and exit operations:<br />
a. Press Select to toggle to online.<br />
b. Press Menu repeatedly until<br />
Exit Menu displays.<br />
c. Press Select to exit.<br />
3. To change configuration or do<br />
special operations:<br />
a. Press Select to toggle to offline.<br />
<strong>Drive</strong> Main Menu<br />
Drv Menu<br />
(<strong>Drive</strong> Menu)<br />
This is the entry point to the<br />
<strong>Drive</strong> submenus.<br />
b. Press Menu several times to<br />
reach the <strong>Drive</strong> main menu.<br />
1. If applicable, press Menu to access.<br />
2. Press Select to enter the <strong>Drive</strong><br />
submenus or press Menu to bypass<br />
the <strong>Drive</strong> menus.<br />
95739 Ninth Edition 4-17
<strong>Drive</strong> Operations Menu<br />
Table 4-5. Menu Table—<strong>Drive</strong> Operations (Continued)<br />
Options Notes Procedure<br />
Code Update Submenu In <strong>Drive</strong> Main Menu<br />
IPL From Tp<br />
(Initial Program<br />
Load <strong>Drive</strong> from<br />
New Firmware<br />
<strong>Tape</strong>)<br />
Displays:<br />
CodUpFailsx<br />
(Code Update<br />
Fail<br />
Number x)—see<br />
Table 5-2 on<br />
page 5-3 for<br />
help<br />
This selection updates the<br />
firmware in the drive from the<br />
firmware tape inserted in the<br />
drive.<br />
Dump <strong>Tape</strong> Submenu in <strong>Drive</strong> Main Menu<br />
MakeDumpTp<br />
(Make Dump<br />
<strong>Tape</strong>)<br />
Displays:<br />
DmpCrFailx<br />
(Dump Create<br />
Fail<br />
Number x)—see<br />
Table 5-2 on<br />
page 5-3 for<br />
help<br />
This selection formats a dump<br />
tape. It does not collect<br />
diagnostic data. <strong>Tape</strong>s used to<br />
obtain dump data must first be<br />
formatted this way to accept<br />
dump data.<br />
1. Press Menu to bypass. If not<br />
bypassing, follow the remaining<br />
steps:<br />
2. Press Select to activate.<br />
If a tape is present in the drive, it<br />
ejects.<br />
3. When Ld IPL TP displays, insert<br />
the write-protected firmware tape<br />
with the desired code.<br />
When done, the drive automatically<br />
ejects tape, IPLs, and comes online.<br />
1. If applicable, press Menu once to<br />
access or twice to bypass. If not<br />
bypassing, follow the remaining<br />
steps:<br />
2. Press Select to activate.<br />
If a tape is present in the drive, it<br />
ejects.<br />
3. When Ld Dump Tp displays, insert<br />
a write-enabled tape.<br />
Old data on the tape is erased.<br />
4. When the tape ejects, insert another<br />
or press Menu to exit to the next<br />
submenu.<br />
4-18 Ninth Edition 95739
<strong>Drive</strong> Operations Menu<br />
Table 4-5. Menu Table—<strong>Drive</strong> Operations (Continued)<br />
Options Notes Procedure<br />
Create Code Update Submenu in <strong>Drive</strong> Main Menu<br />
MakeCodeTp<br />
(Make Code<br />
<strong>Tape</strong>)<br />
Displays:<br />
CodCrFailx<br />
(Code Create<br />
Fail<br />
Number x)—see<br />
Table 5-2 on<br />
page 5-3 for<br />
help<br />
This selection copies the<br />
firmware from the drive to the<br />
tape. This tape may be used to<br />
update other drives using the<br />
Code Update submenu.<br />
Reclaim <strong>Tape</strong> Submenu in <strong>Drive</strong> Main Menu<br />
MakeDataTp<br />
(Make Data<br />
<strong>Tape</strong>)<br />
Displays:<br />
DatCrFailx<br />
(Data Create Fail<br />
Number x)—see<br />
Table 5-2 on<br />
page 5-3 for<br />
help<br />
This selection reformats tapes<br />
so they can be reused as<br />
normal data tapes. This is<br />
referred to as “reclaiming.”<br />
Note:<br />
This procedure is for a qualified<br />
technician only. Operators do<br />
not use the function.<br />
1. If applicable, press Menu once to<br />
access or twice to bypass. If not<br />
bypassing, follow the remaining<br />
steps:<br />
2. Press Select to activate.<br />
If a tape is present in the drive, it<br />
ejects.<br />
3. When Ld Data Tp displays, insert<br />
write-enabled tape.<br />
Old data on the tape is erased.<br />
4. When tape ejects, insert another, or<br />
press Menu to go to the <strong>Drive</strong> Exit<br />
Submenu.<br />
95739 Ninth Edition 4-19
<strong>Drive</strong> Operations Menu<br />
Table 4-5. Menu Table—<strong>Drive</strong> Operations (Continued)<br />
Options Notes Procedure<br />
Build Media Information Region (MIR)<br />
Build MIR<br />
(Build media<br />
information<br />
region)<br />
The <strong>9840</strong> <strong>Tape</strong> <strong>Drive</strong> uses<br />
information recorded on each<br />
tape to access and manage that<br />
tape while mounted on the<br />
drive.<br />
This information is recorded at<br />
the beginning of the tape in an<br />
area known as the Media<br />
Information Region (MIR).<br />
1. If applicable, press Menu once to<br />
access or twice to bypass. If not<br />
bypassing, follow the remaining<br />
steps:<br />
Note: Ensure the drive is<br />
unloaded.<br />
2. Press Select to activate.<br />
3. When Ld Cust Tp displays,<br />
insert tape requiring MIR.<br />
Note: If using a Cartridge Scratch<br />
Loader (CSL) to build the<br />
MIR on a tape, after<br />
inserting the tape into the<br />
feed channel, press the Start<br />
switch to load the tape.<br />
Rebuild MIR flashes on<br />
the operator panel when the<br />
MIR is rebuilding.<br />
<strong>Drive</strong> Exit Submenu in <strong>Drive</strong> Main Menu<br />
Exit Drv <br />
(Exit <strong>Drive</strong>)<br />
This submenu allows you to<br />
repeat the <strong>Drive</strong> menu or exit.<br />
4. When the MIR is rebuilt the tape<br />
ejects, insert another, or press Menu<br />
to go to the <strong>Drive</strong> Exit Submenu.<br />
1. If applicable, press Menu to access.<br />
2. To return to Code Update submenu<br />
(the beginning of the <strong>Drive</strong> main<br />
menu), press Menu.<br />
3. To exit menu system:<br />
a. Press Select.<br />
b. Press Menu repeatedly until<br />
Exit Menu displays.<br />
4-20 Ninth Edition 95739
<strong>Drive</strong> Operations Menu<br />
Table 4-5. Menu Table—<strong>Drive</strong> Operations (Continued)<br />
Options Notes Procedure<br />
Main Exit Main Menu<br />
Exit Menu This menu gives you the<br />
opportunity to return the drive<br />
online and stay in or exit the<br />
menu system.<br />
1. If applicable, press Menu to access.<br />
2. To return to the Online/Offline<br />
main menu to return the drive to<br />
Online and exit:<br />
a. Press Menu.<br />
b. Return to the Online/Offline<br />
menu at the beginning of this<br />
table.<br />
3. To exit the menu system without<br />
returning drive to online, press<br />
Select.<br />
95739 Ninth Edition 4-21
Online/Offline Main Menu Tasks<br />
■ Online/Offline Main Menu Tasks<br />
Online<br />
Use the Online/Offline main menu to change the state of the <strong>9840</strong> <strong>Tape</strong> <strong>Drive</strong><br />
from online to offline and offline to online. When the <strong>9840</strong> <strong>Tape</strong> <strong>Drive</strong> is in a<br />
particular state, you can perform further operations using the menu system.<br />
To change the state of the <strong>9840</strong> <strong>Tape</strong> <strong>Drive</strong> to online, follow these steps:<br />
1. Press the Menu switch.<br />
The operator panel displays the “Online” or “Offline” message, which<br />
indicates the present state of the <strong>9840</strong> <strong>Tape</strong> <strong>Drive</strong>.<br />
2. Do one of the following:<br />
• If the operator panel displays the “Online” message, go to step 5.<br />
• If the operator panel displays the “Offline” message, continue with<br />
step 3.<br />
3. Press the Select switch once to place the <strong>9840</strong> <strong>Tape</strong> <strong>Drive</strong> online.<br />
The operator panel displays some of the following messages:<br />
• The “TIPS Pend” message indicates that the ESCON tape independent<br />
protocol is pending.<br />
• The “IPLPend” message indicates that the IPL is starting.<br />
• The “CC Diags” message indicates that the controller diagnostics are<br />
running.<br />
• The “ASIA Diags” message indicates that the additional diagnostics<br />
are running.<br />
• The “Onl Pend” message indicates that the online state is pending due<br />
to the completion of diagnostics.<br />
• The “Online” message indicates that the transition completed<br />
successfully.<br />
4. Bring the drive back online to the host. Enterprise and client-server (Fibre<br />
Channel/SCSI) operations are discussed here.<br />
a. Enterprise, vary the drive online for all host paths to the drive by keying<br />
in one of the following commands:<br />
MVS V online<br />
VM Vary on, <br />
b. Fibre Channel and SCSI: The drive is ready for I/O after it is put online.<br />
4-22 Ninth Edition 95739
Online/Offline Main Menu Tasks<br />
5. Press the Menu switch until the operator panel displays the “Exit Menu”<br />
message.<br />
6. Press the Select switch to exit.<br />
The <strong>9840</strong> <strong>Tape</strong> <strong>Drive</strong> is online and available.<br />
Offline<br />
To change the state of the <strong>9840</strong> <strong>Tape</strong> <strong>Drive</strong> to offline, follow these steps:<br />
1. Cease all I/O from the host. Enterprise and client-server (Fibre Channel/<br />
SCSI) operations are discussed here.<br />
a. Enterprise: vary the drive offline for all host paths to the drive by keying<br />
in one of the following commands:<br />
MVS V offline<br />
VM Vary off, <br />
b. Fibre Channel and SCSI: Ensure the operator ceases all I/O from the<br />
host.<br />
2. Press the Menu switch.<br />
The operator panel displays the “Online” or “Offline” message, which<br />
indicates the present state of the <strong>9840</strong> <strong>Tape</strong> <strong>Drive</strong>.<br />
3. Do one of the following:<br />
• If the operator panel displays the “Offline” message, go to step 5.<br />
• If the operator panel displays the “Online” message, continue with<br />
step 4.<br />
4. Press the Select switch once to place the <strong>9840</strong> <strong>Tape</strong> <strong>Drive</strong> offline.<br />
The operator panel displays some of the following messages:<br />
• The “TIPS Pend” message indicates that the ESCON tape independent<br />
protocol is pending.<br />
• The “IPLPend” message indicates that the IPL is starting.<br />
• The “Offl Pend” message indicates that the offline state is pending<br />
because it is waiting for a system response.<br />
• The “Offline” message indicates that the transition completed<br />
successfully.<br />
5. When the operator panel displays the “Offline” message, press the Menu<br />
switch to proceed to other menus.<br />
95739 Ninth Edition 4-23
View Configuration Main Menu Task<br />
■ View Configuration Main Menu Task<br />
Use the View Configuration main menu to view configuration information. You<br />
can view this menu while the <strong>9840</strong> <strong>Tape</strong> <strong>Drive</strong> is online. Authorized service<br />
personnel perform other procedures with the View Configuration main menu<br />
when the <strong>9840</strong> <strong>Tape</strong> <strong>Drive</strong> is offline.<br />
CAUTION:<br />
Do not navigate through the View Configuration main menu when the<br />
<strong>9840</strong> <strong>Tape</strong> <strong>Drive</strong> is offline because doing so might alter the drive<br />
configuration.<br />
Follow the directions in this section exactly to avoid configuration<br />
problems.<br />
View Configuration Information<br />
View the configuration settings of the <strong>9840</strong> <strong>Tape</strong> <strong>Drive</strong> by looking at the<br />
submenus of the View Configuration main menu while the <strong>9840</strong> <strong>Tape</strong> <strong>Drive</strong> is<br />
online. Follow these steps:<br />
1. Press the Menu switch once to enter the menu system.<br />
The operator panel displays the “Online” or “Offline” message.<br />
2. Do one of the following:<br />
• If the <strong>9840</strong> <strong>Tape</strong> <strong>Drive</strong> is already online, go to step 4.<br />
• If the <strong>9840</strong> <strong>Tape</strong> <strong>Drive</strong> is offline, continue with step 3.<br />
3. Press the Select switch once to change the state of the <strong>9840</strong> <strong>Tape</strong> <strong>Drive</strong> to<br />
online.<br />
The operator panel displays the “Online” message.<br />
4. Press the Menu switch until the operator panel displays the “View Cfg”<br />
message.<br />
5. Press the Select switch to enter the View Configuration main menu.<br />
The operator panel displays the value for the Compress mode submenu.<br />
6. Press the Menu or the Select switch repeatedly to view the other drive<br />
configurations. Do so until you reach the Configuration Exit menu.<br />
The operator panel displays the “Exit Config” message.<br />
7. At the Configuration Exit submenu, do one of the following:<br />
• Press the Menu switch to view the configuration values again.<br />
• Press the Select switch to exit the View Configuration main menu; then<br />
press the Select switch until you exit the menu system.<br />
4-24 Ninth Edition 95739
Select a Language<br />
■ Select a Language<br />
Language selection is a configuration task. Qualified technicians use this<br />
selection to change the displayed language. The selections are: English,<br />
Espanol, Francais, Italiano, Deutcher.<br />
CAUTION:<br />
Language selection should only be changed by a qualified technician.<br />
Operators should request assistance if the language selection must be<br />
changed.<br />
Note: Refer to Table 5-3 on page 5-7 for <strong>9840</strong> <strong>Tape</strong> <strong>Drive</strong> translated messages.<br />
■ Select <strong>Tape</strong> Bar Task<br />
The tape bar selection is a configuration task. Qualified technicians set this<br />
selection during initial configuration of the drive. Refer to “<strong>Tape</strong> Bar-Chart<br />
Explanation” on page 4-31 for a detailed explanation of the tape bar.<br />
■ Reclaim Cartridge <strong>Tape</strong><br />
Use the <strong>Drive</strong> main menu to reclaim (or reformat) a cartridge tape. You can<br />
view this menu while the <strong>9840</strong> <strong>Tape</strong> <strong>Drive</strong> is offline. Authorized service<br />
personnel perform other procedures with the <strong>Drive</strong> main menu when the <strong>9840</strong><br />
<strong>Tape</strong> <strong>Drive</strong> is offline.<br />
CAUTION:<br />
Do not navigate through the <strong>Drive</strong> main menu when the <strong>9840</strong> <strong>Tape</strong> <strong>Drive</strong><br />
is offline because doing so might alter the drive configuration. Before<br />
performing this procedure, view the drive configuration and make a note<br />
of the configuration parameters.<br />
Do not degauss <strong>9840</strong> <strong>Tape</strong> <strong>Drive</strong> cartridges. Servo tracks are written on<br />
the tape at the factory. When these tracks are mistakenly erased, the<br />
cartridge tape must be discarded. They cannot be recovered with this<br />
procedure.<br />
When a cartridge tape has been formatted for special uses, such as a firmware<br />
update, it can be reformatted as a data tape and return it to usual usage. This<br />
process is referred to as “reclaiming a cartridge tape.”<br />
To reclaim a cartridge tape, follow these steps:<br />
1. Place the <strong>9840</strong> <strong>Tape</strong> <strong>Drive</strong> offline (see “Offline” on page 4-23).<br />
2. Press the Menu switch until the operator panel displays the “Drv Menu”<br />
message.<br />
3. Press the Select switch to enter the <strong>Drive</strong> main menu.<br />
95739 Ninth Edition 4-25
Reclaim Cartridge <strong>Tape</strong><br />
4. Press the Menu switch until the operator panel displays the “MakeDataTp”<br />
message.<br />
5. Press the Select switch to initiate the reclaim process.<br />
If a cartridge tape is already in the <strong>9840</strong> <strong>Tape</strong> <strong>Drive</strong>, it ejects. The operator<br />
panel displays the “LdDataTp” message.<br />
6. Place a cartridge tape that is not write-protected into the <strong>9840</strong> <strong>Tape</strong> <strong>Drive</strong>.<br />
The reclaim process starts automatically, and it erases and reformats the<br />
tape. After the reclaim process completes, the cartridge tape ejects.<br />
Note: If the operator panel displays the “DatCrFail1” message, see<br />
Chapter 5, “<strong>Drive</strong> Errors and Messages,” for corrective action.<br />
7. Remove the ejected cartridge tape from the <strong>9840</strong> <strong>Tape</strong> <strong>Drive</strong>.<br />
8. To reclaim another cartridge tape, repeat steps 6 and 7.<br />
9. When you are finished reclaiming cartridge tapes, press the Select switch<br />
until the operator panel displays the “Exit Drv” message.<br />
10. Press the Menu switch until the operator panel displays the “Exit Menu”<br />
message.<br />
11. Press the Menu switch to repeat the operation or Select to exit the operation<br />
12. Press the Menu switch to go to main exit menu<br />
13. Place the <strong>9840</strong> <strong>Tape</strong> <strong>Drive</strong> online (see “Online” on page 4-22).<br />
4-26 Ninth Edition 95739
Firmware Release Main Menu Task<br />
■ Firmware Release Main Menu Task<br />
Use the Firmware Release main menu to view the level of the firmware used by<br />
the <strong>9840</strong> <strong>Tape</strong> <strong>Drive</strong>.<br />
View Firmware Release Level<br />
View the firmware release level to determine if the firmware in the <strong>9840</strong> <strong>Tape</strong><br />
<strong>Drive</strong> requires an update.<br />
To view the firmware release level, follow these steps:<br />
1. Place the <strong>9840</strong> <strong>Tape</strong> <strong>Drive</strong> online (see “Online” on page 4-22).<br />
2. Press the Menu switch to reach the Firmware Release main menu.<br />
The operator panel displays the level of the firmware release used by the<br />
<strong>9840</strong> <strong>Tape</strong> <strong>Drive</strong>. The format is Rx.yy.zzzc, where x is the major revision<br />
number, yy is the minor revision number, zzz is the integration number,<br />
and c is the channel type (“s” is SCSI, “e” is ESCON, “f” is Fibre Channel).<br />
3. Press the Menu switch until the operator panel displays the “Exit Menu”<br />
message.<br />
4. Press the Menu switch to return to the Online/Offline menu.<br />
The operator panel displays the “Online” message.<br />
5. Press the Menu switch to exit the menu system.<br />
95739 Ninth Edition 4-27
CSL Code Level Main Menu Task<br />
■ CSL Code Level Main Menu Task<br />
Use the Cartridge Scratch Loader (CSL) Code Level Main Menu to view the<br />
firmware level used by the CSL.<br />
View CSL Code Level<br />
To view the CSL code level, follow these steps:<br />
1. Place the <strong>9840</strong> <strong>Tape</strong> <strong>Drive</strong> online (see “Online” on page 4-22).<br />
2. Press the Menu switch to reach the CSL code level main menu.<br />
The operator panel displays the level of code used by the CSL. The format<br />
is CSL x.y.zz, where x is the major revision number, y is the minor<br />
revision number, and zz is the integration number.<br />
Note: If no CSL is attached, the display shows CSL NONE.<br />
3. Press the Menu switch until the operator panel displays the “Exit Menu”<br />
message.<br />
4. Press the Menu switch to return to the Online/Offline menu.<br />
The operator panel displays the “Online” message.<br />
5. Press the Menu switch to exit the menu system.<br />
4-28 Ninth Edition 95739
Exit Main Menu Tasks<br />
■ Exit Main Menu Tasks<br />
The Exit main menu offers three choices:<br />
• Exit the menu system<br />
• Return to the Online/Offline main menu<br />
• Return to the menu system<br />
Exit the Menu System<br />
At the Main Exit menu (the operator panel displays the “Exit Menu”<br />
message), press the Select switch to exit the menu system.<br />
After exiting, observe the operator display, which provides some <strong>9840</strong> <strong>Tape</strong><br />
<strong>Drive</strong> status information messages:<br />
• A “Ready F” message means the drive is online and loaded with a writeprotected<br />
cartridge tape.<br />
• A “Ready U” message means the drive is online and loaded with a writeenabled<br />
cartridge tape.<br />
• A “Ready A” message means the drive is online, VolSafe is enabled, and<br />
the drive is loaded with a write-enabled VolSafe cartridge tape.<br />
• An * (asterisk) indicates that the <strong>9840</strong> <strong>Tape</strong> <strong>Drive</strong> is online, but a cartridge<br />
tape is not loaded.<br />
• An “Offline” message alternating with the “*” (asterisk) message indicates<br />
that the <strong>9840</strong> <strong>Tape</strong> <strong>Drive</strong> is offline<br />
Return to Online/Offline Main Menu<br />
To return to the menu system to place the <strong>9840</strong> <strong>Tape</strong> <strong>Drive</strong> online after you<br />
reach the Exit main menu (the operator panel displays the “Exit Menu”<br />
message), follow these steps:<br />
1. Press the Menu switch.<br />
The operator panel displays the “Offline” message.<br />
2. Press the Select switch to place the <strong>9840</strong> <strong>Tape</strong> <strong>Drive</strong> online.<br />
The operator panel displays the “Online” message.<br />
3. Press the Menu switch until the operator panel displays the “Exit Menu”<br />
message.<br />
4. Press the Select switch to exit the menu system.<br />
95739 Ninth Edition 4-29
Exit Main Menu Tasks<br />
Return to the Menu System<br />
To return to the menu system from the Exit main menu (the operator panel<br />
displays the “Exit Menu” message) to perform another operation, follow<br />
these steps:<br />
1. Press the Menu switch at the Exit main menu.<br />
The operator panel displays the “Offline” or “Online” message.<br />
2. If necessary, press the Select switch to place the <strong>9840</strong> <strong>Tape</strong> <strong>Drive</strong> online or<br />
offline.<br />
The operator panel displays the “Online” or “Offline” message.<br />
3. Press the Menu switch to reach the main menu you want to enter.<br />
4. Work in the main menu using the instructions in this chapter.<br />
4-30 Ninth Edition 95739
<strong>Tape</strong> Bar-Chart Explanation<br />
■ <strong>Tape</strong> Bar-Chart Explanation<br />
The tape bar-chart (Figure 4-9 on page 4-32) displays two horizontal bars, one<br />
showing how much tape has been written, and the other showing how much<br />
tape has been read. When selected from the menu, these bars are shown during<br />
read and write operations, and when drive is in Ready (idle) mode. The bar<br />
display alternates with the Write, Read, or Ready display, depending on the<br />
present mode of the drive.<br />
Media Information Region<br />
Displayed Bars<br />
Segment<br />
Dots<br />
Write Bar<br />
Read Bar<br />
The bar gets its information from the MIR (Media Information Region) on the<br />
tape. This information is written to tape when the tape is unloaded. If this<br />
information is bad, the bar will not display. To rewrite the MIR information, the<br />
host must read the entire tape and then unload it.<br />
The displayed bars use all ten display segments on the operator panel. Each<br />
segment is usually employed to display a number, letter, or symbol, but in “Bar<br />
Mode,” all ten segments are used together to display the horizontal bars.<br />
Each segment has seven vertical dots and five horizontal dots. There are fifty<br />
dots the entire length of the display, so that each dot represents 2% travel and<br />
each segment represents 10% travel of the bars. Please see next page.<br />
The three rows of dots in the middle of the display represent the read bar and<br />
the two outer rows of dots on each side represent the write bar. However,<br />
where the read bar has not pe<strong>net</strong>rated, the write bar takes up all the rows. See<br />
Figure 4-9.<br />
The write bar is in the shaded area. It has a matrixed pattern: only every other<br />
dot is lighted. It shows that the tape is 50% written.<br />
The read bar is inside the write bar in the unshaded area to the left. The bar<br />
shows up as an unlit single row lined with a solid-lighted row on each side. It<br />
shows that the tape is 24% read.<br />
95739 Ninth Edition 4-31
<strong>Tape</strong> Bar-Chart Explanation<br />
Figure 4-9. <strong>Tape</strong> Write/Read Bar Chart<br />
READ BAR<br />
WRITE BAR<br />
10% 20% 30% 40% 50% 60% 70% 80% 90% 100%<br />
10% 20% 30% 40% 50%<br />
C53412<br />
4-32 Ninth Edition 95739
<strong>Drive</strong> Errors and Messages<br />
5<br />
This chapter describes error indications that may occur with the <strong>9840</strong> <strong>Tape</strong><br />
<strong>Drive</strong> (Figure 5-1) and the procedures to resolve the problem. It includes:<br />
• “Power and Service Indicator Errors” on page 5-2<br />
• “Clean Indicator Error” on page 5-3<br />
• “Operator Panel Messages” on page 5-3<br />
• “Language Translated Messages” on page 5-7<br />
• “Specific Error Recovery Procedures” on page 5-8<br />
• “Shipping Insert” on page 5-9<br />
• “Jammed Cartridge” on page 5-12<br />
• “Fiber-Optic Problems” on page 5-14<br />
Figure 5-1. <strong>9840</strong> <strong>Tape</strong> <strong>Drive</strong><br />
Note: If you use the procedures in this chapter to recover from a problem and<br />
you cannot resolve it yourself, contact authorized service personnel.<br />
POWER<br />
INDICATOR<br />
ACTIVITY<br />
INDICATOR<br />
SERVICE<br />
INDICATOR<br />
CLEAN<br />
INDICATOR<br />
IPL<br />
SWITCH<br />
MANUAL<br />
UNLOAD<br />
DEVICE<br />
UNLOAD<br />
SWITCH<br />
OPERATOR<br />
DISPLAY<br />
MENU<br />
SWITCH<br />
SELECT<br />
SWITCH<br />
DATA<br />
CARTRIDGE<br />
C53117<br />
Refer to Chapter 6, “Cartridge Scratch Loader,” for CSL error information.<br />
95739 Ninth Edition 5-1
Power and Service Indicator Errors<br />
■ Power and Service Indicator Errors<br />
Table 5-1 summarizes the combination of the Power and the Service indicators<br />
(“<strong>9840</strong> <strong>Tape</strong> <strong>Drive</strong>” on page 5-1), the meaning, and the recommended<br />
corrective action.<br />
Note: Table 5-1 does not summarize all conditions that can occur. If an<br />
uncorrectable malfunction occurs, contact authorized service personnel.<br />
Table 5-1. Power and Service Indicators<br />
Power<br />
Indicator<br />
Service<br />
Indicator<br />
Meaning<br />
On Off Normal operation is<br />
occurring.<br />
On or<br />
flashing<br />
Flashing<br />
while action<br />
takes place<br />
Continuous<br />
flashing<br />
Flashing<br />
after dump<br />
collection<br />
Flashing or<br />
off<br />
Flashing or<br />
off<br />
A <strong>9840</strong> <strong>Tape</strong> <strong>Drive</strong><br />
error is detected.<br />
A <strong>9840</strong> <strong>Tape</strong> <strong>Drive</strong><br />
error occurred.<br />
Power-on and IPL<br />
sequences occur<br />
automatically.<br />
The <strong>9840</strong> <strong>Tape</strong> <strong>Drive</strong><br />
failed the power on<br />
procedure; it cannot<br />
exit the IPL mode.<br />
On On A <strong>9840</strong> <strong>Tape</strong> <strong>Drive</strong><br />
failure occurred.<br />
Action<br />
No user action is<br />
necessary.<br />
Perform an IPL.<br />
If the problem<br />
persists, contact<br />
authorized service<br />
personnel.<br />
No user action is<br />
necessary.<br />
If repeated power-on<br />
and IPL sequences do<br />
not make the drive<br />
operational, contact<br />
authorized service<br />
personnel.<br />
Retry the power on<br />
and IPL procedure.<br />
If the problem<br />
persists, contact<br />
authorized service<br />
personnel.<br />
Perform an IPL.<br />
If the problem<br />
persists, contact<br />
authorized service<br />
personnel.<br />
5-2 Ninth Edition 95739
Clean Indicator Error<br />
■ Clean Indicator Error<br />
When the amber-colored Clean indicator is on, you must clean the <strong>9840</strong> <strong>Tape</strong><br />
<strong>Drive</strong>. The Clean indicator signifies that particular tape errors occurred or a<br />
specific length of tape passed through the tape path.<br />
For information about cleaning the <strong>9840</strong> <strong>Tape</strong> <strong>Drive</strong>, see “Cleaning a <strong>Drive</strong>” in<br />
Chapter 3, “Operator Tasks.”<br />
■ Operator Panel Messages<br />
The operator display on the <strong>9840</strong> <strong>Tape</strong> <strong>Drive</strong> operator panel displays the names<br />
of menus, sub-menus, and choices. It also displays status and error messages<br />
Table 5-2. Operator Display Messages<br />
Display Probable Cause Recommended Action<br />
* (asterisk) A steady asterisk indicates that<br />
drive is online but a cartridge is<br />
not loaded.<br />
Operator discretion<br />
ASIA Diags<br />
Bank n Bad<br />
Diagnostics are running during a<br />
normal IPL.<br />
During boot, a section of memory<br />
was found bad.<br />
No user action is necessary.<br />
Perform an IPL.<br />
If the problem persists, contact<br />
authorized service personnel.<br />
Boot Fail The IPL failed. Perform an IPL.<br />
If the problem persists, contact<br />
authorized service personnel.<br />
BT Monitor<br />
CC Diags<br />
Chk (FSC)<br />
Cleaning<br />
(*Cleaning*)<br />
cnhndnsn<br />
A sequence of switches took you<br />
to an Engineering area.<br />
Diagnostics are running during a<br />
normal IPL.<br />
An operational failure occurred;<br />
the <strong>9840</strong> <strong>Tape</strong> <strong>Drive</strong> automatically<br />
performs an IPL.<br />
Cleaning tape was inserted and<br />
drive is now in process of<br />
cleaning.<br />
Hardware revision level<br />
supported by the firmware in this<br />
drive.<br />
IPL to clear.<br />
No user action is necessary.<br />
Wait for the IPL to complete and retry<br />
the operation.<br />
If the problem persists, contact<br />
authorized service personnel.<br />
No user action is necessary.<br />
This message occurs when firmware<br />
level is insufficient to control the<br />
hardware level in the drive: call for<br />
service.<br />
95739 Ninth Edition 5-3
Operator Panel Messages<br />
Table 5-2. Operator Display Messages (Continued)<br />
Display Probable Cause Recommended Action<br />
CodCrFail1<br />
CodCrFail2<br />
CodeUpDate<br />
CodUpFail1<br />
The <strong>9840</strong> <strong>Tape</strong> <strong>Drive</strong> cannot write<br />
code onto the tape.<br />
The <strong>9840</strong> <strong>Tape</strong> <strong>Drive</strong> cannot<br />
position the tape.<br />
The <strong>9840</strong> <strong>Tape</strong> <strong>Drive</strong> cannot read<br />
code from the tape.<br />
The firmware in the drive is being<br />
updated from the host: operator<br />
panel switches are locked.<br />
The <strong>9840</strong> <strong>Tape</strong> <strong>Drive</strong> cannot read<br />
the tape.<br />
The <strong>9840</strong> <strong>Tape</strong> <strong>Drive</strong> cannot<br />
position the tape.<br />
The <strong>9840</strong> <strong>Tape</strong> <strong>Drive</strong> cannot read<br />
an image on the tape.<br />
Ensure that the tape is write-enabled.<br />
Try another cartridge tape.<br />
Retry the operation.<br />
Try another cartridge tape.<br />
If the problem persists, contact<br />
authorized service personnel.<br />
No user action is necessary.<br />
Try another cartridge tape.<br />
CodUpFail2 The EEPROM failed. Contact authorized service personnel.<br />
CodUpFail3 The <strong>9840</strong> <strong>Tape</strong> <strong>Drive</strong> cannot read<br />
code from the tape.<br />
Retry the operation.<br />
Try another cartridge tape.<br />
If the problem persists, contact<br />
authorized service personnel.<br />
CodUpFail4<br />
DatCrFail1<br />
DmpCrFail1<br />
DmpCrFail2<br />
DumpToHost<br />
The tape is not a code update<br />
tape.<br />
The <strong>9840</strong> <strong>Tape</strong> <strong>Drive</strong> cannot<br />
create (reformat) the data tape.<br />
The <strong>9840</strong> <strong>Tape</strong> <strong>Drive</strong> cannot<br />
create (reformat) the diagnostic<br />
dump tape.<br />
The <strong>9840</strong> <strong>Tape</strong> <strong>Drive</strong> cannot read<br />
the format of the tape.<br />
Dump or event log is being<br />
transferred to host: operator<br />
panel switches are locked.<br />
Try another cartridge tape.<br />
If the problem persists, contact<br />
authorized service personnel.<br />
Ensure that the tape is write-enabled.<br />
Try to reformat the data tape using<br />
another <strong>9840</strong> <strong>Tape</strong> <strong>Drive</strong>.<br />
If the problem persists, contact<br />
authorized service personnel.<br />
Ensure that the tape is write-enabled.<br />
Contact authorized service personnel.<br />
Retry the operation.<br />
Try another cartridge tape.<br />
If the problem persists, contact<br />
authorized service personnel.<br />
No user action is necessary.<br />
5-4 Ninth Edition 95739
Operator Panel Messages<br />
Table 5-2. Operator Display Messages (Continued)<br />
Display Probable Cause Recommended Action<br />
DmpWrFail1<br />
DmpWrFail2<br />
DumpAgain<br />
The <strong>9840</strong> <strong>Tape</strong> <strong>Drive</strong> cannot write<br />
diagnostic data onto the tape.<br />
The <strong>9840</strong> <strong>Tape</strong> <strong>Drive</strong> cannot<br />
position the tape.<br />
There is no diagnostic dump data<br />
to process.<br />
The <strong>9840</strong> <strong>Tape</strong> <strong>Drive</strong> detected the<br />
same Chk (FSC) within a minute.<br />
Contact authorized service personnel.<br />
Contact authorized service personnel.<br />
See “DumpAgain Condition” on<br />
page 5-8.<br />
Exp ClCart The cleaning cartridge is spent. Replace the cleaning cartridge.<br />
FFFF:Dmp Y Alternates with and “*” (asterisk)<br />
after completion of IPL, where<br />
FFFF=the FSC of last dump data<br />
collected and Y=number of<br />
uncollected dumps in EEPROM.<br />
Optionally move dump/s to the host or<br />
tape. See various dump instructions in<br />
this chapter.<br />
Fix CfgErr The checksum does not match Contact authorized service personnel.<br />
after an IPL.<br />
Init (FSC) An initialization error occurred. Contact authorized service personnel.<br />
IPL Pend<br />
After the IPL switch is pressed,<br />
the IPL is pending.<br />
Wait until the IPL automatically<br />
completes.<br />
Load CC The common controller code is No user action is necessary.<br />
loading.<br />
Load ESCON Normal display during IPL. No user action is necessary.<br />
Loading Cartridge tape is being loaded. No user action is necessary.<br />
Load (FSC)<br />
The load or unload operation<br />
failed.<br />
If another tape also fails load, IPL drive.<br />
If the problem persists, contact<br />
authorized service personnel. If another<br />
tape works, tape is suspect.<br />
Load FIBRE Normal display during IPL. No user action is necessary.<br />
Load SCSI Normal display during IPL. No user action is necessary.<br />
Locating <strong>Drive</strong> is doing a high speed seek. No user action is necessary.<br />
Memory Err The IPL failed. Perform an IPL.<br />
If the problem persists, contact<br />
authorized service personnel.<br />
NTReady F The write-protected tape is in the No user action is necessary.<br />
process of a manual unload.<br />
NTReady U The non-write-protected tape is in<br />
the process of a manual unload.<br />
No user action is necessary.<br />
95739 Ninth Edition 5-5
Operator Panel Messages<br />
Table 5-2. Operator Display Messages (Continued)<br />
Display Probable Cause Recommended Action<br />
Offline<br />
Alternating with the “*” message,<br />
this message indicates that the<br />
<strong>9840</strong> <strong>Tape</strong> <strong>Drive</strong> is offline.<br />
No user action is necessary.<br />
Online The <strong>9840</strong> <strong>Tape</strong> <strong>Drive</strong> is<br />
No user action is necessary.<br />
operational.<br />
Power Fail The power supply has failed. Contact authorized service personnel.<br />
Ready A<br />
The drive is VolSafe-enabled and<br />
loaded with a write-enabled<br />
VolSafe cartridge tape.<br />
No user action is necessary.<br />
Ready F The loaded cartridge tape is No user action is necessary.<br />
write-protected.<br />
Reading The drive is in read mode. No user action is necessary.<br />
Ready U The loaded cartridge tape is not No user action is necessary.<br />
write-protected.<br />
Rewinding The drive is rewinding. No user action is necessary.<br />
Save Fails<br />
SavingDump<br />
The new configuration cannot be<br />
saved because the read-access<br />
memory (RAM) may be defective.<br />
Displayed while saving dump to<br />
EEPROM.<br />
See “Save Fails Condition” on page 5-8.<br />
Normal display. Wait for dump to<br />
complete.<br />
Start Init Initialization started. No user action is necessary.<br />
Trapped Boot is trapped in a closed loop. Perform an IPL.<br />
If the problem persists, contact<br />
authorized service personnel.<br />
Unloading Cartridge tape is being unloaded. No user action is necessary<br />
UnWr (FSC) The Unload switch was pressed See “UnWr Condition” on page 5-8.<br />
during a write operation.<br />
Write Prot <strong>Drive</strong> attempted to write to a<br />
write-protected tape.<br />
Change switch on cartridge tape to<br />
write-enable.<br />
Writing The drive is in write mode. No user action is necessary.<br />
5-6 Ninth Edition 95739
Language Translated Messages<br />
■ Language Translated Messages<br />
Table 5-3 provides <strong>9840</strong> <strong>Tape</strong> <strong>Drive</strong> messages that have been translated from<br />
English to Spanish, French, Italian, and German. This table will be updated as<br />
new information is acquired.<br />
Table 5-3. Language Translated Messages<br />
English Spanish French Italian German<br />
*Cleaning* *Limpia* Nettoyage *Pulir* Reinigen<br />
*Erasing* *Borrando* Effacement *Cancella* *Loeschng*<br />
Locating Situando Recherche Ricerca Suchen<br />
Loading Cargando Chargement Carico Laden<br />
NT Ready F Noprep P Npret PTG No PRT P N Bereit N<br />
NT Ready U Noprep N Npret NPTG No PRT N N Bereit G<br />
Ready F Prepda P Pret PTG Pronto P Bereit G<br />
Ready U Prepda N Pret NPTG Pronto N Bereit N<br />
Rewinding Rebobina Rebobinage Riavvolg Spult-R<br />
Unloading Descarga Dechargemt Scaricam Entladung<br />
95739 Ninth Edition 5-7
Specific Error Recovery Procedures<br />
■ Specific Error Recovery Procedures<br />
This section describes recovery actions for the following:<br />
• “DumpAgain Condition”<br />
• “Save Fails Condition”<br />
• “UnWr Condition”<br />
If your error condition is not listed, contact authorized service personnel for<br />
assistance.<br />
DumpAgain Condition<br />
If the <strong>9840</strong> <strong>Tape</strong> <strong>Drive</strong> detects the same fault symptom code within a minute,<br />
the Service light flashes and the “DumpAgain” message alternates with a “Chk<br />
xxxx” message, where xxxx is the fault symptom code. The <strong>9840</strong> <strong>Tape</strong> <strong>Drive</strong><br />
is not operational and requires manual intervention.<br />
1. Press the IPL switch to perform an IPL on the <strong>9840</strong> <strong>Tape</strong> <strong>Drive</strong>.<br />
2. Do one of the following:<br />
Save Fails Condition<br />
UnWr Condition<br />
• If the IPL successfully completes, continue with normal operation.<br />
• If the IPL fails as indicated by any displayed message, contact<br />
authorized service personnel.<br />
If the operator panel displays the “Save Fails” message while you are saving<br />
a new configuration, it means that the random-access memory (RAM) in the<br />
drive failed. Contact authorized service personnel to replace the drive.<br />
Note: You should not encounter this condition as authorized service personnel<br />
generally enter all configuration information using the operator panel.<br />
If the operator panel displays the “UnWr” (Unwritten Data) message after you<br />
press the Unload switch, it indicates that you pressed the switch during a write<br />
operation. This signifies that the <strong>9840</strong> <strong>Tape</strong> <strong>Drive</strong> tried to write some remaining<br />
data before it unloaded the cartridge tape, but the attempt failed. Some data<br />
remains unwritten.<br />
At this point, you have two choices:<br />
• If you do not want to save the unwritten data, press the Unload switch again<br />
to unload the cartridge tape immediately. Data loss occurs.<br />
• If you want to save the unwritten data, issue one of the following command<br />
sequences before pressing the Unload switch:<br />
5-8 Ninth Edition 95739
Shipping Insert<br />
■ Shipping Insert<br />
Figure 5-2. Shipping Insert<br />
• In the VM/MVS environment: ESCON Swap<br />
• In the SCSI environment: Recover Buffer Data<br />
Note: Refer to Chapter 6, “Cartridge Scratch Loader,” to install and lock a<br />
shipping insert into a CSL.<br />
Follow these instructions to properly install and lock the shipping insert<br />
(Figure 5-2) into a drive. Before you can lock the shipping insert into the drive,<br />
you must use the manual unload device (MUD) screw (step 2) to raise the reel<br />
motors and to lower the cleaning brush within the drive.<br />
SHIPPING<br />
INSERT<br />
C53635<br />
CAUTION:<br />
If the shipping insert is not locked into the tape drive, the drive head will<br />
become damaged in shipment.<br />
Notes:<br />
• Only use the MUD mechanism to reset the drive for shipping or to<br />
remove jammed cartridges.<br />
• The MUD screw must be turned to the left or counter-clockwise<br />
(CCW) to reset the drive to its shipping position and to install and<br />
lock the shipping insert into the drive.<br />
• The MUD screw must be turned to the right or clockwise (CW) to<br />
remove jammed cartridges.<br />
95739 Ninth Edition 5-9
Shipping Insert<br />
1. Power off the drive if power is applied.<br />
POWER<br />
SWITCH<br />
POWER<br />
PLUG<br />
C53636<br />
Note:<br />
This drive uses a SCSI interface to the host.<br />
2. Locate the manual unload device (MUD) screw on right-front area of the drive.<br />
1. MUD screw<br />
MUD<br />
SCREW<br />
C53637<br />
3. Obtain a common screwdriver and insert it into the MUD slot.<br />
4. Press against the spring-loaded MUD screw until it stops.<br />
5-10 Ninth Edition 95739
Shipping Insert<br />
WARNING:<br />
Do not turn the screwdriver to the right or clockwise (CW) when preparing the drive<br />
for a shipping insert.<br />
5. Slowly turn the screwdriver to the left or counter-clockwise (CCW) to raise the reel<br />
motors up and to lower the cleaning brush.<br />
Note:<br />
When the MUD screw will not turn any further CCW, the reel motors are up and the<br />
cleaning brush is lowered.<br />
C53638<br />
6. Remove the screwdriver.<br />
7. Insert and lock the shipping insert in the <strong>9840</strong> <strong>Tape</strong> <strong>Drive</strong>.<br />
Note:<br />
Gently pull on the shipping insert to verify it is locked within the carriage.<br />
SHIPPING<br />
INSERT<br />
C53635<br />
95739 Ninth Edition 5-11
.<br />
Jammed Cartridge<br />
■ Jammed Cartridge<br />
Note: Refer to Chapter 6, “Cartridge Scratch Loader,” to remove a jammed<br />
cartridge from a CSL.<br />
A jammed cartridge in a <strong>9840</strong> <strong>Tape</strong> <strong>Drive</strong> is not a common malfunction.<br />
However, you must know how to remove jammed cartridges when the<br />
malfunction occurs. Follow the procedures in this section to remove a jammed<br />
cartridge.<br />
See Figure 5-3 for the <strong>9840</strong> <strong>Tape</strong> <strong>Drive</strong> MUD screw location. The MUD screw is<br />
located on the right-front side of the drive.<br />
Figure 5-3. <strong>9840</strong> <strong>Tape</strong> <strong>Drive</strong> <strong>Manual</strong> Unload Device (MUD)<br />
MUD<br />
SCREW<br />
C53632<br />
Notes:<br />
• Only use the MUD mechanism to remove jammed cartridges or to<br />
reset the drive for shipping.<br />
• The MUD screw must be turned to the right or clockwise (CW) to<br />
remove jammed cartridges.<br />
• The MUD screw must be turned to the left or counter-clockwise<br />
(CCW) to reset the drive to its shipping position and to install and<br />
lock the shipping insert into the drive.<br />
5-12 Ninth Edition 95739
Jammed Cartridge<br />
1. Locate the MUD screw on the drive.<br />
Note:<br />
The <strong>9840</strong> <strong>Tape</strong> <strong>Drive</strong> MUD screw is located on the right-front side of the drive.<br />
MUD<br />
SCREW<br />
C53633<br />
2. Obtain a common screwdriver and insert it into the MUD slot.<br />
3. Press against the spring-loaded MUD screw until it stops.<br />
WARNING:<br />
Do not turn the screwdriver to the left or counter-clockwise (CCW) when removing a<br />
jammed cartridge.<br />
4. Slowly turn the screwdriver clockwise (CW) to remove the jammed cartridge.<br />
Note:<br />
When the MUD screw will not turn any further CW, the reel motors are lowered and<br />
the cartridge can be removed.<br />
C53634<br />
5. Remove the screwdriver.<br />
6. Remove the cartridge from the <strong>9840</strong> <strong>Tape</strong> <strong>Drive</strong>.<br />
Note:<br />
If cartridges continue to jam, the drive is defective and must be replaced.<br />
95739 Ninth Edition 5-13
Fiber-Optic Problems<br />
■ Fiber-Optic Problems<br />
Note: Contact authorized service personnel to perform any fiber-optic<br />
cleaning.<br />
The <strong>9840</strong> ESCON and Fibre Channel <strong>Tape</strong> <strong>Drive</strong>s use many fiber-optic<br />
components, including connectors, adapters, plugs, and transmitter/receiver<br />
subassemblies.<br />
If you encounter unexplained problems that occur in the interface, some of the<br />
fiber-optic components that are part of the interface might require cleaning.<br />
5-14 Ninth Edition 95739
Cartridge Scratch Loader<br />
6<br />
■ Overview<br />
Figure 6-1. CSL<br />
This chapter covers the Cartridge Scratch Loader (CSL). It contains:<br />
• “Overview”<br />
• “Rack” on page 6-4<br />
• “Rack-mount CSL Tray” on page 6-5<br />
• “Operator Panel” on page 6-6<br />
• “Power On/Off CSL” on page 6-10<br />
• “CSL Cartridge Loading/Unloading” on page 6-12<br />
• “Modes of Operation” on page 6-14<br />
• “Error and Recovery” on page 6-21<br />
• “Jammed Cartridge” on page 6-26<br />
• “Shipping Insert” on page 6-30<br />
• “CSL Model Numbers” on page 6-35<br />
The CSL (Figure 6-1) consists of a <strong>9840</strong> <strong>Tape</strong> <strong>Drive</strong>, a power supply, and a CSL<br />
mechanism. The CSL is an electromechanical device that can load and unload<br />
up to seven cartridge tapes. It also has a priority feed slot (open area of feed<br />
channel) to mount a priority cartridge into the tape drive.<br />
Note: Priority cartridges can be mounted in any mode of operation.<br />
FEED<br />
CHANNEL<br />
INPUT<br />
BIN<br />
OUTPUT<br />
BIN<br />
OP<br />
PANEL<br />
C53614<br />
95739 Ninth Edition 6-1
Overview<br />
Component Locations<br />
Refer to Table 6-1 for CSL component descriptions and to Figure 6-2 for<br />
locations of the CSL components. Operators should become familiar with the<br />
CSL components listed below.<br />
Table 6-1. CSL Component Descriptions<br />
Component<br />
Operator Panel<br />
Output Bin<br />
Feed Channel<br />
Input Bin<br />
Purpose<br />
Operates the <strong>9840</strong> <strong>Tape</strong> <strong>Drive</strong> and CSL<br />
Houses ejected cartridges from the feed channel<br />
Inputs/outputs cartridges to/from <strong>9840</strong> <strong>Tape</strong> <strong>Drive</strong> and also<br />
used for priority mounts<br />
Loads cartridges into the feed channel<br />
Figure 6-2. CSL Component Locations<br />
FEED<br />
CHANNEL<br />
INPUT<br />
BIN<br />
OUTPUT<br />
BIN<br />
OP<br />
PANEL<br />
C53614<br />
The CSL ships as a 19 inch tray that can be mounted into a rack. One to six<br />
CSLs may be installed within the rack enclosure.<br />
Figure 6-4 on page 6-4 illustrates the rack mount CSL. The rack mount CSL is<br />
offered as a SCSI and ESCON interface.<br />
6-2 Ninth Edition 95739
Overview<br />
Cartridge Routing<br />
Cartridges are loaded into the CSL (Figure 6-3 on page 6-3) vertically with the<br />
Media Id label (R) facing out towards the operator (reels to the right). Load<br />
cartridges into the input bin (right side of the CSL).<br />
Note: Never load cartridges flat or with the cartridge reels to the left.<br />
Figure 6-3. Cartridge Routing<br />
CARTRIDGE<br />
REELS<br />
INPUT<br />
BIN<br />
SLIDER<br />
C53358<br />
Figure 6-2 on page 6-2 provides all components of the CSL. The output bin is<br />
located on the left side of the CSL. The feed channel is in the middle of the CSL.<br />
Cartridges are shifted from the right to the left, from the input bin into the feed<br />
channel and from the feed channel into the output bin.<br />
Note: The CSL is unable to prevent or detect miss-oriented cartridges. Ensure<br />
cartridges are always loaded correctly (Figure 6-3).<br />
Cartridges are loaded into the drive as they are manually loaded by the<br />
operator. If the drive detects an incorrectly positioned cartridge, it forces a CSL<br />
failure condition or requests an unload operation from the CSL.<br />
95739 Ninth Edition 6-3
Rack<br />
■ Rack<br />
The StorageTek RACK001 may be used to install the rack mount CSL trays. Refer<br />
to Figure 6-4 for the StorageTek RACK001. This rack contains 6 CSLs. The rack<br />
may contain a combination of <strong>9840</strong> <strong>Tape</strong> <strong>Drive</strong>s and CSLs.<br />
Note: A customer may wish to use other racks to install the rack mount CSL<br />
trays. This is permissible.<br />
The rack can have up to six CSLs with one per tray, up to 12 manual drives with<br />
two per tray, or a combination of CSLs and manual drives to fill the six slots.<br />
Different trays may have different interfaces.<br />
Figure 6-4. RACK001 for CSL Trays<br />
C53615<br />
The rack and CSLs ship in separate containers. The CSLs must be installed<br />
within the rack by a qualified individual.<br />
6-4 Ninth Edition 95739
Rack-mount CSL Tray<br />
■ Rack-mount CSL Tray<br />
Refer to Figure 6-5 for the rack mount CSL. The rack mount CSL ships as a SCSI<br />
or ESCON interface.<br />
Note: The slide rails are installed on the CSL in Figure 6-5.<br />
This rack unit has the feed channel, input bin, output bin, and operator panel<br />
identified. The rack unit has a power switch on the rear to control all enclosed<br />
electronics.<br />
Figure 6-5. Rack Mount CSL<br />
FEED<br />
CHANNEL<br />
INPUT<br />
BIN<br />
OUTPUT<br />
BIN<br />
OP<br />
PANEL<br />
C53614<br />
Table 6-2 provides the rack mount CSL tray dimensions.<br />
Table 6-2. Rack Mount CSL Tray Dimensions<br />
Dimension Client Server Enterprise<br />
Width ANSI/EIA 19-inch rack ANSI/EIA 19-inch rack<br />
Depth 30 in. 30 in.<br />
Height 7.625 in. 7.625 in.<br />
Weight 39 lb 39 lb<br />
95739 Ninth Edition 6-5
Operator Panel<br />
■ Operator Panel<br />
Note: The <strong>9840</strong> <strong>Tape</strong> <strong>Drive</strong> and CSL operator panel use small push-button<br />
switches. The term switch or switches is used to identify them<br />
throughout this manual.<br />
The operator panel (Figure 6-6) allows a human interface to the subsystem. The<br />
left half of the operator panel contains the indicators and switches specifically<br />
for the <strong>9840</strong> <strong>Tape</strong> <strong>Drive</strong>.<br />
The right half of the operator panel contains the indicators and switches<br />
specifically for the CSL. They are:<br />
• Operator Indicator (6)<br />
• System Indicator (7)<br />
• Automatic Indicator (8)<br />
• <strong>Manual</strong> Indicator (9)<br />
• Start Switch (14)<br />
• Autoload Mode Switch (15)<br />
Figure 6-6. CSL Operator Panel<br />
1 2 3 4 5 6 7 8 9<br />
service<br />
10 11 12 13 14 15<br />
1. Power Indicator<br />
2. Activity Indicator<br />
3. Clean Indicator<br />
4. Service Indicator<br />
5. IPL Switch<br />
6. Operator Indicator<br />
7. System Indicator<br />
8. Automatic Indicator<br />
9. <strong>Manual</strong> Indicator<br />
10. Unload Switch<br />
11. Menu Switch<br />
12. Select Switch<br />
13. Operator Display<br />
14. Start Switch<br />
15. Autoload Mode Switch<br />
C53362<br />
Note:<br />
The IPL switch (5) only IPLs the drive. Use the Power switch on the back of the CSL to<br />
IPL the CSL.<br />
Note: Only the CSL indicators and switches are discussed in this section. Refer<br />
to “Operator Panel” on page 1-4 for an explanation of the <strong>9840</strong> <strong>Tape</strong><br />
<strong>Drive</strong> indicators and switches.<br />
6-6 Ninth Edition 95739
Operator Panel<br />
CSL Switches<br />
Refer to Table 6-3 for CSL operator panel switch descriptions.<br />
Note: Refer to “Operator Panel” on page 1-4 for explanation of the <strong>9840</strong> <strong>Tape</strong><br />
<strong>Drive</strong> switches.<br />
Table 6-3. CSL Operator Panel Switches<br />
Switch<br />
Start Switch<br />
(CSL only)<br />
Description<br />
Pressing this switch restarts CSL operation after the operator empties a<br />
full output bin or replenishes an empty input bin.<br />
Also used to restart CSL operation after clearing a misfed cartridge.<br />
Notes:<br />
1. Remove the cartridge before pressing the Start switch.<br />
Autoload Mode<br />
Switch<br />
(CSL only)<br />
2. Press the Start switch twice when there is a load failure or<br />
solid Operator light (red) on the CSL. Pressing the switch<br />
twice reinitializes the CSL.<br />
Pressing this switch changes the operation of the CSL to one of three<br />
modes: System, Automatic, or <strong>Manual</strong>.<br />
Notes:<br />
1. Select the mode of operation by using the Autoload Mode<br />
switch.<br />
2. Press the Start switch to set the mode of operation.<br />
The CSL powers on in the default mode selected in the drive<br />
configuration menu. The default mode is overridden when the switch is<br />
used to select a new setting. The CSL remains in the selected mode<br />
while the drive is powered on. This does not change the IPL default<br />
mode in the drive configuration menu.<br />
• System allows host to control CSL.<br />
• Auto allows CSL to operate automatically.<br />
• <strong>Manual</strong> allows manual operations only.<br />
95739 Ninth Edition 6-7
Operator Panel<br />
CSL Indicators<br />
The CSL operator panel indicators (Figure 6-7) are described in Table 6-4.<br />
Note: Refer to “Operator Panel” on page 1-4 for explanation of the <strong>9840</strong> <strong>Tape</strong><br />
<strong>Drive</strong> indicators.<br />
Figure 6-7. CSL Operator Panel Indicators<br />
1 2 3 4 5 6 7 8 9<br />
service<br />
10 11 12 13 14 15<br />
1. Power Indicator<br />
2. Activity Indicator<br />
3. Clean Indicator<br />
4. Service Indicator<br />
5. IPL Switch<br />
6. Operator Indicator<br />
7. System Indicator<br />
8. Automatic Indicator<br />
9. <strong>Manual</strong> Indicator<br />
10. Unload Switch<br />
11. Menu Switch<br />
12. Select Switch<br />
13. Operator Display<br />
14. Start Switch<br />
15. Autoload Mode Switch<br />
C53362<br />
Note:<br />
The IPL switch (5) only IPLs the drive. Use the Power switch on the back of the CSL to<br />
IPL the CSL.<br />
Table 6-4. CSL Operator Panel Indicators<br />
Indicator<br />
Operator<br />
(red)<br />
(CSL only)<br />
Figure 6-7<br />
Number<br />
Description<br />
6 When flashing:<br />
When flashing<br />
and xxxx xxxx<br />
is displayed:<br />
When constantly<br />
on:<br />
Explanation<br />
The CSL detected an operator-intervention<br />
condition. Do the following as required:<br />
• See if input bin empty<br />
• Verify if a mode change is in progress<br />
• Remove cartridge(s) from output bin<br />
• Load cartridge(s)<br />
It asks for the specific tape indicated in the<br />
display<br />
It indicates an error condition. To correct, fix<br />
jam (remove cartridge in feed channel) and<br />
press Start switch.<br />
Refer to “Jammed Cartridge” on page 6-26.<br />
6-8 Ninth Edition 95739
Operator Panel<br />
Table 6-4. CSL Operator Panel Indicators (Continued)<br />
Indicator<br />
System<br />
(green)<br />
(CSL only)<br />
Automatic<br />
(green)<br />
(CSL only)<br />
<strong>Manual</strong><br />
(green)<br />
(CSL only)<br />
Figure 6-7<br />
Number<br />
Description<br />
Explanation<br />
7 Indicates CSL is in System mode: allows host to control CSL.<br />
8 Indicates CSL is in Auto mode: allows CSL to operate<br />
automatically.<br />
9 Indicates CSL is in <strong>Manual</strong> mode: allows manual operations only.<br />
95739 Ninth Edition 6-9
Power On/Off CSL<br />
■ Power On/Off CSL<br />
Figure 6-8. SCSI CSL Power<br />
This section provides a process to power on/off the CSL. Figure 6-8 provides<br />
locations of the Power switch, power cord, terminator, and cable for a CSL SCSI<br />
interface.<br />
Note: The CSL Power switch and power cord are located on the rear of the<br />
CSL.<br />
TERMINATOR<br />
POWER<br />
SWITCH<br />
SCSI<br />
CABLE<br />
POWER<br />
CORD<br />
C53616<br />
Figure 6-9 provides locations of the Power switch, power cord, and cable for a<br />
CSL ESCON interface.<br />
Figure 6-9. ESCON CSL Power<br />
ESCON<br />
CABLE<br />
POWER<br />
SWITCH<br />
POWER<br />
CORD<br />
C53617<br />
6-10 Ninth Edition 95739
Power On/Off CSL<br />
Power On<br />
Power Off<br />
1. Ensure the power cord is attached to the receptacle on the rear of the CSL.<br />
Note: The power cord and applicable interface cable (ESCON or SCSI) should<br />
have been attached during initial installation.<br />
2. If the power cord is not attached to the CSL, do the following:<br />
a. Attach the female end of the power cord to the CSL receptacle.<br />
b. Attach the male end of the power cord to a power outlet.<br />
3. Press the POWER switch on the rear of the CSL to ON (1).<br />
4. Verify that the CSL powers on.<br />
Note: A steady asterisk on the operator panel indicates a successful IPL<br />
completion, the drive is online, but not loaded with a cartridge.<br />
1. Press the Unload switch to eject the cartridge from the CSL.<br />
2. Ask the operator to ensure that the drive has no I/O from the host.<br />
Note: In the enterprise environment, have the operator vary the drive<br />
offline.<br />
3. Use the operator panel to place the CSL offline.<br />
Note: Refer to Chapter 4, “Menus.” for instructions to place the CSL offline.<br />
4. Press the POWER switch on the rear of the CSL to OFF (0). This will power<br />
off the CSL.<br />
5. Verify that the CSL powers off.<br />
Note: All indicators are off and the operator panel is blank.<br />
95739 Ninth Edition 6-11
CSL Cartridge Loading/Unloading<br />
■ CSL Cartridge Loading/Unloading<br />
Cartridge Loading<br />
This section contains procedures to load and unload cartridges within the CSL.<br />
Note: Engineering recommends no drive activity during cartridge loading. This<br />
ensures that no drive errors are induced.<br />
To correctly load a cartridge into the input bin, follow these instructions and<br />
refer to Figure 6-10.<br />
Notes:<br />
Figure 6-10. Cartridge Loading<br />
• Load cartridges into the CSL vertically with the Media Id label (R)<br />
right side up and facing out towards the operator (reels to the right).<br />
• Never load cartridges with the cartridge reels to the left.<br />
• Never load cartridges flat within the CSL. This causes an instant CSL<br />
failure.<br />
CARTRIDGE<br />
REELS<br />
INPUT<br />
BIN<br />
SLIDER<br />
C53358<br />
1. Move the CSL spring-loaded slider to the right and hold it in this position<br />
while loading cartridges.<br />
2. Load cartridges into the CSL vertically with the Media Id label (R) facing out<br />
towards the operator (reels to the right).<br />
3. Verify that the customer label (if used) is on the left side of the cartridge<br />
(toward the feed channel).<br />
4. Tilt the cartridge back slightly.<br />
5. Insert the bottom-back edge of the cartridge into the CSL input bin.<br />
6-12 Ninth Edition 95739
CSL Cartridge Loading/Unloading<br />
6. Slide the front edge of the cartridge into the CSL.<br />
7. Slowly release the CSL spring-loaded slider and ensure it touches the loaded<br />
cartridges.<br />
8. Check that all loaded cartridges are seated correctly.<br />
Cartridge Unloading<br />
Note: Ensure cartridges are aligned vertically and horizontally within the<br />
input bin and the spring-loaded slider is firmly against the cartridges.<br />
Cartridges are ejected from the feed channel into the output bin (Figure 6-11).<br />
One to seven cartridges may be ejected into the CSL output bin.<br />
Note: When unloading cartridges from the CSL output bin, ensure the springloaded<br />
slider does not slam into the feed channel.<br />
To correctly unload a cartridge from the output bin, follow these instructions<br />
and refer to Figure 6-11:<br />
1. Move the CSL spring-loaded slider to the left and hold it in this position<br />
while unloading cartridges.<br />
2. Grasp the cartridge(s) and tilt the cartridge back slightly.<br />
3. Remove the cartridge(s).<br />
4. Slowly allow the CSL spring-loaded slider to touch the feed channel.<br />
Figure 6-11. Cartridge Unloading<br />
Note: Allowing the output or input bin slider to slam into the feed channel<br />
may cause drive errors.<br />
OUTPUT<br />
BIN<br />
SLIDER<br />
C53359<br />
95739 Ninth Edition 6-13
Modes of Operation<br />
■ Modes of Operation<br />
The CSL has three distinct modes of operation (Figure 6-12). They are:<br />
• System Mode<br />
• Automatic Mode<br />
• <strong>Manual</strong> Mode<br />
Figure 6-12. CSL Modes of Operation<br />
1 2 3<br />
service<br />
1. System Indicator<br />
2. Automatic Indicator<br />
3. <strong>Manual</strong> Indicator<br />
C53361<br />
System Mode<br />
When power is applied to the CSL, illumination of one of the mode LEDs<br />
indicates the CSL is receiving power and is ready for operation. The Operator<br />
indicator may also light indicating a required manual intervention.<br />
The system mode allows the host (enterprise only) to control the CSL. The CSL<br />
stays in the system mode until changed from the operator panel or until the<br />
drive sends a mode change command. The drive changes the mode of<br />
operation at IPL to the mode set in the configuration on the operator panel.<br />
Mount Message<br />
Note: If the input bin is empty while the CSL is in System mode, the input<br />
bin must be replenished, and the Start switch must be pressed to<br />
restart the CSL operation.<br />
If a Load Display command has been sent to the CSL from the<br />
host, a cartridge will be loaded.<br />
If a Load Display command has not been sent to the CSL from<br />
the host, a cartridge will not load until a Load Display command<br />
is received from the host to mount a cartridge.<br />
When the CSL receives a mount message from the host, one of the following<br />
occurs:<br />
6-14 Ninth Edition 95739
Modes of Operation<br />
• If the drive is empty and the feed channel contains a cartridge which hasn’t<br />
been previously loaded, the cartridge loads into the drive.<br />
• If the drive and the feed channel are empty, but at least one cartridge is<br />
available in the input bin, then the cartridge loads into the drive.<br />
• If the drive, the feed channel, and the input bin are all empty, the Operator<br />
indicator blinks until a cartridge is loaded and the Start switch is pressed.<br />
Note: This is for ESCON attached drives only. SCSI attached drives will<br />
issue an error to the host.<br />
• If the drive is full, then a mount pre-queues for execution during the next<br />
unload.<br />
Note: This is for ESCON attached drives only.<br />
Unload Message<br />
Refer to “Priority Mount Mode” on page 6-18 to physically mount a<br />
priority cartridge directly into the CSL.<br />
When the CSL receives an unload message, the cartridge in the drive moves to<br />
the feed channel. The CSL sequences as follows:<br />
• If the output bin is not full, the cartridge is placed into the output bin.<br />
• If the output bin is full, the cartridge remains in the feed channel, and the<br />
Operator indicator blinks until the cartridge is removed and the Start switch<br />
is pressed.<br />
Note: Refer to “Cartridge Removal from Feed Channel” on page 6-20 to<br />
remove a priority mounted cartridge from the feed channel.<br />
• If a mount has been pre-queued then, if possible, the next cartridge is<br />
mounted with only one cartridge shift operation.<br />
Place CSL in System Mode<br />
1. Press the Autoload Mode switch until the System indicator illuminates.<br />
2. Press the Start switch to set the System mode.<br />
3. Load up to seven cartridges in the input bin.<br />
4. Press the Start switch.<br />
Note: The CSL does not respond to the Start switch if a cartridge is not in<br />
the input bin of the loader.<br />
5. Unload the output bin when necessary.<br />
95739 Ninth Edition 6-15
Modes of Operation<br />
Automatic Mode<br />
The automatic mode allows the CSL to operate without operator intervention.<br />
Cartridges automatically loads from the input bin into the drive. Cartridges are<br />
loaded in the order they were inserted and unloaded into the output bin when<br />
the operating system is finished with the tape.<br />
Unload Message<br />
Example<br />
Note: If the input bin is empty while the CSL is in Automatic mode, the<br />
input bin must be replenished, and the Start switch must be pressed<br />
to restart the CSL operation.<br />
Refer to “Priority Mount Mode” on page 6-18 to physically mount a<br />
priority cartridge directly into the CSL.<br />
Upon receiving an unload message from the host, the CSL acts identically to the<br />
unload in the system mode with a subsequent pre-queued mount of the next<br />
cartridge into the drive automatically if possible. The CSL sequences as follows:<br />
• If the output bin is not full, the cartridge is placed into the output bin.<br />
• If the output bin is full, the cartridge remains in the feed channel, and the<br />
Operator indicator blinks until the cartridge is removed from the output bin<br />
and the Start switch is pressed.<br />
Note: Refer to “Cartridge Removal from Feed Channel” on page 6-20 to<br />
remove a priority mounted cartridge from the feed channel.<br />
• If a mount has been pre-queued then, if possible, the next cartridge is<br />
mounted with only one cartridge shift operation.<br />
A job requires a specific order of cartridges to execute.<br />
1. Load the cartridge tapes into the input bin in the order they will be used.<br />
2. Press the Start switch.<br />
Note: The CSL automatically inserts cartridges into the feed channel in the<br />
order they were inserted in the input bin and ejects them into the<br />
output bin when the operating system has finished with each tape.<br />
Place CSL in Automatic Mode<br />
1. Press the Autoload Mode switch until the green Automatic indicator<br />
illuminates.<br />
2. Press the Start switch to set the Automatic mode.<br />
3. Load up to seven cartridges in the input bin in the required sequence (left<br />
to right, in the order they will be used).<br />
6-16 Ninth Edition 95739
Modes of Operation<br />
<strong>Manual</strong> Mode<br />
Unload<br />
4. Press the Start switch.<br />
5. Unload the output bin when the job is complete or as necessary.<br />
In manual mode, the operator has complete control over CSL and drive<br />
operation. While the CSL is in manual mode:<br />
• You may wait for a cartridge mount request and then mount a cartridge.<br />
• You may receive requests for multiple cartridge mounts and load the<br />
requested volumes into the input tray.<br />
• You may remove individual cartridges as they are ejected from the feed<br />
channel or wait until the output bin is full before removing them.<br />
Note: In <strong>Manual</strong> mode, however, you must press the Start switch each time to<br />
load a cartridge into the drive.<br />
Refer to “Priority Mount Mode” on page 6-18 to physically mount a<br />
priority cartridge directly into the CSL.<br />
Upon receiving an unload command from the drive, the CSL acts identically to<br />
the unload in the system mode.<br />
After the unload is successfully completed the CSL pauses until the Start switch<br />
is pressed. Pressing the Start switch loads the next available cartridge. The CSL<br />
sequences as follows:<br />
• If the output bin is not full, the cartridge is placed into the output bin.<br />
• If the output bin is full, the cartridge remains in the feed channel, and the<br />
Operator indicator blinks until the cartridge is removed from the output bin<br />
and the Start switch is pressed.<br />
Note: Refer to “Cartridge Removal from Feed Channel” on page 6-20 to<br />
remove a priority mounted cartridge from the feed channel.<br />
• If a mount has been pre-queued then, if possible, the next cartridge is<br />
mounted with only one cartridge shift operation.<br />
Place CSL in <strong>Manual</strong> Mode<br />
1. Press the Autoload Mode switch until the green <strong>Manual</strong> indicator illuminates.<br />
2. Press the Start switch to set the <strong>Manual</strong> mode.<br />
3. When a mount message appears on the operator panel or system console,<br />
place the requested volumes in the input bin.<br />
4. Press the Start switch.<br />
95739 Ninth Edition 6-17
Modes of Operation<br />
5. Unload the output bin when necessary.<br />
Priority Mount Mode<br />
The CSL is a sequential scratch loader. An operator can physically mount a<br />
priority cartridge directly into the unit. The host may issue a Load Display<br />
command with required volser. This command may be issued during any CSL<br />
mode of operation informing the operator to place the cartridge into the feed<br />
channel (Figure 6-13).<br />
Note: The output bin holds only seven cartridges. If you are going to load a<br />
priority cartridge into the feed channel, ensure the output bin is<br />
unloaded or has space for the priority mounted cartridge.<br />
To mount a priority cartridge, review:<br />
• “CSL in System Mode” on page 6-18<br />
• “CSL in Automatic Mode” on page 6-19<br />
• “CSL in <strong>Manual</strong> Mode” on page 6-19<br />
Figure 6-13. Priority Mounting a Cartridge<br />
FEED<br />
CHANNEL<br />
SECOND<br />
INDEX<br />
ROD<br />
FIRST<br />
INDEX<br />
ROD<br />
C53116<br />
CSL in System Mode<br />
When the CSL is in the system mode and the drive is not loaded, follow these<br />
procedures to load a priority cartridge:<br />
1. Verify that the drive is currently unloaded and the index rods are on the<br />
right (Figure 6-13).<br />
2. Insert the priority cartridge into the CSL feed channel (Figure 6-13):<br />
6-18 Ninth Edition 95739
Modes of Operation<br />
a. Insert the cartridge past the cartridge stop mechanism. See Figure 6-14.<br />
Figure 6-14. Cartridge Stop Mechanism/First Index Rod<br />
CARTRIDGE<br />
STOP<br />
MECHANISM<br />
CARTRIDGE<br />
FIRST<br />
INDEX<br />
ROD<br />
C53618<br />
b. Do not insert the cartridge past the first index rod (Figure 6-14).<br />
Note: If the cartridge is not inserted into the CSL feed channel properly<br />
(Figure 6-14), the CSL cannot insert the cartridge into the drive slot.<br />
3. Check to ensure the Operator light is flashing.<br />
4. Press the Start switch to feed the cartridge into the drive and to clear the<br />
flashing Operator light.<br />
CSL in Automatic Mode<br />
The automatic mode is used for sequential mounting of cartridges from the<br />
input bin into the drive. When the CSL is in the automatic mode and the drive is<br />
not loaded, follow these procedures to load a priority cartridge:<br />
1. If there are no cartridges in the input bin, the Operator light flashes to signal<br />
you to insert a priority (single) cartridge into the feed channel. Press the<br />
Start switch to resume CSL operation.<br />
2. If the input bin is not empty, the mode must be changed to manual mode to<br />
mount the priority cartridge. This prevents the next cartridge from being<br />
automatically loaded.<br />
Note: Refer to Figure 6-14 on page 6-19 to correctly load a cartridge into the<br />
feed channel.<br />
CSL in <strong>Manual</strong> Mode<br />
This mode is used for sequential mounting of cartridges from the input bin into<br />
the drive. The operator controls each mount by pressing the Start switch before<br />
each mount. When the CSL is in the manual mode and the drive is not loaded,<br />
follow these procedures to load a priority cartridge:<br />
95739 Ninth Edition 6-19
Modes of Operation<br />
1. If there are no cartridges in the input bin, the Operator light flashes<br />
signaling you to put a cartridge into the feed channel.<br />
2. Press the Start switch to resume CSL operation.<br />
Note: Refer to Figure 6-14 on page 6-19 to correctly load a cartridge into the<br />
feed channel.<br />
Cartridge Removal from Feed Channel<br />
If the output bin is full (seven cartridges), and you load an eighth cartridge into<br />
the feed channel for a priority mount, the cartridge cannot eject into the output<br />
bin. The cartridge ejects into the feed channel. You must physically remove the<br />
cartridge from the feed channel.<br />
Follow these instructions to remove the eighth cartridge from the feed channel:<br />
1. Remove all cartridges from the input and output bins.<br />
2. Push the cartridge stop mechanism down.<br />
3. Grasp the cartridge and remove it from the feed channel.<br />
Figure 6-15. Cartridge Removal<br />
CARTRIDGE<br />
STOP<br />
MECHANISM<br />
CARTRIDGE<br />
FIRST<br />
INDEX<br />
ROD<br />
C53618<br />
6-20 Ninth Edition 95739
Error and Recovery<br />
■ Error and Recovery<br />
Note: Refer to Chapter 5, “<strong>Drive</strong> Errors and Messages,” for specific drive errors.<br />
Errors may be encountered anytime during operation of the CSL. Errors,<br />
recovery, and FSCs are discussed in this chapter.<br />
Operator Indicator<br />
Note: The 4EXX FSCs are for the CSL only.<br />
When the Operator indicator (call out 6) is flashing (Figure 6-16), the CSL<br />
detected an operator-intervention condition. Refer to Table 6-4 on page 6-8 for<br />
a description of the Operator indicator.<br />
When the Operator indicator is on constantly, the CSL has detected an error<br />
condition (usually a jammed cartridge or an incorrectly loaded cartridge).<br />
Figure 6-16. CSL Operator Panel<br />
1 2 3 4 5 6 7 8 9<br />
service<br />
10 11 12 13 14 15<br />
1. Power Indicator<br />
2. Activity Indicator<br />
3. Clean Indicator<br />
4. Service Indicator<br />
5. IPL Switch<br />
6. Operator Indicator<br />
7. System Indicator<br />
8. Automatic Indicator<br />
9. <strong>Manual</strong> Indicator<br />
10. Unload Switch<br />
11. Menu Switch<br />
12. Select Switch<br />
13. Operator Display<br />
14. Start Switch<br />
15. Autoload Mode Switch<br />
C53362<br />
<strong>Drive</strong> Failure to Load<br />
Cartridges may be loaded into the CSL incorrectly (priority mount or from the<br />
input bin). Sometimes, cartridges are loaded with the cartridge reels to the left<br />
(Figure 6-17 on page 6-22). When this is done, the CSL attempts to load the<br />
cartridge into the drive. This type of a load causes an instant CSL failure.<br />
CAUTION:<br />
Never load cartridges with the cartridges reels to the left. Only load<br />
cartridges with the cartridges reels to the right.<br />
95739 Ninth Edition 6-21
Error and Recovery<br />
Incorrect Load Process<br />
This is the process of events when cartridges are loaded incorrectly into the<br />
CSL. The cartridge reels are facing to the left (Figure 6-17). You cannot see them<br />
in Figure 6-17.<br />
1. The CSL attempts to load the cartridge into the drive.<br />
2. The CSL loads the cartridge approximately three-quarters of the way into<br />
the drive.<br />
3. The drive senses the cartridge is loaded incorrectly.<br />
4. The CSL moves the cartridge out of the drive and to the cartridge stop<br />
mechanism (Figure 6-17).<br />
Figure 6-17. Ejected Cartridge (Failure to Load)<br />
CARTRIDGE<br />
STOP<br />
MECHANISM<br />
OPERATOR<br />
INDICATOR<br />
DISPLAY<br />
C53625<br />
5. Fault Symptom Code (FSC) LOAD 4E04 displays on the operator panel and<br />
the Operator indicator is on constantly.<br />
Recovery Process<br />
1. Remove the incorrectly loaded cartridge:<br />
a. Press down on the cartridge stop mechanism (Figure 6-17).<br />
b. Grasp the cartridge and pull it from the feed channel.<br />
2. Clear the CSL error.<br />
a. Press the Start switch (Figure 6-16 on page 6-21) to clear the solid<br />
Operator indicator.<br />
b. After the Start switch is pressed, the Operator indicator blinks and the<br />
operator display still shows LOAD 4E04 until a successful load or you<br />
press the Unload switch (Figure 6-16 on page 6-21) to clear the display.<br />
6-22 Ninth Edition 95739
Error and Recovery<br />
3. Ensure all remaining cartridges to be loaded are placed within the input bin<br />
correctly (cartridge reels to the right).<br />
4. The CSL is now ready for normal operations.<br />
Clearing CSL Errors<br />
Figure 6-18. CSL Rear View<br />
Refer to the following process to clear CSL errors. Follow the directions<br />
explicitly.<br />
Note: Any time the Operator indicator is flashing or on solid, clear the obvious<br />
error.<br />
1. After correcting the error, press the Start switch (Figure 6-16 on page 6-21,<br />
call out 14) to clear the Operator indicator.<br />
2. If pressing the Start switch did not clear the Operator indicator, press the<br />
Start switch twice.<br />
Note: Press the Start switch twice when there is a load failure or solid<br />
Operator indicator (red) on the CSL. Pressing the switch twice<br />
reinitializes the CSL.<br />
3. If pressing the Start switch twice did not clear the Operator indicator, power<br />
cycle the CSL to bring it back online. Refer to “Power On/Off CSL” on<br />
page 6-10 to correctly power cycle the CSL. Figure 6-18 shows the location<br />
of the power switch.<br />
TERMINATOR<br />
POWER<br />
SWITCH<br />
Note:<br />
SCSI<br />
CABLE<br />
This CSL uses a SCSI interface to the host.<br />
POWER<br />
CORD<br />
C53616<br />
95739 Ninth Edition 6-23
Error and Recovery<br />
Fault Symptom Codes<br />
Perform the following sequence of checks if a CSL error occurs.<br />
1. Check the CSL Operator indicator to see if it is flashing (operator<br />
summoned) or on solid (failure). Clear the obvious error.<br />
2. If the CSL does not indicate any problems, check the FSC list (Table 6-5).<br />
3. Check sense data at the host for any FSC in addition to the information<br />
provided in Table 6-5.<br />
Note: Some malfunctions are caused by communications errors between the<br />
CSL and the drive, and also by internal software. If the malfunctions<br />
continue, force a dump of the drive for engineering evaluation.<br />
Table 6-5 provides the 4EXX FSCs, suspected malfunction, and possible fix.<br />
Table 6-5. CSL FSCs<br />
FSC Malfunction Fix<br />
4E04 Cartridge installed incorrectly (180 degrees<br />
out, cartridge reels to left).<br />
Insert cartridge<br />
correctly. Install<br />
cartridge with reels to<br />
the right.<br />
4E05 SCSI load command rejected due to no CSL<br />
being attached to the drive.<br />
Replace the CSL.<br />
4E0C<br />
4E0D<br />
SCSI load command cannot be performed.<br />
The CSL is not in the System mode.<br />
SCSI load command cannot be performed.<br />
There is no cartridge in the input bin or<br />
feed channel.<br />
Select the System<br />
mode.<br />
Load cartridge.<br />
Note: The 4E0D FSC may occur after a cleaning cartridge has been<br />
unloaded.<br />
4E11 ESCON load command is rejected due to<br />
no CSL being attached to the drive.<br />
Replace the CSL.<br />
4E2D<br />
SCSI load command failed due to the CSL<br />
no longer in the System mode. The mode<br />
was changed during the load.<br />
Return CSL to System<br />
Mode.<br />
6-24 Ninth Edition 95739
Error and Recovery<br />
Table 6-5. CSL FSCs<br />
FSC Malfunction Fix<br />
4E31<br />
4E34<br />
SCSI load command failed due to the CSL<br />
no longer in the System mode. The mode<br />
was changed during the load. This error<br />
occurs immediately after a cleaning or<br />
dump cartridge has just been unloaded.<br />
SCSI load command failed due to no<br />
cartridge being available to load. This error<br />
only occurs immediately after a cleaning or<br />
dump cartridge has just been unloaded and<br />
the CSL is in the Automatic mode.<br />
Return CSL to System<br />
Mode.<br />
Load a cartridge.<br />
95739 Ninth Edition 6-25
.<br />
Jammed Cartridge<br />
■ Jammed Cartridge<br />
A jammed cartridge in a CSL is not a common malfunction. A jammed cartridge<br />
unloads from the drive and remains on the feed roller (Figure 6-19). It does not<br />
eject fully into the feed channel.<br />
You must know how to remove jammed cartridges when the malfunction<br />
occurs. Follow the procedures in this section to remove a jammed cartridge.<br />
See Figure 6-19 for the CSL manual unload device (MUD) screw location. The<br />
MUD screw is located to the right of the feed channel.<br />
Figure 6-19. <strong>9840</strong> <strong>Tape</strong> <strong>Drive</strong> <strong>Manual</strong> Unload Device (MUD)<br />
FEED<br />
CHANNEL<br />
MUD<br />
SCREW<br />
INPUT<br />
BIN<br />
C53620<br />
Notes:<br />
1. Only use the MUD mechanism to remove jammed cartridges<br />
(cartridges still in the <strong>9840</strong> <strong>Tape</strong> <strong>Drive</strong>) or to reset the drive for<br />
shipping (cartridges not on the feed roller).<br />
2. The MUD screw must be turned to the right or clockwise (CW) to<br />
remove jammed cartridges.<br />
3. The MUD screw must be turned to the left or counter-clockwise<br />
(CCW) to reset the drive to its shipping position and to install and<br />
lock the shipping insert into the drive.<br />
6-26 Ninth Edition 95739
Jammed Cartridge<br />
1. Power off the CSL if power is applied (“Power On/Off CSL” on page 6-10).<br />
2. Remove all cartridges from the input and output bins.<br />
3. Locate the MUD screw within the CSL input bin (upper-left area).<br />
Note:<br />
The CSL MUD screw is located to the right of the feed channel.<br />
FEED<br />
CHANNEL<br />
MUD<br />
SCREW<br />
INPUT<br />
BIN<br />
C53620<br />
4. Obtain a long-common 1/8 in. screwdriver and insert it into the MUD slot.<br />
5. Press against the spring-loaded MUD screw until it stops.<br />
WARNING:<br />
Do not turn the screwdriver to the left or counter-clockwise (CCW) when removing a<br />
jammed cartridge.<br />
6. Slowly turn the screwdriver to the right or clockwise (CW) to remove the jammed<br />
cartridge (may take approximately ten turns).<br />
a. Turn the MUD screw until it will not turn any further. This action lowers the reel<br />
motors within the drive.<br />
C53621<br />
95739 Ninth Edition 6-27
Jammed Cartridge<br />
b. Turn the MUD screw to the right (CW) until the cartridge rests on the feed roller.<br />
FEED<br />
CHANNEL<br />
MUD<br />
SCREW<br />
FEED<br />
ROLLER<br />
A<br />
INPUT<br />
BIN<br />
DETAIL A<br />
C53640<br />
7. Remove the screwdriver.<br />
8. Remove the cartridge from the <strong>9840</strong> <strong>Tape</strong> <strong>Drive</strong>.<br />
Note: The cartridge will not eject completely out of the CSL. It will only eject out of the<br />
drive and stop deep inside the feed channel on the feed roller.<br />
a. Use both hands and reach between the input bin and output bin sliders.<br />
b. Grasp the cartridge with your fingers.<br />
c. Slowly work the cartridge out of the drive through the feed channel.<br />
FEED CHANNEL<br />
CARTRIDGE<br />
C53624<br />
6-28 Ninth Edition 95739
Jammed Cartridge<br />
9. Work the cartridge through the feed channel to the cartridge stop mechanism.<br />
a. Push down on the cartridge stop mechanism.<br />
Note: This allows the cartridge to be removed from the front of the feed channel.<br />
b. Grasp the cartridge and remove it from the feed channel.<br />
CARTRIDGE<br />
STOP<br />
MECHANISM<br />
CARTRIDGE<br />
FIRST<br />
INDEX<br />
ROD<br />
C53618<br />
10. Power on the CSL.<br />
11. Refer to “Power On/Off CSL” on page 6-10 for the power on procedures.<br />
Note:<br />
Refer to the figure below for location of the power switch.<br />
If cartridges continue to jam, the CSL is defective and must be replaced.<br />
TERMINATOR<br />
POWER<br />
SWITCH<br />
SCSI<br />
CABLE<br />
POWER<br />
CORD<br />
C53616<br />
95739 Ninth Edition 6-29
Shipping Insert<br />
■ Shipping Insert<br />
This section contains instructions to remove, install, and lock a shipping insert<br />
into the CSL. The shipping insert must always be inserted and locked into the<br />
CSL. Read caution below.<br />
CAUTION:<br />
If the shipping insert is not locked into the tape drive, the drive head will<br />
become damaged in shipment.<br />
When you receive a new CSL, you must remove the shipping insert. Figure 6-20<br />
provides the location of the shipping insert within the CSL feed channel.<br />
Figure 6-20. Shipping Insert<br />
FEED<br />
CHANNEL<br />
SHIPPING<br />
INSERT<br />
FEED<br />
ROLLER<br />
INPUT<br />
BIN<br />
CARTRIDGE<br />
STOP<br />
MECHANISM<br />
C53622<br />
6-30 Ninth Edition 95739
Shipping Insert<br />
Removal<br />
Follow these instructions to remove the shipping insert from the CSL.<br />
1. Locate the shipping insert within the feed channel.<br />
2. Push the input bin slider to right of the input bin and hold it in place.<br />
3. Reach through the input bin and squeeze the shipping insert handle together.<br />
Note:<br />
Squeezing the handle unlocks the shipping insert from the drive.<br />
4. Slide the shipping insert out through the feed channel to the cartridge stop mechanism.<br />
5. Push down on the cartridge stop mechanism and remove the shipping insert.<br />
FEED<br />
CHANNEL<br />
SHIPPING<br />
INSERT<br />
FEED<br />
ROLLER<br />
INPUT<br />
BIN<br />
CARTRIDGE<br />
STOP<br />
MECHANISM<br />
C53622<br />
6. Store the shipping insert.<br />
95739 Ninth Edition 6-31
Shipping Insert<br />
Install and Lock<br />
Follow these instructions to properly install and lock the shipping insert into a<br />
CSL. Before you can lock the shipping insert into the CSL, you must use the<br />
manual unload device (MUD) screw (Figure 6-21) to raise the reel motors and<br />
to lower the cleaning brush within the drive.<br />
CAUTION:<br />
If the shipping insert is not locked into the tape drive, the drive head will<br />
become damaged in shipment.<br />
Notes:<br />
Figure 6-21. MUD Screw in CSL<br />
1. Only use the MUD mechanism to reset the drive for shipping.<br />
2. The MUD screw must be turned to the left or counter-clockwise<br />
(CCW) to reset the drive to its shipping position and to install and<br />
lock the shipping insert into the drive.<br />
FEED<br />
CHANNEL<br />
MUD<br />
SCREW<br />
INPUT<br />
BIN<br />
C53620<br />
6-32 Ninth Edition 95739
Shipping Insert<br />
1. Power off the CSL if power is applied.<br />
TERMINATOR<br />
POWER<br />
SWITCH<br />
SCSI<br />
CABLE<br />
POWER<br />
CORD<br />
C53616<br />
2. Locate the manual unload device (MUD) screw to the right side of the feed channel.<br />
3. Obtain a long-common 1/8 in. screwdriver and insert it into the MUD slot.<br />
4. Press against the spring-loaded MUD screw until it stops.<br />
FEED<br />
CHANNEL<br />
MUD<br />
SCREW<br />
INPUT<br />
BIN<br />
C53620<br />
95739 Ninth Edition 6-33
Shipping Insert<br />
WARNING:<br />
Do not turn the screwdriver to the right or clockwise (CW) when preparing the drive<br />
for a shipping insert.<br />
5. Slowly turn the screwdriver to the left or counter-clockwise (CCW) to raise the reel<br />
motors and to lower the cleaning brush.<br />
Note:<br />
When the MUD screw will not turn any further, the reel motors are raised and the<br />
cleaning brush is lowered.<br />
C53363<br />
6. Remove the screwdriver.<br />
7. Insert and lock the shipping insert in the <strong>9840</strong> <strong>Tape</strong> <strong>Drive</strong>.<br />
Note:<br />
Some force must be used to insert the shipping insert past the feed roller.<br />
8. Gently pull the shipping insert outward to verify it is locked within the carriage.<br />
FEED<br />
CHANNEL<br />
SHIPPING<br />
INSERT<br />
FEED<br />
ROLLER<br />
INPUT<br />
BIN<br />
CARTRIDGE<br />
STOP<br />
MECHANISM<br />
C53622<br />
9. Send the defective CSL to StorageTek.<br />
6-34 Ninth Edition 95739
CSL Model Numbers<br />
■ CSL Model Numbers<br />
The CSL is offered within a rack enclosure (Figure 6-22). Refer to Table 6-6 for<br />
the rack mount model numbers.<br />
Figure 6-22. Rack Enclosure<br />
C53615<br />
Table 6-6. CSL Configurations<br />
CSL Configuration<br />
Model Number<br />
Rack Mount, SCSI<br />
<strong>9840</strong>S01<br />
Rack Mount, ESCON<br />
<strong>9840</strong>S02<br />
Note: Refer to the System Assurance Guide (SAG) for feature codes.<br />
95739 Ninth Edition 6-35
CSL Model Numbers<br />
This page intentionally left blank.<br />
6-36 Ninth Edition 95739
Product Specifications<br />
A<br />
This appendix lists the following product specifications for the <strong>9840</strong> <strong>Tape</strong> <strong>Drive</strong>:<br />
• “Power Requirements” on page A-1<br />
• “Environmental Requirements” on page A-2<br />
• “Cartridge <strong>Tape</strong> Specifications” on page A-4<br />
• “<strong>Drive</strong> Performance” on page A-5<br />
• “Host Interfaces and Device Modes” on page A-6<br />
■ Power Requirements<br />
The specifications shown in Table A-1 reflect power requirements for each <strong>9840</strong><br />
<strong>Tape</strong> <strong>Drive</strong> installed as a desktop and rack-mount drive tray.<br />
Table A-1. Power Requirements<br />
Characteristics<br />
Input voltage<br />
Input frequency<br />
Power consumption<br />
Internal voltages<br />
Inrush current<br />
Value<br />
100 to 240 VAC<br />
50 to 60 Hz<br />
90 W<br />
+3.3, ±5.0, and +24.0 VDC<br />
14.813 A for 2 ms at 110 VAC, 60 Hz<br />
24.680 A for 2 ms at 220 VAC, 50 Hz<br />
95739 Ninth Edition A-1
Environmental Requirements<br />
■ Environmental Requirements<br />
This section describes environmental requirements, including the drive, power<br />
supply, cartridge tapes, and media for the <strong>9840</strong> <strong>Tape</strong> <strong>Drive</strong>.<br />
<strong>Drive</strong> and Power Supply<br />
Table A-2 shows the environmental requirements for the drive and the power<br />
supply for the <strong>9840</strong> <strong>Tape</strong> <strong>Drive</strong>.<br />
Table A-2. <strong>Drive</strong> and Power Supply Requirements<br />
Temperature<br />
Operating<br />
15.0º to 32.0ºC (59º to 90ºF)<br />
Storage<br />
10.0º to 40.0ºC (50º to 104ºF)<br />
Shipping<br />
-40º to 60ºC (-40º to 140ºF)<br />
Relative Humidity Non-Condensing<br />
Operating 20% to 80%<br />
Storage 10% to 95%<br />
Shipping 10% to 95%<br />
Wet Bulb Maximum<br />
Operating<br />
26ºC (79ºF)<br />
Storage<br />
26ºC (79ºF)<br />
Shipping<br />
26ºC (79ºF)<br />
Altitude<br />
Operating<br />
Up to 3.05 km (up to 10,000 ft)<br />
Storage<br />
Up to 3.05 km (up to 10,000 ft)<br />
Shipping<br />
Up to 15.24 km (up to 50,000 ft)<br />
Operating Heat Output/Air Flow Requirements<br />
<strong>Drive</strong> and power 61.7 kCal (241.3 Btu/hr)<br />
supply<br />
A-2 Ninth Edition 95739
Environmental Requirements<br />
Cartridge <strong>Tape</strong>s and Media<br />
Table A-3 shows the environmental requirements for cartridge tapes and media<br />
for the <strong>9840</strong> <strong>Tape</strong> <strong>Drive</strong>.<br />
Table A-3. Cartridge <strong>Tape</strong>s and Media Requirements<br />
Temperature<br />
Operating (see note)<br />
15º to 32ºC (59º to 90ºF)<br />
Storage (up to four weeks)<br />
5º to 32ºC (41º to 90ºF)<br />
Storage (archive)<br />
18º to 26ºC (65º to 79ºF)<br />
Shipping<br />
-23º to 49ºC (-10º to 120ºF)<br />
Relative Humidity, Non-Condensing<br />
Operating (see note) 20% to 80%<br />
Storage (up to four weeks) 5% to 80%<br />
Storage (archive) 40% to 60%<br />
Shipping 5% to 80%<br />
Wet Bulb Maximum<br />
Operating (see note)<br />
26ºC (79ºF)<br />
Storage (up to four weeks)<br />
26ºC (79ºF)<br />
Storage (archive)<br />
26ºC (79ºF)<br />
Shipping<br />
26ºC (79ºF)<br />
Note: Allow a cartridge to acclimatize within the operating environment for<br />
at least 24 hours.<br />
95739 Ninth Edition A-3
Cartridge <strong>Tape</strong> Specifications<br />
■ Cartridge <strong>Tape</strong> Specifications<br />
Table A-4 shows the specifications for the cartridge tapes to be inserted into the<br />
<strong>9840</strong> <strong>Tape</strong> <strong>Drive</strong>.<br />
CAUTION:<br />
Do not degauss <strong>9840</strong> <strong>Tape</strong> <strong>Drive</strong> cartridges. Servo tracks are written on<br />
the tape at the factory. When these tracks are mistakenly erased, the<br />
cartridge tape must be discarded.<br />
Table A-4. Cartridge <strong>Tape</strong> Specifications<br />
Characteristics<br />
Type STK1R data cartridge,<br />
StorageTek PN 310319401<br />
Type STK1U cleaning cartridge,<br />
StorageTek PN 310324601<br />
Dimensions<br />
Data Compression<br />
Note:<br />
Values<br />
271 m (889 ft) physical length<br />
251 m (823 ft) recordable length<br />
9 µm tape thickness<br />
Good for about 100 cleanings. Estimated<br />
usage: 1 cleaning per drive every two days.<br />
125 x 109 x 25.8 mm<br />
(4.92 x 4.29 x 1.00 in.)<br />
LZ-1 Enhanced, 3:1 Ratio<br />
Individual results may vary depending on the characteristics of the<br />
data and other variables.<br />
Capacity<br />
Archival Life<br />
Media Durability<br />
Short length<br />
Long length<br />
Load/Unloads<br />
Uncorrected bit error rate,<br />
including those caused by<br />
media defects<br />
Permanent Errors<br />
Weight<br />
20 GB uncompressed<br />
15 to 30 years<br />
80,000 write/read passes minimum<br />
6,500 write/read passes minimum<br />
10,000 minimum<br />
1 in 10 18 bytes<br />
Zero<br />
0.26 kg (9.17 oz)<br />
A-4 Ninth Edition 95739
<strong>Drive</strong> Performance<br />
■ <strong>Drive</strong> Performance<br />
Table A-5 shows performance characteristics of the <strong>9840</strong> <strong>Tape</strong> <strong>Drive</strong>.<br />
Table A-5. <strong>Drive</strong> Performance<br />
Characteristics<br />
Maximum block size<br />
Data rate, head-to-tape<br />
Data rate of host interface<br />
Maximum rewind time:<br />
from end of any wrap to<br />
logical beginning of tape<br />
(BOT)<br />
Reposition time<br />
<strong>Tape</strong> load and initialize to<br />
ready<br />
Unload time<br />
Access time (does not<br />
include library timing)<br />
Data buffer size<br />
Read/write speed<br />
Search/rewind speed<br />
Note:<br />
Values<br />
256 kB<br />
Greater than 10 MB/s (see note)<br />
Fibre Channel: burst transmission speed of<br />
100 MB/s (256 kB)<br />
SCSI: 40 MB/s burst synchronous/ ULTRA-1,<br />
differential, wide/fast, negotiable down to<br />
SCSI-1 narrow differential (see note)<br />
ESCON: burst transmission speed of 18 MB/s<br />
(see note)<br />
Approximately 16 s maximum for a 271 m (889<br />
ft) cartridge tape<br />
No penalty<br />
4 s<br />
5 s excluding rewind<br />
8 s for first search<br />
11 s average for subsequent search<br />
8 MB<br />
79 ips (2m/s)<br />
315 ips (greater than 8 m/s)<br />
Individual results may vary depending on the characteristics of the<br />
data and other variables.<br />
95739 Ninth Edition A-5
Host Interfaces and Device Modes<br />
■ Host Interfaces and Device Modes<br />
Table A-6 shows the host interfaces supported by the <strong>9840</strong> <strong>Tape</strong> <strong>Drive</strong>. Table A-<br />
6 also shows the device modes supported by each interface type.<br />
Table A-6. Host Interfaces<br />
Interface Type<br />
Fibre Channel<br />
SCSI<br />
ESCON<br />
Interface Characteristics<br />
Transmission speed of 100 MB/s (burst)<br />
Interface options:<br />
• Bridge: Connects SCSI devices to an FC <strong>net</strong>work<br />
• Hub: Connects FC devices in a logical loop<br />
• Switch: Connects FC devices in a fabric<br />
Synchronous, differential (burst):<br />
• Narrow/slow at 5 MB/s<br />
• Narrow/fast at 10 MB/s<br />
• Narrow/ultra at 20 MB/s<br />
• Wide/slow at 10 MB/s<br />
• Wide/fast at 20 MB/s<br />
• Wide/ultra at 40 MB/s<br />
Transmission speed of 18 MB/s<br />
A-6 Ninth Edition 95739
Library Attachments<br />
■ Library Attachments<br />
Table A-7 lists the libraries in which the <strong>9840</strong> <strong>Tape</strong> <strong>Drive</strong> can be installed. The<br />
table also lists the cartridge capacity of each library.<br />
Table A-7. Library Attachments<br />
Library Type Description<br />
9310 The StorageTek PowderHorn library. It holds up to 6,000<br />
cartridges and up to 80 drives in up to four 20-drive 9741<br />
cabi<strong>net</strong>s. Several 9310 libraries can be interconnected.<br />
ESCON, Fibre Channel, and SCSI interfaces are available.<br />
9360 The StorageTek WolfCreek library. It holds up to 1,000<br />
cartridges and up to 20 drives in up to two 10-drive 9741<br />
cabi<strong>net</strong>s. Several 9360 libraries can be interconnected.<br />
ESCON, Fibre Channel, and SCSI interfaces are available.<br />
9710 A StorageTek TimberWolf family library. It holds from 224 to<br />
588 cartridges and up to 10 drives. Fibre Channel and SCSI<br />
interfaces are available.<br />
9738 A StorageTek TimberWolf family library. It holds 30<br />
cartridges and up to 3 drives. Fibre Channel and SCSI<br />
interfaces are available.<br />
9740 A StorageTek TimberWolf family library. It holds 326 or 494<br />
cartridges and up to 10 drives in one 10-drive 9741 cabi<strong>net</strong>.<br />
Up to six 9740 libraries can be interconnected in the<br />
Enterprise environment. ESCON, Fibre Channel, and SCSI<br />
interfaces are available.<br />
L180<br />
A new StorageTek library. It holds 84 to 174 cartridges and<br />
up to 6 drives. Fibre Channel and SCSI interfaces are<br />
available.<br />
L700<br />
A new StorageTek library. It holds 156 to 678 cartridges and<br />
up to 12 drives. Fibre Channel and SCSI interfaces are<br />
available.<br />
95739 Ninth Edition A-7
Non-Library Installations<br />
■ Non-Library Installations<br />
Table A-8 describes the non-library <strong>9840</strong> <strong>Tape</strong> <strong>Drive</strong> installations.<br />
Table A-8. Non-Library <strong>Drive</strong> Installations<br />
Installation<br />
Type<br />
Desktop,<br />
manual-load<br />
Desktop, CSL<br />
Rack-mount,<br />
manual-load<br />
Rack-mount,<br />
CSL<br />
Description<br />
This installation consists of a <strong>9840</strong> <strong>Tape</strong> <strong>Drive</strong> and a power<br />
supply. The desktop has the smallest footprint of any<br />
version of the <strong>9840</strong>. Fibre Channel and SCSI interfaces are<br />
available for the <strong>9840</strong>.<br />
This installation consists of a <strong>9840</strong> <strong>Tape</strong> <strong>Drive</strong>, a CSL<br />
mechanism, and a power supply. ESCON, Fibre Channel,<br />
and SCSI interfaces are available for the <strong>9840</strong>.<br />
This installation consists of a rack-mount tray with either<br />
one drive or two drives side-by-side. The StorageTek rack<br />
holds up to six trays. ESCON, Fibre Channel, and SCSI<br />
interfaces are available for the <strong>9840</strong>.<br />
This installation consists of a rack-mount tray with one<br />
<strong>9840</strong> <strong>Tape</strong> <strong>Drive</strong>, a CSL mechanism, and a power supply.<br />
The StorageTek rack holds up to six trays. ESCON, Fibre<br />
Channel, and SCSI interfaces are available for the <strong>9840</strong>.<br />
A-8 Ninth Edition 95739
Client Programmer Information<br />
B<br />
This appendix is intended for the client programmer who is responsible for<br />
updating firmware for the <strong>9840</strong> <strong>Tape</strong> <strong>Drive</strong>. It describes the file format and<br />
handling of unmarked <strong>9840</strong> <strong>Tape</strong> <strong>Drive</strong> firmware update tapes and firmware<br />
update files (such as those that are downloaded, are on disk, or are placed on<br />
the Inter<strong>net</strong>).<br />
This appendix includes the following topics:<br />
• “Unmarked Firmware-Update Files” on page B-1<br />
• “Enterprise ESCON Updates” on page B-1<br />
• “Multi-Platform SCSI Updates” on page B-2<br />
• “Firmware-File Format” on page B-2<br />
• “Data Transfer Limitations” on page B-2<br />
■ Unmarked Firmware-Update Files<br />
Unmarked firmware-update tapes are tapes on which the <strong>9840</strong> <strong>Tape</strong> <strong>Drive</strong><br />
firmware is written in normal data format. The drive cannot automatically<br />
identify these tapes as firmware-update tapes, but they can be used by the host<br />
to update the firmware in the drives.<br />
You can download firmware-update files to the host from a source site using a<br />
program, such as the File Transfer Protocol (FTP). The host then uses these files<br />
to update the <strong>9840</strong> <strong>Tape</strong> <strong>Drive</strong> firmware.<br />
■ Enterprise ESCON Updates<br />
The StorageTek MPST/TIPS program reads the tape and updates the firmware.<br />
The MPST/TIPS program can also use a firmware file as source data.<br />
95739 Ninth Edition B-1
Multi-Platform SCSI Updates<br />
■ Multi-Platform SCSI Updates<br />
The host reads the tape. The firmware then loads into the <strong>9840</strong> <strong>Tape</strong> <strong>Drive</strong><br />
using the SCSI Write Buffer commands, provided that the vendor has<br />
implemented the correct utilities for using this command.<br />
You can also use SCSI Write Buffer commands to load downloaded firmware<br />
files into the <strong>9840</strong> <strong>Tape</strong> <strong>Drive</strong>.<br />
■ Firmware-File Format<br />
The firmware file is formatted as follows:<br />
• 80-byte ASCII header (tape only).<br />
• <strong>Tape</strong> mark (tape only).<br />
• 8,192-byte records on tape (the last record may be less than 8,192 bytes).<br />
The same firmware file on other media equals the byte count of all these<br />
records.<br />
• <strong>Tape</strong> mark (tape only).<br />
■ Data Transfer Limitations<br />
The host transfers firmware update records to the <strong>9840</strong> <strong>Tape</strong> <strong>Drive</strong> at a<br />
minimum of 8,192 bytes per record. The record sizes can be between 8,192<br />
bytes and 262,144 bytes (8 kB to 256 kB), except for the last record, which may<br />
be less than 8 kB.<br />
B-2 Ninth Edition 95739
Glossary<br />
This glossary defines abbreviations and new<br />
or special terms used in this publication.<br />
Some of the definitions are taken from the<br />
IBM Dictionary of Computing. The letters in<br />
the parentheses that follow some definitions<br />
indicate the source of the definition:<br />
(A) The American National Standard<br />
Dictionary for Information Systems, ANSI<br />
X3.172-1990, copyright 1990 by the American<br />
National Standards Institute (ANSI).<br />
(E) The ANSI/Electronic Industries<br />
Association (EIA) Standard-440-A, Fibre Optic<br />
Terminology.<br />
(I) The Information Technology Vocabulary,<br />
developed by Subcommittee 1, Joint<br />
Technical Committee 1, of the International<br />
Organization for Standardization and<br />
International Electrotechnical Commission<br />
(ISO/IEC/JTC1/SC1).<br />
(IBM) The IBM Dictionary of Computing,<br />
copyright 1994 by IBM.<br />
(T) Draft international standards committee<br />
drafts, and working papers being developed<br />
by the ISO/IEC/JTC1/SC1.<br />
A<br />
access time The time interval between the<br />
instant at which a call for data is initialized<br />
and the instant at which the delivery of data<br />
is completed. (T)<br />
adapter Hardware used to join different<br />
optical fiber connector types. (IBM)<br />
Also, any hardware used to join different<br />
connector types.<br />
address A character or group of characters<br />
that identifies a register, a particular part of<br />
storage, or some other data source or<br />
destination. (A)<br />
Advanced Interactive Executive (AIX)<br />
IBM’s implementation of the UNIX<br />
(trademark of AT&T Bell Laboratories)<br />
operating system. The RISC System/6000<br />
system, among others, runs the AIX operating<br />
system. (IBM)<br />
AIX See Advanced Interactive Executive.<br />
alphanumeric Pertaining to data that<br />
consist of letters, digits, and usually other<br />
characters, such as punctuation marks. (T)(A)<br />
applications software Software that is<br />
specific to the solution of an application<br />
problem. (T)<br />
automatic checking test See checksum.<br />
B<br />
backup Pertaining to a procedure,<br />
technique, or hardware used to recover lost<br />
or destroyed data or to keep a system<br />
operating. (T)<br />
beginning-of-tape The location on a tape<br />
where written data begins.<br />
bin A place in which a cartridge resides in a<br />
library. A bin can be an input bin or an<br />
output bin.<br />
block A collection of contiguous records<br />
recorded as a unit. Interblock gaps separate<br />
blocks, and each block can contain one or<br />
more records.<br />
buffer A routine or storage that<br />
compensates for a difference in the rate of<br />
data flow, or the time of occurrence of events<br />
when transferring data from one device to<br />
another.<br />
95739 Ninth Edition Glossary-1
Glossary<br />
burst In data communication, a sequence of<br />
signals counted as one unit in accordance<br />
with a specific criterion or measure. (A)<br />
C<br />
cartridge A storage device that consists of<br />
mag<strong>net</strong>ic tape on supply and take-up reels,<br />
in a protective housing. (IBM)<br />
In the <strong>9840</strong> <strong>Tape</strong> <strong>Drive</strong> System, the cartridge<br />
has both the supply and take-up reels.<br />
Cartridges in other tape subsystems may have<br />
only a single supply reel with the take-up<br />
mechanism residing in the drive itself.<br />
channel A functional unit, controlled by the<br />
processor (or host), that handles the transfer<br />
of data between processor storage and local<br />
peripheral equipment. (IBM)<br />
check A detection of an error condition or<br />
test for correct condition.<br />
checksum In error detection, a function of<br />
all bits in a block. If the written and<br />
calculated sums do not agree, an error is<br />
indicated. (IBM)<br />
Chk Check.<br />
cleaning cartridge A cartridge tape<br />
containing special material used to clean the<br />
<strong>9840</strong> <strong>Tape</strong> <strong>Drive</strong> System.<br />
code Instructions written for a computer.<br />
(IBM)<br />
compress To save storage space by<br />
eliminating gaps, empty fields, redundancy,<br />
or unnecessary data to shorten the length of<br />
records or files. (IBM)<br />
condition One of a set of specified values<br />
that a data item can assume. (IBM)<br />
conditioning time The amount of time to<br />
prepare a tape for use in the <strong>9840</strong> <strong>Tape</strong> <strong>Drive</strong><br />
System.<br />
configuration The manner in which the<br />
hardware and software of an information<br />
processing system is organized and<br />
interconnected. (T)<br />
configuration error An error that results<br />
from incorrect configuration values.<br />
connector An electrical part used to join<br />
two or more other electrical parts. (IBM)<br />
CSL Cartridge Scratch Loader.<br />
D<br />
data error rate The number of errors that<br />
occur per a measurable amount of data on a<br />
tape.<br />
data rate The speed of a data transfer<br />
process, usually expressed in bits per second<br />
or bytes per second. (IBM)<br />
data tape A cartridge tape formatted for use<br />
as a regular data tape for the system in which<br />
it is used.<br />
diagnostic Pertaining to the detection and<br />
isolation of errors in programs and faults in<br />
equipment. (IBM)<br />
drive A device for moving mag<strong>net</strong>ic tape<br />
and controlling its movement. (IBM)<br />
dump To copy the contents of all or part of<br />
virtual storage for the purpose of collecting<br />
error information. (IBM)<br />
In the <strong>9840</strong> <strong>Tape</strong> <strong>Drive</strong> System, to copy the<br />
contents of the drive EEPROM to a cartridge<br />
tape or host file.<br />
dump-formatted cartridge A cartridge on<br />
which the tape has been specially formatted<br />
to store diagnostic dump data.<br />
E<br />
emulation The use of programming<br />
techniques and special machine features to<br />
permit a computing system to execute<br />
programs written for another system. (IBM)<br />
Glossary-2 Ninth Edition 95739
Glossary<br />
enterprise A representation of the goals,<br />
organizational structure, business processes,<br />
and information resources and requirements<br />
of an enterprise. (IBM)<br />
Enterprise Systems Connection<br />
(ESCON) A set of IBM products and services<br />
that provide a dynamically- connected<br />
environment within an enterprise. (IBM)<br />
environmental requirement Any of the<br />
physical conditions required for the<br />
protection and proper operation of a<br />
functional unit; the requirement is usually<br />
specified as a nominal value and a tolerance<br />
range. For a device, there may be more than<br />
one set of environmental requirements; for<br />
example, one set for transport, another for<br />
storage, and another for operation. (T) (A)<br />
error A discrepancy between a computed,<br />
observed, or measured value or condition<br />
and the true, specified, or theoretically<br />
correct value or condition. (I) (A)<br />
ESCON See Enterprise Systems Connection.<br />
ESCON channel A channel having an<br />
Enterprise Systems Connection channel-tocontrol-unit<br />
I/O interface that uses optical<br />
cables as a transmission medium.<br />
F<br />
fault symptom code (FSC) A hexadecimal<br />
code generated by the drive for controller<br />
microcode in response to a detected<br />
subsystem error.<br />
fibre channel (FC) The ANSI standard that<br />
defines an ultra high-speed, content<br />
independent, multi-level data transmission<br />
interface that can support multiple protocols<br />
simultaneously, support connectivity to<br />
millions of devices over copper and/or fiber<br />
optic physical media, and provides the best<br />
characteristics of both <strong>net</strong>works and<br />
channels, over diverse topologies.<br />
fiber optics The branch of optical<br />
technology concerned with the transmission<br />
of radiant power through fibers made of<br />
transparent materials such as glass, fused<br />
silica, and plastic. (E)<br />
field replaceable unit (FRU) An assembly<br />
that is replaced in its entirety when any one<br />
of its components fails. (IBM)<br />
file-protect To prevent the destruction or<br />
overwriting of data stored on cartridge tape.<br />
See also write-protect switch.<br />
firmware An ordered set of instructions and<br />
data stored in a way that is functionally<br />
independent of main storage; for example,<br />
microprograms stored in ROM. (T)<br />
fixed Synonym for resident.<br />
format In programming languages, a<br />
language construct that specifies the<br />
representation, in character form, of data<br />
objects in a file. (I)<br />
frame A hardware device in which drives<br />
are installed.<br />
FRU See field replaceable unit.<br />
FSC See fault symptom code.<br />
H<br />
hardware All or part of the physical<br />
components of an information processing<br />
system, such as computers or peripheral<br />
devices. (T) (A)<br />
host The primary computer on a <strong>net</strong>work,<br />
with which other computers interact.<br />
host interface An interface between a<br />
<strong>net</strong>work and host computer. (T)<br />
HP/UX A form of UNIX designed to run on<br />
Hewlett Packard and other workstations.<br />
I<br />
indicator A device that gives a visual or<br />
other indication of the existence of a defined<br />
state. (T)<br />
95739 Ninth Edition Glossary-3
Glossary<br />
initialization The operations required for<br />
setting a device to a starting state, before the<br />
use of a data medium, or before<br />
implementation of a process. (T)<br />
Initial Program Load (IPL) The<br />
initialization procedure that causes an<br />
operating system to commence operation.<br />
input/output (I/O) Pertaining to a device,<br />
process, or channel involved in data input,<br />
data output, or both. (IBM)<br />
interface Hardware, software, or both, that<br />
links systems, programs, or devices. (IBM)<br />
interface card See input/output.<br />
I/O See input/output.<br />
IPL See Initial Program Load.<br />
IRIX An operating system that runs on<br />
Silicon Graphics and other workstations.<br />
L<br />
library installation The process of<br />
installing the <strong>9840</strong> <strong>Tape</strong> <strong>Drive</strong> System in a<br />
library environment.<br />
loader The device that physically loads<br />
cartridges for use.<br />
link In an ESCON environment, the physical<br />
connection and transmission medium used<br />
between an optical transmitter and an optical<br />
receiver. A link consists of two conductors,<br />
one used for sending and the other for<br />
receiving, providing a duplex communication<br />
path.<br />
link address In an ESCON environment, an<br />
address assigned at initialization that<br />
identifies a channel or control unit and<br />
allows it to send and receive transmission<br />
frames and perform I/O operations.<br />
logical device address A number used to<br />
represent a terminal or terminal component<br />
within a workstation. (IBM)<br />
M<br />
mag<strong>net</strong>ic tape A tape with a mag<strong>net</strong>izable<br />
layer on which data can be stored. (T)<br />
manual operation Processing of data in a<br />
system by direct manual techniques. (IBM)<br />
MB Megabytes, or 1,048,576 bytes.<br />
media defects Physical impurities or other<br />
problems that cause the medium to function<br />
improperly.<br />
medium A physical material in or on which<br />
data may be represented. (IBM)<br />
menu A list of options displayed to the user<br />
by a data processing system, from which the<br />
user can select an action to be initiated. (T)<br />
microcode A code, representing the<br />
instructions of an instruction set, that is<br />
implemented in a part of storage that is not<br />
program-addressable. See also firmware.<br />
(IBM)<br />
Multiple Virtual Storage (MVS) IBM’s<br />
Multiple Virtual Storage, consisting of MVS/<br />
System Product Version 1 and the MVS/370<br />
Data Facility Product operating on a System/<br />
370 processor. (IBM).<br />
Multiple Virtual Storage/Enterprise<br />
Systems Architecture (MVS/ESA) An<br />
extended version of IBM’s MVS.<br />
MVS See Multiple Virtual Storage.<br />
MVS/ESA See Multiple Virtual Storage/<br />
Enterprise Systems Architecture.<br />
N<br />
Netware An operating system used with<br />
Compaq and other workstations.<br />
Nearline A registered trademark of<br />
StorageTek. This term is used in association<br />
with StorageTek’s Automated Cartridge<br />
System.<br />
Glossary-4 Ninth Edition 95739
Glossary<br />
O<br />
offline Neither controlled by nor<br />
communicating with a computer. (IBM)<br />
online Pertaining to the operation of a<br />
functional unit when under the direct control<br />
of the computer. (T)<br />
open systems A system whose<br />
characteristics comply with standards made<br />
available throughout the industry and that<br />
therefore can be connected to other systems<br />
complying with the same standards. (T)<br />
In the <strong>9840</strong> <strong>Tape</strong> <strong>Drive</strong> System, a drive that<br />
has a SCSI or fibre-optic interface.<br />
operating system Software that controls<br />
program execution.<br />
operator control panel A functional unit<br />
that contains switches used to control all or<br />
part of a computer and possibly the<br />
indicators giving information about its<br />
functioning. (T)<br />
P<br />
performance One of two major factors,<br />
together with facility, on which the total<br />
productivity of a system depends.<br />
Performance is largely determined by a<br />
combination of throughput, response time,<br />
and availability. (IBM)<br />
port A specific communications end point<br />
within a host. A port is identified by a port<br />
number. (IBM)<br />
protocol A set of semantic and syntactic<br />
rules that determines the behavior of<br />
functional units in achieving communication.<br />
(I).<br />
R<br />
RAM See random access memory.<br />
random access memory (RAM) A storage<br />
device in which data can be written and read.<br />
(IBM).<br />
read/write head The data sensing and<br />
recording unit of a diskette magazine drive or<br />
tape drive. (IBM)<br />
reclaim In the <strong>9840</strong> <strong>Tape</strong> <strong>Drive</strong> System, the<br />
process of reformatting a tape as a data tape.<br />
release A distribution of a new product or<br />
new function and fixes for an existing<br />
product. (IBM)<br />
resident Pertaining to computer programs<br />
or data while they remain on a particular<br />
storage device. (T)<br />
restore To return a backup copy to the<br />
active storage location for use. (IBM)<br />
rewind To move tape from the take-up hub<br />
to the supply hub. (IBM)<br />
S<br />
SCSI See Small Computer System Interface.<br />
small computer system interface (SCSI)<br />
An input and output bus that provides a<br />
standard interface between the devices.<br />
software All or part of the programs,<br />
procedures, rules, and associated<br />
documentation of a data processing system.<br />
Software is an intellectual creation that is<br />
independent of the medium on which it is<br />
recorded. (T)<br />
Solaris An operating system that runs on<br />
SUN Microsystems and other workstations.<br />
state The condition of a device, such as<br />
online or offline.<br />
sub-menu A menu related to and reached<br />
from a main menu. (IBM)<br />
switch A device or programming technique<br />
for making a selection; for example, a toggle,<br />
a conditional jump. (A)<br />
95739 Ninth Edition Glossary-5
Glossary<br />
T<br />
tape See mag<strong>net</strong>ic tape.<br />
tape drive A device for moving mag<strong>net</strong>ic<br />
tape and controlling its movement. (T) It is<br />
also called a tape transport.<br />
target A SCSI device performing an I/O<br />
operation requested by the initiator.<br />
transmitter/receiver subassembly (TRS)<br />
In an ESCON environment, the electronic<br />
component that contains an optical<br />
transmitter and an optical receiver. (IBM)<br />
transport An electro-mechanical device<br />
capable of threading tape from a cartridge,<br />
moving the tape across a read/write head,<br />
and writing data onto or reading data from<br />
the tape.<br />
TRS See transmitter/receiver subassembly.<br />
V<br />
vary offline To change the status of a<br />
device from online to offline. When a device<br />
is offline, no data set may be opened on that<br />
device. (IBM)<br />
vary online To restore a device to a state<br />
where it is available for use by the system.<br />
(IBM)<br />
VOLSER See volume serial number.<br />
volume serial number A six-character<br />
alphanumeric label used to identify a<br />
volume.<br />
W<br />
Windows NT Microsoft’s operating system<br />
that is used on a variety of computers and<br />
workstations.<br />
write operation An output operation that<br />
sends a processed record to an output device<br />
or output file. (IBM)<br />
write protection Restriction of writing into<br />
a data set, file or storage area of a user or<br />
program not authorized to do so. (IBM)<br />
Glossary-6 Ninth Edition 95739
Index<br />
Symbols<br />
* (asterisk) message, 4-29<br />
Numerics<br />
9310 library, 1-14<br />
9360 library, 1-14<br />
9710 library, 1-14<br />
9738 library, 1-14<br />
9740 library, 1-14<br />
<strong>9840</strong><br />
cartridge, 1-4<br />
configuration<br />
library and non-library, 1-14<br />
view ESCON menu, 4-13<br />
view fibre channel menu, 4-7<br />
view SCSI menu, 4-10<br />
CSL<br />
power off, 6-11<br />
power on, 6-11<br />
specifications, A-8<br />
data buffer size, A-5<br />
desktop, 1-14, A-8<br />
indicators, 2-4<br />
activity, 2-4<br />
clean, 2-4<br />
location, 6-8<br />
power, 2-4<br />
service, 2-5<br />
jammed cartridges<br />
CSL, 6-26<br />
drive, 5-12<br />
menus<br />
configuration menu, 4-3<br />
ESCON, 4-13<br />
fibre channel, 4-7<br />
main menu, 4-2<br />
navigating menus, 4-1<br />
offline, 4-6<br />
online, 4-5<br />
SCSI, 4-10<br />
MUD<br />
screw, 5-12, 6-26<br />
usage, 5-12, 6-26<br />
Offline, 4-23<br />
Online, 4-22<br />
operator panel, 1-4<br />
CSL, 1-5<br />
description, 1-4<br />
display, 2-6<br />
standard, 1-4<br />
performance, A-5<br />
returning to the menus, 4-30<br />
stand-alone rack, A-8<br />
stuck cartridge removal, 5-12, 6-26<br />
switches, 2-2<br />
IPL, 2-2<br />
menu, 2-3<br />
select, 2-3<br />
unload, 2-3<br />
tape drive<br />
cartridges, 1-4<br />
components, 1-13<br />
configuring by service personnel, 1-5<br />
in L180, 3-1<br />
in L700, 3-1<br />
maintaining, 1-2<br />
time<br />
access, A-5<br />
load, A-5<br />
unload, A-5<br />
viewing<br />
configuration information, 4-24<br />
drive operations, 4-16<br />
ESCON configurations, 4-13<br />
fibre channel configurations, 4-7<br />
SCSI configurations, 4-10<br />
software release level, 4-27<br />
A<br />
access time, A-5<br />
activity indicator, 2-4, 3-6<br />
alternating messages, 2-6<br />
ASIA<br />
DIAGS, 3-2<br />
Diags, 5-3<br />
Diags message, 2-2, 4-22<br />
asterisk, 4-29, 5-3<br />
95739 Ninth Edition Index-1
Index<br />
attachments for library, A-7<br />
autoload mode switch, 1-5, 2-7, 6-6, 6-7<br />
automatic<br />
indicator, 1-5, 2-8, 6-6, 6-9<br />
mode, 6-16, 6-19<br />
B<br />
Bank n Bad, 5-3<br />
Bar-Chart, 4-31<br />
bin<br />
input, 6-2<br />
output, 6-2<br />
Boot Fail, 5-3<br />
BT Monitor, 5-3<br />
buffer size, A-5<br />
build MIR, 4-20<br />
C<br />
cartridge<br />
<strong>9840</strong>, 1-4<br />
cleaning, 3-6<br />
failure to load, 6-21<br />
jammed, 5-12, 6-26<br />
loading, 3-5<br />
manual unload device, 5-12, 6-26<br />
procedures, 6-12<br />
reading mode, 5-6<br />
reclaiming, 4-25<br />
rewinding, 5-6<br />
routing, 6-3<br />
scratch loader (CSL)<br />
code, 4-28<br />
main menu, 4-28<br />
specifications, A-4<br />
standard, 1-7<br />
stop mechanism, 6-19<br />
tape<br />
removal from CSL, 6-26<br />
removal from drive, 5-12<br />
unloading, 3-5, 6-13<br />
VolSafe, 1-7<br />
worn cleaning, 3-6<br />
write protect, 3-3<br />
caution<br />
shielded cables, xxiii<br />
CC Diags, 2-2, 4-22, 5-3<br />
CD DIAGS, 3-2<br />
channel (feed), 6-2<br />
channel transfer rate<br />
ESCON, A-5<br />
fibre channel, A-5<br />
SCSI, A-5<br />
Channels web site, xviii<br />
chart (tape bar), 4-31<br />
check malfunction<br />
Chk (FSC), 5-3<br />
Chk (FSC) message, 3-6, 5-8<br />
CIM. See Customer Initiated Maintenance<br />
cleaning<br />
cartridge, 3-6<br />
indicator, 2-4, 3-6<br />
message, 5-3<br />
clear<br />
CSL malfunction, 6-21<br />
operator indicator error, 6-23<br />
client programmer information, B-1<br />
cnhndnsn, 5-3<br />
CodCrFail1,5-3,5-4<br />
CodCrFail2, 5-4<br />
code FSCs, 6-21<br />
CodeUpDate, 5-4<br />
CodUpFail1, 5-4<br />
CodUpFail2, 5-4<br />
CodUpFail3, 5-4<br />
CodUpFail4, 5-4<br />
commands<br />
ESCON swap, 5-9<br />
recover buffer data, 5-9<br />
vary<br />
offline, 4-23<br />
online, 4-22<br />
compliance statements<br />
code, xxv<br />
FCC, xxiii<br />
Japanese, xxiv<br />
Taiwan, xxiv<br />
components<br />
<strong>9840</strong><br />
drive, 1-13<br />
power supply, 1-13<br />
specifications, 1-13<br />
CSL, 6-2<br />
ESCON, 5-14<br />
fiber optic, 5-14<br />
fibre channel, 5-14<br />
operator panel for <strong>9840</strong>, 1-4<br />
Index-2 Ninth Edition 95739
Index<br />
configuration<br />
<strong>9840</strong><br />
desktop, 1-14<br />
drives, 1-14<br />
stand-alone rack, 1-14<br />
tape drive system, 1-5<br />
desktop, 1-14<br />
drive menu<br />
code update, 4-18<br />
create code update, 4-19<br />
dump tape, 4-18<br />
main display, 4-17<br />
reclaim a tape, 4-19<br />
Fix CfgErr error, 3-2, 5-5<br />
L180 Library, 1-14<br />
L700 Library, 1-14<br />
library<br />
9310, 1-14<br />
9360, 1-14<br />
9710, 1-14<br />
9738, 1-14<br />
9740, 1-14<br />
L180, 1-14<br />
L700, 1-14<br />
menus, 4-3<br />
stand-alone rack, 1-14<br />
status<br />
ESCON, 4-13<br />
fibre channel, 4-7<br />
SCSI, 4-10<br />
viewing information, 4-24<br />
configuring<br />
fibre channel, 4-8<br />
contacting StorageTek, xix<br />
controls for operator<br />
CSL operator panel, 2-7<br />
IPL switch, 2-2<br />
menu switch, 2-3<br />
select switch, 2-3<br />
standard operator panel, 2-2<br />
unload switch, 2-3<br />
conventions (explanation), xvii<br />
CSL<br />
capacity, A-8<br />
cartridge<br />
procedures, 6-12<br />
routing, 6-3<br />
stop mechanism, 6-19<br />
unloading, 6-13<br />
components, 6-2<br />
drive, 1-11<br />
fault symptom codes (FSCs), 6-21<br />
feed channel, 6-2<br />
FRUs, 1-11<br />
FSCs, 6-24<br />
host interfaces, 6-2<br />
indicators<br />
automatic, 2-8, 6-9<br />
location, 6-8<br />
manual, 2-8, 6-9<br />
operator, 6-8<br />
operator panel, 2-8<br />
system, 6-9<br />
input bin, 6-2<br />
interface, A-8<br />
interfaces<br />
ESCON, 6-2<br />
SCSI, 6-2<br />
malfunction<br />
4eXX FSCs, 6-21<br />
clear error, 6-21<br />
model numbers, 1-11, 6-35<br />
modes<br />
automatic, 6-16, 6-19<br />
explanation, 6-14<br />
manual, 6-17<br />
priority, 6-18<br />
system, 6-14, 6-18<br />
operator<br />
indicator, 2-8, 6-21<br />
panel, 1-5, 6-2, 6-6<br />
output bin, 6-2<br />
overview, 1-11<br />
power<br />
cord, 6-11<br />
explanation, 6-10<br />
on CSL, 6-11<br />
supply, 1-11<br />
rack<br />
components, 6-5<br />
dimensions, 6-5<br />
enclosure, 1-12, 6-4<br />
removing shipping insert, 6-31<br />
sequence checks, 6-24<br />
switches<br />
autoload mode, 2-7<br />
95739 Ninth Edition Index-3
Index<br />
description, 2-7<br />
start, 2-8<br />
CSS. See Customer Support Services<br />
Customer Initiated Maintenance (CIM), xix<br />
Customer Resource Center (CRC), xviii<br />
Customer Support Services, xix<br />
D<br />
data<br />
make tape, 4-26<br />
reclaim process, 4-26<br />
transfer rate<br />
ESCON, A-5<br />
fibre channel, A-5<br />
limitations, B-2<br />
SCSI, A-5<br />
DatCrFail1, 5-4<br />
degauss <strong>9840</strong> tapes, 3-8<br />
description<br />
NTReady, 5-5<br />
NTReady U, 5-5<br />
Offline, 5-6<br />
Online, 5-6<br />
operator panel, 1-4<br />
desktop<br />
<strong>9840</strong>, 1-14, A-8<br />
capacity, A-8<br />
installations, A-8<br />
interface, A-8<br />
device<br />
mode<br />
ESCON, A-6<br />
fibre channel, A-6<br />
SCSI, A-6<br />
MUD screw, 5-12, 6-26<br />
dimensions<br />
cartridge, A-4<br />
rack for CSL, 6-5<br />
displayed bars, 4-31<br />
dots on tape, 4-31<br />
drive<br />
installations<br />
library, A-7<br />
non-library, A-8<br />
main menu, 4-25<br />
offline, 3-2<br />
online, 3-2<br />
operations menu, 4-16<br />
power off, 3-7, 6-11<br />
power on, 3-1, 6-11<br />
Drv Menu message, 4-25<br />
dry cleaning, 3-6<br />
dump messages<br />
Dmp y, 2-3, 2-5<br />
DmpCrFail1, 5-4<br />
DmpCrFail2, 5-4<br />
DmpWrFail1, 5-5<br />
DmpWrFail2, 5-5<br />
DumpAgain,2-5,5-5,5-8<br />
DumpToHost, 5-4<br />
E<br />
enclosure rack, 1-12, 6-4<br />
enterprise<br />
ESCON updates, B-1<br />
host, 1-15<br />
environmental requirements, A-2<br />
drive and power supply, A-2<br />
tape cartridges and media, A-3<br />
environments<br />
host, 1-15<br />
MVS/VM, 5-9<br />
SCSI, 5-9<br />
error indications<br />
Bank n Bad, 5-3<br />
Boot Fail, 5-3<br />
Chk (FSC), 5-3<br />
CodCrFail2, 5-4<br />
CodeUpDate, 5-4<br />
CodUpFail1, 5-4<br />
CodUpFail2, 5-4<br />
CodUpFail3, 5-4<br />
CodUpFail4, 5-4<br />
CSL, 6-24<br />
DatCrFail1, 5-4<br />
DmpCrFail1, 5-4<br />
DmpCrFail2, 5-4<br />
DmpWrFail2, 5-5<br />
DumpAgain, 5-5<br />
Exp ClCart, 5-5<br />
Fix CfgErr, 5-5<br />
Init (FSC), 5-5<br />
IPL Pend, 5-5<br />
Load (FSC), 5-5<br />
Memory Err, 5-5<br />
operator display, 5-3<br />
Index-4 Ninth Edition 95739
Index<br />
operator indicator, 6-23<br />
ESCON<br />
data rate, A-5<br />
default, 4-14<br />
description, 1-16<br />
interface<br />
attachments, 1-15<br />
CSL, 6-2<br />
host channel, 6-2<br />
logical paths, 6-2<br />
menu, 4-13<br />
problems, 5-14<br />
speed, 6-2<br />
Swap command, 5-9<br />
tape independent protocol, 4-22, 4-23<br />
updates, B-1<br />
view<br />
firmware, 4-14<br />
menu tree, 4-13<br />
View CFG display, 4-14<br />
example of menu<br />
<strong>9840</strong>, 4-4<br />
drive operations, 4-16<br />
ESCON, 4-13<br />
fibre channel, 4-7<br />
offline, 4-6<br />
online, 4-5<br />
SCSI, 4-10<br />
Exit<br />
Config, 4-24<br />
Config message, 4-24<br />
Drv, 4-26<br />
Drv message, 4-26<br />
Menu, 4-30<br />
menu message, 4-30<br />
messages, 4-29<br />
exit displays<br />
Exit Menu<br />
drive operations, 4-21<br />
ESCON, 4-15<br />
fibre channel, 4-9<br />
SCSI, 4-12<br />
Exp ClCart<br />
error indication, 5-5<br />
message, 3-6<br />
explanation<br />
conventions, xvii<br />
FSCs, 6-21<br />
F<br />
failure<br />
CSL (FSCs), 6-24<br />
power supply, 5-6<br />
to load, 6-21<br />
fault<br />
indicators<br />
CSL, 6-21<br />
drive, 5-2<br />
symptom code (FSC), 2-3, 6-24<br />
feed channel, 6-2<br />
FFFF, Dmp Y, 5-5<br />
fiber optic<br />
components, 5-14<br />
problems<br />
ESCON, 5-14<br />
fibre channel, 5-14<br />
fibre channel<br />
configuration, 1-16<br />
data rate, A-5<br />
default, 4-8<br />
description, Glossary-3<br />
drive offline, 4-23<br />
drive online, 4-22<br />
library drives, 1-14<br />
menu<br />
table, 4-8<br />
view, 4-7<br />
non-library drives, 1-14<br />
view<br />
firmware, 4-8<br />
menu tree, 4-7<br />
View CFG display, 4-8<br />
file<br />
protected message, 3-5, 4-29<br />
unprotected message, 3-5, 4-29<br />
firmware<br />
ESCON, 4-14<br />
fibre channel, 4-8<br />
file format, B-2<br />
SCSI, 4-11<br />
unmarked, B-1<br />
update files, B-1<br />
fix config error<br />
Fix CfgErr display, 3-2<br />
Fix CfgErr error, 5-5<br />
flashing messages, 2-6<br />
flow of cartridges, 6-3<br />
95739 Ninth Edition Index-5
Index<br />
FRUs<br />
CSL, 1-11<br />
desktop, 1-11<br />
rack, 1-11<br />
FSC<br />
CSL, 6-24<br />
description (Fault Symptom Code), 2-3<br />
Dmp y message, 2-3, 2-5<br />
indicators, 6-21<br />
last dump data, 5-5<br />
function<br />
indicator<br />
clean, 5-3<br />
CSL, 6-8<br />
drive, 2-4<br />
power, 5-2<br />
service, 5-2<br />
G<br />
gain access<br />
drive menu, 4-1<br />
ESCON port, 4-1<br />
main menu, 4-1<br />
to different menus, 4-1<br />
view configuration menu, 4-1<br />
gather information on<br />
ESCON, 1-15<br />
fibre channel, 1-15<br />
SCSI, 1-15<br />
H<br />
handle errors<br />
CSL, 6-23<br />
drive, 5-2<br />
hard-copy publications from StorageTek, xviii<br />
hosts<br />
environments, 1-15<br />
ESCON interface, 1-15, 1-16<br />
interface performance, A-6<br />
multi-platform, 1-15<br />
SCSI interface, 1-15, 1-16<br />
supported device modes, A-6<br />
I<br />
incorrect load process, 6-22<br />
indicators<br />
activity,2-4,3-6<br />
clean, 2-4, 3-6<br />
CSL<br />
automatic, 1-5, 6-6, 6-9<br />
location, 6-8<br />
manual, 1-5, 6-6, 6-9<br />
operator,1-5,6-6,6-8<br />
system,1-5,6-6,6-9<br />
error, 5-3<br />
location<br />
CSL, 6-8<br />
standard op panel, 2-4<br />
operator, 6-21<br />
power, 2-5<br />
service, 2-5<br />
information<br />
displayed bars, 4-31<br />
MIR, 4-31<br />
programmer, B-1<br />
read bar on tape, 4-31<br />
tape<br />
bar task, 4-25<br />
dots usage, 4-31<br />
write/read bar chart, 4-32<br />
trademarks, 2<br />
write<br />
bar on tape, 4-31<br />
protected tape, 5-6<br />
to a cartridge, 5-6<br />
information (build MIR), 4-20<br />
Init (FSC), 5-5<br />
Initial Program Load, 2-2, 3-1<br />
input bin, 6-2<br />
inserting a cartridge, 3-5<br />
install/lock shipping insert, 6-32<br />
installation of racks, A-8<br />
interfaces<br />
ESCON, 1-16<br />
fibre channel, 1-16<br />
host, 1-16, A-6<br />
SCSI, 1-16<br />
IPL<br />
description, 2-2<br />
Pend message, 2-2, 4-22, 4-23, 5-5<br />
power on, 3-1<br />
switch, 2-2<br />
J<br />
jacks (connector)<br />
CSL power, 6-10<br />
Index-6 Ninth Edition 95739
Index<br />
drive power, 5-10<br />
jammed cartridge<br />
clear CSL operator indicator, 6-21<br />
CSL, 6-26<br />
CSL recovery, 6-21<br />
drive, 5-12<br />
K<br />
keeping saved data, 5-8<br />
key<br />
indicators<br />
activity, 2-4<br />
clean, 2-4<br />
power, 2-4<br />
service, 2-5<br />
switches<br />
IPL, 2-1<br />
menu, 2-3<br />
select, 2-3<br />
unload, 2-3<br />
L<br />
L180 library, 1-14, A-7<br />
L700 library, 1-14, A-7<br />
label, laser product, xxii<br />
language<br />
selection<br />
explanation, 4-25<br />
view ESCON status, 4-13<br />
view fibre channel status, 4-7<br />
view SCSI status, 4-10<br />
translated messages<br />
English, 5-7<br />
French, 5-7<br />
German, 5-7<br />
Italian, 5-7<br />
Spanish, 5-7<br />
laser product label, xxii<br />
last dump data- FSC, 5-5<br />
LdDataTp message, 4-26<br />
LEDs<br />
CSL indicators, 6-8<br />
standard indicators, 2-4<br />
library<br />
9310, 1-14<br />
9360, 1-14<br />
9710, 1-14<br />
9738, 1-14<br />
9740, 1-14<br />
attachments, A-7<br />
drives, 1-9<br />
host interfaces, 1-15<br />
L180, 1-14<br />
L700, 1-14<br />
list of configurations, 1-14<br />
software attachments, 1-15<br />
limitations on transfering data, B-2<br />
lists<br />
menus, 4-3<br />
sub menus, 4-3<br />
load<br />
<strong>9840</strong> cartridge, 3-5<br />
cartridges incorrectly, 6-21<br />
FSCs, 6-21<br />
messages,2-2,3-5,5-5<br />
time, A-5<br />
loader (CSL)<br />
code, 4-28<br />
main menu, 4-28<br />
locating message, 5-5<br />
location of MUD screw, 1-5<br />
M<br />
main menus<br />
<strong>Drive</strong>, 4-25<br />
exit menu, 4-29<br />
Online/Offline, 2-3, 4-22, 4-29<br />
Software Release, 4-27<br />
summary, 4-2<br />
View Configuration, 4-24<br />
maintaining the <strong>9840</strong> <strong>Tape</strong> <strong>Drive</strong> System, 1-2<br />
make<br />
code tape, 4-19<br />
data tape, 4-19<br />
dump tape, 4-18<br />
MakeDataTp, 4-26<br />
malfunctions<br />
Chk (FSC), 3-6, 5-8<br />
clear error, 6-21<br />
CSL, 6-24<br />
failure to load, 6-21<br />
fiber optic, 5-14<br />
fibre channel, 5-14<br />
FSCs, 6-21<br />
list of errors, 5-3<br />
sequence checks, 6-24<br />
95739 Ninth Edition Index-7
Index<br />
use CSL start switch, 6-23<br />
manual<br />
indicator, 1-5, 2-8, 6-6, 6-9<br />
mode, 6-17<br />
unload device (MUD)<br />
location, 5-12, 6-26<br />
remove jammed cartridge, 5-12, 6-26<br />
maximum channel block, A-5<br />
mechanism (cartridge stop), 6-19<br />
media information region (MIR), 4-31<br />
Memory Err, 3-3, 5-5<br />
menu<br />
drive operations, 4-16<br />
ESCON, 4-13<br />
examples, 4-4<br />
fibre channel, 4-7<br />
list of, 4-2<br />
main, 4-2<br />
returning, 4-30<br />
SCSI, 4-10<br />
switch, 2-3<br />
messages<br />
(FSC) Dmp y, 2-3, 2-5<br />
* (asterisk), 4-29<br />
alternating, 2-6<br />
ASIA Diags, 2-2, 4-22<br />
asterisk (*), 4-29<br />
CC Diags, 2-2, 4-22<br />
Chk (FSC), 3-6, 5-8<br />
cleaning, 5-3<br />
Drv Menu , 4-25<br />
DumpAgain,2-5,5-8<br />
English, 5-7<br />
Exit Config, 4-24<br />
Exit <strong>Drive</strong>, 4-26<br />
Exit Menu, 4-30<br />
Exp ClCart, 3-6<br />
File Protected, 3-5, 4-29<br />
File Unprotected, 3-5, 4-29<br />
flashing, 2-6<br />
French, 5-7<br />
German, 5-7<br />
indicated by operator display, 5-3<br />
IPLPend, 2-2, 4-22, 4-23<br />
Italian, 5-7<br />
language translated, 5-7<br />
LdDataTp, 4-26<br />
Load (FSC), 2-2, 3-5<br />
locating, 5-5<br />
Offl Pend, 4-23<br />
Offline, 4-23, 4-29<br />
Onl Pend, 4-22<br />
Online, 4-22<br />
protected file, 4-29<br />
Ready A, 3-5, 4-29, 5-6<br />
Ready F, 3-5, 4-29, 5-6<br />
Ready U, 3-5, 4-29, 5-6<br />
Save Fails, 5-8<br />
solid, 2-6<br />
Spanish, 5-7<br />
Start Init, 2-2<br />
TIPS Pend, 4-22, 4-23<br />
unprotected file, 4-29<br />
UnWr (FSC), 2-3, 3-5, 5-8<br />
View Cfg , 4-24<br />
MIR, 4-20<br />
mode<br />
autoload switch, 1-5, 6-6, 6-7<br />
of operation<br />
automatic, 6-16, 6-19<br />
manual, 6-17<br />
priority, 6-18<br />
system, 6-14, 6-18<br />
model numbers, 1-11, 6-35<br />
MUD<br />
location of screw<br />
CSL, 6-26<br />
drive, 5-12<br />
procedure to use, 5-12, 6-26<br />
removing jammed cartridge, 5-12, 6-26<br />
warning, 5-12, 6-26<br />
multi-platform<br />
host environment, 1-15<br />
SCSI updates, B-2<br />
MVS<br />
online, 4-22<br />
vary commands, 4-22, 4-23<br />
N<br />
navigating, 4-3, 4-6<br />
new cleaning tape required, 3-6<br />
non-library drive installations, A-8<br />
NTReady F, 5-5<br />
NTReady U, 5-5<br />
numbers (CSL model), 1-11, 6-35<br />
Index-8 Ninth Edition 95739
Index<br />
O<br />
Offline<br />
description, 5-6<br />
message and "*", 4-29<br />
message indication, 4-23<br />
Offl Pend message, 4-23<br />
state of the drive, 4-23<br />
vary, 4-23<br />
Online<br />
description, 5-6<br />
message, 4-22<br />
state of the drive, 4-22<br />
vary, 4-22<br />
Online/Offline<br />
main menu, 2-3<br />
returning system online, 4-29<br />
state of drive, 4-22<br />
operations menu (drive), 4-16<br />
operator controls<br />
Menu switch, 2-3<br />
Select switch, 2-3<br />
Unload switch, 2-3<br />
operator panel<br />
<strong>9840</strong>, 1-4<br />
components, 6-2<br />
description, 1-4, 1-5, 6-6<br />
diagnostic messages, 3-2<br />
display<br />
appearance, 2-6<br />
FFFF, Dmp Y, 5-5<br />
messages, 5-3<br />
indicators,6-8,6-21<br />
operator indicator, 1-5, 6-6, 6-8<br />
summary of operations, 1-4<br />
organization of information in this manual, xv<br />
output bin, 6-2<br />
overview<br />
CSL, 1-11<br />
P<br />
panel (operator), 6-2<br />
performance<br />
<strong>9840</strong> <strong>Tape</strong> <strong>Drive</strong> System, A-5<br />
ESCON, A-6<br />
Fibre Channel, A-6<br />
SCSI, A-6<br />
place drive<br />
offline, 4-22<br />
online, 4-22<br />
power<br />
explanation, 6-10<br />
failure, 5-6<br />
indicator, 2-5<br />
off<br />
CSL, 6-11<br />
drive, 3-7<br />
on<br />
CSL, 6-11<br />
CSL switch location, 6-10<br />
drive, 3-1<br />
drive switch location, 3-1<br />
requirements, A-1<br />
switch, 6-11<br />
priority mode, 6-18<br />
problems<br />
DumpAgain condition, 5-8<br />
ESCON, 5-14<br />
fiber-optic, 5-14<br />
fibre channel, 5-14<br />
Save Fails condition, 5-8<br />
UnWr condition, 5-8<br />
procedures<br />
cartridge<br />
explanation, 6-12<br />
loading a CSL, 6-12<br />
loading a drive, 3-5<br />
unloading a CSL, 6-13<br />
cleaning the <strong>9840</strong> tape drive, 3-6<br />
IPL, 3-1<br />
loading a CSL cartridge, 6-12<br />
loading a drive cartridge, 3-5<br />
power off, 3-7<br />
power on, 3-1<br />
unloading a CSL cartridge, 6-13<br />
unloading a drive cartridge, 3-5<br />
process<br />
build MIR, 4-20<br />
code update, 4-18<br />
incorrect load, 6-22<br />
make code tape, 4-19<br />
make data tape, 4-19<br />
make dump tape, 4-18<br />
product<br />
<strong>9840</strong> interfaces, 1-15<br />
libraries, 1-15<br />
95739 Ninth Edition Index-9
Index<br />
programmer information, B-1<br />
protected message for tape, 3-5, 4-29<br />
protocol, ESCON tape<br />
independent, 4-22, 4-23<br />
Q<br />
quick menu<br />
drive operations, 4-16<br />
ESCON, 4-13<br />
fibre channel, 4-7<br />
SCSI, 4-10<br />
quit menu<br />
drive operations, 4-21<br />
ESCON, 4-15<br />
fibre channel, 4-9<br />
SCSI, 4-12<br />
R<br />
rack<br />
enclosure, 1-12, 6-4<br />
for CSL, 6-5<br />
installations, A-8<br />
stand-alone, A-8<br />
read bar, 4-31<br />
reading mode, 5-6<br />
Ready A message, 3-5, 4-29, 5-6<br />
Ready F message, 3-5, 4-29, 5-6<br />
Ready U message, 3-5, 4-29, 5-6<br />
reclaiming a cartridge<br />
menu, 3-8<br />
procedure, 4-25<br />
Recover Buffer Data command, 5-9<br />
recovery<br />
DumpAgain message, 5-8<br />
process (bad CSL load), 6-22<br />
Save Fails message, 5-8<br />
UnWr (FSC) message, 5-8<br />
release level (viewing), 4-27<br />
remove<br />
cartridges, 3-5, 6-13<br />
jammed cartridge, 5-12, 6-26<br />
requirements<br />
environmental, A-2<br />
power, A-1<br />
returning<br />
<strong>9840</strong> online, 4-29<br />
to the menu system, 4-30<br />
to the Online/Offline menu system, 4-29<br />
rewinding tape, 5-6<br />
routing cartridges, 6-3<br />
S<br />
safety<br />
fiber optics, xxi<br />
laser product label, xxii<br />
Save Fails message, 5-6, 5-8<br />
SavingDump, 5-6<br />
scratch loader<br />
code, 4-28<br />
main menu, 4-28<br />
screw (MUD), 5-12, 6-26<br />
SCSI<br />
data rate, A-5<br />
default<br />
online, 4-11<br />
description, 1-16<br />
drive<br />
offline, 4-23<br />
online, 4-22<br />
environment, 5-9<br />
Exit Menu, 4-12<br />
interface, 1-15, 6-2<br />
menu, 4-10<br />
speed, 6-2<br />
Ultra-1, A-5<br />
updates, B-2<br />
view<br />
firmware, 4-11<br />
menu tree, 4-10<br />
View CFG display, 4-11<br />
width, 6-2<br />
segment, 4-31<br />
select<br />
<strong>9840</strong> switch, 2-3<br />
language, 4-25<br />
tape bar, 4-25<br />
sequence checks<br />
clearing malfunctions, 6-24<br />
FSCs, 6-24<br />
process, 6-24<br />
service indicator, 2-5<br />
shipping insert<br />
important information, 5-9, 6-32<br />
install/lock, 5-10, 6-32<br />
lock in drive, 5-11, 6-34<br />
MUD screw, 6-32<br />
Index-10 Ninth Edition 95739
Index<br />
removal from CSL, 6-31<br />
using MUD screw, 5-11, 6-34<br />
warning if not used, 6-30<br />
size<br />
of buffer, A-5<br />
rack, 6-5<br />
software<br />
firmware file, B-2<br />
release main menu, 4-27<br />
update firmware, B-1<br />
viewing release level, 4-27<br />
solid messages, 2-6<br />
specifications<br />
cartridge, A-4<br />
drive performance, A-5<br />
environmental requirements, A-2<br />
interfaces, A-6<br />
library, A-7<br />
non-library drive installs, A-8<br />
power requirements, A-1<br />
tape cartridges and media, A-3<br />
Stand-Alone Rack, 1-13<br />
standard cartridge, 1-7<br />
Start Init message, 2-2, 5-6<br />
start switch,1-5,2-8,6-6,6-7,6-23<br />
status (view)<br />
ESCON menu, 4-13<br />
fibre channel menu, 4-7<br />
SCSI menu, 4-10<br />
stop mechanism, 6-19<br />
StorageTek<br />
Channels site, xviii<br />
Customer Resource Center (CRC), xviii<br />
hard-copy publications, xviii<br />
web site, xviii<br />
StorageTek libraries<br />
9310, 1-14, 1-15, A-7<br />
9360, 1-14, A-7<br />
9710, 1-14, A-7<br />
9738, 1-14, A-7<br />
9740, 1-14, A-7<br />
L180, 1-14, A-7<br />
L700, 1-14, A-7<br />
summary menu, 4-2<br />
switches<br />
CSL autoload mode, 1-5, 2-7, 6-6, 6-7<br />
CSL Start, 2-8<br />
CSL start, 1-5, 6-6, 6-7, 6-23<br />
IPL, 2-2<br />
Menu, 2-3<br />
operator panel, 1-4<br />
Select, 2-3<br />
Unload, 3-5<br />
system<br />
indicator, 1-5, 2-8, 6-6, 6-9<br />
mode, 6-14, 6-18<br />
T<br />
table<br />
drive operations menu, 4-17<br />
ESCON menu, 4-14<br />
fibre channel menu, 4-8<br />
SCSI menu, 4-11<br />
Taiwan warning statement, xxiv<br />
tape<br />
<strong>9840</strong>, 1-4<br />
bar<br />
chart, 4-31<br />
task information, 4-25<br />
cartridge<br />
cleaning, 3-6<br />
procedures, 6-12<br />
code load, 4-28<br />
displayed bars, 4-31<br />
dots explanation, 4-31<br />
drive<br />
in L180, 3-1<br />
in L700, 3-1<br />
file<br />
protected, 3-5, 4-29<br />
unprotected, 3-5<br />
jammed cartridge, 5-12, 6-26<br />
loading<br />
CSL, 6-12<br />
drive, 3-5<br />
main menu, 4-28<br />
making a data tape, 4-26<br />
MIR, 4-31<br />
read<br />
bar information, 4-31<br />
mode, 5-6<br />
reclaiming, 4-25<br />
removing stuck cartridge, 5-12, 6-26<br />
rewinding, 5-6<br />
unloading<br />
<strong>9840</strong> drive, 3-5<br />
95739 Ninth Edition Index-11
Index<br />
CSL, 6-13<br />
write bar, 4-31<br />
telephone number, CSS, xix<br />
time<br />
access, A-5<br />
load, A-5<br />
unload, A-5<br />
TIPS PEND message, 4-22, 4-23<br />
trademarks, 2<br />
transfer<br />
limitations, B-2<br />
rate<br />
ESCON, A-5<br />
fibre channel, A-5<br />
SCSI, A-5<br />
translated messages, 5-7<br />
English, 5-7<br />
French, 5-7<br />
German, 5-7<br />
Italian, 5-7<br />
Spanish, 5-7<br />
trapped explanation, 5-6<br />
typographical conventions, xvii<br />
U<br />
Ultra-1 SCSI, A-5<br />
unload<br />
cartridges, 6-13<br />
message, 5-6<br />
switch, 2-3<br />
time, A-5<br />
unmarked firmware, B-1<br />
unprotected message for tape, 3-5<br />
UnWr (FSC) message, 2-3, 3-5, 5-6, 5-8<br />
update<br />
firmware files, B-1<br />
SCSI in multi-platform, B-2<br />
tapes (firmware), B-1<br />
use<br />
configuration menu, 4-6<br />
drive menu, 4-3, 4-17<br />
ESCON menu, 4-14<br />
fibre channel menu, 4-8<br />
SCSI menu, 4-11<br />
V<br />
vary drive<br />
offline, 4-23<br />
online, 4-22<br />
view<br />
Cfg message, 4-24<br />
configuration information, 4-24<br />
configuration main menu, 4-24<br />
firmware<br />
ESCON, 4-14<br />
fibre channel, 4-8<br />
SCSI, 4-11<br />
offline main menu<br />
drive, 4-6<br />
entry point, 4-6<br />
ESCON drives, 4-6<br />
exit, 4-6<br />
fibre channel drives, 4-6<br />
firmware, 4-6<br />
SCSI drives, 4-6<br />
online main menu<br />
drive, 4-5<br />
entry point, 4-5<br />
ESCON drives, 4-5<br />
exit, 4-5<br />
fibre channel drives, 4-5<br />
firmware, 4-5<br />
SCSI drives, 4-5<br />
release level, 4-27<br />
View CFG<br />
ESCON, 4-14<br />
fibre channel, 4-8<br />
SCSI, 4-11<br />
VM<br />
vary commands, 4-22, 4-23<br />
vary off, 4-23<br />
vary on, 4-22<br />
VM/MVS environment, 5-9<br />
VolSafe cartridge, 1-7<br />
VOLSER label, 2-6<br />
W<br />
warning<br />
eye hazard from laser, xxi<br />
weight<br />
cartridge, A-4<br />
rack, 6-5<br />
WolfCreek library, 1-14<br />
worn cleaning cartridge, 3-6<br />
write<br />
bar explanation, 4-31<br />
Index-12 Ninth Edition 95739
Index<br />
protect cartridge<br />
standard, 3-3<br />
VolSafe, 3-3<br />
protect switch enabled, 5-6<br />
tape write/read bar chart, 4-32<br />
to a cartridge, 5-6<br />
95739 Ninth Edition Index-13
Index<br />
This page intentionally left blank.<br />
Index-14 Ninth Edition 95739
READER’S COMMENT FORM<br />
<strong>Manual</strong> Name: ___________________________________________ <strong>Manual</strong> PN: _______________<br />
Please check or fill in the items; adding explanations/comments in the space provided.<br />
Which of the following terms best describes your job<br />
❑ Field Engineer ❑ Manager ❑ Programmer ❑ Systems Analyst<br />
❑ Engineer ❑ Mathematician ❑ Sales Representative ❑ Systems Engineer<br />
❑ Instructor ❑ Operator ❑ Student/Trainee ❑ Other (explain below)<br />
How did you use this publication<br />
❑ Introductory text ❑ <strong>Reference</strong> <strong>Manual</strong> ❑ Student/Trainee ❑ Instructor text<br />
❑ Other (explain)<br />
Did you find the material easy to read and understand ❑ Yes ❑ No (explain below)<br />
Did you find the material organized for convenient use ❑ Yes ❑ No (explain below)<br />
Specific criticisms (explain below):<br />
Clarification on pages<br />
Additions on pages<br />
Deletions on pages<br />
Errors on pages<br />
Explanations and other comments:<br />
Note: Staples can cause problems with automated mail sorting equipment. Please use pressure sensitive or other<br />
gummed tape to seal this form. If you would like a reply, please supply your name and address on the reverse side of<br />
this form.<br />
Thank you for your cooperation. No postage stamp is required if mailed in the U.S.A.
TO COMPLY WITH POSTAL REGULATIONS, FOLD EXACTLY ON DOTTED LINES AND TAPE (DO NOT STAPLE)<br />
BUSINESS REPLY CARD<br />
FIRST CLASS PERMIT NO. 2 LOUISVILLE, CO U.S.A.<br />
NO POSTAGE<br />
NECESSARY<br />
IF MAILED<br />
IN THE<br />
UNITED STATES<br />
POSTAGE WILL BE PAID BY ADDRESSEE<br />
TECHNICAL INFORMATION SERVICES MS 2201<br />
STORAGE TECHNOLOGY CORPORATION<br />
ONE STORAGETEK DRIVE<br />
LOUISVILLE CO 80027-9984<br />
FOLD HERE AND TAPE DO NOT STAPLE FOLD HERE AND TAPE<br />
If you would like a reply, please print:<br />
Your Name:__________________________________________________________<br />
Company Name:______________________________ Department:_____________<br />
Street Address:_______________________________________________________<br />
City:________________________________________________________________<br />
State:_______________________________________ Zip Code:_______________<br />
STORAGE TECHNOLOGY CORPORATION<br />
ONE STORAGETEK DRIVE<br />
Louisville, CO 80028-2201<br />
CSE World Wide Tech Support: 303-673-4056<br />
OEM Tech Support 303-673-3126
World Headquarters<br />
Storage Technology Corporation<br />
One StorageTek <strong>Drive</strong><br />
Louisville, Colorado 80028 USA<br />
Phone: 1.800.786.7835<br />
Fax: 719.536.4053