Corinex ADSL2+ Wireless Gateway G - Aptolution, Inc.
Corinex ADSL2+ Wireless Gateway G - Aptolution, Inc.
Corinex ADSL2+ Wireless Gateway G - Aptolution, Inc.

You also want an ePaper? Increase the reach of your titles
YUMPU automatically turns print PDFs into web optimized ePapers that Google loves.
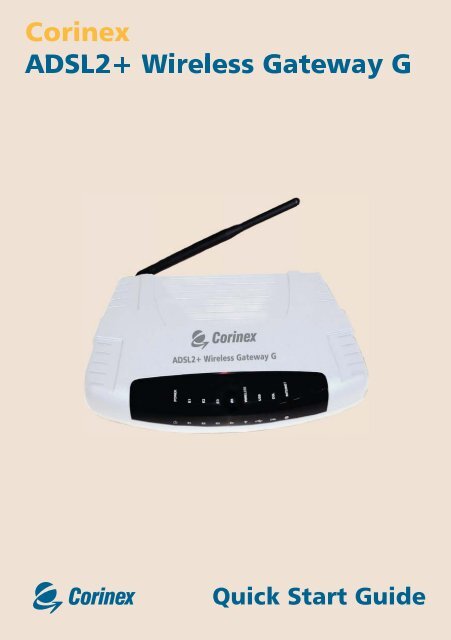
<strong>Corinex</strong><br />
<strong>ADSL2+</strong> <strong>Wireless</strong> <strong>Gateway</strong> G<br />
Quick Start Guide
Declaration of Conformity<br />
Declaration of Conformity<br />
Marking by the above symbol indicates compliance with the Essential Requirements<br />
of the R&TTE Directive of the European Union (1999/5/EC). This equipment meets<br />
the following conformance standards:<br />
EN300 328, EN301 489-17, EN60950<br />
Countries of Operation and Conditions of Use in the<br />
European Community<br />
This device is intended to be operated in all countries of the European Community.<br />
Requirement is for indoors vs. outdoors operation, license requirements and allowed<br />
channels of operation apply in some countries as described in this document.<br />
Note: The user must use the configuration utility provided with this product<br />
to check the current channel of operation and confirm that the devices<br />
operating in conformance with the spectrum usage rules for the European<br />
Community countries as described below.<br />
If operation is occurring outside of the allowable channels as indicated in this guide,<br />
then the user must cease operating the product and consult with the local technical<br />
support staff responsible for the wireless network.<br />
This device may be operated indoors or outdoors in all countries of the European<br />
Community using the 2.4GHz band: Channels 1 – 13, except where noted below:<br />
• In Italy the end-user must apply for a license from the national spectrum authority<br />
to operate this device outdoors.<br />
• In France outdoor operation is only permitted using the 2.4 – 2.454 GHz band:<br />
Channels 1 – 7.<br />
<strong>Corinex</strong> <strong>ADSL2+</strong> <strong>Wireless</strong> <strong>Gateway</strong> G<br />
1
Radio Frequency Interference<br />
Warnings & Instructions<br />
RFI Warnings & Instructions<br />
This equipment has been tested and found to comply with the limits for a Class B<br />
digital device, pursuant to Part 15 of the FCC Rules. These limits are designed to<br />
provide reasonable protection against harmful interference in a residential installation.<br />
This equipment uses and can radiate radio frequency energy and, if not installed and<br />
used in accordance with the instructions, may cause harmful interference to radio<br />
communications. However, there is no guarantee that interference will not occur in<br />
a particular installation. If this equipment does cause harmful interference to radio<br />
or television reception, which can be determined by turning the equipment off and<br />
on, the user is encouraged to try to correct the interference by one or more of the<br />
following methods:<br />
• Reorient or relocate the receiving antenna<br />
• <strong>Inc</strong>rease the separation between the equipment and the receiver<br />
• Connect the equipment into an electrical outlet on a circuit different from that<br />
which the radio receiver is connected<br />
• Consult the dealer or an experienced radio/TV technician for help.<br />
Modifications made to the product, unless expressly approved by the party<br />
responsible, could void the user’s right to operate the equipment.<br />
RF Exposure<br />
This device has been tested and complies with FCC RF Exposure (SAR) limits in<br />
typical laptop computer configurations and this device can be used in desktop<br />
or laptop computers with side mounted PCMCIA slots, which can provide 1 cm<br />
separation distance from the antenna to the body of the user or a nearby person.<br />
Thin laptop computers may need special attention to maintain antenna spacing<br />
while operating. This device cannot be used with handheld PDAs (personal digital<br />
assistants). Use in other configurations may not ensure compliance with FCC RF<br />
exposure guidelines. This device and its antenna must not be co-located or operate<br />
in conjunction with another antenna or transmitter.<br />
<strong>Corinex</strong> <strong>ADSL2+</strong> <strong>Wireless</strong> <strong>Gateway</strong> G<br />
2
Copyright<br />
This document, as well as the software described in it, is furnished under license<br />
and may be used or copied only in accordance with the terms of the license. The<br />
content of this document is furnished for informational use only, it is subject to<br />
change without notice, and it does not represent a commitment on the part of<br />
<strong>Corinex</strong> Communications Corp.<br />
<strong>Corinex</strong> Communications Corp. assumes no responsibility or liability for any errors<br />
or inaccuracies that may appear in this document.<br />
It is our policy to enhance our products as new technologies, hardware components,<br />
software and firmware become available; therefore, the information contained in<br />
this document is subject to change without notice.<br />
Some features, functions, and operations described in this document may not be<br />
included and sold in certain countries due to government regulations or marketing<br />
policies.<br />
The use of the product or its features described in this document may be restricted<br />
or regulated by law in some countries. If you are unsure which restrictions or<br />
regulations apply, you should consult your regional <strong>Corinex</strong> office or the authorized<br />
reseller.<br />
Published by:<br />
<strong>Corinex</strong> Communications Corp.<br />
#670-789 West Pender Street<br />
Vancouver, B.C.<br />
Canada V6C 1H2<br />
Tel.: +1 604 692 0520<br />
Fax: +1 604 694 0061<br />
<strong>Corinex</strong> is a registered trademark of <strong>Corinex</strong> Communications Corp.<br />
Apple, MAC OS X are either registered trademarks or trademarks of Apple<br />
Computer, <strong>Inc</strong>. in the U.S.A. and/or other countries.<br />
Microsoft, MS-DOS, MS, Windows are either registered trademarks or trademarks<br />
of Microsoft Corporation in the U.S.A. and/or other countries.<br />
All products or company names mentioned herein may be the trademarks of their<br />
respective owners.<br />
Copyright (c) 2001-2005 by <strong>Corinex</strong> Communications Corp.<br />
<strong>Corinex</strong> <strong>ADSL2+</strong> <strong>Wireless</strong> <strong>Gateway</strong> G<br />
3
Content<br />
Content<br />
Declaration of Conformity ............................................................................ 1<br />
RFI Warnings & Instructions ......................................................................... 2<br />
Copyright ....................................................................................................... 3<br />
Contents ........................................................................................................ 4<br />
1 Introduction ................................................................................................... 5<br />
1.1 Minimum System Requirements ...................................................................... 5<br />
1.2 Package Contents ............................................................................................ 5<br />
1.3 <strong>Wireless</strong>-G Router Overview ......................................................................... 6<br />
2 Installation Overview ..................................................................................... 8<br />
3 Connecting the <strong>Gateway</strong> to Your Computer ................................................ 9<br />
3.1 Connecting to the Ethernet ......................................................................... 9<br />
3.2 Connecting to the ADSL Line ...................................................................... 9<br />
3.3 Connecting to the Power Outlet and Powering On ...................................... 9<br />
4 Configuring Your Ethernet Network Card / Installing Your USB Device ......... 10<br />
4.1 Configuring Your Ethernet Network Card .................................................... 10<br />
4.2 Installing the USB Device Driver ................................................................... 11<br />
5 Connnecting to the Internet .......................................................................... 13<br />
<strong>Corinex</strong> <strong>ADSL2+</strong> <strong>Wireless</strong> <strong>Gateway</strong> G<br />
4
1 Introduction<br />
Congratulations on your purchase of the <strong>Corinex</strong> <strong>ADSL2+</strong> <strong>Wireless</strong> <strong>Gateway</strong> G! This<br />
gateway allows you to share a high-speed broadband Internet connection with<br />
multiple computers using a single device with a wired, or wireless, connection.<br />
This document describes only the initial setup and basic configuration of the<br />
<strong>Corinex</strong> <strong>ADSL2+</strong> <strong>Wireless</strong> <strong>Gateway</strong> G. For detailed information about the advanced<br />
configuration of the product, it is strongly recommended that you read the User<br />
Guide, which is available on the enclosed CD.<br />
1.1 Minimum System Requirements<br />
• Pentium® MMX 233MHz<br />
• Ethernet card installed with TCP/IP Protocol (Required only if you are<br />
onnecting to the ETHERNET port of your gateway)<br />
• One USB port (Required if you are connecting to the USB port of the<br />
gateway)<br />
• IEEE 802.11b <strong>Wireless</strong> adapter (Required if you are connecting to the gateway<br />
using a wireless connection)<br />
• Windows/Linux/Mac OS for Ethernet or <strong>Wireless</strong> connection, Microsoft<br />
Windows 98SE/ME/2000/XP for USB connection<br />
• Web Browser support:<br />
Microsoft Internet Explorer 4.0 (or later versions)<br />
Netscape® Navigator 3.02 (or later versions)<br />
Mozilla Firefox 1.0 (or later versions)<br />
1.2 Package Contents<br />
• <strong>Corinex</strong> <strong>ADSL2+</strong> <strong>Wireless</strong> <strong>Gateway</strong> G<br />
• AC power adapter with the appropriate plug for your region<br />
• Telephone cable<br />
• Ethernet cable<br />
• USB cable<br />
• Printed Quick Start Guide<br />
• CD with documentation and drivers<br />
Introduction<br />
<strong>Corinex</strong> <strong>ADSL2+</strong> <strong>Wireless</strong> <strong>Gateway</strong> G<br />
5
1.3 <strong>Wireless</strong>-G Router Overview<br />
Front Indicators<br />
4 6<br />
1 2 3 5<br />
1 POWER green On Power is supplied to the gateway.<br />
Off The gateway is turned off.<br />
Introduction<br />
2 ETHERNET (E1 ~ E4)<br />
green On Connection established between the gateway and<br />
the Ethernet device.<br />
Off Ethernet cable is disconnected.<br />
Blinking Receiving/transmitting data.<br />
3 WIRELESS<br />
green Blinking Receiving/transmitting data via wireless interface.<br />
4 USB green On Connection established between the gateway and<br />
the computer’s USB slot.<br />
Off USB cable not connected.<br />
5 DSL green On ADSL connection is established.<br />
Off No telephone jack is connected.<br />
Blinking The gateway is attempting to establish a<br />
connection with your ADSL Service Provider.<br />
6 INTERNET<br />
green On PPP connection is established.<br />
Off No PPP connection is established.<br />
<strong>Corinex</strong> <strong>ADSL2+</strong> <strong>Wireless</strong> <strong>Gateway</strong> G<br />
6
Back panel<br />
1 2 3<br />
Introduction<br />
1 DSL (RJ-11) to connect to your DSL line.<br />
2 USB to connect to your PC’s USB slot.<br />
3 RESET to reset your ADSL Router to factory default settings.<br />
4 ETHERNET E1-E4 (10/100 Base-T Auto-MDI/MDIX RJ-45 jack) to connect to<br />
your PC’s Ethernet Network card or Ethernet Hub / Switch.<br />
5 DC IN (9V) to connect to the Power Supply Adapter.<br />
6 POWER SWITCH to power on or off the gateway (I - ON position, O - OFF<br />
position).<br />
7 RF Antenna 180 0 2.4Ghz <strong>Wireless</strong> Antenna for wireless networking.<br />
To activate the factory default reset function:<br />
• Ensure that your ADSL Router is powered on.<br />
• Use a paper clip or a pencil tip to press the reset button, hold for at least<br />
5secs and release. At this point, the <strong>Wireless</strong> indicator and DSL indicator will<br />
turn off. The reset is in progress.<br />
• When the <strong>Wireless</strong> indicator starts blinking, it means that the reset process is<br />
complete. The default settings are then restored.<br />
• DSL line is synchronized once the DSL indicator color is green.<br />
NOTE: By executing the reset procedure, all customized settings that you<br />
have saved will be lost and the gateway will be set back to the original factory<br />
default settings as they are described in this document.<br />
4<br />
<strong>Corinex</strong> <strong>ADSL2+</strong> <strong>Wireless</strong> <strong>Gateway</strong> G<br />
7
2 Installation Overview<br />
This Guide will assist you with the hardware installation and basic configuration of your<br />
<strong>Corinex</strong> <strong>ADSL2+</strong> <strong>Wireless</strong> <strong>Gateway</strong> G. It will show you how to connect your <strong>Wireless</strong><br />
<strong>Gateway</strong> G to the internet. If you require a more sophisticated configuration, please<br />
refer to the <strong>Corinex</strong> <strong>ADSL2+</strong> <strong>Wireless</strong> <strong>Gateway</strong> G User Guide, which is available on<br />
the enclosed Installation CD.<br />
����<br />
������ �������� ������� �<br />
Installation Overview<br />
��������� �� ��������� ����<br />
�������� ������� �����<br />
��������� �� ��������� ����<br />
�������� �� ����� �� ��� ������<br />
The following chapters explain how to install and configure your <strong>Corinex</strong> <strong>ADSL2+</strong><br />
<strong>Wireless</strong> <strong>Gateway</strong> G in a few easy steps.<br />
<strong>Corinex</strong> <strong>ADSL2+</strong> <strong>Wireless</strong> <strong>Gateway</strong> G<br />
8
3 Connecting the <strong>Gateway</strong> to Your Computer<br />
This chapter gives step-by-step instructions on how to connect your computer to<br />
the gateway, connect the gateway to your ADSL line, and finally, to turn on all the<br />
devices.<br />
3.1 Connecting to the Ethernet<br />
Connect your computer(s) to the <strong>ADSL2+</strong> <strong>Wireless</strong> <strong>Gateway</strong> G by plugging one<br />
end of the supplied Ethernet cable (RJ45) to the network card of your computer,<br />
and the other end of the cable to one of the gateway’s four Ethernet LAN ports<br />
(E1~E4).<br />
NOTE: If you want to connect more computers to the gateway via Ethernet<br />
cables, follow the same procedure as described above. Please note that if you<br />
want to connect more than four computers in this way, an additional device<br />
(a switch or a hub) is required.<br />
3.2 Connecting to the ADSL Line<br />
To connect the gateway to the ADSL line, please use the supplied telephone cable<br />
(RJ11). Plug one end of the cable to the DSL port of the gateway, and plug the other<br />
end of the telephone cable into the telephone socket in the wall. If you want to plug<br />
a phone in at the same location, you will need to use a POTS splitter.<br />
A POTS Splitter (with built-in Microfilter) is a device that allows you to connect both<br />
your telephone cable and telephone set to the same wall socket. At the same time,<br />
this splitter helps to eliminate background noise on the telephone line, ensuring the<br />
best possible phone performance.<br />
3.3 Connecting to the Power Outlet and Powering On<br />
1. Connect the supplied power supply cable to the DC 9V port on the gateway.<br />
2. Plug the power adapter into the electrical outlet.<br />
3. Power on the gateway by toggling the POWER switch into position I.<br />
4. Start up all computers in the network.<br />
Connecting the <strong>Gateway</strong> to Your Computer<br />
<strong>Corinex</strong> <strong>ADSL2+</strong> <strong>Wireless</strong> <strong>Gateway</strong> G<br />
9
Configuring Your Ethernet Network Card / Installing Your USB Device<br />
4 Configuring Your Ethernet Network Card /<br />
Installing Your USB Device<br />
If your computers are connected to the Ethernet Port of the gateway, proceed with<br />
section 4.1. If your computer is connected to the gateway’s USB Port, you can skip<br />
ahead to section 4.2.<br />
4.1 Configuring Your Ethernet Network Card<br />
Proceed with this section ONLY if your computer is connected to the Ethernet Port<br />
of the gateway.<br />
The following instructions are based on the Windows XP operating system. The<br />
configuration procedure may be slightly different on other operating systems. Please<br />
refer to the User Guide provided on the Installation CD and also to your operation<br />
system’s documentation for more information about establishing a network<br />
connection.<br />
(Instructions are based on default Start menu option)<br />
1. From your Windows desktop, click Start > All Programs > Accessories ><br />
Communications > Network Connections.<br />
2. Right-click on the Local Area Connection icon that reflects the model of<br />
Ethernet Card which you have connected to the <strong>Corinex</strong> <strong>ADSL2+</strong> <strong>Wireless</strong><br />
<strong>Gateway</strong> G, and click Properties.<br />
3. Make sure that the field Connect Using indicates the model of Ethernet Card<br />
that is connected to the gateway. (This is important especially if you have<br />
more than one Local Area Connection icon displayed in the Network and<br />
Dial-up Connections / Network Connections window. Make sure that you<br />
have selected the appropriate one.)<br />
4. Select Internet Protocol (TCP/IP) and click Properties.<br />
<strong>Corinex</strong> <strong>ADSL2+</strong> <strong>Wireless</strong> <strong>Gateway</strong> G<br />
10
Configuring Your Ethernet Network Card / Installing Your USB Device<br />
5. Select the option Obtain an IP address automatically and click OK.<br />
6. Click OK again to close.<br />
7. Make sure that the <strong>ADSL2+</strong> <strong>Wireless</strong> <strong>Gateway</strong> G is powered on. Restart your<br />
system.<br />
8. Follow the above steps 1-7 for all computers connected to the gateway through<br />
the Ethernet interface.<br />
Proceed to Chapter 5.<br />
4.2 Installing the USB Device Driver<br />
NOTE: Please do not connect the <strong>Corinex</strong> <strong>ADSL2+</strong> <strong>Wireless</strong> <strong>Gateway</strong> G to<br />
your computer before step #2.<br />
1. Insert the <strong>Corinex</strong> <strong>ADSL2+</strong> <strong>Wireless</strong> <strong>Gateway</strong> G CD into the CD-ROM drive of<br />
your computer. If the installation wizard doesn’t start automatically, please<br />
navigate to the main folder of the installation CD (with Windows Explorer or<br />
any other file browser program) and run the program named autorun.exe.<br />
Click Install USB Drivers. The wizard for the USB driver installation will start.<br />
Please wait until the installation of the drivers is finished and then click Close to<br />
finish the installation wizard.<br />
2. Plug the <strong>Corinex</strong> <strong>ADSL2+</strong> <strong>Wireless</strong> <strong>Gateway</strong> G into a USB port on your computer.<br />
These are often located on the front on desktop computers, and on the back on<br />
laptops.<br />
<strong>Corinex</strong> <strong>ADSL2+</strong> <strong>Wireless</strong> <strong>Gateway</strong> G<br />
11
Configuring Your Ethernet Network Card / Installing Your USB Device<br />
3. Windows will detect new hardware and will start installing it. If a box pops<br />
up asking whether Windows should connect to Windows Update to search for<br />
software, choose No, not at this time and click Next. This screen will only<br />
occur if you have Windows XP Service Pack 2 installed. Then choose Install the<br />
software automatically and click Next. You may get a security warning about<br />
the drivers not being Microsoft-certified or not passing Microsoft Logo testing,<br />
but click Continue Anyway. The installation of the USB driver is now complete.<br />
You may click Finish.<br />
<strong>Corinex</strong> <strong>ADSL2+</strong> <strong>Wireless</strong> <strong>Gateway</strong> G<br />
12
5 Connecting to the Internet<br />
Configuring the <strong>Gateway</strong><br />
If you want to configure the <strong>Corinex</strong> <strong>ADSL2+</strong> <strong>Wireless</strong> <strong>Gateway</strong> G’s connection to<br />
the internet, you can access the device through the web user interface by following<br />
these steps:<br />
1. Open your Internet Browser and enter 192.168.1.1 in the address bar, and<br />
press Enter.<br />
You will be asked for the username and password. The default username is “admin”<br />
and the password is “admin”.<br />
<strong>Corinex</strong> <strong>ADSL2+</strong> <strong>Wireless</strong> <strong>Gateway</strong> G<br />
13
2. Upon Login, the main page will be displayed.<br />
Click on Setup in the upper bar. The following window will appear.<br />
Configuring the <strong>Gateway</strong><br />
<strong>Corinex</strong> <strong>ADSL2+</strong> <strong>Wireless</strong> <strong>Gateway</strong> G<br />
14
Configuring the <strong>Gateway</strong><br />
3. In the left menu bar, click on “Quick Start” to start the internet connection<br />
wizard. The following screen will appear.<br />
4. All the information you need for this screen should have already been provided<br />
to you by your Internet Service Provider. Please carefully fill in all required fields<br />
and click on Connect.<br />
5. The gateway will now connect to your Internet Service Provider. A few screens<br />
displaying the connection status will appear. If all the required authentication<br />
data was entered correctly and the gateway is connected to the DSL line, a<br />
screen similar to the one below will appear.<br />
<strong>Corinex</strong> <strong>ADSL2+</strong> <strong>Wireless</strong> <strong>Gateway</strong> G<br />
15
Configuring the <strong>Gateway</strong><br />
6. Your <strong>ADSL2+</strong> <strong>Wireless</strong> <strong>Gateway</strong> G is now connected to the internet.<br />
7. Click on Save All Settings once you’ve successfully established a connection, so<br />
that all settings are saved. Your gateway will then connect to the internet<br />
automatically after restart.<br />
For more detailed information on how to set up your <strong>ADSL2+</strong> <strong>Wireless</strong> <strong>Gateway</strong><br />
G, and for troubleshooting, please read the User Guide, which can be found on the<br />
enclosed CD.<br />
<strong>Corinex</strong> <strong>ADSL2+</strong> <strong>Wireless</strong> <strong>Gateway</strong> G<br />
16