Installer's Guide - Lutron
Installer's Guide - Lutron
Installer's Guide - Lutron

Create successful ePaper yourself
Turn your PDF publications into a flip-book with our unique Google optimized e-Paper software.
Install Controls and<br />
Activate Loads<br />
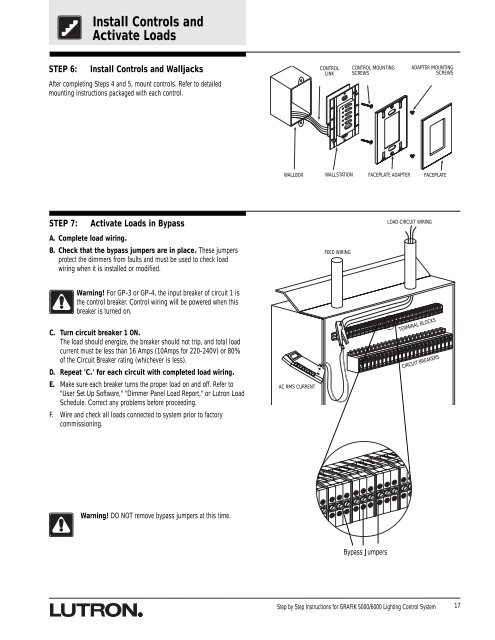
STEP 6:<br />
Install Controls and Walljacks<br />
After completing Steps 4 and 5, mount controls. Refer to detailed<br />
mounting instructions packaged with each control.<br />
CONTROL<br />
LINK<br />
CONTROL MOUNTING<br />
SCREWS<br />
ADAPTER MOUNTING<br />
SCREWS<br />
WALLBOX<br />
WALLSTATION<br />
FACEPLATE ADAPTER<br />
FACEPLATE<br />
STEP 7:<br />
Activate Loads in Bypass<br />
A. Complete load wiring.<br />
B. Check that the bypass jumpers are in place. These jumpers<br />
protect the dimmers from faults and must be used to check load<br />
wiring when it is installed or modified.<br />
FEED WIRING<br />
LOAD CIRCUIT WIRING<br />
Warning! For GP-3 or GP-4, the input breaker of circuit 1 is<br />
the control breaker. Control wiring will be powered when this<br />
breaker is turned on.<br />
C. Turn circuit breaker 1 ON.<br />
The load should energize, the breaker should not trip, and total load<br />
current must be less than 16 Amps (10Amps for 220-240V) or 80%<br />
of the Circuit Breaker rating (whichever is less).<br />
D. Repeat 'C.' for each circuit with completed load wiring.<br />
E. Make sure each breaker turns the proper load on and off. Refer to<br />
"User Set Up Software," "Dimmer Panel Load Report," or <strong>Lutron</strong> Load<br />
Schedule. Correct any problems before proceeding.<br />
F. Wire and check all loads connected to system prior to factory<br />
commissioning.<br />
AC RMS CURRENT<br />
TERMINAL BLOCKS<br />
CIRCUIT BREAKERS<br />
Warning! DO NOT remove bypass jumpers at this time.<br />
Bypass Jumpers<br />
Step by Step Instructions for GRAFIK 5000/6000 Lighting Control System<br />
17