Installer's Guide - Lutron
Installer's Guide - Lutron
Installer's Guide - Lutron

Create successful ePaper yourself
Turn your PDF publications into a flip-book with our unique Google optimized e-Paper software.
Set Normal/Emergency<br />
Switch<br />
STEP 17:<br />
Set Normal/Emergency Switch (Non-<br />
Essential/Essential)<br />
Note: This step is only performed if there are any panels with<br />
Emergency (Essential) Lighting Circuits on the job.<br />
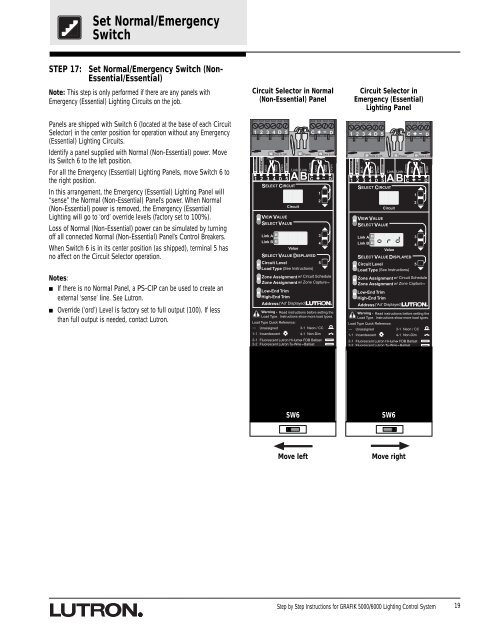
Panels are shipped with Switch 6 (located at the base of each Circuit<br />
Selector) in the center position for operation without any Emergency<br />
(Essential) Lighting Circuits.<br />
Identify a panel supplied with Normal (Non-Essential) power. Move<br />
its Switch 6 to the left position.<br />
For all the Emergency (Essential) Lighting Panels, move Switch 6 to<br />
the right position.<br />
In this arrangement, the Emergency (Essential) Lighting Panel will<br />
“sense” the Normal (Non-Essential) Panel’s power. When Normal<br />
(Non-Essential) power is removed, the Emergency (Essential)<br />
Lighting will go to ‘ord’ override levels (factory set to 100%).<br />
Loss of Normal (Non-Essential) power can be simulated by turning<br />
off all connected Normal (Non-Essential) Panel’s Control Breakers.<br />
When Switch 6 is in its center position (as shipped), terminal 5 has<br />
no affect on the Circuit Selector operation.<br />
Notes:<br />
■ If there is no Normal Panel, a PS-CIP can be used to create an<br />
external ‘sense’ line. See <strong>Lutron</strong>.<br />
■ Override (‘ord’) Level is factory set to full output (100). If less<br />
than full output is needed, contact <strong>Lutron</strong>.<br />
Circuit Selector in Normal<br />
(Non-Essential) Panel<br />
1 2 3 4 D 5 C D<br />
Common<br />
24VFW<br />
MUX<br />
Data A OK<br />
MUX<br />
Drain<br />
Sense<br />
Circuit<br />
Power<br />
Link Link<br />
A B<br />
Comm<br />
MUX<br />
1<br />
2<br />
Data B OK<br />
1 2 3 4 D 5 C D<br />
SELECT CIRCUIT<br />
VIEW VALUE<br />
SELECT VALUE<br />
Link A<br />
3<br />
Link B<br />
4<br />
Value<br />
SELECT VALUE DISPLAYED<br />
Circuit Level<br />
5<br />
Load Type (See Instructions)<br />
Zone Assignment w/ Circuit Schedule<br />
Zone Assignment w/ Zone CaptureTM<br />
Low-End Trim<br />
High-End Trim<br />
Address('Ad' Displayed)<br />
Warning - Read instructions before setting the<br />
Load Type. Instructions show more load types.<br />
Load Type Quick Reference:<br />
--- Unassigned<br />
3-1 Neon / CC<br />
1-1 Incandescent<br />
4-1 Non-Dim<br />
2-1 Fluorescent <strong>Lutron</strong> Hi-lume FDB Ballast<br />
2-2 Fluorescent <strong>Lutron</strong> Tu-Wire TM Ballast<br />
MUX<br />
Drain<br />
Circuit Selector in<br />
Emergency (Essential)<br />
Lighting Panel<br />
1 2 3 4 D 5 C D<br />
Common<br />
24VFW<br />
MUX<br />
Data A OK<br />
MUX<br />
Drain<br />
Sense<br />
Circuit<br />
Power<br />
Link Link<br />
A B<br />
Comm<br />
MUX<br />
1<br />
2<br />
Data B OK<br />
1 2 3 4 D 5 C D<br />
SELECT CIRCUIT<br />
VIEW VALUE<br />
SELECT VALUE<br />
Link A<br />
3<br />
Link B<br />
4<br />
Value<br />
SELECT VALUE DISPLAYED<br />
Circuit Level<br />
5<br />
Load Type (See Instructions)<br />
Zone Assignment w/ Circuit Schedule<br />
Zone Assignment w/ Zone CaptureTM<br />
Low-End Trim<br />
High-End Trim<br />
Address('Ad' Displayed)<br />
Warning - Read instructions before setting the<br />
Load Type. Instructions show more load types.<br />
Load Type Quick Reference:<br />
--- Unassigned<br />
3-1 Neon / CC<br />
1-1 Incandescent<br />
4-1 Non-Dim<br />
2-1 Fluorescent <strong>Lutron</strong> Hi-lume FDB Ballast<br />
2-2 Fluorescent <strong>Lutron</strong> Tu-Wire TM Ballast<br />
MUX<br />
Drain<br />
SW6<br />
SW6<br />
Move left<br />
Move right<br />
Step by Step Instructions for GRAFIK 5000/6000 Lighting Control System<br />
19