PDF Version - The American Watchmakers-Clockmakers Institute
PDF Version - The American Watchmakers-Clockmakers Institute
PDF Version - The American Watchmakers-Clockmakers Institute

You also want an ePaper? Increase the reach of your titles
YUMPU automatically turns print PDFs into web optimized ePapers that Google loves.
L&R tempo 400 watch cleaning machine<br />
Repair & Modification of the Start Switch<br />
by karel ebenstreit, cmw, cc21<br />
1. Description of Problem and Parts:<br />
L&R Tempo 400 watch cleaning machines came on<br />
the market some 30-40 years ago and were proven<br />
to be made very robust and have been doing an<br />
excellent job for decades. <strong>The</strong>y are still working<br />
in many shops, but if they fail, spare parts and the<br />
shops that perform the repair are hard to find. <strong>The</strong><br />
machine I have now has worked flawlessly for some<br />
28 years, except for a start switch that has failed<br />
twice. <strong>The</strong> first time was about four years ago when<br />
the parts inside the switch broke lose, shorted and<br />
caused severe burning damage to the body of the<br />
switch. I managed to get the replacement switch<br />
from L&R, but it failed again in exactly four years.<br />
This time the switch was not making any contact<br />
inside. When<br />
I pressed the<br />
start switch,<br />
nothing was<br />
happening and<br />
there was no<br />
way to fix the<br />
inside of the<br />
start switch.<br />
An ohmmeter<br />
test confirmed<br />
the contacts<br />
were not doing<br />
their job.<br />
<strong>The</strong>re are four<br />
yellow push<br />
button (PB)<br />
switches on<br />
the front of<br />
this machine. Three of them are simple ON/OFF<br />
switches, but the start switch is a double switch, a<br />
combination of “normally open (NO)” and “normally<br />
closed (NC)” contacts that must operate at the<br />
same time. All push buttons are illuminated inside<br />
by a small light bulb. <strong>The</strong>se are separately fed and<br />
rarely fail, but bulbs are still available.<br />
<strong>The</strong> L&R shop in Kearney, New Jersey no longer<br />
supports this machine and parts are no longer available.<br />
In the U.S., this service has been passed on to<br />
the shop in San Rafael, California called Electronics<br />
Instruments Service (Contact: Richard, 415-479-<br />
8960). In Canada, similar help for this equipment<br />
and ultrasonic work is available from Crystal Electronics<br />
in Newmarket, Ontario (905-953-9129).<br />
When I talked with both of them I found they would<br />
be able to repair the start switch, but not with original<br />
parts. Additionally, they would need to search<br />
for the replacement to do the job at a cost of at<br />
least $400 plus shipping. Considering the cost of<br />
shipping this heavy machine, the risk of equipment<br />
damage during shipping, and the time lost being<br />
without the machine, I decided to find replacement<br />
parts myself. I thought this would not be too difficult,<br />
and it should work far better with new, more<br />
robust parts, if done correctly.<br />
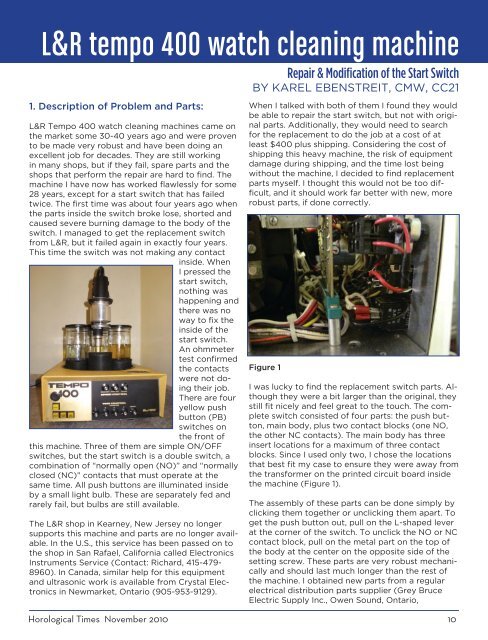
Figure 1<br />
I was lucky to find the replacement switch parts. Although<br />
they were a bit larger than the original, they<br />
still fit nicely and feel great to the touch. <strong>The</strong> complete<br />
switch consisted of four parts: the push button,<br />
main body, plus two contact blocks (one NO,<br />
the other NC contacts). <strong>The</strong> main body has three<br />
insert locations for a maximum of three contact<br />
blocks. Since I used only two, I chose the locations<br />
that best fit my case to ensure they were away from<br />
the transformer on the printed circuit board inside<br />
the machine (Figure 1).<br />
<strong>The</strong> assembly of these parts can be done simply by<br />
clicking them together or unclicking them apart. To<br />
get the push button out, pull on the L-shaped lever<br />
at the corner of the switch. To unclick the NO or NC<br />
contact block, pull on the metal part on the top of<br />
the body at the center on the opposite side of the<br />
setting screw. <strong>The</strong>se parts are very robust mechanically<br />
and should last much longer than the rest of<br />
the machine. I obtained new parts from a regular<br />
electrical distribution parts supplier (Grey Bruce<br />
Electric Supply Inc., Owen Sound, Ontario,<br />
Horological Times November 2010 10