LVM-171WP Manual - Postium
LVM-171WP Manual - Postium
LVM-171WP Manual - Postium

You also want an ePaper? Increase the reach of your titles
YUMPU automatically turns print PDFs into web optimized ePapers that Google loves.
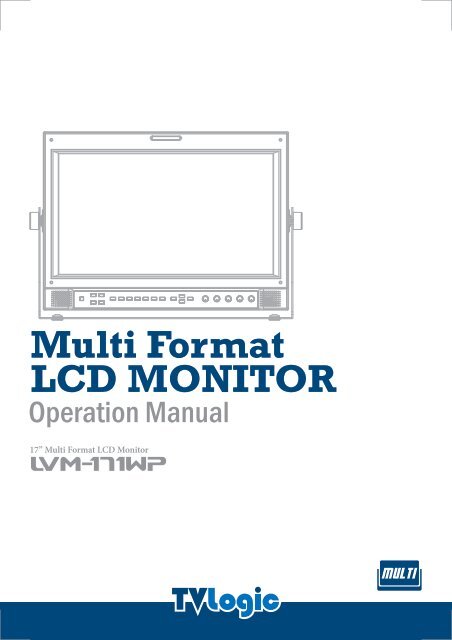
Multi Format<br />
LCD MONITOR<br />
Operation <strong>Manual</strong><br />
17” Multi Format LCD Monitor<br />
<strong>LVM</strong>-<strong>171WP</strong><br />
MULTI
Contents<br />
CAUTION ........................................................................................ 4<br />
FEATURES ...................................................................................... 6<br />
NAME & FUNCTION OF EACH PART ....................................................... 7<br />
OSD MENU ORGANIZATION & ADJUSTMENT ............................................ 12<br />
OSD MENU CONTENTS ....................................................................... 13<br />
OTHER FUNCTIONS ........................................................................... 21<br />
DVI ANALOG INPUT SIGNAL FORMAT ..................................................... 23<br />
DVI DIGITAL INPUT SIGNAL FORMAT ..................................................... 24<br />
PRODUCT SPECIFICATION .................................................................. 25<br />
PRODUCT LINEUP ............................................................................. 26<br />
OPTIONAL ACCESSORIES ................................................................... 28<br />
FCC (Federal Communications Commission)<br />
This equipment has been tested and found to comply with the limits for class A digital device, pursuant to part 15 of the<br />
FCC Rules. These limits are designed to provide reasonable protection against harmful interface when the equipment is<br />
operated in a commercial environment.<br />
This equipment generates, uses, and can radiate radio frequency energy, and if not installed and used in accordance with<br />
the instruction manual, may cause harmful interference to radio communications. Operation of this equipment in a<br />
residential to correct the interference at his own expense<br />
CAUTION: Change or modifications not expressly approved by the manufacturer responsible for compliance void the<br />
user’s authority to operate the equipment.<br />
Disposal of Old Electrical & Electronic Equipment<br />
(Applicable in the European Union and other European countries with separate collection systems)<br />
This symbol on the product or on its packing indicates that this product shall not be treated as household waste. Instead<br />
it shall be handed over to the applicable collection point for the recycling of electrical and electronic equipment. By<br />
ensuring this product is disposed of correctly, you will help prevent potential negative consequence for the environment<br />
and human health, which could otherwise be caused by inappropriate waste handling of this product. The recycling of<br />
materials will help to conserve natural resources.
<strong>LVM</strong>-<strong>171WP</strong><br />
Caution<br />
ALWAYS USE SET VOLTAGE. AC 100 ~ 240V (1.2A/50~60HZ), DC 12/24V (MAX 6A)<br />
All operating instructions must be read and understood before the product is operated.<br />
These safety and operating instructions must be kept in safe place for future reference.<br />
All warnings on the product and in the instructions must be observed closely.<br />
All operating instructions must be followed.<br />
17” Multi Format LCD Monitor 04<br />
Do not use attachments not recommended by the manufacturer. Use of inadequate attachments<br />
can result in accidents.<br />
This product must be operated on a power source specified on the specification label.<br />
If you are not sure of the type of power supply used in your home, consult your dealer or local<br />
power company. For units designed to operate on batteries or another power source, refer to the<br />
operating instructions.<br />
The power cords must be routed properly to prevent people from stepping on them or objects from<br />
resting on them. Check the cords at the plugs and product.<br />
Do not overload AC outlets or extension cords. Overloading can cause fire or electric shock.<br />
Never insert an object into the product through vents or openings. High voltage flows in the<br />
product, and inserting an object can cause electric shock and/or short internal parts.<br />
For the same reason, do not spill water or liquid on the product.<br />
Do not attempt to service the product yourself. Removing covers can expose you to high voltage<br />
and other dangerous conditions. Request a qualified service person to perform servicing.<br />
If any of the following conditions occurs, unplug the power cord from the AC outlet, and request a<br />
qualified service person to perform repairs.<br />
a. When the power cord or plug in damaged.<br />
b. When a liquid was spilled on the product or when objects have fallen into the product.<br />
c. When the product has been exposed to rain or water.<br />
d. When the product does not operate properly as described in the operating instructions.<br />
Do not touch the controls other than those described in the operating instructions.<br />
Improper adjustment of controls not described in the instructions can cause damage,<br />
which often requires extensive adjustment work by a qualified technician.<br />
e. When the product has been dropped or damaged.<br />
f. When the product displays an abnormal condition. Any noticeable abnormality<br />
in the product indicates that the product needs servicing.
<strong>LVM</strong>-<strong>171WP</strong><br />
Caution<br />
In case the product needs replacement parts, make sure that the service person uses<br />
replacement parts specified by the manufacturer, or those with the same characteristics and<br />
performance as the original parts. Use of unauthorized parts can result in fire, electric shock<br />
and/or other danger.<br />
Upon completion of service or repair work, request the service technician to perform safety<br />
checks to ensure that the product is in proper operating condition.<br />
When mounting the product on a wall or ceiling, be sure to install the product according to the<br />
method recommended by the manufacturer.<br />
Unplug the power cord from the AC outlet before cleaning the product. Use a damp cloth to clean<br />
the product. Do not use liquid cleaners or aerosol cleaners.<br />
Unplug the power cord from the AC outlet if you do not use the product for considerably long time.<br />
Do not use the product near water, such as bathtub, washbasin, kitchen sink and laundry tub,<br />
swimming pool and in a wet basement.<br />
Keep the product away from direct rays of the Sun-light.<br />
Do not place the product on an unstable cart, stand, tripod or table. Placing the product on an<br />
unstable base can cause the product to fall, resulting in serious personal injuries as well as<br />
damage to the product. Use only a cart, stand, tripod, bracket or table recommended by the<br />
manufacturer or sold with the product. When mounting the product on a wall, be sure to follow<br />
the manufacturer's instruction. Use only the mounting hardware recommended by the<br />
manufacturer.<br />
17” Multi Format LCD Monitor 05<br />
When relocating the product placed on a cart, it must be moved with the utmost care.<br />
Sudden stops, excessive force and uneven floor surface can cause the product to fall from the cart.<br />
The vents and other openings in the cabinet are designed for ventilation. Do not cover or block<br />
these vents and openings since insufficient ventilation can cause overheating and/or shorten the<br />
life of the product. Do not place the product on a bed, sofa, rug or other similar surface, since they<br />
can block ventilation openings. This product is not designed for built-in installation; do not place<br />
the product in an enclosed place such as a bookcase or rack, unless proper ventilation is provided<br />
or the manufacturer's instructions are followed.<br />
The LCD panel used in this product is made of glass. Therefore, it can break when the product is<br />
dropped or applied with impact. Be careful not to be injured by broken glass pieces in case the<br />
LCD panel breaks.<br />
Keep the product away from heat sources such as radiators, heaters, stoves and other heatgenerating<br />
products (including amplifiers).
<strong>LVM</strong>-<strong>171WP</strong><br />
Features<br />
<strong>LVM</strong>-<strong>171WP</strong> HAS THE FOLLOWING FEATURES:<br />
Compatible with varied SDI signals<br />
- The product is compatible with varied SDI<br />
Signals - 480i, 576i, 720p, 1080i, 1080p, 1080psF (SDI A, B 2 channels are compatible)<br />
Compatible with varied analog signals<br />
- The product is compatible with varied analog signals (Composite, S-Video, Component, RGB)<br />
17” Multi Format LCD Monitor 06<br />
All-in-one type system<br />
- Slim and all-in-one type monitor that requires no other accessory, for optimized space utilization.<br />
Wide Screen compatible<br />
- Wide Screen for 16:9 aspect monitoring.<br />
Dual Link support (Option)<br />
- <strong>LVM</strong>-<strong>171WP</strong> can use 4:4:4 format and 1080/60p.<br />
Wide Variety of Marker & Safety Areas<br />
- Center Marker, Safty Area Marker, Fit Marker, Marker Mat.<br />
Compatible with varied DVI Digital/Analog Signals<br />
- DVI input is standard equipment(HDCP)<br />
Compatible with VGA Signals using DVI-I connection<br />
Audio Level Meter<br />
- Embedded Audio Level Meter<br />
Audio in & out<br />
- Built in audio disembedder and internal speakers<br />
- Stereo audio out using phone jack<br />
- External audio in for stereo speaker out<br />
Knob Control<br />
- Easy to adjust user configuration using the control knobs<br />
BLUE ONLY/MONO<br />
H/V delay<br />
1:1 SCAN<br />
- Provides both full screen and unscaled native image.<br />
AC/DC Compatible<br />
- The product may be powered by normal AC source,but also 12V/24V DC source.<br />
Remote control function<br />
- Simple remote controllability with single cable connection, no additional modules required<br />
In addition, the product is compatible with Wide Viewing Angle, Through OUT (SDI), VESA Mounting Standard,<br />
900:1 contrast ratio, 280cd brightness, User Interface and Rack-Mountable.
<strong>LVM</strong>-<strong>171WP</strong><br />
Name & Function of Each Part<br />
FRONT<br />
TALLY<br />
POWER<br />
ANALOG<br />
SDI-A<br />
SDI-B<br />
DVI<br />
SCAN<br />
ASPECT<br />
MARKER<br />
APERTURE<br />
BRIGHT<br />
CHROMA<br />
CONTRAST<br />
VOLUME<br />
ENTER<br />
UP/DOWN<br />
MENU<br />
WAVEFORM<br />
PHASE<br />
BLUE ONLY/MONO<br />
H/V DELAY<br />
17” Multi Format LCD Monitor 07<br />
[ANALOG] button/lamp<br />
- Used when ANALOG INPUT is selected. Sub Menu for analog input menu-selection appears.<br />
[SDI-A] button/lamp<br />
- Used to select SDI-A Input<br />
[SDI-B] button/lamp<br />
- Used to select SDI-B Input<br />
[DVI] button/lamp<br />
- Used to select desired DVI Input. (DVI DIGITAL, DVI ANALOG, HDMI)<br />
[SCAN] button/lamp<br />
- Used when transferring from OVER SCAN mode to UNDER SCAN mode.<br />
(Compatible up to SD 1:1 SCAN mode.)<br />
[ASPECT] button/lamp<br />
- Used to toggle aspect ratio in SD from standard to anamorphic.<br />
[MARKER] button/lamp<br />
- Used to toggle on Screen Marker on/off<br />
The type of marker at work may be selectrd on the main menu
<strong>LVM</strong>-<strong>171WP</strong><br />
Name & Function of Each Part<br />
[H/V DELAY] button/lamp<br />
- Used when checking horizontal sync and vertical sync simultaneously.<br />
[BLUE ONLY] [MONO] button/lamp<br />
- You may remove R(red) and G(green) from the input signal and play the screen only in<br />
B(blue) signal. And if the button hit twice, it will turn to MONO mode. (This mode use<br />
only luminance value.)<br />
17” Multi Format LCD Monitor 08<br />
[PHASE] button<br />
Used when changing the CHROMINCE, PHASE and Closed Caption values during menu in-activation.<br />
- Chroma => Phase => Closed Caption : Composite modes.<br />
- Chroma => Closed Caption : SDI-A/B modes.<br />
- Chroma => Phase : S-Video mode.<br />
- Phase(Auto Adjustment) : DVI-Analog mode.<br />
- Chroma : Component mode.<br />
[W-FORM] button/lamp<br />
- Used to activate the Waveform or Vector Scope. Pressing the button once will activate the<br />
Waveform, pressing the button twice activates the Vector Scope.<br />
[MENU] button<br />
- Used when OSD menu is activated.<br />
[DOWN] button<br />
- Used when moving within the menus during OSD menu activation.<br />
[UP] button<br />
- Used when moving within the menu during OSD menu activation.<br />
[ENTER] button<br />
- Used when confirming a chosen value (or mode) during OSD menu activation or inactivation.<br />
[POWER] button/lamp<br />
- Used when power on and off.<br />
- It affords power supply, which may be indicated by indication lamp. The lamp is RED<br />
during power supply and GREEN during system is in operation. In case of power cut and<br />
sudden shut off of the power, our monitor keep previous setup stage.<br />
[TALLY] lamp<br />
- LED indicating monitors current status.<br />
[APERTURE] knob<br />
- Used to adjust the picture sharpness between MAX(5) and MIN(-1).<br />
#Aperture is not available in DVI Analog mode.
<strong>LVM</strong>-<strong>171WP</strong><br />
Name & Function of Each Part<br />
[BRIGHT] knob<br />
- Used to adjust the degree of brightness between MAX(100) and MIN(-100).<br />
[CHROMA] knob<br />
- Used to adjust the saturation between MAX(50) and MIN(-50).<br />
#Chroma is not available in DVI Analog mode.<br />
[CONTRAST] knob<br />
- Used to adjust the contrast ration between MAX(100) and MIN(-100).<br />
[VOLUME] knob<br />
- Used to adjust the volume between MAX(30) and MIN(0).<br />
17” Multi Format LCD Monitor 09
<strong>LVM</strong>-<strong>171WP</strong><br />
Name & Function of Each Part<br />
REAR<br />
17” Multi Format LCD Monitor 10<br />
POWER S/W<br />
AC IN<br />
DC IN<br />
FACTORY PGM<br />
CVBS1/G/Y/S-Y<br />
CVBS2/B/Pb/<br />
CVBS3/R/Pr/S-C<br />
DVI-I<br />
SDI IN-A<br />
SDI OUT-A<br />
SDI IN-B<br />
SDI OUT-B<br />
HDMI<br />
AUDIO OUT<br />
AUDIO IN<br />
REMOTE<br />
RS422 OUT<br />
RS422 IN<br />
REMOTE (RJ-45)<br />
- Provides connection to monitor control equipment via simple GPI contact closure.<br />
DVI-I (DVI-I)<br />
- Used to connect DVI Analog or DVI Digital signals.<br />
HDMI (HDMI)<br />
- Used to connect HDMI signal.<br />
FACTORY PGM (D-SUB 15 pins)<br />
- Input connector for FACTORY PGM allowing for firmware updates.<br />
CVBS1/Y/G/S-Y (BNC)<br />
- Signal input terminal used to put in COMPOSITE 1, S-VIDEO Y, COMPONENT Y, RGB G signals.<br />
CVSBS2/Pb/B (BNC)<br />
- Signal input terminal used to put in COMPOSITE 2, RGB B, COMPONENT Pb signals.<br />
CVSBS3/Pr/R/S-C (BNC)<br />
- Signal input terminal used to put in COMPOSITE 3, S-VIDEO C, COMPONENT Pr, RGB R signals.
<strong>LVM</strong>-<strong>171WP</strong><br />
Name & Function of Each Part<br />
SDI-IN A (BNC)<br />
- SDI signal input terminal that provides A signal.<br />
SDI-OUT A (BNC)<br />
- SDI signal output terminal used for SDI A output.<br />
SDI-IN B (BNC)<br />
- SDI signal input terminal that provides B signal.<br />
SDI-OUT B (BNC)<br />
- SDI signal output terminal used for SDI B output.<br />
~ AC IN<br />
- Used to supply AC power; 100V~240V input range.<br />
DC IN (XLR, 4 pins)<br />
- Used to supply DC power; 12V or 24V available<br />
POWER S/W<br />
Information<br />
- Input VIDEO connection method<br />
DC IN socket<br />
1,2: GND<br />
3,4: +12V/+24V 1<br />
2 3<br />
4<br />
17” Multi Format LCD Monitor 11<br />
Connector Composite Component S - Video<br />
1 CVBS 1<br />
Y G Y<br />
2 CVBS 2<br />
Pb B No Con.<br />
3 CVBS 3<br />
Pr R C
<strong>LVM</strong>-<strong>171WP</strong><br />
OSD Menu Organization & Adjustment<br />
THE PRODUCT MAY BE CONTROLLED AND SET SYSTEM-WISE THROUGH OSD<br />
DISPLAYED ON THE SCREEN.<br />
1) Menu Organization<br />
Below is the organization of the product’s menu.<br />
<strong>LVM</strong>-<strong>171WP</strong><br />
17” Multi Format LCD Monitor 12<br />
2) Menu Control<br />
You may control various functions using MENU, UP/DOWN and ENTER buttons on the<br />
bottom front of the monitor.<br />
3) Menu Control Sequence<br />
Menu control sequence follows the order below<br />
1. Press MENU button to bring OSD menu on the screen.<br />
2. Display the desired sub menu with the UP/DOWN button.<br />
3. After select a sub menu, press ENTER to select an item with UP/DOWN button.<br />
4. Press ENTER to select the desired item. (Verified by highlighted field returning to default black<br />
color.)<br />
5. Press ENTER to save the new value (verified by highlighted field returning to default black color.)<br />
6. Press MENU once to remove OSD menu from the screen.
<strong>LVM</strong>-<strong>171WP</strong><br />
OSD Menu Contents<br />
[1] PICTURE PART<br />
Below is the description of each function of the menu.<br />
<strong>LVM</strong>-<strong>171WP</strong><br />
<strong>LVM</strong>-<strong>171WP</strong><br />
<strong>LVM</strong>-<strong>171WP</strong><br />
17” Multi Format LCD Monitor 13<br />
BRIGHT<br />
This item controls the degree of brightness between MAX(100) and MIN (-100) range.<br />
CONTRAST<br />
This item controls the contrast ratio between MAX(100) and MIN(-100).<br />
CHROMA<br />
This item controls saturation between MAX(50) and MIN(-50).<br />
PHASE<br />
This item controls Phase(hue) value and Phase(no hue) on Analog and DVI_Analog modes.<br />
Phase(hue) value controls between MAX(50) and MIN(-50) on Analog modes(Composite, S-Video).<br />
Phase(no hue) value controls between MAX(63) and MIN(0) on DVI-Analog mode.<br />
#Phase value can be adjusted by press the [PHASE] button button on the front of the monitor.<br />
APERTURE<br />
This item controls the picture sharpness. Sharpness select between MIN(-1) and MAX(5).
<strong>LVM</strong>-<strong>171WP</strong><br />
OSD Menu Contents<br />
[1] PICTURE PART<br />
NTSC SETUP<br />
This item sets IRE value in NTSC mode between 0 IRE and 7.5 IRE.<br />
SDI FORMAT<br />
This item selects input SDI format between single mode and dual mode. (Use Dual mode)<br />
SDI SAMPLING<br />
This item selects input SDI sampling mode between YCbCr and RGB. (Use Dual mode)<br />
17” Multi Format LCD Monitor 14<br />
FILTER<br />
This item selects set the filter ON for smoother transitions between colors.<br />
ORBITER CIRCUIT<br />
This item prevents image sticking effect on LCD Panels when signal input is used. The user may decide<br />
number of pixels to move. The number of pixels should be within range between MIN(0) and MAX(100).<br />
Moving speed is per 10 minutes.<br />
INTERNAL PATTERN<br />
This item generates internal white pattern. The white level select between 0% and 100%<br />
(Per 5% increase or decrease)<br />
FAST MODE<br />
This item minimize de-interlacing processing time delay. If user want to see without 1field time delay,<br />
use this mode.<br />
VGA H POSITION<br />
This item controls VGA H position. It is only available on DVI analog mode.<br />
VGA V POSITION<br />
This item controls VGA V position. It is only available on DVI analog mode.<br />
DITHERING<br />
This item enables dithering to 10 bits.<br />
FORCE psf<br />
This item sets psf mode for psf signals.<br />
FILM MODE DETECTION<br />
This item enables film mode or disables.<br />
DVI INPUT FORMAT SELECT<br />
This item selects color format between RGB and YPbPr. However, it is only available on DVI-DIGITAL mode.<br />
RGB INPUT MODE<br />
This item selects luminance value between RGB255 and RGB235. However, it is<br />
only available on DVI-DIGITAL and HDMI modes.
<strong>LVM</strong>-<strong>171WP</strong><br />
OSD Menu Contents<br />
[2] COLOR PART<br />
<strong>LVM</strong>-<strong>171WP</strong><br />
<strong>LVM</strong>-171WG<br />
COLOR TEMP<br />
This item controls COLOR TEMPERATURE and is basically compatible with 5000K, 5600K, 6500K,<br />
9300K and USER modes. On user mode, the user may select among R,G and B values.<br />
GAIN RED<br />
This item controls red color. The value should be within range between MIN(-255) and MAX(255).<br />
17” Multi Format LCD Monitor 15<br />
GAIN GREEN<br />
This item controls green color. The value should be within range between MIN(-255) and MAX(255).<br />
GAIN BLUE<br />
This item controls blue color. The value should be within range between MIN(-255) and MAX(255).<br />
BIAS RED<br />
This item adjusts black level to control red color. The value should be within range between MIN(-50)<br />
and MAX(50).<br />
BIAS GREEN<br />
This item adjusts black level to control green color. The value should be within range between<br />
MIN(-50) and MAX(50).<br />
BIAS BLUE<br />
This item adjusts black level to control blue color. The value should be within range between<br />
MIN(-50) and MAX(50).<br />
COLOR COPY<br />
This item is used when the user want to adjust only some particular parameters in basic setting<br />
color temperature value.
<strong>LVM</strong>-<strong>171WP</strong><br />
OSD Menu Contents<br />
[3] MARKER PART<br />
<strong>LVM</strong>-<strong>171WP</strong><br />
<strong>LVM</strong>-<strong>171WP</strong><br />
17” Multi Format LCD Monitor 16<br />
MARKER<br />
This selects the marker type when the MARKER is displayed on the screen.<br />
MARKER may only be activated by pressing the MARKER button on the front of the monitor.<br />
Compatible MARKER types are as follows:<br />
MODE<br />
MARKER CLASS<br />
HD 16:9, 4:3, 4:3 ON AIR, 15:9, 14:9, 13:9, 1.85:1, 2.35:1,<br />
SD 16:9<br />
1.85:1 & 4:3, USER<br />
SD 4:3 16:9<br />
CENTER MARKER<br />
This item displays the CENTER MARKER on the screen. This function operates only after<br />
activating the MARKER function by pressing the MARKER button on the front of the<br />
monitor.<br />
SAFETY AREA<br />
This item controls the size of the SAFETY AREA among 80%, 88%, 90%, 93%, 100%,<br />
EBU ACTION 16:9, EBU GRAPHIC 16:9, EBU ACTION 14:9, EBU GRAPHIC 14:9,<br />
EBU ACTION 4:3 and EBU GRAPHIC 4:3.<br />
FIT MARKER<br />
This item sets the fit marker. When using the fit marker, safety area is displayed within<br />
the marker area.<br />
MARKER MAT<br />
This item darkens the area of the outside of MARKER setting area. The degrees of<br />
darkness are between OFF(0) and (7). The higher the number, the darker MARKER border<br />
becomes.
<strong>LVM</strong>-<strong>171WP</strong><br />
OSD Menu Contents<br />
MARKER COLOR<br />
This item controls the color of MARKER is generated. Settable colors are white, gray, black, red, green and blue.<br />
MARKER THICKNESS<br />
This item controls the width of marker. The degrees of width are between 1 and 7.<br />
<strong>LVM</strong>-171WG<br />
USER MARKER H1 / H2<br />
This item controls the marker of horizontal value.<br />
USER MARKER V1 / V2<br />
This item controls the marker of vertical value.<br />
[4] REMOTE PART<br />
<strong>LVM</strong>-<strong>171WP</strong><br />
REMOTE (RJ-45)<br />
1: Pin1<br />
2: Pin2<br />
3: Pin3<br />
4: Pin4<br />
5: Pin5<br />
6: Pin6<br />
7: Pin7<br />
8: GND<br />
1 8<br />
17” Multi Format LCD Monitor 17<br />
This product provides a REMOTE CONTROL mode. The user may connect RJ-45 jack to the REMOTE<br />
terminal on the rear of the unit and designate a function for each pin.<br />
PIN 1 ~PIN 6<br />
The user designates function for PIN 1~PIN 6. PIN 7 is POWER ON/OFF use only. The selectable functions are<br />
as follows:<br />
Menu<br />
Classification<br />
PIN 1~6<br />
Settable Values<br />
NONE, ANALOG CHANNEL, DIGITAL A/B CHANNEL, BLUE ONLY, SD<br />
1:1 SCAN, UNDER SCAN, ASPECT, H/V DELAY, 16:9,15:9,14:9,13:9<br />
MARKER, 4:3, 4:3 ON AIR MARKER, 1.85:1, 2.35:1 MARKER,<br />
1.85:1&4:3 MARKER, CENTER MARKER,SAFETY AREA 80% / 88% /<br />
90% / 93%, TALLY RED, TALLY GREEN<br />
PIN 7<br />
PIN 7 is for power ON/OFF use only<br />
On the pin to be used, set the function you desire with the ENTER button and UP/DOWN button.<br />
The method of setting the value is the same as that for the MENU function discussed
<strong>LVM</strong>-<strong>171WP</strong><br />
OSD Menu Contents<br />
[5] SYSTEM PART<br />
<strong>LVM</strong>-<strong>171WP</strong><br />
<strong>LVM</strong>-<strong>171WP</strong><br />
UMD<br />
UMD CHARACTER<br />
UMD POSITION<br />
17” Multi Format LCD Monitor 18<br />
<strong>LVM</strong>-<strong>171WP</strong><br />
SET DEFAULT<br />
You can use the SET DEFAULTS menu to initialize the values of BRIGHT, CONTRAST, PHASE, CHROMA,<br />
APERTURE and BACKLIGHT of the monitor.<br />
USER CONFIG SET<br />
This item saved monitor configuration. If user wants to save particular circumstance, use this mode.<br />
This mode supports three users. (BRIGHT, CONTRAST, PHASE, CHROMA, APERTURE, MARKER<br />
CENTER MARKER, SAFETY AREA, MARKER MAT, MARKER COLOR)<br />
BACK LIGHT<br />
This item controls LCD Panel’s brightness. The value should be within range between MIN(0) and<br />
MAX(100).<br />
AUDIO VOLUME<br />
This item controls embedded audio volume between MIN (0) and MAX (30).<br />
AUDIO CHANNEL<br />
This item sets embedded audio channel selects CH 1 ~ CH 16 and Off.<br />
LOCK NUMBER<br />
Lock number is product’s serial number.
<strong>LVM</strong>-<strong>171WP</strong><br />
OSD Menu Contents<br />
LOCK ENABLE<br />
Lock enable is enable code input item to use Dual link item. (User must know the enable<br />
code to use this term.)<br />
BOARD VER<br />
This item is serial number of product main board. (User can’t touch this item.)<br />
KEY LED<br />
This item controls KEY LED ON/OFF.<br />
OSD DISPLAY<br />
This item controls OSD DISPLAY time. (3 sec, 20 sec, continue)<br />
OSD POSITION<br />
This item controls OSD position. (Left-Top, Left-Bottom, Right-Top, Right-Bottom and<br />
Center.)<br />
UMD<br />
This item is display input UMD.(ANC, UMD, D-UMD)<br />
UMD CHARACTER<br />
This item is set input UMD name. (Use Menu, Down, Up and Enter key.)<br />
17” Multi Format LCD Monitor 19<br />
UMD POSITION<br />
This item controls UMD position. (Left-Top, Left-Bottom, Center-Top, Center-Bottom,<br />
Right-Top and Right-Bottom)<br />
CLOSE CAPTION<br />
This item controls closed caption ON/OFF.<br />
AUDIO LEVEL METER<br />
This item sets embedded audio group selects off, G1+G2, G2+G3, G3+G4, G1+G3,<br />
G1+G4,G2+G4 to activate audio level meter.<br />
AUDIO LEVEL METER DISPLAY<br />
When audio level meter is activated, This item controls display method.(Pair, Group)<br />
AUDIO LEVEL METER REFERENCE<br />
this item sets audio level default.(-18dB, -20dB)
<strong>LVM</strong>-<strong>171WP</strong><br />
OSD Menu Contents<br />
WAVEFORM / VECTOR<br />
This item sets display type of waveform(User can’t touch this item.)<br />
WAVEFORM TYPE<br />
This item sets the waveform type between normal and N-TRANS<br />
WAVEFORM POSITION<br />
This item sets the waveform position.(R-B,C-B,L-B,L-T,C-T,R-T)<br />
17” Multi Format LCD Monitor 20<br />
WAVEFORM SIZE<br />
This item sets the waveform size.(Large,Medium,Small)<br />
TIME CODE ENABLE<br />
This item displays the time code.(VITC, LTC)
<strong>LVM</strong>-<strong>171WP</strong><br />
Other Functions<br />
[1] ANALOG / DVI MODE USAGE<br />
This product is capable of processing all input signals usable in ANALOG/DVI mode.<br />
The ANALOG/DVI input settings are as follows:<br />
1. Press ANALOG or DVI button on the front of the product and activate the menu below.<br />
Analog<br />
DVI<br />
2. Highlight the value you desire by using the UP/DOWN button and press the MENU<br />
button to confirm your selection. From this point the OSD menu operates identically<br />
to the MENU operations discussed above.<br />
17” Multi Format LCD Monitor 21<br />
Warning!!<br />
When using ANALOG and DVI modes, always check the input method and modify the setting<br />
as needed for optimized output results.<br />
[2] HD/SD 1:1 SCAN MODE<br />
Widescreen models provide not only an UNDERSCAN mode but also an SD 1:1<br />
SCAN mode. These modes maybe selected as follows:<br />
1. Transfer to UNDERSCAN by pressing the SCAN button on the front of the monitor.<br />
2. Press the SCAN button again after the mode is shifted to UNDERSCAN mode to<br />
transfer to HD/SD 1:1 SCAN mode.<br />
3. Press the ENTER button to change the picture position in 1:1 SCAN mode.(1080i/1080p modes)
<strong>LVM</strong>-<strong>171WP</strong><br />
Other Functions<br />
[3] DUAL LINK MODE<br />
This product provides a DUAL LINK mode. If user wants to play dual link signal, select signal format<br />
on picture menu. DUAL LINK Mode can setup by following these steps:<br />
1. Press the MENU button to bring up the OSD menu.<br />
<strong>LVM</strong>-<strong>171WP</strong><br />
17” Multi Format LCD Monitor 22<br />
2. Display Picture menu and press ENTER button and then PICTURE menu will be activated.<br />
3. Select DUAL item in SDI FORMAT.<br />
4. Select YCbCr 444, YCbCr 422 or RGB item in SDI SAMPLING.
<strong>LVM</strong>-<strong>171WP</strong><br />
DVI Analog Input Signal Format<br />
DVI ANALOG<br />
Resolution (Source) DotClock [MHz] f H (kHz) f V (Hz) Sync (H/V)<br />
640 x 350 70Hz (IBM) 25.175 31.469 70.086 P/N<br />
640 x 480 60Hz (IBM) 25.175 31.469 59.940 N/P<br />
720 x 400 70Hz (IBM) 28.322 31.469 70.087 N/P<br />
640 x 480 67Hz (MAC) 30.240 35.000 66.667 N/N<br />
832 x 624 75Hz (MAC) 57.284 49.726 74.551 N/N<br />
1152 x 870 75Hz (MAC) 100.00 68.681 75.062 N/N<br />
640 x 480 75Hz (VESA) 31.500 37.500 75.000 N/N<br />
640 x 480 72Hz (VESA) 31.500 37.861 72.809 N/N<br />
800 x 600 56Hz (VESA) 36.000 35.156 56.250 N/N<br />
800 x 600 60Hz (VESA) 40.000 37.879 60.317 P/P<br />
800 x 600 75Hz (VESA) 49.500 46.875 75.000 P/P<br />
800 x 600 72Hz (VESA) 50.000 48.077 72.188 P/P<br />
1024 x 768 60Hz (VESA) 65.000 48.363 60.004 N/N<br />
1024 x 768 70Hz (VESA) 75.000 56.476 70.069 N/N<br />
1024 x 768 75Hz (VESA) 78.750 60.023 75.029 P/P<br />
1152 x 864 75Hz (VESA) 108.00 67.500 75.000 P/P<br />
1280 x 1024 60Hz (VESA) 108.00 60.000 60.000 P/P<br />
1280 x 1024 75Hz (VESA) 135.00 79.976 75.025 P/P<br />
17” Multi Format LCD Monitor 23<br />
Supported Video Mode 480/60p, 576/50p , 720/50p, 720/60p, 1080/60p
<strong>LVM</strong>-<strong>171WP</strong><br />
DVI Digital Input Signal Format<br />
DVI DIGITAL<br />
Resolution (Source) DotClock [MHz] f H (kHz) f V (Hz) Sync (H/V)<br />
Multi Format LCD Monitor 24<br />
640 x 350 70Hz (IBM) 25.175 31.469 70.086 P/N<br />
640 x 480 60Hz (IBM) 25.175 31.469 59.940 N/P<br />
720 x 400 70Hz (IBM) 28.322 31.469 70.087 N/P<br />
640 x 480 67Hz (MAC) 30.240 35.000 66.667 N/N<br />
832 x 624 75Hz (MAC) 57.284 49.726 74.551 N/N<br />
1152 x 870 75Hz (MAC) 100.00 68.681 75.062 N/N<br />
640 x 480 75Hz (VESA) 31.500 37.500 75.000 N/N<br />
640 x 480 72Hz (VESA) 31.500 37.861 72.809 N/N<br />
800 x 600 56Hz (VESA) 36.000 35.156 56.250 N/N<br />
800 x 600 60Hz (VESA) 40.000 37.879 60.317 P/P<br />
800 x 600 75Hz (VESA) 49.500 46.875 75.000 P/P<br />
800 x 600 72Hz (VESA) 50.000 48.077 72.188 P/P<br />
1024 x 768 60Hz (VESA) 65.000 48.363 60.004 N/N<br />
1024 x 768 70Hz (VESA) 75.000 56.476 70.069 N/N<br />
1024 x 768 75Hz (VESA) 78.750 60.023 75.029 P/P<br />
1152 x 864 75Hz (VESA) 108.00 67.500 75.000 P/P<br />
1280 x 1024 60Hz (VESA) 108.00 60.000 60.000 P/P<br />
1280 x 1024 75Hz (VESA) 135.00 79.976 75.025 P/P<br />
Supported Video Mode<br />
480/60i, 480/60p,<br />
576/50i, 576/50p ,<br />
720/50p, 720/60p,<br />
1080/50i, 1080/60i,<br />
1080/24p, 1080/25p, 1080/30p, 1080/50p, 1080/60p
<strong>LVM</strong>-<strong>171WP</strong><br />
Product Specification<br />
Input<br />
Output<br />
Input Signal<br />
Analog Input Spec<br />
SDI Input Signal<br />
Formats<br />
Audio In<br />
Audio Out<br />
LCD<br />
Power<br />
1 x DVI- I DVI IN<br />
3 x BNC Analog Input<br />
2 x BNC SDI A/B Channel Input<br />
1 x HDMI HDMI Input<br />
3 x BNC Analog Output<br />
2 x BNC SDI A/B Channel (Active Through Out)<br />
Analog<br />
HD-SDI<br />
SD-SDI<br />
DVI<br />
HDMI<br />
Composite<br />
S -Video<br />
Component<br />
Composite / S-Video / Component / RGB<br />
1.458Gpbs<br />
270Mpbs<br />
4VESA/IBM Modes<br />
80i/480p/720p/1080i & VESA/IBM Modes<br />
1.0Vpp (With Sync)<br />
1.0Vpp (Y With Sync), 0.286Vpp(C)<br />
1.0Vpp (Y With Sync), 0.7Vpp (Pb,Pr)<br />
RGB<br />
1.0Vpp (G With Sync), 0.7Vpp (B,R)<br />
1080i (60/59.94/50)<br />
SMPTE-274M<br />
1080p (30/29.97/25/24/24sF/23.98/23.98sF)<br />
SMPTE-296M<br />
720p (60/59.94/50)<br />
SMPTE-260M<br />
1035i (60/59.94)<br />
SMPTE-125M<br />
480i (59.94)<br />
ITU-R BT.656<br />
576i (50)<br />
Embedded Audio<br />
Analog Stereo (Phone Jack)<br />
Analog Stereo (Phone Jack)/Stereo speaker<br />
Size 16.84”<br />
Resolution 1366 x 768 (16:9)<br />
Pixel Pitch<br />
0.273(H) x 0.273(V) mm<br />
Color<br />
16.7M(true), 24bit<br />
Viewing Angle<br />
H : 178 degrees / V : 178 degrees<br />
Luminance of white<br />
280 cd/ m2(Center)<br />
Contrast 900:1<br />
Display Area<br />
372.9 x 209.6 mm<br />
Power Consumption (Approx.) 72 Watts(Max. 6A)<br />
Operating Temperature<br />
Storage Temperature<br />
DC 12V/ DC 24V / AC 100~240V (50~60Hz)<br />
0°C to 40°C (32°F to 104°F)<br />
-20°C to 60°C ( - 4°F to 140°F)<br />
Main Body Dimensions (mm/inch) 427 x 310 x 90.5 (16.8 x 12.2 x 3.5)<br />
Main Body Dimensions (With Stand) 474 x 327 x 150 (18.6 x 12.8 x 5.9)<br />
Weight<br />
Accessory<br />
Option<br />
7Kg / 15.4 Lb<br />
AC Power cord, <strong>Manual</strong><br />
Carrying case, V-Mount, Hood, 19” Rack Mountable Kit, ND Filter<br />
17” Multi Format LCD Monitor 25<br />
* Above specifications may be changed without notice
<strong>LVM</strong>-<strong>171WP</strong><br />
Product Lineup<br />
<strong>LVM</strong>-071W<br />
1. LCD Resolution : 800 x 480 (15:9)<br />
2. Color : 16.7M(true), 24bit<br />
3. Contrast - 300 :1<br />
4. Viewing Angle : H (130) / V (115)<br />
5. Weight : 1Kg (2.2 lb)<br />
17” Multi Format LCD Monitor 26<br />
<strong>LVM</strong>-084<br />
1. LCD Resolution : 1024 x 768 (4:3)<br />
2. Color : 16.7M(true), 24bit<br />
3. Contrast - 400 :1<br />
4. Viewing Angle : 170<br />
5. Weight : 2.1Kg (4.63 lb)<br />
<strong>LVM</strong>-091W<br />
1. LCD Resolution : 800 x 480 (15:9)<br />
2. Color : 16.7M(true), 24bit<br />
3. Contrast - 350 :1<br />
4. Viewing Angle : 170<br />
5. Weight : 2.8Kg (6.17 lb)<br />
<strong>LVM</strong>-<strong>171WP</strong> / <strong>LVM</strong>-172W<br />
1. LCD Resolution : 1366 x 768 (16:9)<br />
2. Color : 16.7M(true), 24bit<br />
3. Contrast - 900 :1<br />
4. Viewing Angle : 178<br />
5. Weight : 7Kg (15.4 lb)<br />
<strong>LVM</strong>-241W / <strong>LVM</strong>-242W<br />
1. LCD Resolution : 1920 x 1200 (16:10)<br />
2. Color : 16.7M(true), 24bit<br />
3. Contrast - 800 :1<br />
4. Viewing Angle : 178<br />
5. Weight : 11Kg (24.2 lb)
<strong>LVM</strong>-<strong>171WP</strong><br />
Product Lineup<br />
<strong>LVM</strong>-322W<br />
1. LCD Resolution : 1366 x 768 (16:9)<br />
2. Color : 1 Billion(true), 30bit<br />
3. Contrast - 1100 :1<br />
4. Viewing Angle : 178<br />
5. Weight : 26Kg (57.3 lb)<br />
<strong>LVM</strong>-401W<br />
1. LCD Resolution : 1920 x 1080 (16:9)<br />
2. Color : 16.7M(true), 24bit<br />
3. Contrast - 1000 :1<br />
4. Viewing Angle : 178<br />
5. Weight : 35Kg (77.2 lb)<br />
<strong>LVM</strong>-461W<br />
1. LCD Resolution : 1920 x 1080 (16:9)<br />
2. Color : 16.7M(true), 24bit<br />
3. Contrast - 1000 :1<br />
4. Viewing Angle : 178<br />
5. Weight : 42Kg (92.6 lb)<br />
17” Multi Format LCD Monitor 27<br />
<strong>LVM</strong>-571W<br />
1. LCD Resolution : 1920 x 1080 (16:9)<br />
2. Color : 16.7M(true), 24bit<br />
3. Contrast - 1200 :1<br />
4. Viewing Angle : 178<br />
5. Weight : 57Kg (125.66 lb)
Optional Accessory<br />
ND Filter 17” 24” 40” External Filter 7” 9” Rack-Mountable Kit 7” 9” 17” 24”<br />
46” 57”<br />
Tripod Head 7” 9” V-Mount 17”<br />
Hood-&-Handle 7” 9”<br />
17”<br />
Carrying Case 17” 24” 32” 40” 46” 57”<br />
RACK MOUNT ANY DISPLAY UP TO 24”<br />
7 inch<br />
9 inch 17 inch 24 inch<br />
Developed by<br />
Digital Broadcasting System<br />
FOR MORE INFORMATION PLEASE VISIT : http://www.tvlogic.co.kr<br />
#914 Ace Techno Tower 9, 345-30 Gasan-dong, Geumcheon-gu, Seoul, 153-782, KOREA<br />
Tel : +82 - 2 - 2026 - 1333 Fax : +82 - 2 - 2023 - 1339 Email: support@tvlogic.co.kr