Extruded Rolscreen storm door installation - Pella.com
Extruded Rolscreen storm door installation - Pella.com
Extruded Rolscreen storm door installation - Pella.com

You also want an ePaper? Increase the reach of your titles
YUMPU automatically turns print PDFs into web optimized ePapers that Google loves.
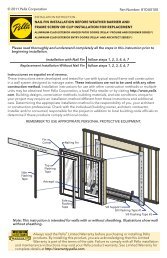
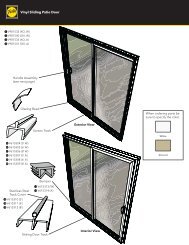
11 EXTERIOR SCREW COVERS<br />
A. Screw Covers: Starting flush at one end, install the horizontal screw cover strip by inserting the angled<br />
edge into the outer most track and pressing in place. Repeat this procedure for the two vertical screw<br />
covers starting at the top of the mounting frames.<br />
Note: Cut the vertical screw covers to match the length of the mounting frame by<br />
scoring with a utility knife, then snapping in two.<br />
Horizontal<br />
Screw<br />
Cover<br />
Vertical<br />
Screw<br />
Cover<br />
11A<br />
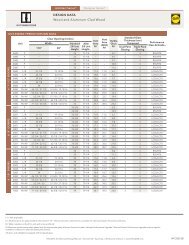
12 GLASS AND ROLSCREEN ® OPERATION<br />
A. Remove the shipping block(s) located between the top<br />
of the sash and the <strong>Rolscreen</strong> ® cover.<br />
Note: The <strong>Rolscreen</strong> is attached to the<br />
top of the glass panel and will fill the<br />
ventilation area as the glass is lowered.<br />
B. Locking the glass panel - slide the<br />
exterior glass upward and the sash lock<br />
will automaticaly engage.<br />
Sash<br />
Handle<br />
Screen (Attached)<br />
12B<br />
Sash Lock<br />
C. Unlocking the glass panel - press the<br />
sash lock button inward as shown and<br />
lower the glass panel. Slide the upper<br />
glass panel to any position for<br />
ventilation preference.<br />
Note: The <strong>Rolscreen</strong> will automatically<br />
retract as the glass slides upward.<br />
P ush<br />
T o Unlock<br />
S ash<br />
12C<br />
10