Installing Arduino and drivers - CGISS
Installing Arduino and drivers - CGISS
Installing Arduino and drivers - CGISS

Create successful ePaper yourself
Turn your PDF publications into a flip-book with our unique Google optimized e-Paper software.
Install, both <strong>Arduino</strong> <strong>and</strong> AmaSeis software programs:<br />
<strong>Installing</strong> <strong>Arduino</strong> <strong>and</strong> <strong>drivers</strong>: Setting up AmaSeis:<br />
1. Plug in the TC1 to the NERdaq amplifier, plug in the NERdaq into the computer using the usb cable.<br />
2. Some computers may see the new hardware, assign a com port number <strong>and</strong> try to help you load the<br />
<strong>Arduino</strong> <strong>drivers</strong>. Take note of the assigned com port number, <strong>and</strong> set up AmaSeis to that number.<br />
3. Some computers will require the following. Keep in mind, <strong>Arduino</strong>, does not need to run or be<br />
involved. You just need to load the <strong>Arduino</strong> software, <strong>and</strong> the <strong>drivers</strong>. Then you forget it.<br />
http://arduino.cc/en/Guide/UnoDriversWindowsXP<br />
Go to START/control panel/system/hardware/device manager/ports<br />
search<br />
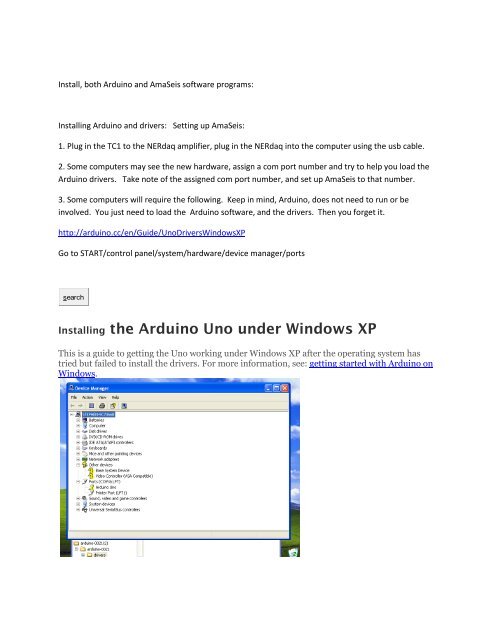
<strong>Installing</strong> the <strong>Arduino</strong> Uno under Windows XP<br />
This is a guide to getting the Uno working under Windows XP after the operating system has<br />
tried but failed to install the <strong>drivers</strong>. For more information, see: getting started with <strong>Arduino</strong> on<br />
Windows.
Go to Browse, <strong>and</strong> locate the installed <strong>Arduino</strong> software folder…. Wherever you installed it.<br />
ie C:/program files/<strong>Arduino</strong> or in my case I found it on my desktop.<br />
After you locate the <strong>Arduino</strong> folder, open it <strong>and</strong> highlight “Drivers” <strong>and</strong> click OK.<br />
That is the Browse path to the needed <strong>drivers</strong>.
Take note of the (com #___) as you will need to set AmaSeis to the same number.<br />
Close all this: If you were successful installing <strong>Arduino</strong> software, <strong>and</strong> installing the <strong>drivers</strong>.<br />
Now open AmaSeis: You may get a error, “Can’t open com port”, <strong>and</strong> then another error.<br />
This is because we need to set up AmaSeis. NOTICE, IF YOU GET THIS ERROR AFTER YOU<br />
WERE SUCESSFUL IN SETTING THINGS UP, IT MAYBE BECAUSE YOU HAVE ANOTHER<br />
AMASEIS, RUNNING AND MINIMIZED ON THE TASK BAR. YOU CAN ONLY HAVE ONE<br />
AMASEIS OPEN.<br />
Go to AmaSeis/settings/device..<strong>and</strong> select SEPuk1<br />
Go to AmaSeis/settings/com port, <strong>and</strong> change it to the same as indicated above, in the device<br />
manager exercise.<br />
Close AmaSeis <strong>and</strong> reopen….hopefully you will get no error this time.<br />
Go to Amaseis/settings/this station <strong>and</strong> enter your information.<br />
Go to AmaSeis/settings/helicorder <strong>and</strong> change the gain to 4.<br />
Go to AmaSeis/settings/show data values…in that window you should see a number flickering.<br />
That’s your data coming in. Leave this window open so you can monitor the numbers.<br />
Go to AmaSeis/settings/set zero level….change this number to about 32600. The objective here<br />
is to modify this set zero number, to whatever brings the Black data line, up or down to match<br />
<strong>and</strong> follow the Blue hour line on the helicorder screen. You can watch the flickering “show data<br />
values” window until it flickers close to zero. This maybe +10/-10……..or +100/-135, could be<br />
any numbers. Just keep changing the set zero level, until the Black data is following the Blue<br />
hour line on the screen.
You’re done. Just let it all quiet down, <strong>and</strong> readjust the numbers if needed.<br />
Ted Channel 208-286-4787 tchannel@cableone.net