Trimble NetRS Instructions - CGISS
Trimble NetRS Instructions - CGISS
Trimble NetRS Instructions - CGISS

You also want an ePaper? Increase the reach of your titles
YUMPU automatically turns print PDFs into web optimized ePapers that Google loves.
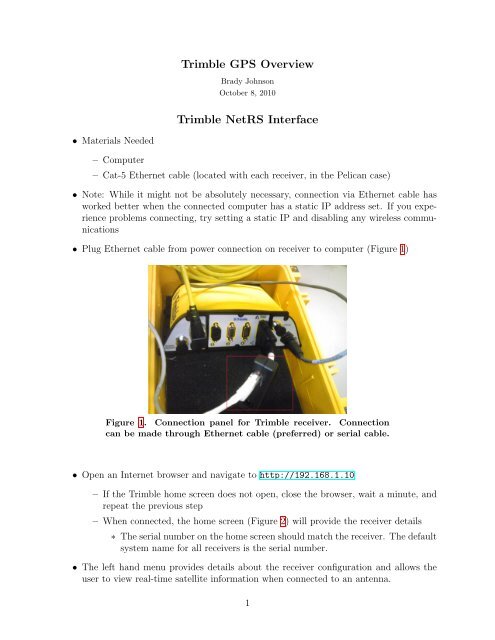
<strong>Trimble</strong> GPS OverviewBrady JohnsonOctober 8, 2010<strong>Trimble</strong> <strong>NetRS</strong> Interface• Materials Needed– Computer– Cat-5 Ethernet cable (located with each receiver, in the Pelican case)• Note: While it might not be absolutely necessary, connection via Ethernet cable hasworked better when the connected computer has a static IP address set. If you experienceproblems connecting, try setting a static IP and disabling any wireless communications• Plug Ethernet cable from power connection on receiver to computer (Figure 1)Figure 1. Connection panel for <strong>Trimble</strong> receiver. Connectioncan be made through Ethernet cable (preferred) or serial cable.• Open an Internet browser and navigate to http://192.168.1.10– If the <strong>Trimble</strong> home screen does not open, close the browser, wait a minute, andrepeat the previous step– When connected, the home screen (Figure 2) will provide the receiver details∗ The serial number on the home screen should match the receiver. The defaultsystem name for all receivers is the serial number.• The left hand menu provides details about the receiver configuration and allows theuser to view real-time satellite information when connected to an antenna.1
Figure 2. Screen shot of the <strong>Trimble</strong> home screen displayingreceiver details– Click ‘Satellites’ to display the current configuration of satellites and to view thesatellites that are currently sending information to the antenna∗ Reviewing this information during field setup is important to ensuring yourlocation has a clear sky view· Note: 8-10 Satellites seems to be common for relatively open spaces– Click ‘Data Logging’ to view your current recording session∗ Powering up the receiver will usually start the last logging program loadedto the receiver but clicking through this at setup will ensure the correctconfiguration file is running and data files are being saved∗ The ‘Session Name’ shows the current test (configuration file) that is running.∗ Click the test name to view the specifics· Current default is set for longer deployments with continuous collectionof satellite information but data files saved at 10 min intervals. Minimalpre-processing options are applied at the receiver but can be applied using<strong>Trimble</strong> Business Center processing software.· If you wish to make changes to this file, make sure to save the new fileusing a different name so others configuration files are not overwritten– Under ‘Data Logging’ on the left hand menu, click ‘Data Files’ to view the receivermemory.∗ Folders are created for each month with a sub folder for each day. Clickthrough to the current day and time to ensure your data are being recordedand files are being created.∗ An example file path is shown in figure 3. Default file names include thereceiver name (RS4921172725), date (20101006; October 06, 2010) and time(13:50 UTC).2
Figure 3. Screen shot of the <strong>Trimble</strong> home screen displayingreceiver details. Files can be saved directly from this screen.∗ Data can also be downloaded directly from the ‘Logged Date Files’ screen. Ifyou don’t have many files to download, the easiest way to get the files is toright-click the file name and save the file to your computer.· For larger sets of data, FTP can be used to automate the downloadingprocess3
OverviewCreating files to upload to OPUSIntroduction text from: http://www.ngs.noaa.gov/OPUS/about.htmlThis Online Positioning User Service (OPUS) provides you with simplified access to highaccuracyNational Spatial Reference System (NSRS) coordinates: all you need is a clear viewof the sky and a survey-grade Global Positioning System (GPS) receiver.OPUS processes your GPS data files with the same models and tools which help manage theNation’s Continuously Operating Reference Station (CORS) network, resulting in coordinateswhich are both highly accurate and highly consistent with other users. Your computedNSRS position is sent privately via email, and, if you choose, can also be shared publicly viathe NGS database.• Materials Needed– Computer– <strong>Trimble</strong> Data files (filename.T00)– RINEX conversion Software∗ http://www.trimble.com/trimblerinex_ts.asp– Dat2Rin software (including rinmerge.exe)∗ http://www.trimble.com/support_trl.asp?Nav=Collection-3621• Note: There are surely other ways around this process of converting raw files to RINEXfiles to piece together 10 min data to longer sets to upload to OPUS. If you find (orknow of) a routine less laborious please pass it on. That being said, the followingroutine works and allows the user to join (or segment) periods of time that can bebeneficial to processing using OPUS or <strong>Trimble</strong> Business Center (TBC)Convert to RINEX• Open Convert to to RINEX Program– Under ’File’, select ‘Open’. Select all files from the station.– The files will be scanned and you will be able to view data associated with eachfile∗ The file name can be changed by clicking to the right of the ‘RINEX file namew/o extension’ field. A shorter (or more descriptive name) can be helpful inmerging the files as that process is DOS based.∗ Under ‘File’, select ‘Convert Files’4
– The files are now in RINEX form and could be uploaded to OPUS if they were ofappropriate length.∗ OPUS uses two processors for computing absolute position· Rapid Static requires single data files between 15 mins and 2 hours· Static requires data greater than 2 hoursMerging Data files• Place rinmerge.exe in the folder(s) containing your raw data files• Open a DOS prompt and navigate to your RINEX files (We’ll be using the .10o files)– To combine 3 files into one file (mergedfile.10o) type the following command(spacing is important)∗ rinmerge filename1.10o+filename2.10o+filename3.10o mergedfile.10o– Warnings may appear in the DOS window pertaining to Unexpected Leap Secondsor unrecognized records in headers but should be followed by a ‘File mergesuccessful’ output.∗ Tip: The program has a tendency to crash when combining numerous files(7+). With 10 minute data files, I typically merge the files into hourly files,then combine hourly files into a daily file for upload to the Static OPUSprocessor.– The new file (with your given filename) should be in your folder and ready forupload to OPUSUpload to OPUS• Navigate to http://www.ngs.noaa.gov/OPUS/index.jsp (figure 4)– The ‘View’ and ‘About’ tabs have a wealth of knowledge and links about howOPUS works and links to other sources of information about processing and creatingfiles for upload– Enter the email address you want your solution sent∗ Note: OPUS doesn’t recognize my @u.boisestate.edu account. Maybe anisolated incident (maybe not) but just use another email if you get an ‘unrecognizedemail’ error– Upload your merged .10o file∗ You can upload multiple .10o files through a single .zip (must be .zip). Doingthis will not join .10o files. Each one will be processed separately and youwill receive individual reports for each file in the .zip– Select the TRM41249.00 <strong>Trimble</strong> Zephyr Geodetic with GP. This will include theoffsets listed on the antenna in elevation calculations5
Figure 4. Upload screen for OPUS– Add the antenna height based on the measurement you made in the field. Theantenna height is the distance between your measuring point and the base of theantenna (or top of the tripod mount)– Select a processor to use based on the length of your record and an email will besent within a few minutes∗ The options button allows you to select specific CORS to use (default optionwill pick the nearest operating stations) along with some specific projectionobjects. Most useful of the options is the ability to receive an .xml file ofthe results. TBC allows for the direct upload of .xml files which can serve aschecks (or absolute positions) for baseline calculations.6