

User Guide ADP186 / SDP & Cdp-Pro / Cdp-Scan ... - COMMON RAIL
User Guide ADP186 / SDP & Cdp-Pro / Cdp-Scan ... - COMMON RAIL
User Guide ADP186 / SDP & Cdp-Pro / Cdp-Scan ... - COMMON RAIL

You also want an ePaper? Increase the reach of your titles
YUMPU automatically turns print PDFs into web optimized ePapers that Google loves.
4.3 Configuration of Diagnostics unit – USB<br />
Note!<br />
- It is important that the software installation is finished before the Diagnostics unit is connected.<br />
- During installation of the software, drivers for the same directory are also installed and placed<br />
in the sub-directory ”../Drivers/USB/”. It is important to remember the location since it shall be<br />
used when installing the drivers.<br />
WinXP installation<br />
This guide refers to a new installation of <strong>ADP186</strong>/<strong>SDP</strong>/CDP USB, it is also assumed that the<br />
software for <strong>ADP186</strong>//<strong>SDP</strong>/CDP is already installed. (If you have not performed the installation<br />
but still want to install the USB drivers, you will find the zip-files on the CD....Driver\USB\)<br />
1: Connect the “power” cable to <strong>ADP186</strong>/<strong>SDP</strong> or connect CDP to power supply.<br />
Connect the USB-cable between tester and computer.<br />
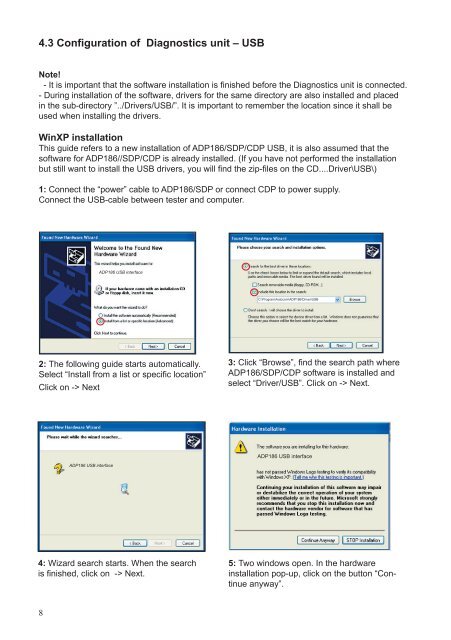
2: The following guide starts automatically.<br />
Select “Install from a list or specific location”<br />
Click on -> Next<br />
4: Wizard search starts. When the search<br />
is finished, click on -> Next.<br />
8<br />
<strong>ADP186</strong> USB interface<br />
<strong>ADP186</strong> USB interface<br />
C:\<strong>Pro</strong>gram\Autocom\<strong>ADP186</strong>\Driver\USB<br />
3: Click “Browse”, find the search path where<br />
<strong>ADP186</strong>/<strong>SDP</strong>/CDP software is installed and<br />
select “Driver/USB”. Click on -> Next.<br />
<strong>ADP186</strong> USB interface<br />
5: Two windows open. In the hardware<br />
installation pop-up, click on the button “Continue<br />
anyway”.