

User Guide ADP186 / SDP & Cdp-Pro / Cdp-Scan ... - COMMON RAIL
User Guide ADP186 / SDP & Cdp-Pro / Cdp-Scan ... - COMMON RAIL
User Guide ADP186 / SDP & Cdp-Pro / Cdp-Scan ... - COMMON RAIL

Create successful ePaper yourself
Turn your PDF publications into a flip-book with our unique Google optimized e-Paper software.
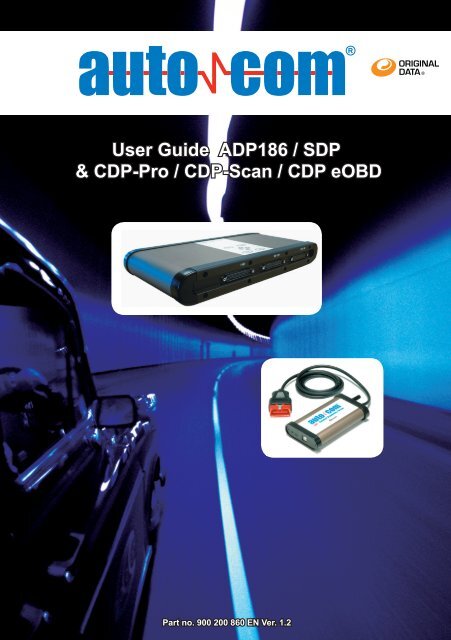
<strong>User</strong> <strong>Guide</strong> <strong>ADP186</strong> / <strong>SDP</strong><br />
& CDP-<strong>Pro</strong> / CDP-<strong>Scan</strong> / CDP eOBD<br />
Part no. 900 200 860 EN Ver. 1.2<br />
1
2<br />
1. TABLE OF CONTENTS<br />
1. Table of contents Page 2<br />
2. System requirements Page 2<br />
3. Hardware contents Page 3<br />
3.1 Hardware Connections Page 4<br />
4. Installing software & setting up hardware (PC) Page 5<br />
4.1 Installing software Page 5<br />
4.2 Configuration Diagnostics unit - Bluetooth Page 7<br />
4.3 Configuration Diagnostics unit - USB Page 8<br />
5. <strong>Guide</strong> for CDP / <strong>ADP186</strong> / <strong>SDP</strong> PC Page 10<br />
5.1 Help program Page 11<br />
5.2 Toolbox Page 11<br />
5.3 Hardware setup Page 12<br />
5.3.1 Update Firmware Page 13<br />
5.4 eOBD Page 14<br />
5.4.1 eOBD Functions Page 14<br />
5.5 OBD Page 15<br />
5.5.1 OBD Menu Page 15<br />
5.5.2 OBD Functions Page 15<br />
5.6 Parallel Page 16<br />
6. Installing software & setting up hardware (Pocket PC) Page 16<br />
6.1 Installation of software CDP Page 17<br />
6.1.1 Installation with SD-card Page 17<br />
6.1.2 Updating SD-card via PC/CD Page 17<br />
7 <strong>Guide</strong> for CDP-<strong>Pro</strong> / CDP-<strong>Scan</strong> Pocket PC Page 18<br />
7.1 Help program Page 18<br />
7.2 Settings Page 19<br />
7.3 Software settings Page 19<br />
7.4 Configuration Diagnostics unit - Bluetooth Page 20<br />
7.5 Hardware setup Page 20<br />
7.6 OBD Page 21<br />
7.6.1 OBD Functions Page 22<br />
7.7 eOBD Page 23<br />
7.7.1 eOBD Functions Page 23<br />
8. Copyright/Brand name Page 24<br />
9. WEEE Page 24<br />
10. Technical specification Page 24<br />
2. System requirements<br />
PC Minimum:<br />
- Windows 98SE/ME/2000/NT/<br />
XP*/Vista*<br />
- Pentium 300 MHz, or<br />
corresponding<br />
- Com-port RS232 or USB or<br />
Bluetooth<br />
- 128 MB internal memory<br />
- CD-ROM unit<br />
- 200-350 MB hard drive space<br />
- Resolution 800x600,<br />
256 colours<br />
PC Recommended:<br />
- Windows 2000/XP*/Vista*<br />
- Pentium 800 MHz<br />
- USB and Bluetooth<br />
- 256 MB internal memory<br />
- CD-ROM unit<br />
- Internet connection broadband<br />
- 200-350 MB hard drive space<br />
- Resolution 1024x768,<br />
High Color<br />
NOTE!<br />
Widescreen not supported<br />
Recommended Pocket PC:<br />
- HP IPAQ HX2190, HX2490,<br />
HX2790, hx2110, h2200,<br />
rx3715, h6340<br />
- Fujitsu Siemens<br />
Pocket LOOX 420<br />
- Dell Axim X50 416 MHz<br />
- QTEK S200<br />
- Acer n300<br />
Contact your supplier for a<br />
current list of recommended<br />
Pocket PC.<br />
* In order for the program to perform well on Windows XP/Vista, the selected “Windows style” must be ”Windows Classic”
3. Hardware contents<br />
Check the contents.<br />
CDP<br />
1. CDP<br />
2. Carry Case<br />
3. USB-cable<br />
4. Software (CD)<br />
5. Software (SD-card) for CDP Pocket PC<br />
2.<br />
<strong>ADP186</strong> / <strong>SDP</strong><br />
1. <strong>ADP186</strong> / <strong>SDP</strong><br />
2. Carry Case<br />
3. Power cable<br />
4. Adapter cables for parallel measuring (Not <strong>SDP</strong>)<br />
5. Software (CD)<br />
6. 16-pin OBD cable<br />
7. Measuring probes<br />
8. USB-cable<br />
9. PC-cable (RS232)<br />
3. 4. 5.<br />
1.<br />
<strong>ADP186</strong> / <strong>SDP</strong><br />
2. 3. 4.<br />
5. 6. 7. 8. 9.<br />
1.<br />
CDP-<strong>Pro</strong> / CDP-<strong>Scan</strong><br />
x 2<br />
3
4<br />
3.1 Hardware Connections<br />
CDP Connections / LED<br />
1. 16-pin OBD connector (J1962).<br />
2:1 Yellow LED (Link)- Indicates communication between tests and PC via USB.<br />
2:2 Green LED (Link)- Indicates communication between tests and PC via Bluetooth.<br />
3. Red LED (Pwr)- Indicates that tester is supplied with electric power.<br />
4. Green LED (Test)- Indicates communication between tester and vehicle.<br />
5. USB-connection for PC.<br />
6. Bluetooth antenna<br />
<strong>ADP186</strong> / <strong>SDP</strong> Connections / LED<br />
1. PC-9-pin connection for PC (RS232).<br />
2. USB-connection for PC.<br />
3. Bluetooth antenna (option).<br />
4. OBD-26-pin connection for OBD cable.<br />
5. AUX-15-pin connection for EDP8 and ABS-cable.<br />
6. P1- Connection for measuring probe (multimeter/oscilloscope).<br />
1.<br />
2.<br />
3. 4.<br />
5.<br />
7. P2- Connection (master) for measuring probe (multimeter/oscilloscope).<br />
8. EXT- 9-pin analogue connection (voltage connection).<br />
9. POWER- Voltage supply for tester.<br />
D1. Green LED- Indicates communication via USB.<br />
D2. Red LED- Indicates communication via Bluetooth.<br />
Control buttons 10-13 are used for<br />
remote control of parallel measuring.<br />
10. Enter, execute<br />
11. Esc, cancel<br />
12. Reset, restore<br />
13. Start and stop test<br />
14. Yellow LED- Power<br />
15. Green LED- Test<br />
16. Red LED- Fault<br />
Only applies to <strong>ADP186</strong>.<br />
D1, D2<br />
17. 1-62- 62-pin connection for parallel measuring.<br />
18. 63-124- 62-pin connection for parallel measuring.<br />
19. 125-186- 62-pin connection for parallel measuring.<br />
<strong>ADP186</strong> / <strong>SDP</strong><br />
1. 2. 3. 4. 5. 6. 7. 8. 9.<br />
<strong>ADP186</strong><br />
17.<br />
18.<br />
19.<br />
6.<br />
10.<br />
11.<br />
12.<br />
13.<br />
14.<br />
15.<br />
16.
2.<br />
4. Installing program & setting up hardware (PC)<br />
New software must be installed before you can use your new product,<br />
and the hardware must be configured.<br />
4.1 Installation of software.<br />
4.2 / 4.3 Configuration of Bluetooth / USB. Installation of drivers.<br />
NOTE! It is possible to select to configure one of these, or to use connection via<br />
Com-port (RS232) for <strong>ADP186</strong> / <strong>SDP</strong>. Does not require any configuration.<br />
Only use one of the connection possibilities between PC and tester.<br />
Following installation, the hardware must be configured. This is described in ch. 5.3<br />
4.<br />
4.1 Installation of software<br />
Installing and updating software via CD-ROM.<br />
1.<br />
5.<br />
3.<br />
1: Place the CD in the computer's CDreader.<br />
The installation starts automatically.<br />
If the installation does not start.<br />
- Select “Run” in the computer's “Start”<br />
menu.<br />
- Write D:\Start (applies if the CD-reader<br />
is D:).<br />
Follow the instructions on the screen:<br />
2: Enter your distributor ID. The ID-number<br />
is found on the CD cover.<br />
A “splash window” opens where it is possible<br />
to select the installation you want.<br />
Click on the button ”Install”.<br />
3: Select language for the installation<br />
and press the button “OK”.<br />
4: Welcome, press “Next” to continue.<br />
5: Read Me File “News in the software”,<br />
press “Next” to continue.<br />
5
6<br />
6: Continue and select the location where<br />
you want to install the program.<br />
You can browse by pressing the button<br />
“Browse”.<br />
8: Enter the information about your company.<br />
The information will be stored and<br />
shown when the test result is printed out.<br />
(The information can be changed in the<br />
program.)<br />
10: You are now ready to install the<br />
program, press on the ”Next”-button.<br />
12: The installation is finished, press<br />
”Finish” to complete the installation.<br />
7: Select the components that are to<br />
be installed.<br />
9: Mark the box if you want to create a<br />
shortcut on the desktop.<br />
11: Enter the hardware key that is<br />
found on the CD cover.<br />
13: Restart the computer after the<br />
installation.
4.2 Configuration of Diagnostics unit - Bluetooth<br />
Note!<br />
- The computer's Bluetooth unit must be installed correctly and support Bluetooth Virtual Comport<br />
(SPP – Serial Port <strong>Pro</strong>file).<br />
- Follow Microsoft's instructions when installing the Bluetooth unit on Microsoft Windows XP<br />
Service Pack 2 (SP2).<br />
- If you install a Bluetooth unit on another operative system than Windows XP Service Pack 2<br />
(SP2) or with another Bluetooth stack than Microsoft, follow the manufacturer's instructions on<br />
how to install the unit as well as connect to hardware via Bluetooth Virtual Comport (SPP – Serial<br />
Port <strong>Pro</strong>file).<br />
1.<br />
2.<br />
3.<br />
4.<br />
Quickguide for addition of Bluetooth units with pairing/passkey.<br />
1. Start -> Settings -> Control panel -> Bluetooth<br />
2. In the ‘Bluetooth Devices’ window, click on the ‘Devices’-tab if it is not<br />
already open. Here you can see all units that have been listed<br />
by the computer. For a new connection, click on the button “Add”.<br />
NOTE! Make sure that the diagnostics unit is connected to vehicle<br />
or<br />
other electric power source. Check “Power” light<br />
3. In ‘Add Bluetooth Device Wizard’, make sure that the checkbox is<br />
checked before you continue.<br />
4. Select the unit you want to add. Then click on “Next“.<br />
The diagnostics unit is listed as a ‘Serial Comport’.<br />
5. In the “passkey” window (see below), select ‘Let me choose my own<br />
passkey’ (Choose own passkey). Then enter zero “0“ in the text field.<br />
Click on “Next“.<br />
6. Now Windows tries to install the unit with all given parameters.<br />
7. Click on “Finish” to complete Bluetooth<br />
Device Wizard. Now you are ready to get started!!<br />
NOTE! Use Outgoing Comport in the Diagnostics program.<br />
5. 6. 7.<br />
7
4.3 Configuration of Diagnostics unit – USB<br />
Note!<br />
- It is important that the software installation is finished before the Diagnostics unit is connected.<br />
- During installation of the software, drivers for the same directory are also installed and placed<br />
in the sub-directory ”../Drivers/USB/”. It is important to remember the location since it shall be<br />
used when installing the drivers.<br />
WinXP installation<br />
This guide refers to a new installation of <strong>ADP186</strong>/<strong>SDP</strong>/CDP USB, it is also assumed that the<br />
software for <strong>ADP186</strong>//<strong>SDP</strong>/CDP is already installed. (If you have not performed the installation<br />
but still want to install the USB drivers, you will find the zip-files on the CD....Driver\USB\)<br />
1: Connect the “power” cable to <strong>ADP186</strong>/<strong>SDP</strong> or connect CDP to power supply.<br />
Connect the USB-cable between tester and computer.<br />
2: The following guide starts automatically.<br />
Select “Install from a list or specific location”<br />
Click on -> Next<br />
4: Wizard search starts. When the search<br />
is finished, click on -> Next.<br />
8<br />
<strong>ADP186</strong> USB interface<br />
<strong>ADP186</strong> USB interface<br />
C:\<strong>Pro</strong>gram\Autocom\<strong>ADP186</strong>\Driver\USB<br />
3: Click “Browse”, find the search path where<br />
<strong>ADP186</strong>/<strong>SDP</strong>/CDP software is installed and<br />
select “Driver/USB”. Click on -> Next.<br />
<strong>ADP186</strong> USB interface<br />
5: Two windows open. In the hardware<br />
installation pop-up, click on the button “Continue<br />
anyway”.
6: After a few seconds, the first part of the<br />
installation is done. Click on -> Finish.<br />
C:\<strong>Pro</strong>gram\Autocom\<strong>ADP186</strong>\Driver\USB<br />
8: Next window asks for search of a driver or<br />
make a selection in a list. Select -> “Search<br />
“. Enter the same search path as in step 3.<br />
Click on -> Next.<br />
<strong>ADP186</strong> Serial Port<br />
<strong>ADP186</strong> USB interface <strong>ADP186</strong> Serial Port<br />
10: Two windows open. In the hardware installation<br />
pop-up, click on the button -> “Continue<br />
anyway”.<br />
7: This is the second part of the USB installation.<br />
This installation creates a virtual com-port.<br />
Select“Install from a list or specific location”.<br />
Click on -> Next.<br />
<strong>ADP186</strong> Serial Port<br />
9: Wizard search starts. When the<br />
search is finished, click on -> Next.<br />
<strong>ADP186</strong> Serial Port<br />
11: After a few seconds, the second part of<br />
the installation is done. Click on -> Finish.<br />
Now the diagnostics unit is ready!<br />
9
18.<br />
10<br />
5. <strong>Guide</strong> for CDP / <strong>ADP186</strong> / <strong>SDP</strong> PC<br />
Main window and Car selection.<br />
10.<br />
11.<br />
14.<br />
20.<br />
1. 2. 3. 4. 5. 6.<br />
1. Exit the program.<br />
2. Help (starts the help program).<br />
3. Toolbox.<br />
4. eOBD (starts the eOBD/OBDII program).<br />
5. OBD.<br />
6. Parallel measring (only applies to <strong>ADP186</strong>).<br />
7. Auto Expert System (wiring diagrams, etc.).<br />
8. Notes.<br />
9. Measuring functions (BOB, multimeter, oscilloscope, etc.).<br />
10. Here you select the brand name to be tested.<br />
11. Here you select model.<br />
12. Here you select model year.<br />
13. Here you select the system type to be tested.<br />
14. Her you select engine designation or system type.<br />
15. This shows the cylinder volume for selected engine.<br />
16. This shows/selects system depending on choice of system type.<br />
17. This shows the number of pins in the control unit.<br />
18. Shows type of transmission/drive.<br />
19. This shows/selects equipment depending choice of system.<br />
20. Shows the selected system type.<br />
21. Shows user's choices.<br />
22. Shows information about the vehicle.<br />
15.<br />
21.<br />
7. 8. 9.<br />
22.<br />
System type (pos. 13)<br />
Fuel<br />
Ignition<br />
12.<br />
Fuel/ignition<br />
Diesel<br />
13.<br />
ABS (Brake)<br />
16.<br />
17.<br />
19.<br />
Transmission (AT)<br />
Instruments<br />
Immobiliser/<br />
Start lock-out<br />
Air<br />
conditioning<br />
SRS (Airbag)<br />
Multi-function/<br />
Central control unit<br />
Service Reset
5.1 HELP PROGRAM<br />
Clicking on the ”Help”-button opens the help program.<br />
If you select a box or button in the program and press on the F1-button on<br />
the keyboard, the applicable help section is shown.<br />
5.2 TOOLBOX<br />
Clicking on “Toolbox” gives you access to functions for setting the<br />
program and the hardware.<br />
Language<br />
Select language in which program shall run.<br />
Archive<br />
Here you find all saved tests in a library.<br />
Workshop<br />
This is where information about the workshop is entered.<br />
This information is found on printouts of tests, etc.<br />
About Autocom<br />
Information on how to reach customer support for the product as well as<br />
information about the program's versions.<br />
It is also possible to add Hardware key and view Release information with<br />
news in the database.<br />
Hardware configuration<br />
This is where you perform settings of hardware and updates of Firmware (the<br />
program code that controls the Diagnostics unit). This is described more in the<br />
next chapter.<br />
11
Hardware configuration (firmware download): Here it is possible to check what hardware and<br />
communication port to use. After installing the program for the first time or after a program<br />
update, a new hardware configuration must be performed. NOTE! For ”Hardware configuration”,<br />
the tester must be connected to PC and supplied with electric power.<br />
The first time that you use the tester, you must make sure that the correct settings<br />
have been performed. Follow the instructions below.<br />
Settings<br />
In ”Settings”, select Com-port for the tester.<br />
By clicking on arrow down, the different Com-port alternatives will be shown.<br />
Go to the top of the list to see all available com-ports that are installed on the computer.<br />
These are designated -----System Comports-----. USB is designated ‘Virtual Comport’ in the<br />
list.<br />
NOTE! When using USB or Bluetooth, a driver must be installed before the Com-port is<br />
available for selection.<br />
Select the Com-port to be used and click on ”Test”. If the program finds the tester, ”OK” will<br />
be shown. If “Error!” is obtained as result, restart the tester by disconnecting electric power<br />
for a short time and try again.<br />
Repeat the step for EOBD.<br />
12<br />
5.3 HARDWARE SETUP
The information found under the ”Test”-button is as follows:<br />
a) Shows type of tester (<strong>ADP186</strong> / CDP)<br />
b) Shows type of communication (RS232/USB/Bluetooth)<br />
c) Shows hardware's serial number<br />
d) Shows version of Firmware<br />
5.3.1 Update Firmware<br />
When you click ”Test” in settings and OK is shown on the screen, everything is ready to<br />
update Firmware in the tester. This is done by clicking on the tab <strong>ADP186</strong> / <strong>SDP</strong>, CDP, or<br />
EOBD depending on which hardware you have.<br />
For updating, follow the instructions on the screen and click on the button ”Update”.<br />
The following will happen:<br />
a) Status row starts to fill with blue squares.<br />
b) When the update is done, ”Update finished!” is shown in the window.<br />
c) Now the Firmware is updated and the tester is ready to be used.<br />
NOTE! Time may vary depending on which communication type is used.<br />
If the update fails, check the following:<br />
- that the tester is supplied with electric power.<br />
- that USB, RS232, or Bluetooth is connected/on-line between PC and tester.<br />
- that the right Com-port is selected in the program.<br />
13
14<br />
5.4 eOBD (European On Board Diagnostic)<br />
eOBD is a standard decided by the EU member<br />
states. The mainpurpose of the standard<br />
is to provide authorities with a tool to check<br />
that exhaust emissions from automobiles follow<br />
established legislation. According to law,<br />
all automobiles powered by gasoline, sold<br />
within the EU from January 2001 must meet<br />
the eOBD standard (EU directive 98/69/EC).<br />
An adapted version of the standard for gas or<br />
diesel-powered automobiles came into effect<br />
on January 1, 2005.<br />
5.4.1 eOBD Functions<br />
Settings - Language, Archive, Workshop,<br />
"About" the program and hardware setup.<br />
Information - Available control units, communication standard,<br />
MIL status and Readiness test status.<br />
Read Fault codes* - Reading out permanent and intermittent Fault codes.<br />
Erase Fault codes - Erasing Fault codes and diagnostic information.<br />
Real-time data - Lists with data parameters (values) from selected control unit.<br />
Updated continuously.<br />
Freeze frame data - Stored data parameters.<br />
Lambda - Reading out lambda values.<br />
Non-continuous tests - Defi ned by vehicle<br />
supplier.<br />
Diagnostics checks - Listed tests that are available per control unit.<br />
Car information - Shows chassis number, calibration<br />
information number, and calibration verifi cation number.<br />
* There may be error codes that are brand-specifi c. These are not supported by the<br />
eOBD standard and therefore these are shown as brand-specifi c in the program.
5.5 OBD (On Board Diagnostic)<br />
Since 1994-1996, most modern automobiles<br />
have a 16-pin diagnostics socket. According<br />
to standard, the socket shall be placed within a<br />
radius of one metre from the driver's seat, most<br />
often under or close to the instrument panel.<br />
Adapter cables are available for cars with other<br />
OBD-connectors.<br />
OBD means that the tester communicates with<br />
selected control unit and writes and reads data.<br />
5.5.1 OBD Menu<br />
Flash-OBD makes it possible to read and erase error codes<br />
and turn off service lights, in certain cases.<br />
OBD is vehicle-specifi c diagnosis with different possibilities on different vehicles.<br />
The functionality is controlled by the vehicle manufacturer. See description below.<br />
eOBD-button is active when it is verifi ed that the vehicle supports the eOBD-standard.<br />
SCAN is available on a number of car brands. The function reads off all<br />
control systems in the car and shows if there are error codes saved.<br />
5.5.2 OBD Functions<br />
Read Fault codes - Reading out<br />
permanent and intermittent Fault<br />
codes.<br />
Erase Fault codes - Erasing Fault<br />
codes and diagnostic information<br />
Activation - Activates selected<br />
components in the system.<br />
Real-time data -Show data<br />
parameters (values) in real-time.<br />
Adjusting / Self-test - Adjusts and restores<br />
the system and also special functions<br />
such as self-test of the system.<br />
<strong>Pro</strong>gramming - Writes data to<br />
the system. E.g. <strong>Pro</strong>gramming of keys.<br />
Continuous test - Function to activate<br />
continuous test.<br />
Stop - Stops continuous test.<br />
15
5.6 PARALLEL<br />
Parallel measurement enables diagnosis of Engine, ABS, Air conditioning, etc. via direct connection<br />
to the control unit. Using an adapter cable, <strong>ADP186</strong> is connected between the control unit<br />
and the vehicle's cable harness. It is possible to perform measurements on all components and<br />
sensors in the system. With different measuring functions, such as Ground & Component test,<br />
Automatic test, and Running test, it is easy to determine what the problem is in the vehicle.<br />
Functions<br />
Ground and Component test - Loaded measurement of grounding points and resistance<br />
measurement of selected components.<br />
6. Installing software & setting up hardware for Pocket PC<br />
Software must be installed and the hardware must be confi gured before you can use your<br />
new product.<br />
Contact your supplier for a current list of recommended Pocket PC.<br />
Important!<br />
1) Make sure that the battery in your Pocket PC is fully charged. The installation may take up to 10<br />
– 20 minutes. To be sure, connect the battery charger during the installation.<br />
2) Under no circumstances may cable or SD-card be removed during the installation<br />
6.1 Installation of software.<br />
7.3 Software settings<br />
7.4 Confi guration of Bluetooth.<br />
7.5 Hardware setup<br />
16<br />
NOTE! Only applies to <strong>ADP186</strong>!<br />
Workshop test Step by Step - Measuring of all grounding points, supply voltages, input<br />
signals, and output signals in the system.<br />
Workshop test Automatic - Same as Workshop test Step by Step, but with automatic<br />
process.<br />
Information test - Continuous measuring of selected components/signals.<br />
Download Running test - Automatic test while driving. Downloaded in <strong>ADP186</strong> for<br />
running test on the road.<br />
Retrieve Running test - Reads out the measuring results of the running test from<br />
<strong>ADP186</strong>.
6.1 Installation of Software on Pocket PC<br />
6.1.1 Installation of SD-card<br />
1. Make sure that the lock-out on the SD-card is in position “ON”.<br />
2. Insert the SD-card in your Pocket PC. Installation of the<br />
program will now take place automatically. NOTE! If this does<br />
not occur, remove the SD-card for a few seconds and then<br />
reinsert it.<br />
3. The program will ask if you want to start the installation.<br />
Click on ”Yes” to proceed.<br />
4. The program will now ask you for distributor ID.<br />
The ID-code is found on the CD cover. Enter approved ID-code,<br />
click on ”OK”. If you have lost your ID-code, please contact your supplier.<br />
5. Now the software is installed on your Pocket PC. If a message appears that<br />
informs that the program already is installed, click ”OK” to perform a new installation.<br />
Questions may appear if you want to install ”reinstall” certain components. Press OK to<br />
complete the installation. If you get a message informing that the program is designed<br />
for an earlier version of Windows Mobile, this will in no way affect the program.<br />
Click on ”OK” to complete the installation.<br />
How to start the CDP Pocket PC program:<br />
Alt.1 First click on the start menu, then click on ”<strong>Pro</strong>gram”, click on the CDP-icon to start the diagnostics<br />
program. See Pocket PC user guide to create shortcuts, etc.<br />
Alt.2 The program will start automatically by removing and reinserting the SD-card in the<br />
Pocket PC. NOTE! Wait a few seconds before reinserting the SD-card.<br />
NOTE! The SD-card must always be in the Pocket-PC when you are going to use the program.<br />
6.1.2 Updating SD-card via PC/CD<br />
1. Check that the program “ActiveSync” is installed on your computer. The program enables<br />
synchronization between Pocket PC and PC.<br />
2. Connect the Pocket PC to your PC. NOTE! Cable for synchronization is supplied with the<br />
Pocket PC.<br />
3. Check that the SD-card is in your Pocket PC and that the switch on the SD-card is in position<br />
”ON”.<br />
4. Follow the instructions on the PC.<br />
5. Now the installation on the SD-card takes place similar to that described above.<br />
Follow the instructions!<br />
6. When the installation is finished, remove the SD-card and wait a few seconds before<br />
reinserting it. Now the program will start automatically.<br />
The installation results in a CDP-<strong>Scan</strong><br />
which is updated to CDP-<strong>Pro</strong> via setup<br />
of software. See 7.3<br />
17
7. <strong>Guide</strong> for CDP-<strong>Pro</strong> / CDP-<strong>Scan</strong> Pocket PC<br />
Main functions in the CDP-program.<br />
18<br />
OBD (On Board Diagnostic). Reading out Fault codes and parameters from each selected<br />
system (engine, ABS, SRS, ACC, etc.) via the vehicle's diagnostics system, OBD.<br />
eOBD (European On Board Diagnostics). Reading out Fault codes and parameters<br />
according to the eOBD standard. Applies to emissions-related systems (engine and automatic<br />
transmission).<br />
Settings. Input of workshop information, language, hardware settings, as well as program<br />
settings.<br />
About. System information, support information, and program version information.<br />
Finish. Click on the button to finish.<br />
Battery. Shows remaining battery capacity in your PDA.<br />
Help. Click on the question mark to find the information you are looking for.<br />
7.1 HELP PROGRAM<br />
Click on the “Help”-button to open the help program.<br />
The help refers to the chapter in question.
7.2 SETTINGS<br />
In settings, it is possible to perform language settings, enter<br />
workshop information, and configure hardware and software.<br />
Workshop<br />
This is where information about the workshop is entered. This information<br />
is found on printouts of tests, etc.<br />
Language<br />
Here you select the main language in which the program runs.<br />
Hardware setup<br />
This is where you perform settings of hardware and updates of Firmware (the<br />
program code that controls the Diagnostics unit). This is described more in the<br />
next chapter.<br />
Software settings<br />
Software keys are added here to unlock functionality.<br />
7.3 Software settings<br />
Set-up of software only for CDP-<strong>Pro</strong> Pocket PC<br />
1. Start the CDP program in your Pocket PC.<br />
2. Click on ”Settings” .<br />
3. In ”Settings”, click on ”Software settings” .<br />
4. In ”<strong>Pro</strong>gram settings”, click on ”License keys” .<br />
5. Now enter the supplied ”License key” and click on ”Add key”.<br />
6. Available modules should now be shown with a ”Yes”.<br />
7. Click on the ”Finish”-button to return to the main menu.<br />
8. The tester is now ready to be used.<br />
NOTE! Since the CDP uses wireless<br />
Bluetooth, there is no need for<br />
a cable between Pocket PC and<br />
CDP.<br />
19
7.4 Configuration of Diagnostics unit- Bluetooth<br />
Important! To enable a ”Bluetooth set-up” the CDP must be connected to a vehicle (the CDP<br />
must be supplied with voltage). See the service manual to find the diagnostics socket.<br />
1. Start the CDP program in your Pocket PC.<br />
2. Click on ”Settings” .<br />
3. In ”Settings”, click on ”Hardware configuration” .<br />
4. In ”Hardware configuration”, click on ”Bluetooth” .<br />
5. In ”Bluetooth”, the program will automatically search for the hardware. If you do not find the<br />
hardware in the list, a new search is performed.<br />
6. When the hardware has been found and the serial number is shown in the list, select the row<br />
with your hardware (serial number). The serial number will now be shown in the field ”Serial no.”.<br />
7. Enter the hardware key, for your tester, in the field ”Hardware key”.<br />
8. Click on the ”Back”-button .<br />
9. In the menu for ”Hardware configuration”, click on the ”Finish”-button to return to the<br />
main menu.<br />
7.5 Hardware setup<br />
Important! To enable a ”Hardware setup”, the CDP must be connected to a vehicle (the CDP<br />
must be supplied with voltage). See the service manual to find the diagnostics socket.<br />
1. Start the CDP program in your Pocket PC.<br />
2. Click on ”Settings” .<br />
3. In ”Settings”, click on ”Hardware configuration” .<br />
4. In ”Hardware configuration”, click on ”Update firmware” .<br />
5. To update firmware, click on ”Yes” (Note! Time approx. 15 min.).<br />
6. When firmware is updated, ”Firmware download successful. Firmware version:<br />
xxxx”.<br />
7. Click on the ”Finish”-button to return to the main menu.<br />
8. The tester is now ready to be used.<br />
NOTE! When updating program or in case of new installation, always perform ”Hardware configuration”.<br />
20
7.6 OBD<br />
Since 1994-1996, most modern automobiles have a 16-pin diagnostics socket. According<br />
to standard, the socket shall be placed within a radius of one metre from the driver's seat, most<br />
often under or close to the instrument panel. Adapter cables are available for cars with other<br />
OBD-connectors. Information about which cable shall be used is included in the car selection<br />
(Step 9 “Connect”).<br />
Step 1: Select ”Brand”<br />
and click on next<br />
Step 3: Select ”Year” and<br />
click on next .<br />
See the different system selections<br />
below.<br />
Ignition system<br />
Fuel/ignition system<br />
Fuel system<br />
Diesel<br />
ABS (anti-lock brakes)<br />
Instrument (service lights)<br />
Step 2: Select ”Model” and click on next.<br />
If you want to undo your selection,<br />
click on the back-button and go one<br />
step back in the OBD-menu.<br />
Step 4: Select ”System type”<br />
and click on next .<br />
Transmission (automatic)<br />
Immobilizer<br />
SRS (Airbag)<br />
AC (air conditioning)<br />
SCAN is available on a<br />
number of car brands.<br />
The function reads off<br />
all control systems in<br />
the car and shows if<br />
there Fault codes are<br />
saved.<br />
Multi-function (radio, 4WD, chassis, etc.)<br />
21
Step 5: Select ”Engine designation<br />
/ System” and click on next<br />
. For information on engine<br />
designation's placement, click on<br />
”Information”.<br />
Step 8: Select equipment. In certain<br />
cases it is not possible to choose between<br />
different alternatives. In these<br />
cases, just click on next .<br />
7.6.1 OBD FUNCTIONS<br />
22<br />
Step 6: Select ”System /<br />
Name” and click on next<br />
.<br />
Step 7: Select “Transmission”<br />
and click on next<br />
.<br />
Step 9: “Connect”. Click “OBD“ to start communication<br />
with the selected system in the<br />
car. The entire selection is shown in the info<br />
window. For certain<br />
engine systems, it is also possible to select<br />
eOBD.<br />
Read Fault codes - Reads Fault codes that are stored in the selected control system.<br />
Erase Fault codes - Erases all codes in the selected control system.<br />
In certain cases, the ignition has to be turned off and on in order to erase the codes.<br />
Real-time data - Reads parameter value in real-time. *<br />
Activate components - Activates selected components in the system. *<br />
Adjust - Adjusts and sets components and functions in the control system. *<br />
<strong>Pro</strong>gram ECU - Writes data to the control system. *<br />
* Only applies to CDP-<strong>Pro</strong><br />
7.7 eOBD (European On Board Diagnostic)<br />
eOBD is a standard decided by the EU member states. The mainpurpose of the standard<br />
is to provide authorities with a tool to check that exhaust emissions from automobiles follow<br />
established legislation. According to law, all automobiles powered by gasoline, sold within<br />
the EU from January 2001 must meet the eOBD standard (EU directive 98/69/EC). An adapted<br />
version of the standard for gas or diesel-powered automobiles came into effect on January 1,<br />
2005.<br />
7.7.1 eOBD FUNCTIONS<br />
Information - Available control units, communication standard,<br />
MIL status and Readiness test status.<br />
Read Fault codes* - Reading out permanent and intermittent Fault codes.<br />
Erase Fault codes - Erasing Fault codes and diagnostic information.<br />
Real-time data - Lists with data parameters (values) from selected control unit.<br />
Updated continuously.<br />
Freeze frame data - Stored data parameters.<br />
Lambda - Reading out lambda values.<br />
Non-continuous tests - Defi ned by vehicle supplier.<br />
24<br />
8. Copyright/Brand name<br />
Reproduction is strictly prohibited without written permission from Autocom Diagnostic<br />
Partner AB. <strong>Pro</strong>tected by copyright since 1991, Autocom Diagnostic Partner<br />
AB. Autocom and Autocom's logotype are brand names belonging to Autocom<br />
Diagnostic Partner AB.<br />
9. WEEE (Waste Electrical and Electronic Equipment)<br />
This label shows that the product is manufactured after August 13, 2005,<br />
and therefore it shall be recycled according to WEEE (EU directive<br />
2002/96/EC for electrical and electronic equipment waste). Contact your<br />
local dealer for more information.<br />
10. Technical specification<br />
<strong>ADP186</strong> / <strong>SDP</strong><br />
Meets EU directive 89/336/EEC and<br />
73/23/EEC<br />
Dimensions: 370 x 185 x 45 (mm)<br />
Weight: 1.9 kg<br />
Voltage supply: 9-32 Volt<br />
Current consumption: 270 mA<br />
Operating temperature: 0-70 ºC<br />
Measuring range:<br />
Voltage: 0-200 Volt (+/- 0.5%)<br />
Frequency: 0-15 kHz (resolution 1 Hz)<br />
Resistance: 0-10 kOhm (+/- 2%)<br />
Please feel free to contact us, if there is anything you wonder about or if<br />
there is anything you want to tell us.<br />
Autocom Diagnostic Partner AB<br />
Grafitvägen 23 B<br />
461 38 Trollhättan<br />
Telephone: +46 (0)520 - 470700<br />
Fax: +46 (0)520 - 470727<br />
E-mail: info@autocom.se<br />
Web: www.autocom.se<br />
CDP<br />
Thank you for choosing our products!<br />
Notes:<br />
Autocom Diagnostic Partner AB, 2006<br />
Meets EU directive 89/336/EEC and<br />
73/23/EEC<br />
Dimensions: 180 x 90 x 30 (mm)<br />
Weight: 0.5 kg<br />
Voltage supply: 9-32 Volt<br />
Current consumption: 150 mA<br />
Operating temperature: 0-70 ºC