built-in refrigerator / refrigerador para empotrar - Avanti Products
built-in refrigerator / refrigerador para empotrar - Avanti Products
built-in refrigerator / refrigerador para empotrar - Avanti Products

Create successful ePaper yourself
Turn your PDF publications into a flip-book with our unique Google optimized e-Paper software.
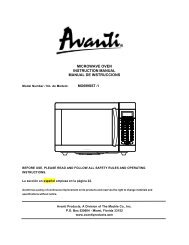
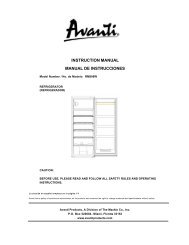
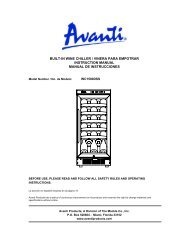
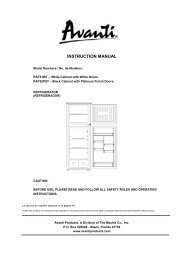
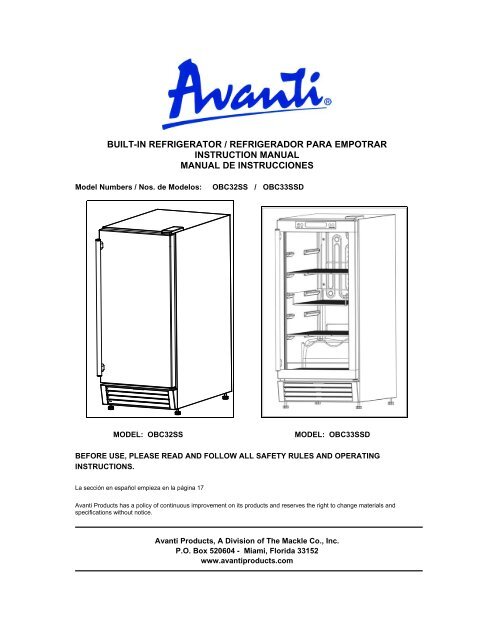
BUILT-IN REFRIGERATOR / REFRIGERADOR PARA EMPOTRAR<br />
INSTRUCTION MANUAL<br />
MANUAL DE INSTRUCCIONES<br />
Model Numbers / Nos. de Modelos:<br />
OBC32SS / OBC33SSD<br />
MODEL: OBC32SS<br />
MODEL: OBC33SSD<br />
BEFORE USE, PLEASE READ AND FOLLOW ALL SAFETY RULES AND OPERATING<br />
INSTRUCTIONS.<br />
La sección en español empieza en la pág<strong>in</strong>a 17<br />
<strong>Avanti</strong> <strong>Products</strong> has a policy of cont<strong>in</strong>uous improvement on its products and reserves the right to change materials and<br />
specifications without notice.<br />
<strong>Avanti</strong> <strong>Products</strong>, A Division of The Mackle Co., Inc.<br />
P.O. Box 520604 - Miami, Florida 33152<br />
www.avantiproducts.com
TABLE OF CONTENTS<br />
Appliance Safety 3<br />
Important Safeguides 4<br />
Help Us Help You … 5<br />
Parts and Features (Model: OBC32SS) 6<br />
Parts and Features (Model: OBC33SSD) 7<br />
Important Safety Instructions 8<br />
Installation Instructions 8<br />
Before Us<strong>in</strong>g Your Refrigerator 8<br />
Installation of Your Refrigerator 8<br />
Install<strong>in</strong>g the Level<strong>in</strong>g Legs or Casters 9<br />
Electrical Connection 10<br />
Extension Cord 10<br />
Surge Protector 10<br />
Operat<strong>in</strong>g Your Refrigerator (Model: OBC32SS) 11<br />
Revers<strong>in</strong>g the Door Sw<strong>in</strong>g of Your Appliance (Model: OBC32SS ONLY) 11<br />
Operat<strong>in</strong>g Your Refrigerator (Model: OBC33SSD) 12 - 13<br />
Care and Ma<strong>in</strong>tenance 13<br />
Clean<strong>in</strong>g Your Refrigerator 13<br />
Power Failure 13<br />
Mov<strong>in</strong>g Your Refrigerator 13<br />
Energy Sav<strong>in</strong>g Tips 14<br />
Troubleshoot<strong>in</strong>g Guide 14<br />
Service for Your Appliance 15<br />
Your <strong>Avanti</strong> <strong>Products</strong> Warranty 16<br />
Instrucciones en Español 17 - 26<br />
Registration Information and Registration Card 27<br />
2
APPLIANCE SAFETY<br />
Your safety and the safety of others are very important.<br />
We have provided many important safety messages <strong>in</strong> this manual and on your appliance. Always<br />
read and obey all safety messages.<br />
This is the Safety Alert Symbol. This symbol alerts you to potential hazards that<br />
can kill or <strong>in</strong>jure you and others. All safety messages will follow the Safety<br />
Alert Symbol and either the words “DANGER”, “WARNING” or “CAUTION”.<br />
Danger means that failure to heed this<br />
safety statement may result <strong>in</strong> severe<br />
personal <strong>in</strong>jury or death.<br />
Warn<strong>in</strong>g means that failure to heed this<br />
safety statement may result <strong>in</strong> extensive<br />
product damage, serious personal <strong>in</strong>jury, or<br />
death.<br />
Caution means that failure to heed this<br />
safety statement may result <strong>in</strong> m<strong>in</strong>or or<br />
moderate personal <strong>in</strong>jury, or property or<br />
equipment damage.<br />
All safety messages will alert you do what the potential hazard is, tell you how to reduce the chance of<br />
<strong>in</strong>jury, and let you know what can happen if the <strong>in</strong>structions are not followed.<br />
3
IMPORTANT SAFEGUIDES<br />
Before the appliance is used, it must be properly positioned and <strong>in</strong>stalled as<br />
described <strong>in</strong> this manual, so read the manual carefully. To reduce the risk of fire,<br />
electrical shock or <strong>in</strong>jury when us<strong>in</strong>g the appliance, follow basic precaution,<br />
<strong>in</strong>clud<strong>in</strong>g the follow<strong>in</strong>g:<br />
<br />
<br />
<br />
<br />
<br />
<br />
<br />
<br />
Plug <strong>in</strong>to a grounded 3-prong outlet, do not remove ground<strong>in</strong>g prong, do not use an adapter, and<br />
do not use an extension cord.<br />
Replace all panels before operat<strong>in</strong>g.<br />
It is recommended that a se<strong>para</strong>te circuit, serv<strong>in</strong>g only your appliance be provided. Use<br />
receptacles that cannot be turned off by a switch or pull cha<strong>in</strong>.<br />
Never clean appliance parts with flammable fluids. These fumes can create a fire hazard or<br />
explosion. And do not store or use gasol<strong>in</strong>e or other flammable vapors and liquids <strong>in</strong> the vic<strong>in</strong>ity of<br />
this or any other appliance. The fumes can create a fire hazard or explosion.<br />
Before proceed<strong>in</strong>g with clean<strong>in</strong>g and ma<strong>in</strong>tenance operations, make sure the power l<strong>in</strong>e of the<br />
unit is disconnected.<br />
Do not connect or disconnect the electric plug when your hands are wet.<br />
Unplug the appliance or disconnect power before clean<strong>in</strong>g or servic<strong>in</strong>g. Failure to do so can result<br />
<strong>in</strong> electrical shock or death.<br />
Do not attempt to repair or replace any part of your appliance unless it is specifically<br />
recommended <strong>in</strong> this material. All other servic<strong>in</strong>g should be referred to a qualified technician.<br />
<br />
<br />
<br />
<br />
<br />
<br />
<br />
<br />
<br />
<br />
FOLLOW WARNING CALL OUTS BELOW ONLY WHEN APPLICABLE TO YOUR MODEL<br />
Use two or more people to move and <strong>in</strong>stall appliance. Failure to do so can result <strong>in</strong> back or other<br />
<strong>in</strong>jury.<br />
To ensure proper ventilation for your appliance, the front of the unit must be completely<br />
unobstructed. Choose a well-ventilated area with temperatures above 60°F (16°C) and below<br />
90°F (32°C). This unit must be <strong>in</strong>stalled <strong>in</strong> an area protected from the element, such as w<strong>in</strong>d, ra<strong>in</strong>,<br />
water spray or drips.<br />
The appliance should not be located next to ovens, grills or other sources of high heat.<br />
The appliance must be <strong>in</strong>stalled with all electrical connections <strong>in</strong> accordance with state and local<br />
codes. A standard electrical supply (115 V AC only, 60 Hz), properly grounded <strong>in</strong> accordance with<br />
the National Electrical Code and local codes and ord<strong>in</strong>ances is required.<br />
Do not k<strong>in</strong>k or p<strong>in</strong>ch the power supply cord of appliance.<br />
The fuse (or circuit breaker) size should be 15 amperes.<br />
It is important for the appliance to be leveled <strong>in</strong> order to work properly. You may need to make<br />
several adjustments to level it.<br />
Never allow children to operate, play with or crawl <strong>in</strong>side the appliance.<br />
Do not use solvent-based clean<strong>in</strong>g agents of abrasives on the <strong>in</strong>terior. These cleaners may<br />
damage or discolor the <strong>in</strong>terior.<br />
Do not use this ap<strong>para</strong>tus for other than its <strong>in</strong>tended purpose.<br />
4
HELP US HELP YOU...<br />
Read this guide carefully.<br />
It is <strong>in</strong>tended to help you operate and ma<strong>in</strong>ta<strong>in</strong><br />
your new Refrigerator properly.<br />
Keep it handy to answer your questions.<br />
If you don't understand someth<strong>in</strong>g or you<br />
need more assistance, please call:<br />
<strong>Avanti</strong> Customer Service<br />
800-220-5570<br />
Keep proof of orig<strong>in</strong>al purchase date (such as<br />
your sales slip) with this guide to establish the<br />
warranty period.<br />
CAUTION:<br />
THIS REFRIGERATOR IS NOT<br />
DESIGNED FOR THE STORAGE<br />
OF MEDICINE OR OTHER<br />
MEDICAL PRODUCTS.<br />
Write down the model and serial numbers.<br />
You'll f<strong>in</strong>d them on a plate located on the rear<br />
outside wall of the Refrigerator.<br />
Please write these numbers here:<br />
____________________________________<br />
Date of Purchase<br />
____________________________________<br />
Model Number<br />
____________________________________<br />
Serial Number<br />
Use these numbers <strong>in</strong> any correspondence or<br />
service calls concern<strong>in</strong>g your Refrigerator.<br />
If you received a damaged Refrigerator,<br />
immediately contact the dealer (or builder) that<br />
sold you the Refrigerator.<br />
Save time and money. Before you call for<br />
service, check the Troubleshoot<strong>in</strong>g Guide. It<br />
lists causes of m<strong>in</strong>or operat<strong>in</strong>g problems that<br />
you can correct yourself.<br />
IF YOU NEED SERVICE<br />
We're proud of our service and want you to be<br />
pleased. If for some reason you are not happy<br />
with the service you receive, here are some<br />
steps to follow for further assistance.<br />
FIRST, contact the people who serviced your<br />
W<strong>in</strong>e Chiller. Expla<strong>in</strong> why you are not pleased.<br />
In most cases, this will solve the problem.<br />
NEXT, if you are still not pleased, write all the<br />
details, <strong>in</strong>clud<strong>in</strong>g your telephone number, and<br />
send it to:<br />
Customer Service<br />
<strong>Avanti</strong> <strong>Products</strong><br />
10880 NW 30 Street<br />
Miami, FL 33172 USA<br />
5
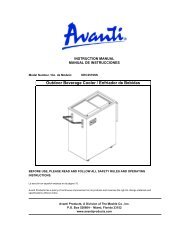
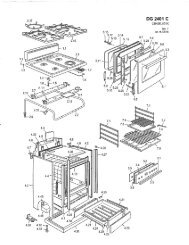
PARTS & FEATURES<br />
MODEL: OBC32SS<br />
7<br />
6<br />
1 Interior Light<br />
2 Temperature Control<br />
3 Sta<strong>in</strong>less Steel Door<br />
4 Light ON / OFF Switch<br />
5 Front Grille<br />
6 Level<strong>in</strong>g Legs or Casters<br />
7 Shelves (Total 4)<br />
6
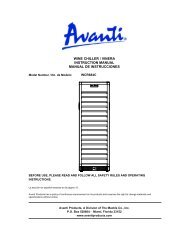
PARTS & FEATURES<br />
MODEL: OBC33SSD<br />
1 Temperature Control<br />
2 Sta<strong>in</strong>less Steel Handle<br />
3 Shelves (Total 4)<br />
4 Interior Light<br />
5 Glass Door<br />
6 Level<strong>in</strong>g Legs or Casters<br />
7 Front Grille<br />
7
IMPORTANT SAFETY INSTRUCTIONS<br />
<br />
<br />
<br />
<br />
<br />
<br />
To reduce the risk of fire, electrical shock,<br />
WARNING<br />
or <strong>in</strong>jury when us<strong>in</strong>g your appliance, follow<br />
these basic precautions:<br />
Read all <strong>in</strong>structions before us<strong>in</strong>g the Refrigerator.<br />
DANGER or WARNING: Risk of child entrapment.<br />
Child entrapment and suffocation are not problems of the past. Junked or abandoned<br />
appliances are still dangerous . . . even if they will “just sit <strong>in</strong> the garage a few days”.<br />
Before you throw away your old Refrigerator: Take off the door. Leave the<br />
shelves <strong>in</strong> place so that children may not easily climb <strong>in</strong>side.<br />
Never allow children to operate, play with, or crawl <strong>in</strong>side the appliance.<br />
Never clean appliance parts with flammable fluids. The fumes can create a fire<br />
hazard or explosion.<br />
Do not store or use gasol<strong>in</strong>e or any other flammable vapors and liquids <strong>in</strong> the vic<strong>in</strong>ity<br />
of this or any other appliance. The fumes can create a fire hazard or explosion.<br />
-Save these <strong>in</strong>structions-<br />
INSTALLATION INSTRUCTIONS<br />
‣ BEFORE USING YOUR REFRIGERATOR<br />
Remove the exterior and <strong>in</strong>terior pack<strong>in</strong>g.<br />
Check to be sure you have all of the follow<strong>in</strong>g parts:<br />
1 Bottom Shelf<br />
3 Flat Shelves<br />
4 Casters<br />
1 wrench for casters <strong>in</strong>stallation<br />
1 Hex key for reversible door operation (model OBC32SS only).<br />
1 Instruction Manual<br />
Before connect<strong>in</strong>g the Refrigerator to the power source, let it stand upright for approximately<br />
24 hours. This will reduce the possibility of a malfunction <strong>in</strong> the cool<strong>in</strong>g system from handl<strong>in</strong>g<br />
dur<strong>in</strong>g transportation.<br />
Clean the <strong>in</strong>terior surface with lukewarm water us<strong>in</strong>g a soft cloth.<br />
‣ INSTALLATION OF YOUR REFRIGERATOR<br />
This appliance is designed to be for free stand<strong>in</strong>g <strong>in</strong>stallation or <strong>built</strong>-<strong>in</strong> (M<strong>in</strong>imum clearances:<br />
¼” on each side, ½” at the back, and 1” on the top).<br />
Place your Refrigerator on a floor that is strong enough to support it when it is fully loaded. To<br />
level your Refrigerator, adjust the front level<strong>in</strong>g legs at the bottom of the Refrigerator.<br />
Locate the Refrigerator away from direct sunlight and sources of heat (stove, heater, radiator,<br />
etc.). Direct sunlight may affect the acrylic coat<strong>in</strong>g and heat sources may <strong>in</strong>crease electrical<br />
consumption. Extreme cold ambient temperatures may also cause the unit not to perform<br />
properly.<br />
Avoid locat<strong>in</strong>g the unit <strong>in</strong> moist areas.<br />
Plug the Refrigerator <strong>in</strong>to an exclusive, properly <strong>in</strong>stalled-grounded wall outlet. Do not under<br />
any circumstances cut or remove the third (ground) prong from the power cord. Any questions<br />
concern<strong>in</strong>g power and/or ground<strong>in</strong>g should be directed toward a certified electrician or an<br />
authorized <strong>Avanti</strong> <strong>Products</strong> service center.<br />
8
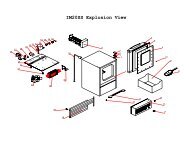
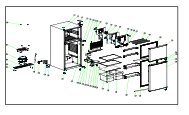
‣ INSTALLING THE LEVELING LEGS OR CASTERS.<br />
TWO OR MORE PEOPLE REQUIRED FOR THIS PROCESS<br />
Four casters are <strong>in</strong>cluded with your <strong>refrigerator</strong>. They are ideal for roll<strong>in</strong>g the unit from place<br />
to place outdoors. If a mobile <strong>in</strong>stallation is chosen, you must <strong>in</strong>stall the casters.<br />
a) Tip the unit to the left as shown <strong>in</strong> the illustration (¾ foot clearance from the floor to the top of<br />
the unit).<br />
b) Remove the level<strong>in</strong>g legs, and screw <strong>in</strong> one of the casters with the foot brake <strong>in</strong> the front<br />
screw hole and one of the casters without the foot brake <strong>in</strong> the back screw hole.<br />
c) Tip the unit to the right and repeat the steps above.<br />
d) The unit should be level at all times, if you need to fix the level, adjust the wheel height by<br />
turn<strong>in</strong>g it counter-clockwise to <strong>in</strong>crease the height and clockwise to reduce it.<br />
e) Repeat the steps on all casters until the unit is fully level.<br />
9
‣ ELECTRICAL CONNECTION<br />
Warn<strong>in</strong>g<br />
Improper use of the grounded plug can result <strong>in</strong> the risk of electrical shock. If the power cord is<br />
damaged, have it replaced by an authorized <strong>Avanti</strong> <strong>Products</strong> service center.<br />
This appliance should be properly grounded for your safety. The power cord of this appliance is<br />
equipped with a three-prong plug which mates with standard three prong wall outlets to m<strong>in</strong>imize the<br />
possibility of electrical shock.<br />
Do not under any circumstances cut or remove the third ground prong from the power cord supplied.<br />
For personal safety, this appliance must be properly grounded.<br />
This appliance requires a standard 115/120 Volt AC ~/60Hz electrical ground outlet with three-prong.<br />
Have the wall outlet and circuit checked by a qualified electrician to make sure the outlet is properly<br />
grounded. When a standard 2-prong wall outlet is encountered, it is your responsibility and obligation<br />
to have it replaced with a properly grounded 3-prong wall outlet.<br />
The cord should be secured beh<strong>in</strong>d the appliance and not left exposed or dangl<strong>in</strong>g to prevent<br />
accidental <strong>in</strong>jury.<br />
The appliance should always be plugged <strong>in</strong>to its own <strong>in</strong>dividual electrical outlet which has a voltage<br />
rat<strong>in</strong>g that matches the rat<strong>in</strong>g label on the appliance. This provides the best performance and also<br />
prevent overload<strong>in</strong>g house wir<strong>in</strong>g circuits that could cause a fire hazard from overheated. Never<br />
unplug the appliance by pull<strong>in</strong>g the power cord. Always grip the plug firmly and pull straight out from<br />
the receptacle. Repair or replace immediately all power cords that have become frayed or otherwise<br />
damaged. Do not use a cord that shows cracks or abrasion damage along its length or at either end.<br />
When mov<strong>in</strong>g the appliance, be careful not to damage the power cord.<br />
‣ EXTENSION CORD<br />
Because of potential safety hazards under certa<strong>in</strong> conditions, it is strongly recommended that you do<br />
not use an extension cord with this appliance. However, if you must use an extension cord it is<br />
absolutely necessary that it be a UL/CUL-Listed, 3-wire ground<strong>in</strong>g type appliance extension cord<br />
hav<strong>in</strong>g a ground<strong>in</strong>g type plug and outlet and that the electrical rat<strong>in</strong>g of the cord be 115 volts and at<br />
least 10 amperes.<br />
‣ SURGE PROTECTOR<br />
Most electrical appliances use a series of electric control boards to operate. These boards are very<br />
susceptible to power surges and could be damaged or destroyed.<br />
If the appliance is go<strong>in</strong>g to be used <strong>in</strong> an area or if your city / country is prone to power surges /<br />
outages; it is suggested that you use a power surge protector for all electrical devices / appliances<br />
you use. The surge protector that you select must have a surge block high enough to protect the<br />
appliance it is connected to. If you have any questions regard<strong>in</strong>g the type and size of surge protector<br />
needed contact a licensed electrician <strong>in</strong> your area.<br />
Damages due to power surges are not considered a manufacturer covered defect and will void your<br />
product warranty.<br />
‣ REVERSING THE DOOR SWING OF YOUR APPLIANCE (MODEL OBC32SS ONLY)<br />
This appliance has the capability of the door open<strong>in</strong>g from either the left or right side. The unit is<br />
delivered to you with the door open<strong>in</strong>g from the left side. Should you desire to reverse the open<strong>in</strong>g<br />
direction, please call service for reversal <strong>in</strong>structions.<br />
10
OPERATING YOUR REFRIGERATOR (MODEL OBC32SS)<br />
It is recommended you <strong>in</strong>stall the Refrigerator <strong>in</strong> a place where the ambient temperature is between<br />
50º - 100ºF (10º - 38ºC ). If the ambient temperature is above or below recommended temperatures,<br />
the performance of the unit may be affected. For example, plac<strong>in</strong>g your unit <strong>in</strong> extreme cold or hot<br />
conditions may cause <strong>in</strong>terior temperatures to fluctuate. The range of 35º - 50º F (2º - 10º C) may not<br />
be reached.<br />
<br />
<br />
<br />
‣ SETTING THE TEMPERATURE CONTROL (MODEL OBC32SS – ONLY)<br />
The unit turns on automatically once plugged <strong>in</strong>.<br />
You can set the temperature as you desire by turn<strong>in</strong>g the temperature control dial.<br />
The range of the temperature controls are from position “OFF” to “COLDEST” the coldest. After<br />
24 to 48 hours, adjust the temperature control to the sett<strong>in</strong>g that best suits your needs. The mid<br />
range between “COLD” and “COLDEST” should be correct for home or office use.<br />
NOTE:<br />
If the unit is unplugged, power lost, or turned off you must wait 3 to 5 m<strong>in</strong>utes before restart<strong>in</strong>g the<br />
unit. If you attempt to restart before this time delay, the Refrigerator will not start.<br />
‣ INTERIOR LIGHT (MODEL OBC32SS ONLY)<br />
The <strong>in</strong>terior light with be turned ON every time the door is opened and OFF once the door is closed.<br />
‣ REVERSING THE OPENINGSWING OF YOUR BEVERAGE COOLER (MODEL 0BC32SS –<br />
ONLY_<br />
This appliance has the capability of the door open<strong>in</strong>g from either the left or right side. The unit is<br />
delivered to you with the door open<strong>in</strong>g from the left side. Should you desire to reverse the open<strong>in</strong>g<br />
direction, please call service for reversal <strong>in</strong>structions.<br />
11
OPERATING YOUR REFRIGERATOR (MODEL OBC33SSD)<br />
IMPORTANT SAFEGUARDS<br />
As a natural result of condensation, <strong>in</strong> summer months or areas of high humidity, the glass door<br />
may build up moisture on the outside. Just wipe it away.<br />
It is recommended you <strong>in</strong>stall the Refrigerator <strong>in</strong> a place where the ambient temperature is between<br />
50ºF - 100ºF (10º - 38ºC ). If the ambient temperature is above or below recommended<br />
temperatures, the performance of the unit may be affected. For example, plac<strong>in</strong>g your unit <strong>in</strong><br />
extreme cold or hot conditions may cause <strong>in</strong>terior temperatures to fluctuate. The range of 36º - 64º F<br />
(2º - 18º C) may not be reached.<br />
‣ CONTROL PANEL (MODEL OBC33SSD – ONLY)<br />
The unit turns on automatically once plugged <strong>in</strong>.<br />
Your beverage center is equipped with an electronic display that once any button is pressed the<br />
display w<strong>in</strong>dow will light on and will automatically light off two (2) m<strong>in</strong>utes after the last button was<br />
pressed.<br />
Alarm Indicator<br />
Compressor Run<br />
Indicator<br />
Temperature Display<br />
SET Button<br />
Temperature<br />
UP / DOWN<br />
Light Switch<br />
CONTROL PANEL FEATURES / DESCRIPTIONS<br />
Alarm mode: In the event there is a fault <strong>in</strong> the unit, an Alarm <strong>in</strong>dicator<br />
will appear <strong>in</strong> the area shown above on the control panel.<br />
If at any time the follow<strong>in</strong>g messages are shown <strong>in</strong> the display w<strong>in</strong>dow,<br />
consult an <strong>Avanti</strong> <strong>Products</strong> Authorized Service Center.<br />
PROBE ERROR<br />
LOW TEMP<br />
HIGH TEMP<br />
When the unit’s compressor is runn<strong>in</strong>g, the control panel will display a<br />
mov<strong>in</strong>g “FAN” icon. Once the compressor stops runn<strong>in</strong>g the icon will<br />
also stop mov<strong>in</strong>g.<br />
The set temperature and current average temperature of the unit will be<br />
displayed <strong>in</strong> this area as shown above.<br />
Use this button to activate the temperature sett<strong>in</strong>g mode and aga<strong>in</strong> to<br />
confirm the selected temperature sett<strong>in</strong>g.<br />
Use these buttons to select the appropriate temperature. Temperature<br />
sett<strong>in</strong>g will either advance or decrease each time you press the<br />
respective button.<br />
The <strong>in</strong>terior light can be operated manually by press<strong>in</strong>g the ON/OFF<br />
button on the control panel. The light will automatically turn itself OFF<br />
after 5 m<strong>in</strong>utes.<br />
NOTE: Avoid extended use of the light as the heat generated by the light<br />
bulb can raise the <strong>in</strong>terior temperature of the unit and affect the<br />
temperature of the items stored.<br />
12
SETTING THE TEMPERATURE CONTROL (MODEL OBC33SSD – ONLY)<br />
The temperature range for your Beverage Center is 36º - 64ºF (2º-18ºC).<br />
The default temperature set at the factory is 41ºF (5ºC). Once the unit is plugged <strong>in</strong>, the default<br />
temperature will be displayed <strong>in</strong> the digital display w<strong>in</strong>dow.<br />
To adjust the temperature, press the SET button, then use the UP or DOWN buttons to select the<br />
preferred temperature. When the selected temperature is shown <strong>in</strong> the display w<strong>in</strong>dow of the<br />
control panel, press the SET button to confirm the sett<strong>in</strong>g.<br />
Once the temperature selection has been confirmed, the actual current temperature of the unit will<br />
be shown <strong>in</strong> the DISPLAY w<strong>in</strong>dow on the control panel. The temperature shown will vary<br />
depend<strong>in</strong>g on the amount of items stored and how frequently the door is opened.<br />
In the event of a power outage, your unit is designed to remember the temperature sett<strong>in</strong>g and<br />
will automatically return to that sett<strong>in</strong>g after the power has returned.<br />
NOTE:<br />
The temperature sensor monitors the average temperature of the unit. Cold air falls and warm air<br />
rises, thus there will be a variation <strong>in</strong> temperature from the bottom to the top of the unit. The<br />
bottom area of the unit will always be slightly cooler than the top area.<br />
The temperature displayed <strong>in</strong> the control panel is an <strong>in</strong>stantaneous average temperature of the<br />
unit and there may be a variation of approximately 0 – 6ºF.<br />
If the unit is unplugged, power lost, or turned off you must wait three (3) m<strong>in</strong>utes before restart<strong>in</strong>g<br />
the unit. If you attempt to restart before this time delay, the <strong>refrigerator</strong> will not start.<br />
‣ INTERIOR LIGHT<br />
The <strong>in</strong>terior light can be operated manually by press<strong>in</strong>g the Light ON / OFF button on the control<br />
panel. The light will automatically turn itself OFF after 5 m<strong>in</strong>utes.<br />
NOTE:<br />
Avoid extended use of the light as the heat generated by the light bulb can raise the <strong>in</strong>terior<br />
temperature of the unit and affect the temperature of the items stored.<br />
You can switch temperature display sett<strong>in</strong>g from Fahrenheit to Celsius degree by push<strong>in</strong>g the UP<br />
button and hold for 10 seconds. Fahrenheit or Celsius degrees will appear <strong>in</strong> the temperature display<br />
w<strong>in</strong>dow .<br />
CARE AND MAINTENANCE<br />
‣ CLEANING YOUR REFRIGERATOR<br />
Turn off the power, unplug the appliance, and remove all items <strong>in</strong>clud<strong>in</strong>g shelves.<br />
Wash the <strong>in</strong>side surfaces with a warm water and bak<strong>in</strong>g soda solution. The solution should be<br />
about 2 tablespoons of bak<strong>in</strong>g soda to a quart of water.<br />
Wash the shelves with a mild detergent solution.<br />
Wr<strong>in</strong>g excess water out of the sponge or cloth when clean<strong>in</strong>g area of the controls, or any<br />
electrical parts.<br />
Wash the outside cab<strong>in</strong>et with warm water and mild liquid detergent. R<strong>in</strong>se well and wipe dry with<br />
a clean soft cloth.<br />
Do not use steel wool or steel brush on the sta<strong>in</strong>less steel. These will contam<strong>in</strong>ate the sta<strong>in</strong>less<br />
steel with steel particles and rust<strong>in</strong>g may occur.<br />
‣ POWER FAILURE<br />
13
Most power failures are corrected with<strong>in</strong> a few hours and should not affect the temperature of<br />
your appliance if you m<strong>in</strong>imize the number of times the door is opened. If the power is go<strong>in</strong>g to be<br />
off for a longer period of time, you need to take the proper steps to protect your contents.<br />
‣ MOVING YOUR REFRIGERATOR<br />
Remove all items.<br />
Securely tape down all loose items (shelves) <strong>in</strong>side your appliance.<br />
Turn the adjustable leg up to the base to avoid damage.<br />
Tape the door shut.<br />
Be sure the appliance stays secure <strong>in</strong> the upright position dur<strong>in</strong>g transportation. Also protect<br />
outside of appliance with a blanket, or similar item.<br />
‣ ENERGY SAVING TIPS<br />
Do not place the unit next to a heat source (heat<strong>in</strong>g vent, range, fireplace, direct sunlight, etc).<br />
Keep the door closed as much as possible, especially <strong>in</strong> hot, humid weather.<br />
Cover foods to reduce moisture build-up <strong>in</strong>side the appliance.<br />
PROBLEMS WITH YOUR REFRIGERATOR?<br />
You can solve many common Refrigerator problems easily, sav<strong>in</strong>g you the cost of a possible service<br />
call. Try the suggestions below to see if you can solve the problem before call<strong>in</strong>g the servicer.<br />
TROUBLESHOOTING GUIDE<br />
PROBLEM<br />
Refrigerator does not operate.<br />
Refrigerator is not cold enough.<br />
Turns on and off frequently.<br />
The light does not work.<br />
Vibrations.<br />
The Refrigerator seems to make too much noise.<br />
POSSIBLE CAUSE<br />
Not plugged <strong>in</strong>.<br />
The appliance is turned off.<br />
The circuit breaker tripped or a blown fuse.<br />
Check the temperature control sett<strong>in</strong>g.<br />
External environment may require a higher<br />
sett<strong>in</strong>g.<br />
The door is opened too often.<br />
The door is not closed completely.<br />
The door gasket does not seal properly.<br />
The room temperature is hotter than normal.<br />
A large amount of contents has been added to<br />
the Refrigerator.<br />
The door is opened too often.<br />
The door is not closed completely.<br />
The temperature control is not set correctly.<br />
The door gasket does not seal properly.<br />
Not plugged <strong>in</strong>.<br />
The circuit breaker tripped or a blown fuse.<br />
The light bulb is burned out.<br />
Check to assure that the Refrigerator is level.<br />
The rattl<strong>in</strong>g noise may come from the flow of the<br />
refrigerant, which is normal.<br />
As each cycle ends, you may hear gurgl<strong>in</strong>g<br />
sounds caused by the flow of refrigerant <strong>in</strong> your<br />
Refrigerator.<br />
Contraction and expansion of the <strong>in</strong>side walls<br />
may cause popp<strong>in</strong>g and crackl<strong>in</strong>g noises.<br />
The Refrigerator is not level.<br />
14
The door will not close properly.<br />
The Refrigerator is not level.<br />
The door was reversed and not properly <strong>in</strong>stalled.<br />
The gasket is dirty.<br />
The shelves are out of position.<br />
15
SERVICE FOR YOUR REFRIGERATOR<br />
We are proud of our customer service organization and the network of professional service<br />
technicians that provide service on your <strong>Avanti</strong> appliances. With the purchase of your <strong>Avanti</strong><br />
appliance, you can have the confidence that if you ever need additional <strong>in</strong>formation or assistance, the<br />
<strong>Avanti</strong> <strong>Products</strong> Customer Service team will be here for you. Just call us toll-free.<br />
Product Information<br />
800-323-5029<br />
Part Orders<br />
800-220-5570<br />
In-Home Repair Service<br />
800-220-5570<br />
AVANTI PRODUCTS CUSTOMER SERVICES<br />
Whatever your questions are about our products,<br />
help is available.<br />
You may order parts and accessories that will be<br />
delivered directly to your home by personal<br />
check, money order, Master Card, or Visa.<br />
An <strong>Avanti</strong> <strong>Products</strong> authorized service center will<br />
provide expert repair service, scheduled at a time<br />
that is convenient for you. Our tra<strong>in</strong>ed servicers<br />
know your appliance <strong>in</strong>side and out.<br />
16
YOUR <strong>Avanti</strong> <strong>Products</strong> WARRANTY<br />
WHAT IS COVERED<br />
LIMITED ONE-YEAR<br />
WARRANTY<br />
For one year from the date of<br />
purchase by the orig<strong>in</strong>al owner, <strong>Avanti</strong><br />
<strong>Products</strong> will, at its option, repair or<br />
replace any part of the unit, which<br />
proves to be defective <strong>in</strong> material or<br />
workmanship under normal use.<br />
Dur<strong>in</strong>g this period <strong>Avanti</strong> <strong>Products</strong> will<br />
provide all parts and labor necessary<br />
to correct such defects free of charge,<br />
so long as the unit has been <strong>in</strong>stalled<br />
and operated <strong>in</strong> accordance with the<br />
written <strong>in</strong>structions <strong>in</strong> this manual.<br />
<strong>Avanti</strong> <strong>Products</strong> will provide you with a<br />
reasonably similar replacement<br />
product that is either new or factory<br />
refurbished. In rental or commercial<br />
use, the warranty period is 90 days.<br />
All <strong>Avanti</strong> Appliances of 3.5 cubic feet<br />
capacity or less must be brought/sent<br />
to the appliance service shop for<br />
repair.<br />
Staple your sales receipt here. Proof of<br />
orig<strong>in</strong>al purchase date is needed to obta<strong>in</strong><br />
service under warranty.<br />
LIMITED SECOND THROUGH<br />
FIFTH YEAR WARRANTY<br />
For the second through the fifth year from date<br />
of orig<strong>in</strong>al purchase, <strong>Avanti</strong> <strong>Products</strong> will<br />
provide a replacement compressor free of<br />
charge due to a failure. You are responsible<br />
for the service labor and freight charges. In<br />
rental or commercial use, the limited<br />
compressor warranty is one year and n<strong>in</strong>e<br />
months. Cost to move the appliance to the<br />
servicers’ shop and back to the user's home,<br />
as may be required, are the user's<br />
responsibility.<br />
WHAT IS NOT COVERED<br />
<br />
<br />
<br />
<br />
<br />
<br />
<br />
<br />
<br />
<br />
Content losses of food or other, due to<br />
spoilage.<br />
Incidental or consequential damages.<br />
Parts and labor costs for the follow<strong>in</strong>g will<br />
not be considered as warranty:<br />
Door spr<strong>in</strong>gs, and/or frames.<br />
Inner door panels, door rails and/or door<br />
supports.<br />
Light bulbs and/or plastic hous<strong>in</strong>g.<br />
Plastic cab<strong>in</strong>et l<strong>in</strong>ers.<br />
Punctured evaporator that voids the<br />
warranty on the complete sealed system.<br />
Repairs performed by unauthorized<br />
servicers.<br />
Shipp<strong>in</strong>g and handl<strong>in</strong>g costs associated<br />
with the replacement of the unit.<br />
<br />
<br />
<br />
<br />
<br />
<br />
Service calls that do not <strong>in</strong>volve defects <strong>in</strong><br />
material or workmanship such as<br />
customer education, door reversal, or<br />
proper <strong>in</strong>stallation.<br />
Surcharges <strong>in</strong>clud<strong>in</strong>g, but not limited to,<br />
any after hour, weekend, or holiday<br />
service calls, tolls, ferry trip charges, or<br />
mileage expense for service call to remote<br />
areas, <strong>in</strong>clud<strong>in</strong>g the State of Alaska.<br />
Service calls that are related to external<br />
problems, such as abuse, misuse,<br />
<strong>in</strong>adequate electrical power, accidents,<br />
fire, floods, or acts of God.<br />
Replacement of house fuses or resett<strong>in</strong>g<br />
circuit breakers.<br />
Failure of the product if it is used for other<br />
than its <strong>in</strong>tended purpose.<br />
This warranty does not apply outside the<br />
Cont<strong>in</strong>ental USA.<br />
17
INSTRUCCIONES EN ESPAÑOL<br />
PRECAUCIÓN<br />
Para reducir el riesgo de <strong>in</strong>cendio, descarga<br />
eléctrica, o daño cuando use su<br />
electrodoméstico, siga las siguientes<br />
precauciones.<br />
Lea todas las <strong>in</strong>strucciones antes de usar su electrodoméstico.<br />
Peligro o Precaución: Existe el riesgo que los niños queden atrapados.<br />
Niños atrapados no son un problema del pasado. Los electrodomésticos son peligrosos<br />
aún si solo los deja en el garaje por un par de días.<br />
Antes de desechar su electrodoméstico o <strong>refrigerador</strong> usado: quítele las puertas. Deje<br />
las repisas en su lugar <strong>para</strong> evitar que los niños se queden atrapados.<br />
No permita que los niños manejen, jueguen o entren dentro del electrodoméstico.<br />
No limpie su electrodoméstico con líquidos <strong>in</strong>flamables. Los gases pueden ocasionar<br />
fuego o una explosión.<br />
No guarde ni use gasol<strong>in</strong>a u otros líquidos <strong>in</strong>flamables cerca de este o de cualquier otro<br />
electrodoméstico. Los vapores pueden ocasionar fuego o explosión.<br />
- Guarde estas <strong>in</strong>strucciones-<br />
INSTRUCCIONES PARA LA INSTALACIÓN<br />
ANTES DE INSTALAR SU ELECTRODOMESTICO<br />
Retire la envoltura <strong>in</strong>terna y externa.<br />
Verifique que tenga las siguientes partes:<br />
1 Manual de Instrucciones 3 Repisas Superiores 1 Repisa Inferior<br />
1 Llave Inglesa<br />
1 Llave tipo Allen<br />
(Para <strong>in</strong>stalar las ruedas) (Para reversar la puerta) (Modelo: OBC32SS Solamente)<br />
Antes de conectar su electrodoméstico a la corriente eléctrica, ubíquelo en posición vertical sobre<br />
una superficie plana por lo menos por 2 horas. Esto reducirá la posibilidad de malfuncionamiento<br />
en el sistema de enfriamiento por el manipuleo durante el transporte.<br />
Limpie la superficie <strong>in</strong>terior con agua tibia usando un trapo suave.<br />
INSTALACION DE SU ELECTRODOMESTICO<br />
Retire el embalaje exterior e <strong>in</strong>terior. Use un trapo suave y seco <strong>para</strong> limpiar el exterior del<br />
<strong>refrigerador</strong> completamente. Use un trapo limpio remojado en agua tibia <strong>para</strong> limpiar el <strong>in</strong>terior del<br />
<strong>refrigerador</strong>.<br />
El air debe circular libremente frente al <strong>refrigerador</strong>. Evite colocarlos cerca de cualquier fuente de<br />
calor o humedad, o directamente a la luz solar. La luz solar directa podría afectar el acabado, y las<br />
fuentes de calor cercanas elevarán el consumo eléctrico.<br />
Su <strong>refrigerador</strong> ha sido diseñado <strong>para</strong> ser usado <strong>in</strong>dependientemente o empotrado. Tiene<br />
ventiladores motorizados en la parte trasera de la unidad que dirigen el calor generado por el<br />
compresor hacia fuera y a través del frente de la unidad.<br />
Si la unidad está empotrada, deje un espacio de ¼” en cada lado, ½” en la parte trasera, y 1” en la<br />
parte superior.<br />
NOTA: La unidad puede ser usada <strong>in</strong>dependientemente con las patas niveladoras o las ruedas de<br />
pivotear<br />
18
PARTES Y CARACTERISTICAS<br />
MODELO: OBC32SS<br />
7<br />
6<br />
1 Luz Interior<br />
2 Control de Temperatura<br />
3 Puerta de Acero Inoxidable<br />
4 Interruptor de Luz Interior<br />
5 Parilla Delantera<br />
6 Patas Niveladoras o Ruedas<br />
7 Repisas (Total 4)<br />
19
PARTES Y CARACTERISTICAS<br />
MODELO: OBC33SSD<br />
1 Control de Temperatura<br />
2 Manija de Acero Inoxidable<br />
3 Repisas (Total 4)<br />
4 Luz Interior<br />
5 Puerta de Cristal<br />
6 Patas Niveladoras o Ruedas<br />
7 Parilla Delantera<br />
20
‣ INSTALACION DE LAS PATAS NIVELADORAS O RUEDAS DE PIVOTE<br />
SE RECOMIENDA QUE SE HACE ENTRE DOS O MAS PERSONAS.<br />
Su <strong>refrigerador</strong> viene equipada con 4 patas niveladoras. Incluido también con el <strong>refrigerador</strong> son<br />
cuatro (4) ruedas de pivote. Son ideales <strong>para</strong> rodar la unidad de un lugar a otro en el exterior. Si<br />
se escoge una <strong>in</strong>stalación móvil, debe <strong>in</strong>stalar las ruedas de pivote.<br />
Fondo de<br />
la unidad<br />
Huecos <strong>para</strong> tornillos<br />
1) Incl<strong>in</strong>e la unidad a la derecha de modo que quede un espacio de ¾ de pie a<br />
la izquierda de la unidad. Pídale a alguien que le ayude a <strong>in</strong>cl<strong>in</strong>ar la unidad,<br />
<strong>para</strong> evitar que se caiga sobre usted mientras <strong>in</strong>stala las ruedas o las patas.<br />
2) Retire las patas niveladoras, y atornille una de las ruedas de pivote que tiene<br />
cierre, en el agujero frontal y luego atornille una de las ruedas de pivote que<br />
no tiene cierre, en el agujero trasero. Guarde las patas niveladoras en un<br />
lugar seguro donde pueden ser ubicados nuevamente si es necesario.<br />
3) Repita los dos pasos previos con excepción de que ahora <strong>in</strong>cl<strong>in</strong>ará la unidad<br />
a la izquierda <strong>para</strong> atornillar las dos ruedas restantes.<br />
4) Las ruedas están <strong>in</strong>staladas.<br />
5) La unidad debe estar nivelada. Si las condiciones del piso no permiten que la<br />
unidad esté nivelada, ajuste la rueda girándola en sentido anti-horario <strong>para</strong><br />
aumentar la altura y en sentido horario <strong>para</strong> reducir la altura.<br />
El procedimiento anterior puede usarse si se <strong>in</strong>stala las patas o las ruedas.<br />
21
Conexión Eléctrica<br />
ADVERTENCIA<br />
EL USO INAPROPIADO DEL ENCHUFE A TIERRA PUEDE OCASIONAR RIESGO DE UN<br />
CHOQUE ELECTRICO. SI EL CORDON SE DAÑASE, LLEVELO A UN CENTRO DE<br />
SERVICIO AUTORIZADO POR AVANTI PRODUCTS PARA QUE SE REEMPLACE.<br />
<br />
<br />
<br />
<br />
<br />
<br />
<br />
Para su seguridad, la electrodoméstica debe estar apropiadamente conectada a tierra. El cordón<br />
eléctrico de su <strong>refrigerador</strong> está equipado con un enchufe de tres puntas, el cual encaja<br />
perfectamente en los receptáculos/enchufes de pared de tres puntas estándar, <strong>para</strong> m<strong>in</strong>imizar la<br />
posibilidad de un choque eléctrico.<br />
Bajo n<strong>in</strong>guna circunstancia corte o retire la tercera punta (cable a tierra) del enchufe del cordón<br />
eléctrico.<br />
Nunca use un cable de extensión <strong>para</strong> conectar la unidad a la electricidad.<br />
Nunca use un adaptado con enchufe de solo 2 puntas.<br />
Si solo puede conectar la unidad a un receptáculo/enchufe de pared de 2 puntas, comuníquese<br />
con un electricista calificado <strong>para</strong> que reemplace ese receptáculo/enchufe de pared por uno de 3<br />
puntas, de acuerdo con los códigos de electricidad aplicables.<br />
Esta máqu<strong>in</strong>a de hacer hielo requiere un receptáculo/enchufe de pared de tres puntas estándar<br />
de 115/120 voltios ac.~/60hz.<br />
Para prevenir cualquier daño físico o lesión, el cordón debe ser asegurado detrás de la unidad y<br />
no estar expuesto o colgando.<br />
Cable de Extensión<br />
Debido al posible riesgo de seguridad causado bajo ciertas circunstancias, se recomienda<br />
firmemente que no use un cable de extensión <strong>para</strong> este electrodoméstico. S<strong>in</strong> embargo, si no tiene<br />
otra opción mas que usar un cable de extensión, asegúrese que este sea un cable de extensión <strong>para</strong><br />
electrodomésticos que este listado bajo UL/CUL, que tenga enchufe y receptáculo <strong>para</strong> enchufe de<br />
tres puntas (cable a tierra) y que la capacidad del cordón eléctrico sea de 115 voltios y no menos de<br />
10 amperios.<br />
Protector contra variaciones de corriente eléctrica (Surge Protector).<br />
La mayoría de electrodomésticos utilizan una series de paneles de control <strong>para</strong> operar. Estos<br />
paneles son muy susceptibles a las variaciones de corriente eléctrica, las cuales causan que estos se<br />
dañen o destruyen.<br />
Si vive en un área o ciudad done hay muchas variaciones de corriente o apagones, se recomienda<br />
que utilice un protector contra variaciones de corriente <strong>para</strong> todos los electrodomésticos y a<strong>para</strong>tos<br />
eléctricos. El protector que elija debe bloquear una variación de electricidad alta <strong>para</strong> poder proteger<br />
el electrodoméstico al cual está conectado. Por favor contáctese con un electricista licenciado en su<br />
área si tuviera preguntas en referencia al tipo y tamaño de protector que necesita.<br />
Daños debido a variaciones de electricidad no se consideran un defecto del fabricante y podrían<br />
anular la garantía.<br />
COMO CAMBIAR LA DIRECCION DE APERTURA DE LA PUERTA<br />
(MODELO OBC32SS SOLAMENTE)<br />
En caso de que necesite cambiar el lado de apertura de la puerta, por favor consulte al servicio posventa<br />
de su localidad.<br />
22
COMO MANEJAR SU REFRIGERADOR (MODELO OBC32SS)<br />
Se recomienda que Ud coloque su <strong>refrigerador</strong> en un lugar donde la temperatura ambiental se<br />
mantenga entre 50º - 100ºF (10º - 38ºC)..<br />
Si la temperatura ambiental es mayor o menor que la temperatura recomendada, el funcionamiento<br />
de la unidad podria ser afectado. Por ejemplo, si mantiene la unidad en condiciones de calor o frío<br />
extremo, puede ocasionar que la temperatura <strong>in</strong>terna fluctúe y que no se alcance el rango de 35º -<br />
50ºF (2º - 10ºC).<br />
Su <strong>refrigerador</strong> ha sido diseñado con un rango de temperatura de 35º - 50ºF (2º - 10ºC).<br />
IMPORTANTE: No enchufe el <strong>refrigerador</strong> hasta que hayan pasado 24 horas de <strong>in</strong>stalar la unidad en<br />
su lugar. No seguir este consejo podría dar como resultado que la unidad funcione<br />
<strong>in</strong>adecuadamente.<br />
El <strong>refrigerador</strong> tiene un botón giratorio de control de temperatura (termostato) dentro de la unidad que<br />
está marcado con las configuraciones.<br />
Con el f<strong>in</strong> de aumentar el enfriamiento. Adicionalmente, esta unidad emplea un calentador dentro del<br />
gab<strong>in</strong>ete y está diseñada <strong>para</strong> ser usada al aire libre.<br />
OFF<br />
COLD<br />
COLDEST<br />
APAGADO<br />
FRÍO<br />
MÁS FRÍO<br />
‣ AJUSTAR LA TEMPERATURA (MODELO: OBC32SS – SOLAMENTE)<br />
El <strong>refrigerador</strong> se enciende automáticamente cuando se le conecta.<br />
Inicialmente fije el control de temperatura al punto medio entre las posiciones “COLD” (FRIO) y<br />
“COLDEST” (MAS FRIO). El compresor funcionará cont<strong>in</strong>uamente unas pocas horas hasta que<br />
la temperatura del <strong>in</strong>terior de la unidad se estabilice. Cuando la unidad se estabilice, el<br />
compresor funcionará normalmente.<br />
Cuando la unidad está conectada por primera vez, se recomienda que no ponga n<strong>in</strong>gún<br />
comestible adentro hasta que la temperatura de la unidad se estabilice.<br />
Cuando la temperatura de la unidad se estabilice, ajuste el termostato en sentido horario entre<br />
las posiciones “COLD” (FRIO) y “COLDEST” (MAS FRIO).<br />
Ajuste la posición del control a la temperatura adecuada <strong>para</strong> su uso.<br />
23
NOTE:<br />
Si la temperatura ambiental está sobre 40ºF (5ºC), gire el control de temperatura en sentido<br />
horario a la posición apropiadamente entre “COLD” y “COLDEST” <strong>para</strong> enfriar los alimentos.<br />
Si la temperatura ambiental está debajo de los 25ºF (-4ºC), no use la unidad <strong>para</strong> almacenar<br />
alimentos / comestibles.<br />
Si usted desenchufa el <strong>refrigerador</strong> o se corta el sum<strong>in</strong>istro eléctrico, deje que pasen un mínimo<br />
de 8 m<strong>in</strong>utos antes de volver a encender o enchufar la unidad. La unidad no funcionará<br />
adecuadamente antes de un mínimo de 8 m<strong>in</strong>utos.<br />
‣ LUZ INTERIOR<br />
Su <strong>refrigerador</strong> está equipada con una luz <strong>in</strong>terna <strong>para</strong> que usted pueda ver fácilmente el contenido<br />
de su <strong>refrigerador</strong>. Cuando la puerta está abierta, la luz se encenderá y cuando está cerrada, la luz<br />
se apagará.<br />
COMO MANEJAR SU REFRIGERADOR (MODELO: OBC33SSD)<br />
PRECAUCIONES IMPORTANTES<br />
La parte externa de la puerta de vidrio puede mostrar signos de humedad durante los meses de<br />
verano o en áreas de alta humedad, esto es el resultado natural de la condensación.<br />
Se recomienda que Ud coloque su <strong>refrigerador</strong> en un lugar donde la temperatura ambiental se<br />
mantenga entre 50º - 100ºF (10º - 38ºC).<br />
Si la temperatura ambiental es mayor o menor que la temperatura recomendada, el funcionamiento<br />
de la unidad podría ser afectado. Por ejemplo, si mantiene la unidad en condiciones de calor o frío<br />
extremo, puede ocasionar que la temperatura <strong>in</strong>terna fluctúe y que no se alcance el rango de 36º -<br />
64ºF (2º - 18ºC).<br />
Su <strong>refrigerador</strong> ha sido diseñado con un rango de temperatura de 34º - 43ºF (1º - 6ºC).<br />
IMPORTANTE: No enchufe el <strong>refrigerador</strong> hasta que hayan pasado 24 horas de <strong>in</strong>stalar la unidad en<br />
su lugar. No seguir este consejo podría dar como resultado que la unidad funcione<br />
<strong>in</strong>adecuadamente.<br />
‣ PANEL DE CONTROLES (MODELO: OBC33SSD – SOLAMENTE)<br />
Su <strong>refrigerador</strong> está equipado con una pantalla electrónica, con cual se configura y monitorea la<br />
temperatura de su <strong>refrigerador</strong>. La pantalla electrónica alumbrará en cuanto se oprima cualquier<br />
botón y apagará automáticamente dos m<strong>in</strong>utos después.<br />
24
CARACTERISTICAS – PANEL DE CONTROLES<br />
1<br />
En caso haya una falla en la unidad, una <strong>in</strong>dicación de<br />
Indicador de ALARMA ALARMA aparecerá en la pantalla.<br />
En el modo ALARMA; la unidad hará un sonido de BEEP y<br />
mostrará un mensaje de alarma.<br />
Si cualquiera de los siguientes mensajes está mostrado en la<br />
pantalla electrónica consulte la sección de Problemas de su<br />
<strong>refrigerador</strong> con un técnico autorizado por <strong>Avanti</strong> <strong>Products</strong>:<br />
PROBE ERROR: (ERROR DE DETECCION)<br />
LOW TEMP: (TEMPERATURA BAJA)<br />
HIGH TEMP: (TEMPERATURA ALTA)<br />
2<br />
Indicador de función del<br />
compresor<br />
3<br />
Indicador de temperatura<br />
4<br />
Interruptor de Luz<br />
5<br />
Botón de configuración<br />
6<br />
Pantalla electrónica<br />
7<br />
Botónes <strong>para</strong> configurar<br />
la temperatura<br />
Cuando el compresor de la unidad esté funcionando, el tablero<br />
de control mostrará un icono en movimiento representando un<br />
ventilador en funcionamiento. Cuando el compresor no está<br />
funcionando el icono también detendrá.<br />
Ambas temperaturas (la corriente y la configurada) serán<br />
mostradas en la pantalla electrónica.<br />
La luz <strong>in</strong>terior se opera manualmente presionando el botón en el<br />
panel de controles. La luz se apagará automáticamente después<br />
de 5 m<strong>in</strong>utos.<br />
Presione este botón <strong>para</strong> configurar la temperatura a su gusto.<br />
La pantalla electrónica muestra todas las condiciones corrientes<br />
de su <strong>refrigerador</strong>.<br />
Para configurar la temperatura a su gusto, presione el botón<br />
apropiado (▲) o (▼). La temperatura mostrada aumentará o<br />
bajará por un grado cada vez que presione el botón respectivo.<br />
<br />
<br />
<br />
<br />
<br />
AJUSTAR LA TEMPERATURA (MODELO: OBC33SSD – SOLAMENTE)<br />
El rango de la temperatura de su <strong>refrigerador</strong> es 36º - 64ºF (2º-18ºC).<br />
La temperatura pre-programada por la factoría es 41ºF (5ºC).<br />
Para ajustar la temperatura, presione el botón “SET”, luego use los botones (▲) o (▼) <strong>para</strong><br />
graduar a la temperatura preferida. Cuando la temperatura correcta esta mostrada en la pantalla<br />
electrónica, presione el botón “SET” otra vez <strong>para</strong> confirmar la configuración.<br />
En cuanto la configuración está confirmada, la temperatura actual del <strong>in</strong>terior de la unidad estará<br />
mostrada en la pantalla electrónica. La temperatura actual de la unidad variará dependiendo del<br />
contenido almacenado en su <strong>refrigerador</strong> y la frecuencia que se abre la puerta.<br />
Su <strong>refrigerador</strong> ha sido diseñado <strong>para</strong> “recordar” la última temperatura configurada. Si hay un<br />
apagón o cualquier corte del sum<strong>in</strong>istro eléctrico, la unidad automáticamente regresará a la<br />
configuración de temperatura anterior cuando vuelva la electricidad.<br />
NOTA:<br />
El sensor de temperatura registra la temperatura promedio de la unidad. El aire frío cae y el aire<br />
tibio se eleva, y habrá una variación de la temperatura desde la parte más baja hasta la parte<br />
más alta de la unidad. La temperatura en la parte baja de la unidad siempre será un poco más<br />
fría.<br />
La temperatura mostrada en la pantalla electrónica es la temperatura promedio <strong>in</strong>stantánea de la<br />
unidad y podría haber una variación de aproximadamente 0 a 6 grados<br />
Si usted desenchufa el <strong>refrigerador</strong> o se corta el sum<strong>in</strong>istro eléctrico, deje que pasen un mínimo<br />
de 8 m<strong>in</strong>utos antes de volver a encender o enchufar la unidad. La unidad no funcionará<br />
adecuadamente antes de un mínimo de 8 m<strong>in</strong>utos.<br />
25
NOTA:<br />
Si la temperatura ambiental está sobre 40ºF (5ºC), gire el control de temperatura en sentido<br />
horario a la posición apropiadamente entre “COLD” y “COLDEST” <strong>para</strong> enfriar los alimentos.<br />
Si la temperatura ambiental está debajo de los 25ºF (-4ºC), no use la unidad <strong>para</strong> almacenar<br />
alimentos / comestibles.<br />
Si usted desenchufa el <strong>refrigerador</strong> o se corta el sum<strong>in</strong>istro eléctrico, deje que pasen un mínimo<br />
de 8 m<strong>in</strong>utos antes de volver a encender o enchufar la unidad. La unidad no funcionará<br />
adecuadamente antes de un mínimo de 8 m<strong>in</strong>utos.<br />
‣ LUZ INTERIOR<br />
La luz <strong>in</strong>terior se opera manualmente presionando el botón en el panel de controles. La luz se<br />
apagará automáticamente después de 5 m<strong>in</strong>utos.<br />
NOTA:<br />
Evite el uso extendido de la luz <strong>in</strong>terior pues el calor generado puede elevar la temperatura de los<br />
contenidos almacenados.<br />
Ud puede cambiar de grados Centígrados a Fahrenheit o viceversa, oprimiendo el botón marcado<br />
“UP” y aguatándalo por 10 segundos . En la pantalla digital aparecerán los grados Fahrenheit o<br />
Centígrados.<br />
Limpieza<br />
CUIDADO Y MANTENIMIENTO<br />
Para limpiar el <strong>in</strong>terior, use un paño suave con una solución de una cucharada de bicarbonato de<br />
sodio por cada cuarto de agua, o una solución de espuma de jabón suave, o un detergente suave.<br />
Para lavar las rejillas, sáquelas deslizándolas con cuidado, y use una solución de detergente suave;<br />
luego séquelas con un paño suave. Limpie el exterior con un paño húmedo suave y un poco de<br />
detergente suave o productos de limpieza <strong>para</strong> electrodomésticos.<br />
Corte de corriente<br />
La mayoría de los cortes de corriente se corrigen en una o dos horas y no afectarán las temperaturas<br />
de su v<strong>in</strong>era. S<strong>in</strong> embargo, Ud. deberá reducir la cantidad de veces que abra la puerta cuando la<br />
corriente esté apagada.<br />
Si Ud. se muda<br />
Saque o asegure todos los artículos dentro de su v<strong>in</strong>era. Para evitar que los tornillos nivelantes se<br />
averíen, gírelos completamente hacia la base.<br />
26
PROBLEMAS CON SU REFRIGERADOR<br />
Error mostrado en la pantalla<br />
“PROBE ERROR”<br />
(ERROR DE DETECCION)<br />
Descripción<br />
Este mensaje es una <strong>in</strong>dicación que el sensor<br />
del termostato ha funcionado mal.<br />
Pónganse en contacto con el departamento<br />
de servicio autorizado <strong>para</strong> que le reemplacen<br />
el sensor<br />
“LOW TEMP”<br />
(TEMPERATURA BAJA)<br />
“HIGH TEMP”<br />
(TEMPERATURA ALTA)<br />
Este mensaje es una <strong>in</strong>dicación que la<br />
temperatura actual es más baja que la<br />
temperatura configurada.<br />
Este mensaje es una <strong>in</strong>dicación que la<br />
temperatura actual es mayor a la temperatura<br />
configurada.<br />
Causas posibles son:<br />
• La puerta no está totalmente cerrada<br />
• El refrigerante podría haber goteado<br />
• La calentadora no puede estar funcionando<br />
apropiadamente y debe ser reemplazada.<br />
Si tiene certeza de que la puerta no es la<br />
causa del problema, pónganse en contacto<br />
<strong>in</strong>mediatamente con el departamento de<br />
servicio.<br />
27
REGISTRATION INFORMATION<br />
Thank you for purchas<strong>in</strong>g this f<strong>in</strong>e <strong>Avanti</strong> products. Please fill out this form and return it with<strong>in</strong> 100<br />
days of purchase and receive these important benefits to the follow<strong>in</strong>g address:<br />
<strong>Avanti</strong> <strong>Products</strong>, A Division of The Mackle Co., Inc.<br />
P.O. Box 520604 - Miami, Florida 33152 USA<br />
‣ Protect your product:<br />
We will keep the model number and date of purchase of your new <strong>Avanti</strong> <strong>Products</strong> product on<br />
file to help you refer to this <strong>in</strong>formation <strong>in</strong> the event of an <strong>in</strong>surance claim such as fire or theft.<br />
‣ Promote better products:<br />
We value your <strong>in</strong>put. Your responses will help us develop products designed to best meet<br />
your future needs.<br />
----------------------------------------------------------(detach here)----------------------------------------------------------<br />
<strong>Avanti</strong> Registration Form<br />
__________________________________ _____________________________________<br />
Name Model # Serial #<br />
__________________________________ _____________________________________<br />
Address Date Purchased Store/Dealer Name<br />
__________________________________ ______________________________________<br />
City State Zip Occupation<br />
__________________________________ As Your Primary Residence, Do You:<br />
Area Code Phone Number Own Rent<br />
Did You Purchase An Additional Warranty: Your Age:<br />
Extended Food Loss None under 18 18-25 26-30<br />
Reason For Choos<strong>in</strong>g This <strong>Avanti</strong> Product: 31-35 36-50 over 50<br />
Please <strong>in</strong>dicate the most important factors Marital Status:<br />
that <strong>in</strong>fluenced your decision to purchase Married S<strong>in</strong>gle<br />
this product.<br />
Is This Product Used In The:<br />
Price Home Bus<strong>in</strong>ess<br />
Product Features<br />
How Did You Learn About This Product:<br />
<strong>Avanti</strong> <strong>Products</strong> Reputation<br />
Advertis<strong>in</strong>g<br />
Product Quality In Store Demo Personal Demo<br />
Salesperson Recommendation<br />
Other_______________________________<br />
Friend/Relative Recommendation<br />
Comments____________________________<br />
Warranty<br />
_____________________________________<br />
Other_______________________<br />
_____________________________________<br />
28
29<br />
PRINTED IN CHINA