If Preferred -- Download The Entire Booklet - Spears Manufacturing ...
If Preferred -- Download The Entire Booklet - Spears Manufacturing ...
If Preferred -- Download The Entire Booklet - Spears Manufacturing ...

You also want an ePaper? Increase the reach of your titles
YUMPU automatically turns print PDFs into web optimized ePapers that Google loves.
Installation<br />
Solvent Cementing Assembly<br />
Verify the expiration date located on the solvent cement can. <strong>The</strong><br />
cement can be used for a period of 2 years from the date stamped<br />
on the can. When cementing pipe and fittings in extremely cold<br />
temperatures, make sure the cement has not “JELLED.” Jelled or<br />
expired cement must be discarded in an environmentally friendly<br />
fashion, in accordance with local regulations. To prolong the life<br />
of solvent cement, keep the containers tightly closed when not in<br />
use, and cover the container as much as possible during use. <strong>If</strong> an<br />
unopened solvent cement container is subjected to freezing temperatures,<br />
the cement may become extremely thick. Place the closed<br />
container in a room temperature area where, after a short time period,<br />
the cement will return to a usable condition. DO NOT attempt to<br />
heat solvent cement. <strong>The</strong> cement must be applied when the pipe and<br />
fittings are clean and free from any moisture and debris.<br />
Primer Use - Softening of pipe and fitting joining surfaces can be<br />
achieved by the cement itself or by using a suitable primer. A primer<br />
will usually penetrate and soften the surfaces more quickly than<br />
the cement alone. However, special “one-step” cements formulated<br />
for use without primers are available. Check local codes (where<br />
required) for acceptable applications.<br />
Apply Primer - USING AN APPLICATOR THAT IS AT LEAST<br />
1/2 THE SIZE OF THE PIPE DIAMETER, vigorously scrub joining<br />
surface of fitting, of pipe and then again of fitting. Work quickly<br />
to apply 2-3 coats in this manner. SOLVENT CEMENT SHOULD<br />
THEN BE APPLIED WHILE PRIMER IS STILL WET.<br />
Apply Solvent Cement - USING AN APPLICATOR THAT IS<br />
AT LEAST 1/2 THE SIZE OF THE PIPE DIAMETER, WORK<br />
THE CEMENT INTO THE JOINING SURFACES USING A<br />
CONTINUOUS, CIRCULAR MOTION.<br />
Use sufficient cement, but avoid puddling the cement on or within<br />
the fitting and pipe. Puddled cement causes excess softening and<br />
damage to the PVC or CPVC material. <strong>If</strong> interference fit was at the<br />
bottom of the socket, use extra cement and make a 2nd application<br />
to pipe. WORK QUICKLY SO THAT PIPE AND FITTING CAN<br />
BE JOINED WHILE CEMENT IS STILL WET.<br />
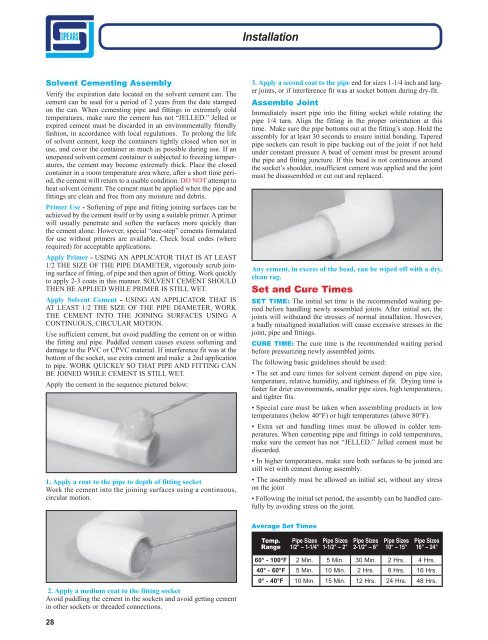
Apply the cement in the sequence pictured below:<br />
1. Apply a coat to the pipe to depth of fitting socket<br />
Work the cement into the joining surfaces using a continuous,<br />
circular motion.<br />
3. Apply a second coat to the pipe end for sizes 1-1/4 inch and larger<br />
joints, or if interference fit was at socket bottom during dry-fit.<br />
Assemble Joint<br />
Immediately insert pipe into the fitting socket while rotating the<br />
pipe 1/4 turn. Align the fitting in the proper orientation at this<br />
time. Make sure the pipe bottoms out at the fitting’s stop. Hold the<br />
assembly for at least 30 seconds to ensure initial bonding. Tapered<br />
pipe sockets can result in pipe backing out of the joint if not held<br />
under constant pressure A bead of cement must be present around<br />
the pipe and fitting juncture. <strong>If</strong> this bead is not continuous around<br />
the socket’s shoulder, insufficient cement was applied and the joint<br />
must be disassembled or cut out and replaced.<br />
Any cement, in excess of the bead, can be wiped off with a dry,<br />
clean rag.<br />
Set and Cure Times<br />
SET TIME: <strong>The</strong> initial set time is the recommended waiting period<br />
before handling newly assembled joints. After initial set, the<br />
joints will withstand the stresses of normal installation. However,<br />
a badly misaligned installation will cause excessive stresses in the<br />
joint, pipe and fittings.<br />
CURE TIME: <strong>The</strong> cure time is the recommended waiting period<br />
before pressurizing newly assembled joints.<br />
<strong>The</strong> following basic guidelines should be used:<br />
• <strong>The</strong> set and cure times for solvent cement depend on pipe size,<br />
temperature, relative humidity, and tightness of fit. Drying time is<br />
faster for drier environments, smaller pipe sizes, high temperatures,<br />
and tighter fits.<br />
• Special care must be taken when assembling products in low<br />
temperatures (below 40°F) or high temperatures (above 80°F).<br />
• Extra set and handling times must be allowed in colder temperatures.<br />
When cementing pipe and fittings in cold temperatures,<br />
make sure the cement has not “JELLED.” Jelled cement must be<br />
discarded.<br />
• In higher temperatures, make sure both surfaces to be joined are<br />
still wet with cement during assembly.<br />
• <strong>The</strong> assembly must be allowed an initial set, without any stress<br />
on the joint<br />
• Following the initial set period, the assembly can be handled carefully<br />
by avoiding stress on the joint.<br />
Average Set Times<br />
Temp.<br />
Range<br />
Pipe Sizes Pipe Sizes<br />
1/2" – 1-1/4" 1-1/2" – 2"<br />
Pipe Sizes<br />
2-1/2" – 8"<br />
Pipe Sizes<br />
10" – 15"<br />
Pipe Sizes<br />
16" – 24"<br />
2. Apply a medium coat to the fitting socket<br />
Avoid puddling the cement in the sockets and avoid getting cement<br />
in other sockets or threaded connections.<br />
60° - 100°F 2 Min. 5 Min. 30 Min. 2 Hrs. 4 Hrs.<br />
40° - 60°F 5 Min. 10 Min. 2 Hrs. 8 Hrs. 16 Hrs.<br />
0° - 40°F 10 Min. 15 Min. 12 Hrs. 24 Hrs. 48 Hrs.<br />
28