You also want an ePaper? Increase the reach of your titles
YUMPU automatically turns print PDFs into web optimized ePapers that Google loves.
______________________________________________________________<br />
CARVIN<br />
X-AMP<br />
Tube Guitar Amplifiers<br />
OPERATION MANUAL<br />
Manual 96-00100<br />
Revision 2.0<br />
Dec 1990<br />
Covers the Following Models<br />
X-50B, X-100B<br />
X60, XT112, XV112, XV212<br />
(800)854-2235<br />
__________________________________________________________________
CONTENTS<br />
Section Description Page<br />
1 Your New X-AMP<br />
Table of Contents 1-1<br />
Receiving Inspection 1-2<br />
For the New Owner 1-3<br />
2 Quick Start Up<br />
Quick Start Up 2-1<br />
3 Detail Control Descriptions<br />
Front Controls 3-1<br />
Rear Controls 3-2<br />
4 Understanding the X-Amp<br />
How to Set Your X-Amp 4-1<br />
The X-AMP Design 4-2<br />
5 Specifications<br />
Specifications 5-1<br />
6 Service and Technical Information<br />
Trouble Shooting 6-1<br />
Schematic Diagrams 6<br />
7 Warranty Information<br />
Warranty and Service Information 7-1
Receiving Inspection<br />
INSPECT YOUR X-AMP FOR ANY DAMAGE which may have occurred during shipping. If any damage is<br />
found, notify the shipping <strong>com</strong>pany and call CARVIN immediately.<br />
SAVE THE CARTON & ALL PACKING MATERIALS. In the event you have to reship your amp, always<br />
use the original carton and packing material. This will provide the best possible protection for your unit during<br />
shipment. CARVIN and the shipping <strong>com</strong>pany are not liable for any damage caused by improper packing.<br />
SAVE YOUR INVOICE. It will be required for warranty servicing of your unit. Always check your invoice<br />
against the items you have received.<br />
SHIPMENT SHORTAGE. If you find items missing, it may be that they were shipped separately. Please<br />
allow several days for the rest of your order to arrive before inquiring. If you determine (after allowing an<br />
appropriate amount of time) you have not received all the items you ordered, please call CARVIN.<br />
For the New Owner<br />
Congratulations on your selection of CARVlN products: “The Professional's Choice.” Your new X-Amp<br />
demonstrates CARVIN's <strong>com</strong>mitment to producing the highest quality & most sophisticated engineering in the<br />
guitar industry today. Its wide acceptance and use by industry professionals illustrates the basis for CARVIN's<br />
recognition as “The Professional's Choice.”<br />
Since their conception, the X-Amps have offered advantages for the guitar player in both performance and<br />
features. Whether you purchased a single 12" Combo amp or double 4-12 Stack you will find powerful<br />
solutions for your lead guitar requirements.<br />
The <strong>Carvin</strong> X-Amps are the apex of advanced guitar amps. Every aspect of their design is specifically targeted to<br />
the needs of critical guitar players. The X-Amps' vacuum tube circuit has a rich sustaining overdrive leading<br />
outstanding performers and recording artist to endorse the X-Amp. As one of the first remotely switched two<br />
channel guitar amps, the X-Amp has helped establish channel switching as an industry standard.<br />
Professionalism can only be measured by the results people achieve through their effort and knowledge. It is<br />
not something that automatically happens when buying a new or more sophisticated product. Rather, it's what<br />
you do with the equipment and how well you do it that ultimately makes the point. We are certain your new X-<br />
Amp will deliver the performance necessary for you to achieve solid results, and ultimately attain a high degree<br />
of professional gain and enjoyment.<br />
To <strong>com</strong>pliment your new amp and help you acquire that knowledge, we've included this <strong>manual</strong>. All of the<br />
information you need to be up and running is right here! You'll find using this <strong>manual</strong> easy and convenient.<br />
We've attempted to present the technical aspects of your new X-Amp accurately and in “plain English”. But, if<br />
you have any questions that are not answered here, please call us on our toll free number. Our sales staff is well<br />
versed in the technical aspects of our products and are waiting to assist you with any questions you may have.<br />
We wish to ensure your <strong>com</strong>plete satisfaction and enjoyment with your new X-Amp.<br />
If you would like to <strong>com</strong>ment on features or performance of your new X-Amp, please feel free to contact us.<br />
Comments from our customers help us improve and further develop our products and our business. We<br />
sincerely wel<strong>com</strong>e any <strong>com</strong>ments or ideas you may have.<br />
Please send in the warranty card. It will allow us to better understand how you are using our equipment while<br />
keeping a ready reference for our files. Sending in the warranty card also helps us to mail out literature and<br />
information that may be of interest to you as a professional musician. Let us know where you are so we can<br />
keep in touch!<br />
In this <strong>manual</strong> there are plenty of diagrams and descriptions to aid you in understanding your new X-Amp . So,<br />
with this <strong>manual</strong> in hand you hold the key to proper operation of your new X-Amp, and to achieve truly<br />
professional results.<br />
May you have many years of enjoyment, success, and fun with your new CARVIN X-Amp!
Quick Set Up<br />
If you're like most new owners, you're probably in a hurry to use your new X-Amp. Here are some brief<br />
instructions to get you started.<br />
1) CONNECTING AC POWER<br />
• Check and change if necessary the rear AC Voltage Switch to the proper voltage. On some models a switch<br />
will not be not found, instead pull out the Fuse Holder (built into the AC cord receptacle) and turn it over to<br />
the proper voltage as seen on the holder.This automatically switches the voltage and the fuse to the proper<br />
voltage and fuse value. On units with an AC Voltages Switch, change the fuse as necessary (fuse values are<br />
listed on the rear panel).<br />
• Use only a grounded (3 prong) power outlet to prevent a shock hazard. This provides the quietest and safest<br />
method of operation.<br />
2) CONNECTING SPEAKERS<br />
• X60 / XT112 / XV112 / XV212 COMBO AMPS Use either of the two speaker jacks on the rear<br />
panel. Be sure the IMPEDANCE switch is set properly or reduced power will result. The impedance is listed<br />
on the rear label of the speaker. Both jacks are wired in parallel. Be sure the RMS POWER switch is<br />
selected for full power.<br />
• X-50B / X100B HEADS<br />
Use either of the two speaker jacks on the rear panel. Be sure the IMPEDANCE switch is set properly or<br />
reduced power will result. The impedance is listed on the rear label of the enclosure. Both jacks are wired in<br />
parallel. If using a double 8Ω speaker stack, then select 4Ω. Be sure the RMS POWER switch is selected<br />
for full power.<br />
3) CONNECTING THE GUITAR TO YOUR AMP<br />
• Use a high quality shielded audio cable. Plug your instrument into the "HI" input jack for maximum gain.<br />
4) TURNING YOUR AMP ON<br />
• Turn all volume and reverb controls off.<br />
• Be sure all volume control switches are pushed in.<br />
• Plug in your amp and speakers. Turn the amp ON and STANDBY off (up)<br />
• Proceed with the following:<br />
5) RHYTHM VOLUME CONTROL<br />
• This control does two things. First, it controls the volume level of your clean playing.<br />
• Secondly, it's a BRIGHT switch when pulled out.<br />
• NOTE: If your guitar is full on and you have hot pickups or active electronics, you may want to turn the<br />
guitar volume down slightly or use the LO INPUT jack (-6dB) to prevent input clipping (distortion) of the<br />
first stage.<br />
6) LEAD DRIVE CONTROL<br />
• This control does two things. First, it switches the amp from the Rhythm Channel to the Lead Drive<br />
Channel when you pull the knob out.<br />
• Secondly, rotating the knob adjusts the amount of Lead overdrive. The amount can be varied from nearly<br />
clean at "0" to full tube overdrive at "10". This will give you the full range from tube crunch to a full<br />
blown cranked output.<br />
• For more drive, pull out the MASTER CONTROL to switch in the hot rodded 20db gain circuit. Your<br />
sound will get fatter with more sustain—not louder.<br />
• NOTE: The guitar's volume control acts like a remote Lead Drive control too. So, for maximum drive, the<br />
guitar should be full on.<br />
7) MASTER VOLUME CONTROL<br />
• This control does two things. It controls the overall volume of the LEAD DRIVE channel.<br />
• And, by pulling the control out, it engages the hot rodded circuit as mentioned earlier.<br />
• Because of the hot rodded nature of<br />
this amp, the MASTER volume control can not be turned up full when the TREBLE and PRESENCE<br />
controls are turned up or squealing will result from the extreme gain.<br />
8) ACTIVE TONE CONTROLS<br />
• Set the BASS, MID, TREBLE and PRESENCE controls at their mid point "5". This is the natural or<br />
"flat" position of the amp. Be careful, because these controls offer more boost and cut than standard<br />
controls. Never turn all the controls up full or squealing will result. If you need more MASTER volume,
turn the TREBLE and PRESENCE controls down. Use only the amount you need—these controls are very<br />
powerful.<br />
9) FS36 FOOTSWITCH<br />
• The optional FS36 footswitch remotely controls the channel switching by depressing the "CH" button on<br />
the footswitch. Be sure that the LEAD DRIVE control is pushed in for this to work. The EFFECTS LOOP<br />
only works with the FS36. To control it, depress the "EFF 1". The REVERB is controlled by depressing<br />
"EFF 2".<br />
10) CAUTION<br />
• NOTE: Just like any highly modified amp, you will not be able to turn the channel volume, master<br />
volume, treble and presence controls up full (at the same time) with out squeal and feedback. This is normal<br />
because of the extended "Hot Rodded" range of these controls.<br />
• Spend time with your new X-Amp. You may not get your sound immediately but all the possibilities are<br />
there.<br />
Getting the Performance Out of your X-Amp<br />
There are two primary factors which will determine the overall sound achieved with your X-Amp. 1) The<br />
output level and characteristics of your guitar pickup configuration (IE: single coil vs humbucking, standard<br />
output vs high output, ETC). 2) The gain structure and tone settings you select on the X-Amp itself.<br />
Regardless of the type of guitar you prefer, the place to start with the X-Amp's tone setting is: all tone<br />
controls set on "5" (flat). Remember, the X-amp utilizes "Active" tone controls, so "5" is the flat response and<br />
anything below or above "5" is cutting or boosting the frequencies that the individual control affects.<br />
The graphic EQ is assignable to either the Lead or Rhythm mode—we would re<strong>com</strong>mend that you start by<br />
using this section for your "Lead" mode. When using the Graphic EQ, remember that this feature is in addition<br />
to and not separate from the basic tone controls.<br />
Start your tone setup in the clean "Rhythm" mode using the chart below as a rough guide. If using a guitar<br />
with single coil pickups, you will probably leave the Rhythm Volume "Pull Bright" in the normal mode and<br />
slightly boosting the "Mid" control. If you are using a guitar with "High Output" humbucking pickups, try<br />
"cutting" your 'Mid" control a bit and adjust the rest of the tone controls to your liking. You may want to use<br />
the "Pull Bright" for this type of setup. The "Pull Bright" is most effective between 2 and 3" on the "Rhythm"<br />
control.<br />
Now setting your "Lead" mode should be fairly easy. Most players tend to use the extra gain available in the<br />
"Hi Lead" setting so pull the Master "Hi Lead" control outward. Set your "Lead Drive at about "5" to start with<br />
and adjust your "Master" control to a volume level <strong>com</strong>parable to your "Rhythm" volume. Do this level<br />
matching by "ear" not by the numbers on the controls. Now, go to the "Graphic EQ" and make the final<br />
adjustment's to your "Lead" tone. Be sure the Graphic is switched to the Lead position. Again, the Graphic EQ<br />
is an active circuit so a little adjustment goes a long way.<br />
The thing to remember when using your X-Amp is that it is highly responsive and many of the tendencies to<br />
extreme settings acquired by using "passive" type tone circuits will need to be re-learned to get the ultimate<br />
benefit from your X-Amp. The sounds are all there and the possibilities are endless—have fun.<br />
EXAMPLES OF X-AMP CONTROL SETTINGS -<br />
In order to get your "sound" from the X-amp you will probably need to spend a bit of time trying various<br />
<strong>com</strong>binations of amp settings and guitar settings. We have put together the following "recipes" for various<br />
sounds which we hope will get you started. In order to get the sounds described below set the controls as<br />
described and then set your RHYTHM or MASTER volume control for the volume you want. Set your guitar<br />
volume at maximum and tone for full treble. Use your "lead" pickup for the "Marshall" type distortion and your<br />
"rhythm" pickup for "Boogie" type distortion.<br />
BRIGHT LEAD DRIVE LEAD SW BASS MID TREB PRES<br />
CLEAN RHYTHM OFF OFF 5 5 5 5<br />
BRIGHT RHYTHM ON OFF 5 5 7 7<br />
SLIGHTLY DISTORTED LEAD OFF ON—2 ON 6 5 5 5<br />
"MARSHALL" DISTORTION ON ON—10 ON 7 4 7 7<br />
"BOOGIE" DISTORTION OFF ON—10 ON 6 5 8 3
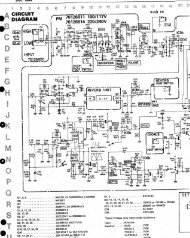
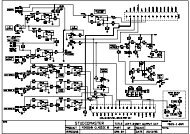
X-Amp Design (technical description)<br />
(Refer to schematic diagram)<br />
Signal input to the X-Amp is by way of either the High or Lo input jacks. These are shorting type jacks<br />
with input resistor arrangement (R62 & R63) such that the LO input is attenuated 6 dB with respect to the HI<br />
input when either jack is used alone. If both jacks are used simultaneously then they each will have the same<br />
sensitivity. The input impedance at the HI jack is 2.2 Megohm (R14): the LO input impedance is 20k ohms<br />
(R62 plus R63).<br />
The two triode stages of V1 serve as the input preamps for both the LEAD and RHYTHM channels. The<br />
LEAD channel preamp is operated with a cathode bypass capacity for maximum gain whereas the RHYTHM<br />
channel preamp employs no cathode bypass so that maximum headroom can be provided for clean playing.<br />
Because V1 serves as the input preamps for both channels it is the most critical of the three 12AX7A's in the<br />
unit. This tube should be selected for low noise and low microphonics.<br />
After the RHYTHM channel preamp, the signal is processed through a fixed EQ network and then applied to<br />
the RHYTHM volume pot. When the RHYTHM channel BRIGHT switch is actuated C14 is allowed to pass<br />
high frequencies around the volume control. For this reason the BRIGHT effect decreases as the RHYTHM<br />
volume control is increased past about "3". A4(A) serves as a level recovery amp following the volume control.<br />
FET switch Q4 is used to mute the RHYTHM channel signal whenever the LEAD channel is selected. Note<br />
that logic line Q goes high when the RHYTHM channel is selected and goes low when the LEAD channel is<br />
selected. From A4(A), the signal is routed to A5(A) through FET switch Q5.<br />
Following the LEAD channel preamp V1(A), the lead signal is processed through a fixed EQ network which<br />
has two possible response characteristics depending on the setting of the HI LEAD switch. FET switch Q1<br />
mutes the lead signal whenever the LEAD channel is not selected in order to prevent distortion products from<br />
leaking into the (clean) RHYTHM channel. The two triode stages of V2 are used in series to provide high<br />
levels of overdrive. The MASTER volume pot (P3) sets the amount of overdrive signal to be passed on to the<br />
FET switch channel selector A5(A).<br />
At the channel selector stage Q2 selects the LEAD channel and Q5 selects the RHYTHM channel. A channel<br />
is selected when the control line at the gate of its FET is low. Logic lines Q and Q NOT toggle in response to<br />
either the front panel PULL ON channel switch or in response to the foot switch; these lines also drive the front<br />
panel LED's via inverted buffers at A6.<br />
The signal selected at A5(A) feeds the effects loop drive amp A4(B). If an outboard effects is patched into the<br />
loop then A4(B) drives the effects input and the effects output returns to A5(B) via Q10. If no effects is patched<br />
in then the send signal feeds the return by way of R160. FET switches Q9 and Q10 toggle in response to the<br />
EFF 1 button on the FS36 footswitch. The send and return levels are varied simultaneously by the effects level<br />
switch.<br />
The signal returned from the effects loop is processed through two tone control stages at A1(A and B) and then<br />
fed to both the reverb drive amp IC3 (A and B) and the reverb return summing amp A2(A). When the front<br />
panel tone controls are set to "5" these stages have a flat frequency response and unit gain.<br />
The reverb unit is driven by the two op amps of A3 operated in paralleled for increased current capability.<br />
Reverb drive equalization is provided by R58 and C31. A2(B) serves as the reverb return preamp and is operated<br />
with 40dB of gain. Further equalization is provided by C32 and R56. FET switch Q6 turns the reverb on and<br />
off. Logic signal conditioning for Q6 is provided by Q7 and one of A6's inverter buffers. The REVERB<br />
control (P8) sets the amount of reverb signal returned to the reverb summing amp. The output of the reverb<br />
summing amp A2(A) constitutes the output of the preamp section of the X-Amp and is tied directly to the input<br />
to the power amplifier.<br />
V3's two triode stages serve as a phase inverter for the power amps push-pull class A/B output stage. Power<br />
pentodes V4 and V5 drive the output coupling transformer T2. Grid biasing for V4 and V5 (approx. -52V)dc is<br />
determined by the voltage divider from by R126 and R127. Quiescent current (measured across the open<br />
standby switch) is normally 100mA (50mA for 50 watt models) +-15mA. Power transfer to the loudspeaker is<br />
maximized by selecting the appropriate output transformer tap at the speaker impedance switch. Loop feedback<br />
around the power amplifier is provided by R67 ad C55.
X-50B/X-100B Specifications<br />
Input Impedance 2.2 Meg ohms<br />
Maximum Input Level before clipping Hi 1:1.5V rms, Lo 2: 3V rms<br />
EQ Tone Controls—Bass ±15 dB shelving below 200 Hz<br />
Mid ±9 dB peak/dip at 500 Hz<br />
Treble ±15 dB peak/dip at 4K Hz<br />
Presence ±15 dB shelving above 8K Hz<br />
Graphic EQ Freq. 75, 150, 500, 1.5k & 3k Hz ±18dB<br />
Hot Rod Gain +20 dB with Master Volume pulled out<br />
Effects Loop -10, 0, or +4 dB adjustable<br />
Line Output +4 dBV 600Ω XLR<br />
Power Output—X50B 50 watts rms (145 watts peak)<br />
X100B 100 watts rms (250 watts peak)<br />
Adjustable Power Output 25%, 50%, and full power<br />
Output Impedance 4, 8, and 16 ohms<br />
Output Tubes—X-50B Two EL34's<br />
X-100B Four EL34's<br />
Pre Amp Tubes Three12AX7’s<br />
Power Requirements 120/240 VAC 50-60 Hz<br />
Fuse 120V: 3.15 Amp. 240V: 2 Amp— slow-blow 5x20mm<br />
Dimensions 29”W x 10”D x 11”H<br />
Shipping Wt X50B—46 lbs, X100B—49 lbs<br />
XT112, XV112 & XV212 Specifications<br />
Input Impedance 2.2 Meg ohms<br />
Maximum Input Level before clipping Hi 1:1.5V rms, Lo 2: 3V rms<br />
EQ Tone Controls—Bass ±15 dB shelving below 200 Hz<br />
Mid ±9 dB peak/dip at 500 Hz<br />
Treble ±15 dB peak/dip at 4K Hz<br />
Presence ±15 dB shelving above 8K Hz<br />
Graphic EQ Freq. 75, 150, 500, 1.5k & 3k Hz ±18dB<br />
Hot Rod Gain +20 dB with Master Volume pulled out<br />
Effects Loop -10, 0, or +4 dB adjustable<br />
Line Output +4 dBV 600Ω XLR<br />
Power Output—XT112 50 watts rms (145 watts peak)<br />
XV112, XV212 100 watts rms (250 watts peak)<br />
Speaker(s) XT112/XV112: one <strong>Carvin</strong> BR12 XV212: two BR12's<br />
Adjustable Power Output 25%, 50%, and full power<br />
Output Impedance 4, 8, and 16 ohms<br />
Output Tubes— XT112 Two EL34's<br />
XV112 Four EL34's<br />
Pre Amp Tubes Three12AX7’s<br />
Power Requirements 120/240 VAC 50-60 Hz<br />
Fuse 120V: 3.15 Amp. 240V: 2 Amp— slow-blow 5x20mm<br />
Dimensions—XT112, XV112 22”W x 10.5”D x 21”H<br />
Shipping Wt XT112—59lbs, XV112—61lbs<br />
Dimensions—XV212 26”W x 10.5”D x 21”H<br />
Shipping Wt XV212—71lbs<br />
X60 Specifications<br />
Input Impedance<br />
Maximum Input Level before clipping<br />
EQ Tone Controls—Bass<br />
Mid<br />
Treble<br />
Presence<br />
Hot Rod Gain<br />
Effects Loop<br />
Power Output<br />
Speaker<br />
Output Impedance<br />
Output Tubes<br />
Power Requirements<br />
Fuse—120VAC<br />
Dimensions<br />
2.2 Meg ohms<br />
Hi 1:1.5V rms, Lo 2: 3V rms<br />
±15 dB shelving below 200 Hz<br />
±9 dB peak/dip at 500 Hz<br />
±15 dB peak/dip at 4K Hz<br />
±15 dB shelving above 8K Hz<br />
+20 dB with Master Volume pulled out<br />
0 dBV<br />
60 watts rms (155 watts peak)<br />
One <strong>Carvin</strong> BR12<br />
4, 8, and 16 ohms<br />
Output: Two EL34's Pre Amp: Three 12AX7's<br />
120/240 VAC 50-60 Hz<br />
120V: 3.15 Amp. 240V: 2 Amp—slow-blow 5x20mm<br />
18”W x 10.5”D x 18”H. Shiping Wt 45 lbs
IN CASE OF TROUBLE<br />
All X-Amps all fully tested with a 10 hr break-in period before they leave the factory. However, on those rare<br />
occasions when an X-Amp fails to operate properly, the problem is almost always with the vacuum tubes.<br />
Vibrations from shipping is usually the cause. The solution to fixing the problem could be as simple as<br />
replacing the defective tube. As the owner of a tube amp, it is to your advantage to learn the symptoms of a bad<br />
tube so that you can avoid the inconven- ience and expense of returning your amp to the factory for service. We<br />
think the trouble shooting hints provided below should prove helpful. However, if you're not sure your problem<br />
is a bad tube, then the best way to proceed is to replace all the tubes in the amp. For this reason we re<strong>com</strong>mend<br />
carrying spare tubes.<br />
12AX7A PRE AMP TUBES<br />
The most critical 12AX7A tube for low noise and controlling acoustic tube feedback is V1. A poor V1 can<br />
also cause a rattling sound when certain notes are played. If this is the case, the tube will have to be replaced.<br />
Viewing the amp from the rear, V1 is the small tube at the far right. At CARVIN we select this tube for low<br />
microphonics. You may switch V2 or V3 into V1 for possible improvements. Some of the symptoms of a<br />
bad 12AX7A tube:<br />
1. Premature feedback<br />
2. Rattle sound at certain notes<br />
3. Ringing<br />
4. Popping<br />
5. Week Lead Drive<br />
6. Intermittent Channel<br />
EL34 POWER TUBES<br />
The symptoms listed here could indicate a bad EL34 power tube. There are a total of 4 tubes to be checked (2<br />
tubes<br />
on the X-50B and X-60). These are the large tubes at the very back of the amp. Caution, these tubes normally<br />
run hot and may be hot to the touch.<br />
If in doubt, simply replace the tubes with new ones. Some of the symptoms of a bad EL34 tube:<br />
1. Loud Hum<br />
2. Popping<br />
3. Early Distortion<br />
4. Low Power Output<br />
5. Glowing Red Hot<br />
Note: The EL34's normally have a "bluish-red" glow.<br />
CHECKING TUBES<br />
Tubes need to be checked under load. Bad tubes will generate a lot of noise when plucked. We also<br />
re<strong>com</strong>mend rotating a new tube in with the old tubes to help determine the bad tube. Caution, there is the<br />
possibility that several tubes may be bad.<br />
FACTORY SERVICING / TUBE<br />
PROBLEMS<br />
Typically over half the service calls on tube amps are bad tubes! Be sure to replace your tubes before your have<br />
your amp serviced. Shipping is expensive. We at CARVIN are be happy to help you through any problems<br />
you are having. Give us a call at 800-854-2235.
CHANNEL SWITCHING / FOOTSWITCH PROBLEMS<br />
a) Verify that the channel switcing and reverb are working properly with the footswitch disconnected.<br />
b) If the footswitch is not working, tighten the small set screw in the XLR connector on the footswitch cable.<br />
NOTE: this is a reversed—right-hand thread). The footswitch ground makes its contact through this screw.<br />
c) If the channel switching at the amp is not working, replace the defective 4049 IC and check the R132, 22<br />
ohms resistor.<br />
EFFECTS LOOP PROBLEMS<br />
a) Check the Effects Loop with nothing connected into the loop. If everything is OK, a noticeable drop in<br />
volume should occur when depressing the EFF 1 button to the on position on the footswitch.<br />
b) With the effects loop turned on, connect a shielded phone cord to the "Return" jack. The signal should be<br />
off. Connect the other end to the "Send" jack. The signal should be there. Now, change the position of the<br />
effects loop "Level" switch . There should be no noticeable change in the volume level. Further, turn the<br />
effects loop on and off via the footswitch. Again, there should be no noticeable change in volume.<br />
c) Set the "Level" switch (-10, 0 or +4) to the position that offers the lowest noise without distortion.<br />
d) If the effects loop is not functioning, servicing will be required.
Warranty and Service Information<br />
You may use our specialized service department to repair your X-Amp amp. Call us Toll-Free 800-854-2235 for your<br />
Service number so we will anticipate your shipment. Put the Service Number on the carton and be sure to include a full<br />
description of every problem when returning your unit. Pack the amp in its original carton using all its packing material<br />
and return it by UPS pre-paid. Units with physical damage, missing parts, or damage from improper service are not<br />
serviceable.<br />
• CALL BEFORE RETURNING<br />
If in doubt about a malfunction, please call our service department (toll-free) and we will help you determine if your unit i s<br />
defective to avoid costly shipping.<br />
• REPAIRS UNDER WARRANTY(1Year)<br />
1 . There is no charge for service under warranty. However, shipping is to be paid both ways by the customer.<br />
2 . Include a copy of the original invoice to verify your warranty along with a full description of the problem(s).<br />
3 . Allow approximately 10 days for servicing.<br />
4 . Include a check for $15 to cover the return shipping charges or we can ship the items back COD for $15 (the cost of<br />
shipping) plus the current COD fee.<br />
5 . Speaker Systems: If you require a loudspeaker repair, you should remove the defective <strong>com</strong>ponent (speaker) to save on<br />
shipping charges.<br />
6 . To avoid damage, ship only in the original carton (save your cartons—a replacement is $5 plus $5 shipping)<br />
• REPAIRS OUT OF WARRANTY<br />
1 . After your warranty has expired, the service charge for the X-Amp will be $60 which includes parts (except tubes),<br />
labor and testing to bring your unit up to factory specifications. Return shipping is an additional $15 (shipping is<br />
lower than the original catalog shipping cost because we use the same carton). Include payment with your<br />
return(personal checks are accepted).<br />
2 . If there are no problems with the unit, a flat fee of 50% ($30) is charged for checking the amp out.<br />
3 . TUBES: EL34 $18.00 ea. 12AX7: $8 ea.<br />
4 . Allow approximately 10 days for repair and testing, plus shipping time.<br />
5 . To avoid damage, ship only in the original carton (save your carton).<br />
• SERVICING IN YOUR AREA<br />
You may select your own service center or have your own qualified technician work on the unit at your own expense. This<br />
will not void the warranty unless damage was done because of improper servicing. Under the ONE YEAR WARRANTY,<br />
<strong>Carvin</strong> will ship parts pre-paid to you or your technician providing that the defective part(s) are first returned for our<br />
inspection. If you do not have a qualified service person, we ask that you do not involve yourself in servicing the unit.<br />
LIMITED WARRANTY<br />
Your <strong>Carvin</strong> Professional Series Product is guaranteed against failure for ONE YEAR. <strong>Carvin</strong> will service the unit and<br />
supply all parts at no charge to the customer providing the unit is under warranty.<br />
CARVIN WILL NOT PAY FOR PARTS OR SERVICING OTHER THAN OUR OWN.<br />
This warranty is extended to the original purchaser only and is not transferable. THIS WARRANTY DOES NOT INCLUDE<br />
FAILURES CAUSED BY INCORRECT USE, INADEQUATE CARE OF THE UNIT, OR NATURAL DISASTERS. A COPY OF<br />
THE ORIGINAL INVOICE IS REQUIRED TO VERIFY YOUR WARRANTY.<br />
<strong>Carvin</strong> takes no responsibility for any horn driver or speaker damaged by this unit. This warranty is in lieu of all other<br />
warranties, expressed or implied. No representative or person is authorized to represent or assume for <strong>Carvin</strong> any liability<br />
in connection with the sale or servicing of <strong>Carvin</strong> products. No liability is assumed for damage due to accident, abuse, lack<br />
of reasonable care, loss of parts, or failure to follow <strong>Carvin</strong>'s directions. CARVIN SHALL NOT BE LIABLE FOR<br />
INCIDENTAL OR CONSEQUENTIAL DAMAGES.<br />
In the interest of creating new products and improving existing ones, <strong>Carvin</strong> is continually researching the latest state of the<br />
art audio design methods, and modern packaging and production techniques. Thus, <strong>Carvin</strong> reserves the right to make<br />
changes in its products and specifications without notice or obligation.<br />
TOLL FREE 800-854-2235