Owner's Manual - TNG Motor Scooters
Owner's Manual - TNG Motor Scooters
Owner's Manual - TNG Motor Scooters

Create successful ePaper yourself
Turn your PDF publications into a flip-book with our unique Google optimized e-Paper software.
Owner’s <strong>Manual</strong><br />
Grand Sport 150cc (GS150)<br />
Revised 11/08
LOCATING YOUR VIN#<br />
The serial numbers of the frame and engine are used for vehicle registration.<br />
The frame VIN# and label are located on the leg shield.<br />
Then engine # is located on the back of the engine.<br />
Frame #<br />
Engine #<br />
2
A: INTRODUCTION<br />
Thank you for purchasing a CMSI Manufactured <strong>TNG</strong> motor scooter. CMSI has invested over 15 years<br />
in establishing the facilities, technical infrastructure and nationwide sales and service network that exists<br />
today as <strong>TNG</strong>, a trademark of CMSI. <strong>TNG</strong> <strong>Scooters</strong> is growing rapidly due to its reputation in quality<br />
research, styling & design, production and service.<br />
We recommend genuine <strong>TNG</strong> products for replacement parts and accessories as they have been specifically<br />
designed for your scooter and manufactured to meet CMSI’s demanding standards. With the intention of<br />
achieving our goal to provide complete customer support, detailed parts catalogs are available for you to<br />
view at our web site, www.tngscooters.com. We continuously keep a large inventory of parts and accessories<br />
in stock to support our <strong>TNG</strong> dealers, service centers and ultimately, <strong>TNG</strong> scooter owners. Your local <strong>TNG</strong><br />
dealer knows your scooter the best and always is interested in your satisfaction! We advise your local <strong>TNG</strong><br />
dealer make all repairs on your scooter. You can find a complete list of dealers and service centers on our<br />
website.<br />
This Owner’s <strong>Manual</strong> contains important information on safety, operation, and maintenance. Anyone who<br />
operates a <strong>TNG</strong> Scooter should carefully read and understand the contents of this manual before use.<br />
<strong>TNG</strong> <strong>Scooters</strong> are street legal vehicles in all 50 states. You need to check with your state requirements on<br />
license and registration to ride this scooter legally on public roads. Do not operate the scooter in off-road<br />
condidions.<br />
3
SPECIAL SYMBOLS<br />
Significant safety messages are provided both in this manual and on the scooter. For your safety and the<br />
safety of others please pay special attention to all warnings preceded by !.<br />
! WARNING - Indicates risk of severe injury or DEATH may result to the scooter operator, a bystander or<br />
a person inspecting or repairing the scooter if failure to follow these instructions.<br />
CAUTION - Indicates that special precaution must be taken to avoid damage to the scooter.<br />
NOTE - A NOTE provides key information to make procedures easier to spot.<br />
This Owner’s <strong>Manual</strong> should be considered as a permanent part of the scooter as it contains important<br />
information for operation and maintenance of the scooter. It should remain with the scooter at all times.<br />
This Owner’s <strong>Manual</strong> contains the most current product information at the time of approval for printing.<br />
<strong>TNG</strong> <strong>Scooters</strong> reserves the right to make changes at any time without notice and without incurring any<br />
obligation. If you have any questions about the manual, please consult your <strong>TNG</strong> dealers, or our web site<br />
www.tngscooters.com.<br />
4
B: TABLE OF CONTENTS<br />
A: INTRODUCTION Page 3<br />
B: TABLE OF CONTENTS Page 5<br />
C: WARRANTY INFORMATION Page 6<br />
D: SAFETY INSTRUCTIONS Page 7<br />
E: SPECIFICATIONS Page 13<br />
F: COMPONENT DESCRIPTIONS & FUNCTIONS Page 14<br />
G: PRE-RIDE CHECKLIST Page 21<br />
H: PROPER OPERATION Page 24<br />
I: SERVICE MAINTENANCE SCHEDULE Page 29<br />
J: WINTERIZING Page 38<br />
K: TROUBLESHOOTING Page 43<br />
L: FULL WARRANTY INFORMATION Appendix<br />
5
C: WARRANTY INFORMATION<br />
WARRANTY: CMSI, Inc., warrants to the first retail purchaser of all <strong>TNG</strong> vehicles from an<br />
Authorized CMSI Dealer, and each subsequent owner, that the vehicle is free from defects in materials<br />
and workmanship for the period stated in this warranty section. For complete warranty information<br />
see the Warranty Appendix.<br />
NOTE: Your scooter performs best when run weekly. Running the engine for a minimum of 20 -30 minutes<br />
per week ensures that your battery remains fully charged and the fuel system doesn’t foul.<br />
NOTE: For the best performance from your <strong>TNG</strong> scooter have a <strong>TNG</strong> dealer perform all service maintenance.<br />
Failure to follow the service maintenance schedule may void your warranty coverage.<br />
6
D: SAFETY INSTRUCTIONS<br />
RIDING SCOOTERS IS FUN ONLY IF YOU PUT SAFETY AS YOUR TOP PRIORITY.<br />
! WARNING: Before you start operating your scooter:<br />
• Be sure you read this owner manual completely and understand all operating<br />
features.<br />
• Take sufficient time training with safe and proper riding technique.<br />
• Practice until you are knowledgeable and comfortable with your scooter.<br />
• Become knowledgeable with all road signs.<br />
! WARNING Failure to follow any SAFETY INSTRUCTION could cause severe injury or even death to<br />
the scooter operator, passenger or a bystander.<br />
Protective Gear<br />
Riding a scooter leaves the rider exposed. Therefore, wearing appropriate protective gear can prevent or<br />
diminish injuries from accidents.<br />
1. An Approved Helmet<br />
The majority of serious scooter injuries and deaths are the direct result of a head injury. Therefore, drivers<br />
and passengers should always wear an approved helmet to prevent or reduce the chance of head injury.<br />
An approved helmet needs to:<br />
7
• Meet U.S. Department of Transportation (DOT) and state standards. In addition with labels from the<br />
Safety Helmet Council of America, the American National Standard Institute (ANSI), or the Snell<br />
Memorial Foundation to assure the integrity of the product.<br />
• Fits snugly on your head.<br />
• Have no obvious defects such as cracks, loose padding or frayed straps.<br />
2. Eye and Face Protection<br />
• A plastic face shield can help prevent accidents by guarding the face from debris, allowing the rider to<br />
devote full attention to the road.<br />
• Goggles can protect your eyes in the same manner. Never use eyeglasses or sunglasses in place of a<br />
face shield or goggles.<br />
3. Clothing<br />
• Bright clothing should be worn by the driver so as to be easily seen by other motorists.<br />
• Jacket and pants should cover your arms and legs completely, but not too loose to flap in the wind or<br />
catch on the levers or wheels which could result in an accident.<br />
• Leather or heavy denim clothing is preferred as these materials help to prevent or reduce abrasion.<br />
• Boots or shoes should be high enough to cover your ankles and sturdy enough to provide support.<br />
• Gloves give you a better grip and help protect your hands from the elements.<br />
8
Safe Riding<br />
• Keep enough distance from the other vehicles around you as this gives you time to react.<br />
• Ensure that you have a driver’s license with correct classification to ride this scooter in your state.<br />
• Always observe the rules of the road. Observe the posted speed limit, and signal your turns well in<br />
advance.<br />
• Know your limits. Do not go faster then you are able to control. Always travel at a speed that is proper<br />
for the terrain, operating conditions, and your experience.<br />
• Always inspect your scooter each time you use it to make sure it is in safe operating condition.<br />
• Always follow the inspection and schedule maintenance procedures described in this manual.<br />
• Test your brakes after operation in wet conditions. If necessary, apply the brakes several times to let<br />
friction dry out the linings.<br />
• Never attempt wheelies, jumps and other stunts, as these could cause damage to the scooter and loss of<br />
control.<br />
• Always keep both hands on the handlebars and feet on the floor board during operation.<br />
• Never consume alcohol or drugs before or while riding scooter.<br />
• Limit the travel distance to avoid fatigue that can affect your performance.<br />
Being seen<br />
Many scooter accidents are caused by car drivers who do not see scooter riders on the road. Therefore you<br />
need to ensure to follow these guidelines:<br />
• Wear bright clothing to increase visibility. Bright orange, yellow or green jackets or vests and brightly<br />
colored helmet can help others see you.<br />
9
• Always use turn signals when you are planning to turn or merge to main road and turn it off after you<br />
have made your turn.<br />
• Flash brake lights whenever you are going to slow down more quickly or where others may not expect<br />
you are going to slow down.<br />
• Stay out of blind spot of other motorists.<br />
• When you come to an intersection, move to the portion of your lane that will bring you into another<br />
driver’s field of sight at the earliest possible moment.<br />
Carrying Passengers & Loading<br />
! WARNING:<br />
• This scooter is rated for 2 people; total weight of the rider and the passenger must not exceed 330 lbs.<br />
• Do not exceed 17.5 lbs of cargo.<br />
• Attach the load securely since a loose load can catch in the wheel or rack causing skidding.<br />
• You should avoid carrying passengers or large loads until you have gained sufficient experience<br />
riding alone. Extra weight changes handling, stability, braking performance, turns, acceleration and<br />
deceleration.<br />
To carry passengers safely you must:<br />
1. Instruct the passenger before you start<br />
• Must wear a helmet.<br />
• Get on the scooter after you have started the engine.<br />
• Sit as far forward as possible without crowding the driver.<br />
10
• Hold firmly to your waist, hips, or belt or passenger handle.<br />
• Keep both feet on the pegs at all time, even when the scooter is stopped.<br />
• Keep legs away from the muffler.<br />
• Stay directly behind you, leaning as you lean.<br />
• Avoid any unnecessary talking or motion.<br />
2. Adjust your riding technique with passenger<br />
• Go slower<br />
• Start slowing earlier as you approach a stop.<br />
• Maintain a larger cushion of space ahead and to the sides.<br />
• Wait for larger gaps when you want to cross, enter, or merge with traffic.<br />
LOADS<br />
• A scooter is not really designed to carry cargo. However, small loads can be carried safely if they are<br />
positioned and fastened properly.<br />
• The rear luggage rack can carry 11 lbs max. The compartment under the seat can carry 6.5 lbs max. No<br />
more than 17.5 lbs. total.<br />
• Keep the load low and distribute the load evenly. An uneven load can cause the scooter to drift to one side.<br />
11
Gasoline & Exhaust Fumes<br />
! WARNING Gasoline is highly flammable and exhaust fumes are poisonous:<br />
• Turn off engine before refueling.<br />
• Do not to spill any gasoline on the engine, exhaust system or the plastic body.<br />
• Do not refuel while smoking or near any open flame.<br />
• Do not operate your scooter in a closed area as the exhaust fumes may cause loss of consciousness or<br />
death within a short time.<br />
• Do not park the scooter near any flammable source.<br />
• If you swallow gasoline, inhale gasoline vapor or spill gasoline into your eyes, see doctor immediately<br />
or call American Association of Poison Control Centers at 1-800-222-1222 for assistance.<br />
• If you spill gasoline on your clothes, change and wash the affected area immediately with soap.<br />
Modification<br />
Any modifications to this scooter or removal of original equipment without approval from <strong>TNG</strong> <strong>Scooters</strong><br />
may cause it to be unsafe for use and may trigger severe accident. Modifications may also make your<br />
scooter illegal to use and will void any and all warranty coverage.<br />
ACCESSORIES<br />
• We recommend ISS Soft Storage scooter bags for your scooter. See www.cmsiinc.com for the ISS<br />
website and information.<br />
• <strong>TNG</strong> custom accessories are also available on the www.tngscooters.com website.<br />
12
E: SPECIFICATIONS<br />
Model Grand Sport 150cc Tire Size (Rear) 100/80-16<br />
Model Number GS150 Tire Pressure (Front) 29psi<br />
Length 70.4 inches Tire Pressure (Rear) 33psi<br />
Width 26.9 inches Idle RPM 1500<br />
Height 43.7 inches Exhaust Valve Gap (Cold) 0.15mm / 0.006 inch<br />
Dry Weight (no fuel) 250 lbs. Intake Valve Gap (Cold) 0.10mm / 0.004 inch<br />
Max. Load 330 lbs Spark Plug Type Autolight 4194<br />
Most Economical Speed 20 mph Battery Type 12V 6Ah<br />
Noise 80dB(A) Headlight (Hi/Lo Beam) 35W / 35W<br />
Engine Type Air Cooled - 4 Stroke Front Running Light 3W<br />
Cylinder Arrangement Single Cylinder Brake/Tail Lights 21W / 5W<br />
Displacement 150cc Turn Signal Light 10W<br />
Ignition Type CDI Turn Signal Indicators ( Dash) 3W<br />
Transmission CVT Instrument Illumination 3W<br />
Front Brake Disc Fuses 15 Amps<br />
Rear Brake Disc Fuel Type 90 Octane<br />
Tire Size (Front) 100/80-13 Fuel Capacity 2.4 gals.<br />
Lubricating Oil<br />
SAE 10W40<br />
Opti-4 Required for Engine Warranty<br />
13
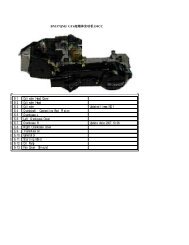
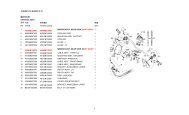
F: COMPONENT DESCRIPTIONS & FUNCTIONS<br />
6<br />
13<br />
3<br />
5<br />
4<br />
7<br />
14 15<br />
2<br />
8<br />
12<br />
9<br />
1. Battery 5. Handle Bars 9. Air box & Filter 13. Instrument Panel<br />
2. Muffler 6. Mirrors 10. Kick Starter 14. Ignition Switch<br />
3. Underseat Storage 7. Turn Signals 11. Side Stand 15. Fuel Cap<br />
4. Seat 8. Headlight 12. Storage Hook 16. Center Stand<br />
14<br />
1<br />
11<br />
10<br />
16
4<br />
5<br />
6<br />
3<br />
2<br />
1<br />
9<br />
10<br />
7<br />
8<br />
1. Horn Button 6. Fuel Gauge/Warning Lights<br />
2. Turn Signal Switch 7. Front Brake Lever<br />
3. Rear Brake 8. Throttle<br />
4. Hi / Lo Beam Switch 9. Engine Stop Switch<br />
5. Speedometer 10. Electric Starter Button<br />
15
Ignition Switch / Steering & Seat Lock<br />
TABLE 1.1<br />
Key Position<br />
Power to Electric<br />
Circuits<br />
Ignition<br />
Steering<br />
Storage<br />
Compartment<br />
Key Removable<br />
ON Yes On Unlocked Locked No<br />
Off No Off Unlocked Locked Yes<br />
Lock No Off Unlocked Unlocked No<br />
Clockwise<br />
(seat lock)<br />
Counter Clockwise<br />
(seat lock)<br />
N/A N/A N/A Unlocked No<br />
N/A N/A N/A Locked Yes<br />
NOTE: Steering can only lock when the handle bar is turned left.<br />
CAUTION: Make sure key is in ‘OFF’ position after riding or opening seat. When key is left in ‘ON’<br />
position and engine is off you will drain your battery.<br />
16
! WARNING DO NOT CHANGE THE KEY POSITION WHILE THE SCOOTER IS IN MOTION.<br />
IT MAY RESULT IN LOSS OF CONTROL OR AN ACCIDENT.<br />
Instrument Panel<br />
2<br />
3<br />
1<br />
4<br />
6<br />
5<br />
1. Turn Signal Indicator<br />
2. Hi Beam Indicator<br />
3. Speedometer<br />
4. Odometer<br />
5. Gas Gauge<br />
6. Clock<br />
• Turn Signal Switch and Indicator<br />
• To assign right turn, push the switch to and the right turn indicator light flashes.<br />
• To assign left turn, push the switch to and the left turn indicator light flashes.<br />
• To cancel turn signal, push in the button on the switch. (White)<br />
17
Lo / Hi Beam Switch and Hi Beam Indicator<br />
• When illuminated high beam is selected.<br />
• See page 15 for Lo/Hi beam switch location.<br />
• See page 17 for indicator location.<br />
CAUTION: Be sure to always use LO BEAM light when facing oncoming traffic.<br />
Speedometer (See page 17) - Indicates the operating speed.<br />
Odometer (See page 17) - Indicates accumulated distance in kilometers.<br />
Gas Gauge (see page 17) - Indicates the fuel Level. The needle moves towards “E” – (empty) as the<br />
gas level is decreasing.<br />
Throttle Control (see page 15)<br />
• Control speed by rotating the throttle. (Right Grip)<br />
• To accelerate speed, rotate the throttle towards you.<br />
• To decelerate speed, rotate the throttle away from you.<br />
18
Electric Starter (see page 15)<br />
• Starts Engine using battery power.<br />
• NOTE: Never engage starter for more than 3-5 seconds at a time to avoid possible damage.<br />
Horn Button (see page 15) - To sound the horn, press this button.<br />
Engine Stop Switch (see page 15)<br />
• Set the switch to on before starting the engine.<br />
• Set the switch to off for EMERGENCY STOP.<br />
• For example, if the scooter overturns or you cannot decrease speed with the throttle.<br />
Rear Brake Lever/ Front Brake Lever (see page 15)<br />
• To decrease speed and stop the scooter from moving.<br />
• To apply rear brake, pull the left brake lever gradually.<br />
• To apply the front brake, pull the right lever towards throttle grip gradually.<br />
Storage Compartment<br />
• To unlock the under seat storage compartment, see TABLE 1.1 (page 15) under ignition switch.<br />
• Once the seat is unlocked, raise the seat pad to access the storage compartment.<br />
• Press the seat pad down to lock it.<br />
19
! WARNING:<br />
• The storage compartment can carry 6.5 lbs max.<br />
• Do not exceed maximum 17.5 lbs for cargo.<br />
• Ensure the storage compartment is locked before riding.<br />
CAUTION:<br />
• Do not store anything susceptible to heat inside storage compartments.<br />
• Do not let humidity spread from storage compartment.<br />
• Do not put anything valuable or breakable in storage compartment.<br />
• The compartment is not waterproof. Use plastic bags to store stuff when washing the scooter.<br />
Luggage Rack<br />
! WARNING:<br />
• Luggage rack can carry 11 lbs max.<br />
• Do not exceed maximum 17.5 lbs for cargo.<br />
Fuel Tank Cap (see page 14 for location)<br />
• To remove the fuel tank cap, slide the lock cover open, insert the ignition key into the fuel tank cap lock,<br />
and turn ¼ counterclockwise. The fuel tank cap is released and can be removed.<br />
• To install the fuel tank cap, insert the fuel tank cap to the tank, turn the key ¼ clockwise to the original<br />
position and removed the key. Slide back the lock cover.<br />
20
! WARNING:<br />
• Always turn the engine off prior to refueling the scooter.<br />
• Ensure the fuel tank cap is properly installed before riding.<br />
• Do not overfill the tank as it may overflow when the fuel warms up and expands.<br />
• Avoid spilling fuel on a hot engine.<br />
CAUTION:<br />
• Wipe off the spilled fuel immediately as fuel may deteriorate the paint on the scooter or any plastic<br />
parts.<br />
• Always use 90 octane or higher gasoline when refueling the scooter. Do not use E85 or fuel containing<br />
more than 10% ethanol.<br />
G: PRE-RIDE CHECKLIST<br />
1. Check the fuel level<br />
• Remove the gas cap by turning the cap counterclockwise.<br />
• Fill the tank up to the bottom of the filler tube. Do not fill past that point.<br />
• Replace the gas cap and turn it clockwise until it is secure.<br />
NOTE: Always turn the engine off prior to refueling the scooter. Always use 90 octane or higher gasoline<br />
to refuel the scooter. Do not use E85 or fuel containing more than 10% ethanol.<br />
21
2. Check the brake light<br />
• Turn the ignition key to the “ON” position.<br />
• Grip the front brake lever or rear brake lever while watching the rear brake light to make sure that it<br />
illuminates.<br />
3. Check the Turn Signals<br />
• Turn the ignition key to the “ON” position.<br />
• Move the turn signal control to the left and right positions. Check the front and rear turn signal lamps<br />
flash, as well as the turn signal indicators on the instrument panel.<br />
4. Check the Tires<br />
• Measure the pressure in each tire. The correct pressures are:<br />
Front 29 PSI<br />
Rear 33 PSI<br />
• Visually inspect the tires for damage and wear. Look for nails, glass or stones what are cutting into the<br />
tire casing.<br />
• Look for partial or abnormal tread wear. The middle of the tread should have:<br />
Front Tire 1.5 mm minimum tread depth<br />
Rear Tire 2 mm minimum tread depth<br />
CAUTION: This Scooter uses tubeless tires on the front and rear wheels. These tires must always be<br />
replaced with tires of the same type.<br />
22
5. Check the Brakes<br />
Front Brake- Compress the front brake lever and measure the distance traveled before the brake begins to<br />
slow the front wheel. The lever should travel between 10 to 20 mm before the wheel begins to drag.<br />
Rear Brake - Depress the rear brake lever and measure the distance travelled before the brake begins to<br />
slow the rear wheel. The lever should travel between 10 to 20 mm before the wheel begins to drag.<br />
7. Check the Brake Fluid Level<br />
See Page 31<br />
8. Check the Spark Plug<br />
• The spark plug will need to be checked if you find the scooter hard to start. The gap should be between<br />
0.023 & 0.032 inches. The electrode should be a light brown color.<br />
• Incorrect gap can cause many problems for the scooter engine. Make sure it is correct!<br />
• If the spark plug is fouled or damaged, replace it with another of similar type.<br />
• Replacing the spark Plug.<br />
CAUTION: Allow the engine to cool down before attempting to replace the spark plug (For replacement<br />
instructions see pages 32)<br />
8. Check the Engine Oil<br />
See page 33<br />
23
9. Check the TRANSMISSION Oil<br />
Page 34<br />
H: PROPER OPERATIONS & TECHNIQUES<br />
! WARNING:<br />
• Be sure you have read this owner manual completely and understand all operating features.<br />
• Do not start the engine or operate the scooter in closed areas , as the exhaust fumes are poisonous and<br />
inhaling them can cause loss of consciousness and /or even death shortly.<br />
• This scooter is rated for two persons, total weight with rider and passenger must not exceed 330 lbs.<br />
1. ENGINE STARTING PROCEDURE<br />
• Normal Start - Place scooter on the center stand<br />
• Turn the ignition key to the “ON” position.<br />
• While holding brake lever, firmly push the electric start.<br />
• Repeat 5 second intervals of starter motor activation and 5 second rest. Do NOT twist throttle open to<br />
start.<br />
NOTE:<br />
• It is recommended to always “prime” the fuel system by kick-starter when starting the scooter in the<br />
following situation (DO NOT ADVANCE THE THROTTLE WHILE KICK STARTING):<br />
• Cold or wet weather .<br />
24
• If the fuel has run dry .<br />
• If the scooters has been stored for any length of time .<br />
• If electric start does not work.<br />
If bike does not start, please refer to trouble shooting section.<br />
! WARNING:<br />
Do not change the position of the ignition switch while the vehicle is in motion, only when the vehicle<br />
has come to a complete stop.<br />
CAUTION:<br />
• When scooter is not running, do not leave the ignition switch in<br />
the “ON” position for extended periods of time. The battery may<br />
become depleted to the point that the vehicle cannot be started.<br />
• To preserve the scooter, each starting attempt should be less than<br />
5 seconds.<br />
• To maximize the engine life, warm up the engine for 2 to 3<br />
minutes prior to riding. No fast acceleration when the engine is<br />
still cold.<br />
NOTE: The engine will not start unless either the front or rear brake<br />
is activated.<br />
25
2. RETRACTING THE STAND<br />
• Center Stand – Holding the left handle with your left hand and grasping the<br />
rear rack with your right hand, push the scooter forward and move the stand<br />
back with your foot until the stand retracts under the scooter.<br />
• Side Stand – Grasp the handlebars with both hands and tip the scooter upright.<br />
Move the stand back with your foot until the stand retracts under the scooter.<br />
5. PULLING AWAY FROM THE CURB<br />
• Sit with a leg on each side of the scooter adjust the rear view mirrors.<br />
• Put on your turn signal before pulling away from the curb.<br />
• Look over both shoulders for oncoming traffic; be sure that it is safe to pull<br />
out into the traffic.<br />
• Release the rear brake and accelerate the scooter slowly to take off.<br />
6. USING THE BRAKES<br />
• The brakes work best when the front and rear brakes are applied<br />
simultaneously.<br />
• To apply the brake, release the throttle quickly, and squeeze the front brake<br />
lever while putting pressure on the rear brake lever.<br />
26
! WARNING:<br />
• Do not apply the brakes too quickly or while in a turn as this may result in loss of traction and control.<br />
• Wet conditions will affect braking. Give twice the normal braking distance in wet or slippery conditions.<br />
Take extra care while riding in these conditions.<br />
CAUTION: Test your brakes after washing your scooter or riding through a large pool of water. When this<br />
happens, apply the brakes gently until they dry themselves and work effectively again.<br />
7. STOPPING & PARKING<br />
• Release the throttle and steer the scooter to the side of the road. Gently apply the front brake using the<br />
right brake lever, and at the same time gently applying the rear brake using the left brake lever.<br />
• Extend your left foot just before coming to a complete stop so as to keep the scooter upright when it<br />
stops.<br />
• Turn off the ignition key and dismount the scooter on the left side.<br />
• Use your right foot to extend the side stand of the scooter.<br />
! WARNING: Do not touch the engine and the exhaust system as they can become very hot.<br />
CAUTION:<br />
• If the scooter will be parked for an extended period of time, use the center stand instead.<br />
• Do not park on a slope or soft ground as the scooter may overturn.<br />
• Do not park near to any flammable material.<br />
27
8. BREAK IN PROCEDURES<br />
• It is very important to follow this procedures during the first 300 km to achieve the best performance<br />
from the scooter.<br />
• Limit full throttle operation and avoid any condition that may result in engine overheating.<br />
• Always keep the speed below 40 mph.<br />
• Do not overload the scooter or carry a passenger during this period.<br />
• Change oil at 300 km (use Opti-4 to maintain engine warranty).<br />
CAUTION: Have your <strong>TNG</strong> Scooter dealer check the vehicle, if any engine trouble occurs during this<br />
period.<br />
28
I: SERVICE MAINTENANCE SCHEDULE<br />
Item Initial 300 km 1000 km 4000 km or Every 6 Months<br />
Fuel Line<br />
I<br />
Fuel Filter<br />
R<br />
Air Filter I I I<br />
Spark Plug<br />
R<br />
Valves I R R<br />
Engine Oil R I R<br />
Oil Filter R R<br />
Carburetor R R<br />
Drive Belt<br />
REPLACE EVERY TWELVE MONTHS<br />
Transmission Oil I R<br />
Braking System I I<br />
Wheels I I<br />
Wheel Bearings I I<br />
Steering Bearings I I I<br />
Rear Shock Absorber I I<br />
29
Item Initial 300 km 1000 km 4000 km or Every 6 Months<br />
Chassis Fasteners R R R<br />
Control Meter Cables R R R<br />
Throttle Grip Housing/Cable R R<br />
Centerstand/Sidestand I I I<br />
Headlight and Other Lights I I<br />
Additional Fasteners I I<br />
30<br />
R: Replace or Service/Adjustment Due I: Inspect and Replace as Necessary<br />
NOTE: For the best performance from your <strong>TNG</strong> scooter have a <strong>TNG</strong> dealer perform<br />
all service maintenance. Failure to follow the service maintenance schedule may void<br />
your warranty coverage.<br />
RECOMMENDED: If regular driving is in arid or coastal condition, air filter and engine oil may need to<br />
be replaced more frequently.<br />
TIRE PRESSURE / TREAD<br />
Measure the pressure of each tire. The correct pressures are: Front 29 PSI / Rear 33 PSI. Visually inspect the<br />
tires for damage and wear or abnormal tread wear. Look for nails, glass, stones or any sharp object cutting<br />
into the tire casing. The middle of the tread depth should have: Front 1.5mm / Rear 2mm
CAUTION: This scooter uses tubeless tires on the front and rear wheels, always replaced with tires of the<br />
same type.<br />
HYDRAULIC BRAKE FLUID LEVEL - Front Brake / Rear Brake<br />
• Check the fluid level by looking at the reservoir. See Fig. 1. The fluid level must be between the two<br />
lines. If it is below the lower line, check the brake line and cylinder for a possible leak.<br />
• Check the brakes for excessive wear. The middle groove of the brake should still be visible. If it isn’t,<br />
the pads should be replaced. See Fig. 2.<br />
• To replace the brake fluid, open the reservoir and add fluid as required.<br />
Reservoir Level<br />
Fig. 1 Fig. 2<br />
31
CAUTION:<br />
• Be sure not to introduce any water or air into the brake system when changing the fluid.<br />
• Do not spill any brake fluid on any other scooter parts as the fluid can damage metal and paint.<br />
• Always replace the brake fluid with type DOT 3 brake fluid.<br />
RECOMMENDATION: An authorized <strong>TNG</strong> Dealer or Service Center should complete all brake fluid<br />
adjustments.<br />
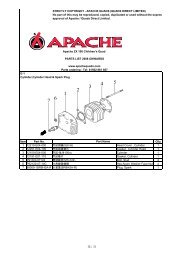
SPARK PLUG REPLACEMENT<br />
Check spark plug if scooter is hard to start.<br />
1. The gap should be between 0.023 & 0.032 inches.<br />
2. The electrode should be a light brown color.<br />
3. Replacing the spark plug,<br />
• Remove the plug cover and remove the spark plug using the spark plug wrench in the tool kit.<br />
• After setting the gap of the new plug, insert it into the cylinder & tighten firmly by hand, then by using<br />
provided wrench tighten another ½ to ¾ turns.<br />
• Reattach the spark plug cover.<br />
! WARNING: Do not change spark plug while engine is hot.<br />
32
CAUTION:<br />
• Incorrect gap can cause problems to the scooter engine. Make sure it is correct!<br />
• If the spark plug is fouled or damaged, replace it with (Autolight 4194) or like plug.<br />
RECOMMENDATION: Most spark plugs are self-cleaning. After replacing its best to ride the scooter<br />
for a minimum of 10 min.<br />
CHECKING ENGINE OIL LEVEL<br />
When the scooter is new, the oil will need to be replaced after the first<br />
300 km. (Please review regular maintenance schedule) Engine oil requires<br />
changing every 4000 km or 6 months which ever comes first.<br />
1. Stop the scooter on a level surface and turn the engine off.<br />
2. Put the scooter on its center stand and let the engine sit for a few<br />
minutes.<br />
3. Remove the oil dipstick, wipe it with a clean towel and replace it. Just<br />
rest the dipstick on the threads, do not screw it down into place when<br />
measuring the oil level.<br />
4. Remove the dipstick again and observe the oil level. It should be<br />
between hi and low-level marks on the dipstick.<br />
5. If the oil level is near the low mark, please add enough Opti-4 lubricating<br />
oil to bring the level up near hi mark.<br />
Dipstick<br />
Oil Drain Plug<br />
33
CAUTION: If the scooter is being used under more severe conditions such as gravel roads or lots of stop<br />
& go traffic, then the oil should be changed more frequently than every 4000 km.<br />
CHECK THE TRANSMISSION OIL<br />
Inspect the transmission oil after the first 300 km and then after every 4000 km or six months which ever<br />
comes first.<br />
NOTE: Must use Opti-4 oil in transmission to maintain warranty<br />
1. Place the scooter on its center stand on a level surface. Let the engine warm up for three minutes and<br />
then shut the engine off.<br />
2. Remove the transmission belt cover so that the oil drain plug is visible.<br />
3. Remove the oil fill plug and the oil drain plug and allow the oil to drain completely.<br />
4. Inspect the sealing washer on the drain plug, and if it’s OK reinstall the drain plug.<br />
5. Refill the gearbox until full.<br />
Oil Fill Plug<br />
6. Reinstall the oil fill plug.<br />
Transmission<br />
Belt Cover<br />
Oil Drain Plug<br />
34
! WARNING: Use caution when changing oil to avoid burns!<br />
CAUTION:<br />
• If the scooter is used in excessively wet areas, or used in severe conditions replace the transmission oil<br />
more often than recommended.<br />
• Make sure that the fill and drain plugs are tight and not leaking.<br />
• Make sure that no foreign substances fall into the transmission box.<br />
AIR FILTER MAINTENANCE<br />
• The air filter should be inspected and cleaned every 1000 km interval.<br />
• Remove left body cover.<br />
• Remove the screws that hold the cover of the air cleaner in place and lift off the air cleaner cover. (See<br />
page 14 for air box location)<br />
• Lift out the air filter screen and cartridge.<br />
• Clean the screen and cartridge with compressed air.<br />
• Reassemble the air filter components and back end of the scooter.<br />
CAUTION:<br />
• If riding in an excessively dusty location, the air filter should be inspected more often than the<br />
recommended.<br />
• When remounting the air cleaner cover components onto the scooter. Be careful to fit all pieces into<br />
their correct place. Failure to achieve proper fit will cause leaks in the air intake system that can cause<br />
35
engine damage.<br />
• Handle the air filter cartridge carefully so that it does not become deformed.<br />
• Never allow water to enter the air filter assembly.<br />
NOTE: Clean and/or replace the air filter components if you experience a decrease of engine power.<br />
Battery Maintenance<br />
Your Scooter uses a calcium sealed, maintenance free, VRLA battery and you should not remove the sealing<br />
strip once the battery has been installed and prepped by a <strong>TNG</strong> dealer.<br />
NOTE: To protect your battery against failure it is important to keep your battery fully charged. This<br />
applies primarily if you are not riding your scooter on a regular basis or are traveling only short distances<br />
while you ride. In these limited use situations you should charge your battery at least once a month using a<br />
battery charger for a minimum of 6 hours. Additionally, it is important that your scooter be stored in a dry<br />
area and protected from extreme temperatures.<br />
Battery Replacement<br />
1. The scooter battery is self-sustained by electric current generated by the alternator within the scooter.<br />
It’s a good idea to replace the battery every three years.<br />
2. Always turn the ignition system off prior to replacing the battery.<br />
3. Observe correct polarity when replacing the battery. The RED wire is connected to the positive battery<br />
36
4.<br />
5.<br />
terminal and the BLACK wire is connected to the negative battery terminal.<br />
Make sure that the battery posts are kept clean at all times and have good contact area. Use a wire brush<br />
to remove any signs of corrosion if required.<br />
Avoid sparks or flame when handling the battery.<br />
Fuse Replacement<br />
Main Fuse<br />
1. The main fuse is located next to the battery in the<br />
floorboard; it is rated at 15 Amps.<br />
2. A visual inspection of the fuse will tell if the fuse is<br />
“open” (burned out).<br />
3. If the fuse is open, then it needs replacement.<br />
NOTE: Check fuse for good tight contact within fuse<br />
housing.<br />
! WARNING: Always turn the ignition off before inspecting the fuses.<br />
CAUTION:<br />
• When removing the fuse from the fuse box do not squeeze the fuse puller or it will release the fuse.<br />
• When inserting the new fuse be sure that it fits snugly into the fuse socket. A loose fit will cause<br />
intermittent electrical problems and possible overheating of the fuse contacts.<br />
37
• Always replace the open fuse with another of the same type!<br />
• When washing your scooter, be sure not to get water into the fuse box as this could cause electrical<br />
problem.<br />
• Do not use a fuse of higher amperage than recommended; this will cause extensive damage to the<br />
electrical system and possibly a fire.<br />
NOTE: If the new fuse burns out immediately, have a <strong>TNG</strong> dealer check scooters complete electrical<br />
system.<br />
J. WINTERIZING INSTRUCTIONS<br />
Proper preparation of your scooter for winter storage will make it more likely that you will be able to get<br />
out and enjoy that first spring ride. There are five basic areas that should be considered when preparing to<br />
put your <strong>TNG</strong> Scooter into storage. The five areas of focus are:<br />
1.<br />
2.<br />
3.<br />
4.<br />
5.<br />
Battery<br />
Fuel System<br />
Engine<br />
Tires<br />
Cover<br />
38
1. BATTERY<br />
Maintaining the state of charge of your scooter battery during an extended period of storage is essential to<br />
insure the maximum service life of the battery.<br />
If at all possible, remove the battery from the vehicle. Clean the battery and terminals using a solution of<br />
baking soda and water, making sure that none of the solution enters the battery during cleaning. After the<br />
battery is cleaned, inspect it for any signs of damage or extraordinary wear that may have occurred while<br />
in service.<br />
At this time you should also use a baking soda and water solution to clean the battery compartment of the<br />
vehicle to help neutralize any electrolyte that may be present. Rinse with clean water and dry thoroughly.<br />
You may return the battery to the battery compartment, or you may store it separately. If it is put back into<br />
the battery compartment for storage it is best that you do not hook up the battery cables until you are ready<br />
to take the scooter out of storage.<br />
Charge the battery to 100%. If the battery is stored at temperatures below 60°F, recharge to 100% every<br />
month. If stored in a warm area above 60°F, recharge the battery every two weeks.<br />
Before you connect your charger to the battery, make sure that you know how your battery charger operates.<br />
Some chargers will not stop charging when the battery reaches 100%, while others will stop automatically.<br />
Some automatic chargers will begin charging again when the battery level drops, while others will not begin<br />
39
charging again until power to the charger has been disconnected and reconnected.<br />
If your charger is one that will continue to charge even after the battery reaches 100%, you must manually<br />
disconnect power to the charger when charging is complete or the battery may be damaged from overcharging.<br />
These chargers should normally be connected for only a few hours at a time.<br />
If your charger is one that must be disconnected in order to reset it to charge, you must manually do so at<br />
the proper intervals.<br />
CAUTION! During charging of a small scooter battery, a low volume of hydrogen gas will be emitted.<br />
While opening a window in the room is not generally required, battery charging should always be done far<br />
away from any source of flame or electrical spark.<br />
2. FUEL SYSTEM<br />
Properly preparing the fuel system before putting your scooter into storage will reduce potential problems<br />
due to a plugged or corroded system. There are two ways this can be accomplished.<br />
A. DRY FUEL SYSTEM<br />
This technique is suitable if you are going to store your bike in a heated location where condensation due<br />
to temperature fluctuations is not a problem.<br />
This requires you to fully drain the entire fuel system including the fuel tank and carburetor. Generally,<br />
you will need to remove the float bowl of the carburetor, and then blow all of the fuel out of the jets with<br />
compressed air to ensure that everything is perfectly dry.<br />
40
B. WET FUEL SYSTEM<br />
This technique is suitable if you are going to store your bike in a heated location where condensation due<br />
to temperature fluctuations is not a problem.<br />
Purchase fuel stabilizer and add it to a nearly full tank of gasoline in the concentration indicated on<br />
the label for long-term storage. Opti-Mizer Fuel Stabilizer is the recommended additive. Opti-Mizer<br />
is available through your local <strong>TNG</strong> Dearler.<br />
After adding the fuel stabilizer, run the engine for at least 10 minutes to allow the stable fuel to make its way<br />
through the entire fuel delivery system and into the carburetor.<br />
Top off the tank with gasoline to vacate all of the air. This will reduce or eliminate chances of condensation<br />
due to temperature fluctuations. Do not use E85 or fuel containing more than 10% ethanol.<br />
3. TIRES<br />
It is best if the weight of the scooter can be kept off the tires so that a flat spot or cracked sidewall does not<br />
develop.<br />
With nearly all <strong>TNG</strong> <strong>Scooters</strong>, when the bike is on the center stand the front wheel is on the ground while<br />
the rear wheel is slightly off the ground. You may simply be able to lift he front wheel of the scooter off<br />
the ground and place something under the frame of the scooter and have both wheels off the ground. Make<br />
sure that the scooter is stable and cannot fall or be knocked over easily.<br />
41
In most cases it will require a little more work to get both wheels off the ground. Place a thick wooden<br />
plank or other object on the floor, making sure that the plank is long enough to easily accommodate the<br />
width of your center stand. Roll the scooter over the plank and put the bike on the center stand, with the<br />
stand sitting on top of the plank. Then lift the front wheel of the scooter off the ground and place something<br />
underneath the frame to support the front of the scooter. Make sure the scooter is stable and cannot fall or<br />
be knocked over easily.<br />
4. ENGINE (OPTIONAL)<br />
If you are placing your scooter into storage in an unheated area, temperature fluctuations may cause<br />
condensation inside the cylinder of the engine. Condensation could cause rust and corrosion to the cylinder<br />
wall.<br />
To reduce the chance of getting rust or corrosion, perform the following steps:<br />
• Remove the spark plug.<br />
• Squirt about 2 ounces of 2-cycle oil into the cylinder. (This applies to both 2 and 4-cycle engines.)<br />
• With the spark plug still out, turn the engine over a few times.<br />
• Reinstall the spark plug.<br />
5. COVER<br />
<strong>TNG</strong> <strong>Scooters</strong> come standard with a nylon weather cover. Placing the cover over the scooter while it is in<br />
storage will reduce the dirt and dust, which would naturally accumulate on the scooter.<br />
42
K. TROUBLESHOOTING<br />
ENGINE WON’T START<br />
Check For Fuel<br />
Ignition Key Must be to the Right<br />
Check Kill Switch is in the Run Position<br />
Depress Either Brake Lever<br />
Push Start Button on the Right Handle Bar<br />
If the Engine Doesn’t Turn Over Charge or Replace the Battery<br />
ENGINE IS DIFFICULT TO START<br />
1. Check for Type of Gasoline<br />
Use of E85 or Fuel Containing<br />
more than 10% Ethanol<br />
2. Check for Fuel in Carburetor<br />
Out of Fuel<br />
Fuel Filter or Petcock Blocked<br />
With Fuel<br />
Replace with Non-Ethanol Gasoline<br />
Fill Fuel Tank<br />
Clean or Replace Fuel Switch or<br />
Petcock<br />
Check Spark Plug<br />
43
3. Check Compression<br />
4. Spark Plug<br />
No Compression<br />
With Compression<br />
No Spark<br />
Spark Plug Wet or Fouled<br />
Intermittent Spark Plug Lead<br />
Spark Plug Dirty or Wrong<br />
Gap<br />
Loose Spark Plug<br />
Spark Plug OK<br />
Have <strong>TNG</strong> Dealer Inspect the<br />
Scooter<br />
Check Spark Plug<br />
Remove Plug & Prime Kick the<br />
Start Pedal without Fuel & Ignition.<br />
Re-install Spark Plug<br />
Replace Lead<br />
Replace Plug or Correct Gap<br />
Tighten Spark Plug<br />
Check Carburetor<br />
44
5. Carburetor<br />
Carburetor Defective<br />
Blocked Idle Jet<br />
Dirty Float Bowl<br />
Low Fuel in Bowl<br />
Carburetor OK<br />
Engine Overheated<br />
Air Inlet System Blocked or<br />
Leaky<br />
Clean Jet<br />
Clean Bowl<br />
Adjust Bowl<br />
Check & Replace Lubricating Oil<br />
Remove Blockage or Leak<br />
KNOCKING SOUND IN CYLINDER<br />
Causes<br />
Solutions<br />
1. Engine Overheating Check & Replace Lubricating Oil<br />
2. Spark Plug Defective Replace the Spark Plug<br />
3. Ignition Timing Too Early Adjust Ignition Timing<br />
4. Carbon Build-up<br />
In Cylinder<br />
Remove Carbon Build-up<br />
In Exhaust Pipe & Muffler Remove Carbon Build-up<br />
45
LOW POWER OUTPUT FROM ENGINE<br />
Causes<br />
1. Air Cleaner Blocked<br />
2. Fuel Line in Carburetor Blocked<br />
3. Excessive Carbon Deposit on Piston in Cylinder &<br />
Exhaust System<br />
Solutions<br />
Clean Air Filter<br />
Remove Residue<br />
Remove Carbon Build-up<br />
4. Piston & Cylinder Excessively Warn Replace Piston & Cylinder<br />
5. Ignition Timing Incorrect Adjust Timing<br />
6. Clutch Slipped Adjust Clutch<br />
7. Belt is Loose Replace Belt<br />
8. Use of E85 or Fuel Containing more than 10% Ethanol Replace with Non-Ethanol Gasoline<br />
BLACK OIL & EXHAUST FROM EXHAUST PIPE<br />
Causes<br />
Solutions<br />
1. Carburetor Not Atomizing Fuel Properly Check & Adjust Carburetor<br />
2. Air Cleaner Blocked Clean Air Filter<br />
46
POOR FUEL ECONOMY<br />
Causes<br />
Solutions<br />
1. Fuel System Leaks Repair Leak<br />
2. Spark Plug Worn Replace Spark Plug<br />
3. Air Cleaner Blocked Clean Air Filter<br />
4. Idle Speed Too High Adjust Idle Speed<br />
5. Riding at Excessive Speeds Ride at More Economical Speeds<br />
6. Use of E85 or Fuel Containing more than 10% Ethanol Replace with Non-Ethanol Gasoline<br />
FUEL DRAINING FROM CARBURETOR OVERFLOW TUBE<br />
Causes<br />
Solutions<br />
1. Float Bowl Residue Clean the Float Bowl<br />
2. Float Bowl Needle Valve Not Completely Closed Replace Needle Valve<br />
3. Occasional Fuel Overflow Tap the Fuel Bowl Lightly<br />
PETCOCK / FUEL FILTER LEAKS<br />
Causes<br />
Solutions<br />
1. Fuel Switch Loose Tighten the Fuel Switch<br />
2. Broken Seal Replace Fuel Switch<br />
47
WARRANTY<br />
2008 and 2009 Models<br />
CMSI, Inc., warrants to the first retail purchaser of all <strong>TNG</strong> vehicles from an Authorized CMSI<br />
Dealer and each subsequent owner that the vehicle is free from defects in materials and workmanship<br />
for the period stated in this warranty section.<br />
TO QUALIFY FOR THIS WARRANTY<br />
• The CMSI vehicles must be purchased from a dealer within the United States,<br />
Canada or Mexico who is authorized by CMSI to sell CMSI products.<br />
• Dealer must be signed up and be familiar with CMSI warranty policy.<br />
WARRANTY VERIFICATION METHOD<br />
Owner and dealer sign Owner Registration Card at time of purchase. This information is kept in<br />
CMSI’s warranty system and can be requested thru an authorized dealer. In the case of a transfer<br />
of ownership during the warranty period, the new owner must submit a written request to update<br />
the owner registration data on file for that particular vehicle. VIN#, Full Name, Address, & Phone<br />
# are required.<br />
Appendix 48
WARRANTY RESPONSIBILITY<br />
THE MANUFACTURER<br />
CMSI Inc.<br />
To repair or replace , at its option, any part which is proven to be defective in material or factory<br />
workmanship under normal use for the applicable warranty period.<br />
• The repair or replacement of defective parts under this limited warranty must be made by an<br />
Authorized CMSI Dealer or service center. Warranty repairs will be made at no charge to you<br />
for parts or labor.<br />
• Parts repaired or replaced under warranty are warranted only during the balance of the applicable<br />
warranty period.<br />
THE AUTHORIZED DEALER<br />
To give you complete warranty documentation when you pick up your vehicle. To perform warranty<br />
repairs on any CMSI product that qualifies for such repairs.<br />
The selling dealer shall sign the Acceptance Certificate and a Card of Delivery upon delivery of the<br />
vehicle. The Card of Delivery outlines the steps your dealer has taken to fulfill his responsibility<br />
to properly assemble and service your new vehicle and inform you of proper break-in, warranty,<br />
periodic maintenance and maximum load and other riding and safety rules.<br />
Appendix 49
YOU, THE OWNER<br />
• The customer should retain all service records for future reference.<br />
• Service inspections and replacements in accordance with the time and mileage intervals given<br />
in the Maintenance Schedule are essential.<br />
• You are responsible for paying all maintenance costs, including service interval costs.<br />
• Failures which occur due to improper maintenance as determined by <strong>TNG</strong> are not covered<br />
under this warranty.<br />
• The engine warranty requires the owner to purchase and use the Interlube Opti engine lubricant<br />
at the time of purchase of the new scooter and use only that lubricant during the entire warranty<br />
period.<br />
• Following this manual for proper use and break-in procedures.<br />
An authorized CMSI dealer is your best source for scheduled maintenance on your vehicle. If<br />
warranty repairs are needed, your dealer may ask you for documentation which may consist of one<br />
or more of the following:<br />
• A Maintenance Record showing the odometer mileage and service date. Each entry should be<br />
signed or stamped by a person who is qualified to service your motorcycle or yourself if you<br />
have performed the maintenance.<br />
• Copies of repair orders or other receipts for required maintenance that include the odometer<br />
mileage and service date.<br />
NOTE: All maintenance receipts should be kept by the owner.<br />
Appendix 50
WARRANTY COVERAGE TABLE<br />
COVERAGE BEGINS<br />
The date the motorcycle is delivered to the first retail purchaser<br />
WARRANTY<br />
CMSI shall repair or<br />
replace, at its option, any<br />
part (including parts of the<br />
emission control system)<br />
that is found defective in<br />
material or workmanship<br />
under normal use for the<br />
applicable time period.<br />
PARTS OR LABOR<br />
No charge to you.<br />
2008/2009 Warranty Information<br />
2008/2009 MODEL YEAR<br />
Engine Parts Labor<br />
50cc and below* 24 months 24 months<br />
51cc and above* 24 months 24 months<br />
Emission Components Parts Labor<br />
Less than 170cc lesser of 30 months or 12,000 Km lesser of 30 months or 12,000 Km<br />
170cc to 280cc lesser of 5 years or 18,000 Km lesser of 5 years or 18,000 Km<br />
280cc and above lesser of 5 years or 30,000 Km lesser of 5 years or 30,000 Km<br />
Basic (non-engine) Parts Labor<br />
50cc and below 24 months 24 months<br />
51cc and above 24 months 24 months<br />
Body Parts Parts Labor<br />
All models 12 months 1 month<br />
Battery Parts Labor<br />
All models 6 months from battery manufacturer N/A<br />
*NOTICE: Basic engine warranty covers 12 months. Use of Opti-2 oil for all 2-stroke vehicles, and Opti-4 oil for all<br />
4-stroke vehicles, purchased, registered with CMSI, and used throughout the entire warranty period, will double<br />
the engine warranty period to 24 months.<br />
Appendix 51
WARRANTY DISCLAIMERS, LIMITATIONS & EXCLUSIONS<br />
Disclaimer of Consequential Damage & Limitation of Implied Warranties<br />
CMSI INC. DISCLAIMS ANY RESPONSIBILITY FOR:<br />
• Loss of time<br />
• Loss of use of vehicle<br />
• Transportation expenses (rental and /or towing)<br />
• Any other incidental or consequential damage<br />
• Any other incidental or consequential expenses (storage)<br />
DURATION OF IMPLIED WARRANTIES<br />
Any Implied Warranties, including the implied warranty of merchantability and fitness for a<br />
particular purpose are limited to the duration of this written warranty.<br />
STATE LAWS MAY VARY<br />
The previously listed limitations or exclusions may not apply to a motor scooter because of state<br />
laws. Some states may not allow limitations on how long an implied warranty lasts. Some states<br />
may not allow exclusion or limitation of incidental or consequential damages.<br />
Appendix 52
YOUR LEGAL RIGHTS<br />
These warranties give you specific legal rights. You may also have other rights which vary from<br />
state to state. It is the responsibility of the owner to be aware of state laws which pertain to this<br />
issue in your particular state.<br />
THESE WARRANTIES DO NOT COVER<br />
Failures which are not due to a defect in material or factory workmanship.<br />
Parts or accessories affected or damaged by:<br />
• Lack of required maintenance<br />
• Owner abuse or misuse<br />
• Accident and/or collision<br />
• Normal wear<br />
• Neglect<br />
• Improper installation<br />
• Unsuitable use in an application for which the part was not designed<br />
• The incorporation or use of unsuitable attachments or parts<br />
• The unauthorized alteration of any part<br />
• The incorporation or use of unsuitable attachments or parts<br />
• Deterioration from the elements<br />
• Failure to follow “break-in” procedures<br />
Appendix 53
Replacement of expendable maintenance item including, but not limited to:<br />
Spark Plug Gaskets Coolant Belts Filters<br />
Hoses Lubricants Fuses Tires<br />
(See Owner’s <strong>Manual</strong>)<br />
Appendix 54<br />
Light Bulbs<br />
Battery Hand Grips Floor Mats Fuel Filters Seat Covers<br />
• Paint and/or decals fading, peeling, blistering, chipping or rusting.<br />
• Plastic body parts and panels, See “Warranty Time Table”<br />
USE FOR THE FOLLOWING ACTIVITIES, SHALL VOID COVERAGE:<br />
• Racing<br />
• Competition<br />
• Rental or other commercial uses<br />
• Towing another vehicle, trailer or similar device<br />
• Alteration to the engine or drive train<br />
• Any operation or use outside of that described in this Owner’s <strong>Manual</strong><br />
• Alteration of the odometer so that the actual mileage cannot be determined; alteration may<br />
VOID coverage<br />
• Any off-road use will void coverage
Replacement parts refer to Distributors Limited Warranties – Replacement Parts<br />
DISTRIBUTORS LIMITED WARRANTY – NEW MOTORCYCLE<br />
CMSI warrants to the first retail purchaser and subsequent purchasers of this vehicle that the<br />
motorcycle is free from defects in materials and workmanship for the period stated in “Warranty<br />
Time Table.”<br />
TO QUALIFY FOR THIS WARRANTY<br />
• The vehicle must originally have been purchased from a dealer within the United States,<br />
Canada, or Mexico who is authorized by CMSI to sell CMSI products.<br />
• Prior to delivery to the purchaser, setup and pre-delivery service must be performed by a dealer<br />
or service center who is authorized by CMSI to deliver it vehicles.<br />
DISTRIBUTOR’S LIMITED WARRANTY- MOTORCYCLE TIRES<br />
WARRANTY TIME PERIOD<br />
90 days, or until the center tread is worn to a depth of 3/32”, whichever occurs first.<br />
Appendix 55
COVERAGE BEGINS<br />
• Original tire on motorcycle - date of delivery<br />
• Tire purchased as replacement - date of purchase<br />
WARRANTY COVERAGE<br />
• Tires distributed and sold by CMSI which are either<br />
• Original equipment on CMSI vehicles, or<br />
• Specified by CMSI for the model the tire is installed on and purchased from an Authorized<br />
Dealer for replacement use.<br />
• To qualify for this warranty<br />
• The tire must have been purchased from an Authorized CMSI Dealer.<br />
• The tire was part of the original factory equipment.<br />
• The tire must have been used for its designed purpose.<br />
THE OBLIGATION OF CMSI INC<br />
To replace any tire which is proven to be defective in material or factory workmanship under<br />
normal use – until the tire center tread is worn to a depth of 3/32”. At that point, there will be no<br />
further warranty consideration, regardless of the tire’s age or mileage.<br />
Appendix 56
YOUR OBLIGATION<br />
To practice proper tire care and prudent motorcycle operation. You must maintain tire inflation<br />
pressure and load in accordance with information in the manual, the tire information label on the<br />
motorcycle, and restrictions molded into the tire sidewalls. The replacement of a defective tire<br />
under this warranty must be made by an Authorized CMSI Inc Dealer.<br />
REPLACEMENT CHARGES – UP TO 50% TREAD WEAR<br />
Tire: No charge for a new direct replacement tire.<br />
Labor: No charge for mounting and balancing – to the tire’s original purchaser if the tire was<br />
factory or dealer installed.<br />
You pay for mounting and balancing - if the tire was not sold installed.<br />
REPLACEMENT CHARGES – AFTER 50% TREAD WEAR<br />
Tire : 50% charge for a new direct replacement tire.<br />
Labor : 50% charge for mounting and balancing.<br />
THIS WARRANTY DOES NOT COVER<br />
• Tires installed on non-CMSI vehicles<br />
• Tires worn beyond the service limit specified in the appropriate Owners <strong>Manual</strong>.<br />
Appendix 57
• Tires rendered unserviceable by road hazard damage, such as impact breaks, punctures, cuts,<br />
or snags.<br />
• Tires rendered unserviceable by running while flat, spinning, improper inflation, overloading,<br />
misalignment, improper mounting during replacement of after repair, or installation on<br />
unsuitable rims.<br />
• Tires rendered unserviceable due to abuse or misuse such as towing a trailer.<br />
• Tube-type tires fitted without inner tubes.<br />
• Tires which have been repaired.<br />
• Tires whose sidewalls have been modified by the addition or removal of material.<br />
• Tires with superficial weathering, checking, or cracking.<br />
• Tires used in racing or other competition.<br />
DISTRIBUTOR’S LIMITED WARRANTY – REPLACEMENT PARTS<br />
WARRANTY TIME PERIOD: See “Warranty Coverage Table” on page 4 of Warranty Section.<br />
Coverage begins: The date of purchase from an Authorized CMSI Dealer.<br />
To qualify for this warranty, the genuine CMSI part<br />
• Must have been purchased from an Authorized CMSI Dealer.<br />
• Must have been used in an application for which it was designed.<br />
Appendix 58
WARRANTY COVERAGE<br />
• CMSI Inc will repair or replace, at its option, any genuine CMSI part that is defective in<br />
material or workmanship under normal use.<br />
• Proof of date of purchase is required.<br />
Parts installed by an Authorized CMSI Dealer:<br />
Parts & Labor: No charge.<br />
Parts not installed by an Authorized CMSI Dealer:<br />
Parts: No charge<br />
Labor: You pay for removal/installation charges<br />
THIS REPLACEMENT PARTS WARRANTY DOES NOT COVER<br />
The following exclusions apply specifically to replacement parts in addition to the exclusions<br />
listed:<br />
• Tires (Refer to Distributor’s Limited Warranty – <strong>Motor</strong>cycle Tires)<br />
• The motorcycle in which the part is installed.<br />
• The color match of painted components (CMSI makes no warranty, expressed or implied,<br />
regarding the color match of painted components.)<br />
Appendix 59
REPORTING SAFETY DEFECTS<br />
If you believe that your vehicle has a defect which could cause an accident or could cause injury<br />
or death, you should immediately inform the National Highway Traffic Safety Administration<br />
(NHTSA) in addition to notifying CMSI Inc.<br />
If NHTSA receives similar complaints, it may open an investigation, and if it finds that a safety<br />
defect exists in a group of vehicles, it may order a recall and remedy campaign. For this reason it<br />
is very important for you to notify CMSI of any change of address or ownership. NHTSA cannot<br />
become involved in individual problems between you, your dealer or CMSI.<br />
To contact NHTSA, you may either call the Auto Safety Hotline toll-free at 1-800-424-9393 (or<br />
202-366-0123 in Washington DC area) or write to: NHTSA, US Department of Transportation,<br />
Washington DC 20590. You can also obtain other information about motor vehicle safety from<br />
the hotline.<br />
Appendix 60
YOUR WARRANTY RIGHTS AND OBLIGATIONS<br />
The California Air Resources Board, the U.S. Environmental Protection Agency, and CMSI Inc.<br />
(Hereinafter CMSI) are pleased to explain the emission control system warranty on your 2008/2009<br />
motorcycle. New on-road motorcycles must be designed, built and equipped to meet U.S. EPA<br />
Federal and California anti-smog standards. CMSI must warrant the emission control system on<br />
your vehicle for 30 months or 12,000 kilometers, whichever comes first, provided that there has<br />
been no abuse, neglect or improper maintenance of your vehicle.<br />
Your emission control system may include parts such as the carburetor, the ignition system, catalytic<br />
converter and engine computer, if it is so equipped. Also included may be hoses, belts, connector<br />
and other emission-related assemblies.<br />
Where a warrantable condition exists, CMSI will repair your vehicle at no cost to you, including<br />
diagnosis, parts and labor.<br />
If an emission-related part on your vehicle is defective, the part will be repaired or replaced by<br />
CMSI. This is your emission control system DEFECTS WARRANTY.<br />
Appendix 61
NOTICE! Use of any CMSI vehicle in any type of competitive event completely and absolutely<br />
voids this and all other warranties offered by CMSI.<br />
OWNER’S WARRANTY RESPONSIBILITIES<br />
As the vehicle owner, you are responsible for the performance of the required maintenance listed<br />
in your owner’s manual. CMSI recommends that you retain all receipts covering maintenance on<br />
your vehicle, but CMSI cannot deny warranty solely for the lack of receipts or for your failure to<br />
ensure the performance of all scheduled maintenance.<br />
You are responsible for presenting your vehicle to the CMSI authorized dealer as soon as a problem<br />
exists. The warranty repairs should be completed in a reasonable amount of time, not to exceed<br />
30 days.<br />
As the vehicle owner, you should be aware that CMSI may deny your warranty coverage if<br />
your vehicle or a part has failed due to abuse, neglect, improper maintenance or unapproved<br />
modifications.<br />
If you use your vehicle in any type of competitive event, this warranty is immediately and<br />
completely void.<br />
Appendix 62
If you have any questions regarding your warranty rights and responsibilities, you should contact<br />
CMSI Inc., PO Box 969, Preston, WA 98050, Phone 425-222-7738.<br />
CMSI warrants that each new 2008 and later <strong>TNG</strong> Brand vehicle:<br />
A. Is designed, built and equipped so as to conform at the time of initial retail purchase with all<br />
applicable regulations of the United States Environmental Protection Agency, and the California<br />
Air Resources Board; and<br />
B. Is free from defects in material and workmanship which cause such vehicle to fail to<br />
conform to applicable regulations of the United States Environmental Protection Agency, and the<br />
California Air Resources Board for the periods specified above.<br />
I. Coverage. Warranty defects shall be remedied during customary business hours at any<br />
authorized CMSI dealer located within the United States of America in compliance with the Clean<br />
Air Act and applicable regulations of the United States Environmental Protection Agency, and the<br />
California Air Resources Board. Any part or parts replaced under this warranty shall become the<br />
property of CMSI.<br />
Appendix 63
II. Limitations. This Emission Control System Warranty shall not cover any of the<br />
following:<br />
A. Repair or replacement as a result of:<br />
1. Accident,<br />
2. Misuse,<br />
3. Repairs improperly performed or replacements improperly installed,<br />
4. Use of replacement parts or accessories not conforming to CMSI specifications which<br />
adversely affect performance and/or,<br />
5. Use in competitive racing or related events.<br />
B. Inspections, replacement of parts and other services and adjustments for required<br />
maintenance.<br />
C. Any vehicle equipped with an odometer on which the odometer mileage reading has been<br />
changed so that actual mileage cannot be readily determined.<br />
III.<br />
Limited Liability.<br />
A. The liability of CMSI under this Emission Control System Warranty is limited solely to<br />
Appendix 64
the remedying of defects in material or workmanship by an authorized CMSI dealer at its place<br />
of business during customary business hours. This warranty does not cover inconvenience or<br />
loss of use of the vehicle or transportation of the vehicle to or from the CMSI dealer. CMSI<br />
SHALL NOT BE LIABLE FOR ANY OTHER EXPENSES, LOSS OR DAMAGE, WHETHER<br />
DIRECT, INCIDENTAL, CONSEQUENTIAL OR EXEMPLARY ARISING IN CONNECTION<br />
WITH THE SALE OR USE OF OR INABILITY TO USE THE VEHICLE FOR ANY PURPOSE.<br />
SOME STATES DO NOT ALLOW THE EXCLUSION OR LIMITATION OF CONSEQUENTIAL<br />
DAMAGES, SO THE ABOVE LIMITATIONS MAY NOT APPLY TO YOU.<br />
B. NO EXPRESS EMISSION CONTROL SYSTEM WARRANTY IS GIVEN BY CMSI<br />
EXCEPT AS SPECIFICALLY SET FORTH HEREIN. ANY EMISSION CONTROL SYSTEM<br />
WARRANTY IMPLIED BY LAW, INCLUDING ANY WARRANTY OF MERCHANTABILITY<br />
OR FITNESS FOR A PARTICULAR PURPOSE, IS LIMITED TO THE EXPRESS EMISSION<br />
CONTROL SYSTEM WARRANTY TERMS STATED IN THIS WARRANTY. THE<br />
FOREGOING STATEMENTS OF WARRANTY ARE EXCLUSIVE AND IN LIEU OF ALL<br />
OTHER REMEDIES. SOME STATES DO NOT ALLOW LIMITATIONS ON HOW LONG<br />
AN IMPLIED WARRANTY LASTS, SO THE ABOVE LIMITATIONS MAY NOT APPLY TO<br />
YOU.<br />
Appendix 65
C. No dealer is authorized to modify this CMSI Limited Emission Control System Warranty.<br />
IV. LEGAL RIGHTS. THIS WARRANTY GIVES YOU SPECIFIC LEGAL RIGHTS, AND<br />
YOU MAY ALSO HAVE OTHER RIGHTS WHICH VARY FROM STATE TO STATE.<br />
V. THIS WARRANTY IS IN ADDITION TO THE CMSI LIMITED MOTORCYCLE<br />
WARRANTY.<br />
VI. ADDITIONAL INFORMATION. Any replacement part that is equivalent in performance<br />
and durability may be used in the performance of any maintenance or repairs. However, CMSI is<br />
not liable for these parts. The owner is responsible for the performance of all required maintenance.<br />
Such maintenance may be performed at a service establishment or by any individual. The warranty<br />
period begins on the date the motorcycle is delivered to an ultimate purchaser.<br />
Appendix 66
Inc.<br />
<strong>Motor</strong>sports<br />
CMSI Inc., <strong>Motor</strong>sports<br />
8146 304th Ave. SE, P.O. B ox 969<br />
Preston, WA 98050, USA<br />
Phone: 425-222-7738<br />
Fax: 425-222-7739