

1 - A.O. Smith Water Heaters
1 - A.O. Smith Water Heaters
1 - A.O. Smith Water Heaters

Create successful ePaper yourself
Turn your PDF publications into a flip-book with our unique Google optimized e-Paper software.
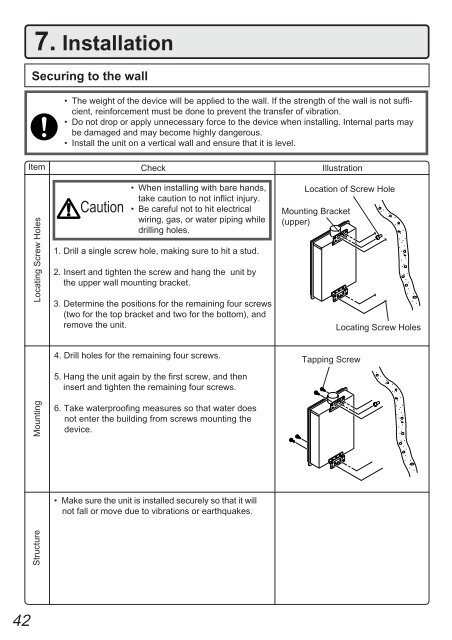
7. Installation<br />
Securing to the wall<br />
• The weight of the device will be applied to the wall. If the strength of the wall is not sufficient,<br />
reinforcement must be done to prevent the transfer of vibration.<br />
• Do not drop or apply unnecessary force to the device when installing. Internal parts may<br />
be damaged and may become highly dangerous.<br />
• Install the unit on a vertical wall and ensure that it is level.<br />
Item<br />
Locating Screw Holes<br />
Caution<br />
Check<br />
• When installing with bare hands,<br />
take caution to not inflict injury.<br />
• Be careful not to hit electrical<br />
wiring, gas, or water piping while<br />
drilling holes.<br />
1. Drill a single screw hole, making sure to hit a stud.<br />
2. Insert and tighten the screw and hang the unit by<br />
the upper wall mounting bracket.<br />
3. Determine the positions for the remaining four screws<br />
(two for the top bracket and two for the bottom), and<br />
remove the unit.<br />
Illustration<br />
Location of Screw Hole<br />
Mounting Bracket<br />
(upper)<br />
Locating Screw Holes<br />
Mounting<br />
4. Drill holes for the remaining four screws.<br />
5. Hang the unit again by the first screw, and then<br />
insert and tighten the remaining four screws.<br />
6. Take waterproofing measures so that water does<br />
not enter the building from screws mounting the<br />
device.<br />
Tapping Screw<br />
• Make sure the unit is installed securely so that it will<br />
not fall or move due to vibrations or earthquakes.<br />
Structure<br />
42


