Amp100 Manual.pdf - AudioSource
Amp100 Manual.pdf - AudioSource
Amp100 Manual.pdf - AudioSource

Create successful ePaper yourself
Turn your PDF publications into a flip-book with our unique Google optimized e-Paper software.
AMP 100 User <strong>Manual</strong><br />
2 Channel Amplifier<br />
With Auto Switching Dual Inputs<br />
General Features and Specifications<br />
Heavy Duty Black Aluminum Faceplate<br />
120W Max Power Amplifier<br />
Power Consumption 350W<br />
2 Pair Stereo Inputs<br />
1 Pair Stereo Outputs<br />
Auto On (Signal Sensing)<br />
Auto Input Switching<br />
A, B, A+B Speaker Selector Switches<br />
5-Way Speaker Binding Posts<br />
Unswitched 400W Power Outlet<br />
User Serviceable Fuse (T4A / 250V)<br />
Bridgeable Outputs<br />
Rubber Vibration-Damping Feet<br />
Net Weight: 9.6 lbs (21.1 kg)<br />
Dimensions: 2.9” H x 16.5” W x 9.25” D (74mm x 419mm x 235mm)<br />
Congratulations on your purchase of the <strong>AudioSource</strong> AMP100 amplifier. We trust that you will enjoy the value and quality of your <strong>AudioSource</strong> AMP100<br />
for many years. Please take a few moments to read this manual and retain it for your reference.<br />
AMP100 Overview<br />
The <strong>AudioSource</strong> AMP100 represents the very latest in affordable state of the art in amplifier design. Featuring dual inputs, its inputs are signal<br />
sensing, which means that the amp can be configured to turn on automatically when music is sensed on the input RCA’s. Input one will override input<br />
two whenever signal is present. This makes the AMP100 the perfect amplifier as a zone amplifier for multi-room distribution systems. Any time a<br />
local source is activated, it will take priority over the whole house audio by simply showing signal present at input one of the AMP100. Also, use the<br />
AMP100 as amplification for your computer or video games. The AMP100 also has two pair of speaker outputs to allow the amp to run a main, or ‘A’<br />
pair of speakers, as well as an auxiliary, or ‘B’ pair of speakers and allows selection of either, or both, from the front panel of the amplifier.<br />
!<br />
Note: When using A & B speaker together it is imperative that the speaker systems all be a minimum 8-ohm impedance.<br />
Technical Specifications<br />
8 ohm Input Sensitivity to Achieve 40W with THD+N less than 0.02%: 672 mVrms<br />
4 ohm Input Sensitivity to Achieve 50W with THD+N less than 0.02%: 532mVrms<br />
Maximum 8 ohm stereo output power at 1% THD+N: 50W<br />
Maximum 4 ohm stereo output power at 1% THD+N: 60W<br />
Maximum 8 ohm Bridged-Mono output at 1% THD+N: 160W<br />
(These specifications were measured with a 1kHz Sine Wave applied to both channels, and both channels driven)<br />
Frequency Response: +1dB, -0.5dB<br />
Channel Separation: 65dB at 1 kHz, referenced to rated power into 4 ohm loads<br />
8 ohm, Stereo Power Bandwidth: 40W @ 8 ohms,
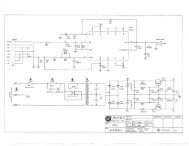
Stereo / Bridged<br />
Switch<br />
“A” Speakers<br />
Unswitched<br />
AC Outlet<br />
Connections on the Rear Panel<br />
Line Input 1 is used to connect a local source such as CD Player, Computer Sound Card, Television Audio Output or other line level source.<br />
Line Input 1 has “Priority” over Line Input 2 and will override Line Input 2 whenever signal is present at the inputs marked Line 1.<br />
Line Input 2 is used to connect a signal such as a whole house audio signal as long as it is at line input levels, not speaker level. This can be any<br />
source the user wants to have as a primary source.<br />
Line Output 2 is a pass through output of the signal at Line Input 2. Although Line 2 may be overridden by Line 1, its signal is always present at Line<br />
Output 2 to be passed on to another zone or location as a line level signal.<br />
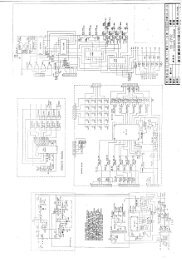
Bridging Switch (refer to wiring diagram Figure 2)<br />
In addition to providing 60 watts RMS per channel in the stereo mode, your <strong>Amp100</strong> can be used as a high power mono amplifier, providing over 160<br />
watts RMS. This can be accomplished by sliding the mono switch from the stereo position to the bridged position. For mono applications, use only<br />
the right channel input.<br />
!<br />
Line 1<br />
Input<br />
Line 2<br />
Input<br />
Line<br />
Output<br />
Signal Sensing<br />
Auto-On<br />
“B” Speakers<br />
Note: Be sure to observe the correct speaker connections for bridged applications. Because of the high power output in this mode, we recommend<br />
initially setting the volume control at ‘min’, and then adjusting the volume to the desired level.<br />
Auto On Switch<br />
The <strong>Amp100</strong> can be configured to power on automatically, or to have manual control. If you would like the amp to come on automatically when the<br />
source begins sending signal, put the auto on switch in the “AUTO” position. When using the amplifier in the “Auto ON” mode the amplifier will<br />
automatically shut down after a period of time without signal present. If you would prefer to use the power button on the front of the amplifier, put the<br />
auto on switch in the “NORMAL” position.<br />
!<br />
Figure1<br />
Note: If someone switches the amplifier off by using the power button on the front of the amplifier, the auto on feature will not work until the unit<br />
is manually switched on again by pressing the power button on the front of the amplifier.<br />
Speaker Terminals<br />
More than one pair of speakers can be used with the <strong>Amp100</strong>. We have provided two pairs of speaker outputs, labeled SPKR A (left & right) and SPKR<br />
B (left & right). The speaker terminals are color coded. Red posts indicate positive (+) terminals and black posts indicate negative (-) terminals. Be<br />
sure to connect the positive output terminals of your <strong>Amp100</strong> to the positive input terminals of your speakers and the negative output terminals of your<br />
<strong>Amp100</strong> to the negative input terminals of your speakers.<br />
!<br />
Note: Refer to the wiring diagrams on the next page for proper connection of speaker cables.<br />
MONO Source<br />
Figure 2<br />
+ _
Stereo Setup<br />
In this configuration, the mono switch is set to stereo for stereo operation. Connect the line out jacks from a stereo preamplifier or source to the line<br />
in jacks of your <strong>Amp100</strong>. Next connect your speakers to the terminals marked SPKR A (observing proper polarity: see above). Connect a second<br />
(optional) pair of speakers to the terminals marked SPKR B. Select between the A and/or B speakers using the front panel speaker selection buttons.<br />
Mono Setup<br />
In this configuration, the mono switch is set to bridged. Connect the line out from a preamplifier to the right line in of your <strong>Amp100</strong>. Connect your<br />
mono speaker to the terminals of your <strong>Amp100</strong>, following the example in the diagram in figure 2 (previous page). Use the volume control on the front<br />
panel to adjust the volume. Leave the balance set to the center detent or normal position.<br />
TELEVISION<br />
Figure 3<br />
Application Setup One<br />
In the application shown above in figure 3, a distributed audio system is connected to the AMP100 as a local zone amplifier via the Line 2 inputs.<br />
Normally the distributed audio system will be the audio source for the AMP100.<br />
The distributed audio is then passed on to be used by additional zones or sub zones in the distributed system via the Line 2 outputs.<br />
The Audio output of a local television is connected to the AMP100 via the Line 1 inputs, and whenever the television is active its signal will take priority<br />
over the distributed audio signal present at Line 2. However, the distributed audio signal will still be present at Line 2 Out. In this circumstance the<br />
audio output of the television will be heard via the AMP100. Once turned off, the AMP100 will automatically switch back the distributed audio system<br />
as an audio source, assuming the television is still active.<br />
Computer<br />
TELEVISION<br />
Application Setup Two<br />
Figure 4<br />
In the application shown above in figure 4, the audio output of a local television is connected to the AMP100 as a local source via the Line 2 inputs.<br />
Normally the television will be the audio source for the AMP100.<br />
The audio output of a computer’s sound card is connected to the AMP100 via the Line 1 inputs, and whenever the computer is active its signal will<br />
take priority over the television’s audio signal present at Line 2. In this circumstance the audio output of the computer will be heard via the AMP100.<br />
Once turned off, the AMP100 will automatically switch to the television as an audio source, assuming the television is still active.<br />
If any components of this system are missing or damaged<br />
please call <strong>AudioSource</strong> directly at:<br />
1.800.HELP.115
Safety Instructions<br />
1) Warning<br />
To reduce the risk of fire or electric shock, do not expose this appliance<br />
to rain or moisture.<br />
2) Caution<br />
To reduce the risk of electric shock, do not remove cover (or back); no<br />
user serviceable parts inside. Refer servicing to qualified service personnel.<br />
Caution<br />
To prevent electric shock, match the wide blade of the AC plug to the wide<br />
slot of the AC outlet, and insert fully.<br />
Attention<br />
Pour eviter les chocs electriques, introduire la lame la plus large de la<br />
fichedans la borne correspondeante de la prise et pousser jusqu’au fond.<br />
3) Read Instructions<br />
All the safety and operating instructions should be read before the appliance<br />
is operated.<br />
4) Retain Instructions<br />
The safety and operating instructions should be adhered to.<br />
5) Heed Warnings<br />
All warnings on the appliance and in the operating instructions should be<br />
adhered to.<br />
6) Follow Instructions<br />
All operating and use instructions should be adhered to.<br />
7) Do not defeat the safety purpose of the polarized or grounding-type<br />
plug.<br />
A polarized plug has two blades with one wider than the other. A grounding<br />
type plug has two blades and a third grounding prong. The wide blade<br />
or third prong are provided for your safety. If the provided plug does not<br />
fit into your outlet, consult an electrician for replacement of the obsolete<br />
outlet.<br />
8) Only use attachments/accessories specified by the manufacturer.<br />
9) Use of Cart<br />
Use only with the cart, stand, tripod, bracket or table specified by the<br />
manufacturer, or sold with the apparatus. When a cart is used, use caution<br />
when moving the cart/apparatus combination to avoid injury from tip-over.<br />
10) Disconnect apparatus.<br />
Unplug this apparatus during lightning storms or when unused for long<br />
periods of time.<br />
11) Water and Moisture<br />
The appliance should not be used near water. For example, near a bathtub,<br />
wash-bowl, Kitchen sink, laundry tub, in a wet basement, or near a swimming<br />
pool, etc.<br />
12) Ventilation<br />
The appliance should be situated so that its location or position does not<br />
interfere with its proper ventilation For example, the appliance should not<br />
be situated on a bed, sofa, rug or similar surface that may block the<br />
ventilation openings; or be placed in a built in situation, such as a bookcase<br />
or cabinet that may impede the flow of air through the ventilation openings.<br />
13) Heat<br />
The appliance should be situated away from heat sources such as radiators,<br />
heat registers, or other appliances (including amplifiers) that produce heat.<br />
14) Power Sources<br />
The appliance should be connected to a power supply only of the type<br />
described in the operating instructions or as marked on the appliance.<br />
15) Power Cord Protection<br />
Power supply cords should be routed so that they are not likely to be walked<br />
on or pinched by items placed on or against them, paying particular attention<br />
to cords at plugs, convenience receptacles, and the point where they exit<br />
from the appliance.<br />
16) Cleaning<br />
The speaker should be cleaned only as recommended by the manufacturer.<br />
17) Non-Use Periods<br />
The power cords of the appliance should be unplugged from the outlet<br />
when left unused for a long period of time.<br />
18) Object and Liquid Entry<br />
Care should be taken so that objects do not fall and liquids are not spilled<br />
into the enclosure through openings.<br />
19) Damage Requiring Service<br />
The appliance should be service by qualified personnel when; a) the power<br />
cord or the plug has been damaged; b) objects have fallen, or liquid has<br />
been spilled into the appliance; c) the appliance has been exposed to rain;<br />
d) the appliance does not appear to operate normally or exhibits a marked<br />
change in performance; e) the appliance has been dropped, or the enclosure<br />
damaged.<br />
20) Servicing<br />
The user should not attempt to service the appliance beyond that described<br />
in the operating instructions. All other servicing should be referred to<br />
qualified service personnel.<br />
21) Product Servicing<br />
In the event your <strong>AudioSource</strong> product fails to operate properly, please<br />
contact the dealer where you purchased the unit, or you may contact<br />
<strong>AudioSource</strong> directly for further assistance.<br />
LIMITED WARRANTY<br />
Phoenix Gold International, Inc. (or "<strong>AudioSource</strong>") warrants this product<br />
against defects in materials and workmanship for a limited period of time.<br />
For a period of two years from date of original purchase, we will repair or<br />
replace the product, at our option, without charge for parts and labor.<br />
Customer must pay all parts and labor charges after the limited warranty<br />
period expires. The limited warranty period for factory refurbished products<br />
expires after ninety (90) days from date of original purchase. This limited<br />
warranty applies only to purchases from authorized <strong>AudioSource</strong> Electronics<br />
retailers. This limited warranty is extended only to the original purchaser<br />
and is valid only to consumers in the United States.<br />
Consumers are required to provide a copy of the original sales invoice<br />
from an authorized <strong>AudioSource</strong> dealer when making a claim against this<br />
limited warranty. This limited warranty only covers failures due to defects<br />
in materials or workmanship that occur during normal use. It does not cover<br />
failures resulting from accident, misuse, abuse, neglect, mishandling,<br />
misapplication, alteration, faulty installation, modification, service by anyone<br />
other than Phoenix Gold, or damage that is attributable to Acts of God. It<br />
does not cover costs of transportation to Phoenix Gold or damage in transit.<br />
This warranty will become void if the serial number identification has been<br />
wholly or partially removed, altered or erased. Repair or replacement under<br />
the terms of this warranty does not extend the terms of this warranty.<br />
Should a product prove to be defective in workmanship or material, the<br />
consumer's sole remedies will be repair or replacement as provided under<br />
the terms of this warranty. Under no circumstances shall Phoenix Gold be<br />
liable for loss or damage, direct, consequential or incidental, arising out<br />
of the use of or inability to use the product. There are no express warranties<br />
other than described above.<br />
Please Read the Safety<br />
Instructions Carefully!<br />
AVIS<br />
CAUTION<br />
RISQUE DE CHOC ELECTRIQUE RISK OF ELECTRIC SHOCK<br />
NE PAS OUVRIR<br />
DO NOT OPEN !<br />
The lightning flash with arrowhead symbol, within an equilateral triangle, is intended<br />
to alert the user to the presence on non-insulated dangerous voltage within the<br />
product’s enclosure that may be of sufficient magnitude to constitute a risk of electrical<br />
shock to persons. The exclamation point within an equilateral triangle is intended to<br />
alert the user to the presence of important operating and maintenance (servicing)<br />
instructions in the literature accompanying the appliance.<br />
8100.0294A<br />
Rev. 10.06.03<br />
9300 North Decatur • Portland, Oregon 97203 • USA<br />
Tel: 503.286.9300 • Fax: 503.978.3302