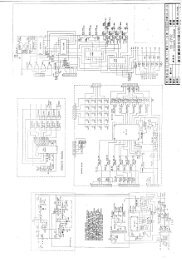
EQ200 Manual.pdf - AudioSource
EQ200 Manual.pdf - AudioSource
EQ200 Manual.pdf - AudioSource

Create successful ePaper yourself
Turn your PDF publications into a flip-book with our unique Google optimized e-Paper software.
EQ 200<br />
OWNER’S MANUAL<br />
EQ 200<br />
Ten-Band Stereo Graphic Equalizer<br />
FEATURES:<br />
Ten Bands from 30 Hz to 16 kHz +/-12dB<br />
Spectrum Analzyer Display<br />
Tape 1 / Tape 2 play-record loops<br />
Audio and Video inputs<br />
Main Output<br />
EQ Bypass<br />
Front panel Right and Left Level controls<br />
Congratulations on your purchase of the <strong>AudioSource</strong>® EQ 200.<br />
Please take a few moments to read this entire manual, and be sure to<br />
retain this document for future reference. Please read and observe all<br />
safety instructions detailed on page 2.<br />
NOTE: If any part of this product is damaged or missing, please call your<br />
dealer or <strong>AudioSource</strong>® directly at 1.877.715.5439 or 503.914.4688.<br />
Please read your warranty and retain your receipt and original carton<br />
for possible future use.<br />
For more information about <strong>AudioSource</strong>® electronics, speakers and<br />
accessories please visit www.audiosource.net<br />
SPECIFICATIONS<br />
Frequency Response: 10 Hz - 50 kHz +/- 1 dB<br />
Harmonic Distortion: 0.03% of nominal output<br />
Signal to Noise Ratio: -95 dB<br />
Input Impedance: 100k ohms<br />
Output Impedance: 600 ohms<br />
Load Impedance: 10k ohms or more<br />
Inputs:<br />
Audio, Video,<br />
Tape 1, Tape 2<br />
Outputs: Main, Tape 1, Tape 2<br />
Control Center Points: 30 Hz, 60 Hz, 120 Hz,<br />
250 Hz, 500 Hz, 1 kHz,<br />
2 kHz, 4 kHz, 8 kHz, 16 kHz<br />
Control Range: +/- 12 dB<br />
Dimensions:<br />
(W x H x D)<br />
Net Weight:<br />
Power Consumption:<br />
16-1/2” x 3-1/2” x 11-1/4”<br />
(419 x 89 x 286 mm)<br />
8 lbs. (3.63 kg)<br />
14 Watts<br />
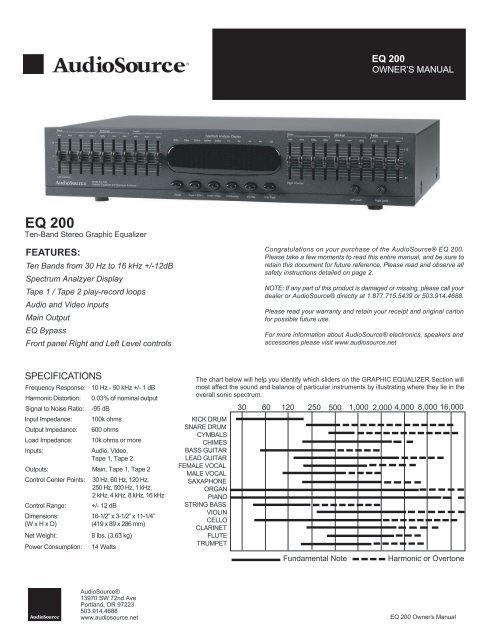
The chart below will help you identify which sliders on the GRAPHIC EQUALIZER Section will<br />
most affect the sound and balance of particular instruments by illustrating where they lie in the<br />
overall sonic spectrum.<br />
30 60 120 250 500 1,000 2,000 4,000 8,000 16,000<br />
KICK DRUM<br />
SNARE DRUM<br />
CYMBALS<br />
CHIMES<br />
BASS GUITAR<br />
LEAD GUITAR<br />
FEMALE VOCAL<br />
MALE VOCAL<br />
SAXAPHONE<br />
ORGAN<br />
PIANO<br />
STRING BASS<br />
VIOLIN<br />
CELLO<br />
CLARINET<br />
FLUTE<br />
TRUMPET<br />
Fundamental Note<br />
Harmonic or Overtone<br />
<strong>AudioSource</strong>®<br />
13970 SW 72nd Ave<br />
Portland, OR 97223<br />
503.914.4688<br />
www.audiosource.net<br />
EQ 200 Owner’s <strong>Manual</strong>
EQ 200<br />
OWNER’S MANUAL<br />
CAUTION<br />
RISK OF ELECTRICAL SHOCK<br />
DO NOT OPEN<br />
CAUTION: TO REDUCE THE RISK OF ELECTRIC SHOCK, DO NOT REMOVE THE COVER. NO<br />
USER SERVICABLE PARTS INSIDE. REFER SERVICING TO QUALIFIED PERSONNEL!<br />
EXPLANATION OF<br />
SAFETY SYMBOLS<br />
The exclamation point within an equilateral triangle is intended to alert the user of the presence of important<br />
operating and maintenance (servicing) instructions in the literature accompanying the appliance.<br />
The lightning flash with the arrowhead symbol within an equilateral triangle is intended to alert the user to the<br />
presence of uninsulated “dangerous voltage” within the products’ enclosure that may be of sufficient magnitude<br />
to constitute a risk of electric shock to persons.<br />
IMPORTANT SAFETY INSTRUCTIONS<br />
• WARNING: TO PREVENT FIRE OR SHOCK HAZARD, DO NOT EXPOSE THIS APPLIANCE TO RAIN OR MOISTURE. THE APPARATUS SHALL NOT<br />
BE EXPOSED TO DRIPPING OR SPLASHING AND THAT OBJECTS FILLED WITH LIQUIDS, SUCH AS VASES, SHALL NOT BE PLACED<br />
ON APPARATUS.<br />
• WARNING: TO PREVENT FIRE OF SHOCK HAZARD, DO NOT USE THIS PLUG WITH AN EXTENSION CORD, RECEPTACLE OR OTHER OUTLET<br />
UNLESS THE BLADES CAN BE FULLY INSERTED TO PREVENT BLADE EXPOSURE.<br />
• WARNING: THE MAINS PLUG IS USED AS DISCONNECT DEVICE. THE DISCONNECT DEVICE SHALL REMAIN READILY AVAILABLE.<br />
• WARNING: ONLY USE ATTACHMENTS OR ACCESSORIES SPECIFIED OR PROVIDED BY THE MANUFACTURER.<br />
1. Read these instructions.<br />
2. Keep these instructions.<br />
3. Heed all warnings.<br />
4. Follow all instructions.<br />
5. Do not use this apparatus near water.<br />
6. Clean only with dry cloth.<br />
7. Do not block any ventilation openings. The ventilation should not be impeded<br />
by covering the ventilation openings with items such as newspaper, tablecloths,<br />
curtains etc. Install in accordance with the manufacturer’s instructions.<br />
8. Do not install near heat sources such as radiators, heat registers, stoves,<br />
or other apparatus (including amplifiers) that produce heat. No open flame<br />
sources, such as lighted candles, should be placed on the apparatus.<br />
9. Do not defeat the safety purpose of the polarized or grounding type plug.<br />
A polarized plug has two blades with one wider than the other. A grounding<br />
type plug has two blades and a third grounding prong. The wide blade or<br />
third prong is provided for your safety. If the provided plug does not fit into<br />
your outlet, consult an electrician for replacement of the obsolete outlet.<br />
10. Protect the power cord from being walked on or pinched particularly at the<br />
plugs, convenience receptacles, and at the point of exit from the apparatus.<br />
11. Unplug the apparatus during lightning storms or when unused for long<br />
periods of time.<br />
12. Refer all servicing to qualified personnel. Servicing is required when the<br />
apparatus has been damaged in any way, such as when the power supply<br />
cord or plug is damaged, liquid has been spilled or objects have fallen into<br />
the apparatus, the apparatus has been exposed to rain or moisture, does<br />
not operate normally, or has been dropped.<br />
13. The apparatus should be connected to a mains socket outlet with a protective<br />
earthing connection.<br />
Two Year Limited Warranty<br />
<strong>AudioSource</strong>, a division of Peak Audio Group, warrants this product against defects in materials and workmanship for a limited period of time.<br />
For a period of two (2) years from date of original purchase, we will repair or replace the product, at our option, without charge for parts.<br />
Customer must pay for all labor charges associated with the removal and re-installation of speakers for the limited period and all parts and<br />
labor charges after the limited warranty period expires. The limited warranty period for factory refurbished products expires after ninety (90) days<br />
from date of original purchase. This limited warranty applies only to purchases from authorized <strong>AudioSource</strong> Retailers or Distributors. This<br />
limited warranty is extended only to the original purchaser and is valid only to consumers in the United States.<br />
Consumers are required to provide a copy of the original sales invoice from an authorized <strong>AudioSource</strong> Retailer or Distributor when making<br />
a claim against this limited warranty. This limited warranty only covers failures due to defects in materials or workmanship that occur during<br />
normal use. It does not cover failures resulting from accident, fire, flood, misuse, abuse, neglect, mishandling, misapplication, alteration, faulty<br />
installation, modification, service by anyone other than <strong>AudioSource</strong>, or damage that is attributable to Acts of God. It does not cover costs of<br />
transportation to <strong>AudioSource</strong> or damage in transit. The customer should return their defective product, freight prepaid and insured, to <strong>AudioSource</strong><br />
only after receiving a Return Authorization.<br />
Repair or replacement under the terms of this warranty does not extend the term of this warranty. Should a product prove to be defective in<br />
workmanship or material, the consumer's sole remedies will be repair or replacement as provided under the terms of this warranty. If the defective<br />
product is discontinued <strong>AudioSource</strong> may replace the product with an equivalent or superior product at its option. Any cost of re-installation<br />
or repair of wall or ceiling surface is the sole responsibility of the customer and that cost shall not be the responsibility of <strong>AudioSource</strong>. Under<br />
no circumstances shall <strong>AudioSource</strong> be liable for loss or damage, direct, consequential or incidental, arising out of the use of or inability to use<br />
the product. There are no express warranties other than described above.<br />
2<br />
13970 SW 72nd Ave. Portland, OR 97223 • 503.914.4688 • www.audiosource.net
EQ 200<br />
OWNER’S MANUAL<br />
A Few Words about Graphic Equalizers<br />
Thank you for choosing this <strong>AudioSource</strong> EQ 200 Graphic Equalizer. Used correctly, a Graphic Equalizer is a powerful tool for very detailed control<br />
over the sound of your speakers, far more than available from simple tone controls. With the EQ 200, you can enhance the sound of older recordings,<br />
alter instrumental and vocal balance to suit your own tastes, make “Custom Equalized” recordings, and a multitude of other uses. However, like any<br />
tool, excessive or incorrect adjustments can yield very unpleasant results, and can overload your amplifiers and speakers. Improvement of sound<br />
quality, particularly in the extreme bass and treble regions, is completely dependent upon the quality of the other equipment you are using in your<br />
system. Limited amplifier power and speakers with a limited frequency range are the greatest barriers to achieving accurate, flat response. If you<br />
detect any distortion in the bass or treble regions while boosting the EQ 200’s sliders in these areas, back off immediately, as you are probably over<br />
taxing either your amplifier or your speakers. Please read this manual before use, and follow our suggestions and basic guidelines for the best sound.<br />
Having said that, be assured that “good sound” is a relative thing… We all have different opinions and tastes. The EQ 200 is designed to allow you to<br />
change the sound of your speakers to suit your own musical choices. On the first page of this manual is a chart designed to show you the frequency<br />
content and range for a variety of musical instruments. This chart will help you find the proper sliders to adjust to achieve the desired results.<br />
Basic Guidelines<br />
Before adjusting the sliders, it is VERY IMPORTANT to clearly define your objectives. Without this consideration before adjustment takes place, it will<br />
be very difficult to attain pleasing results. Carefully listen to your system – ask yourself “What DON’T I like about the sound?” If the answer is “I want<br />
more Bass”, you have two ways to accomplish this. Choice #1 – Raise or “Boost” the sliders for the lowest frequencies – on both channels – Left &<br />
Right. Choice #2 – Lower or “Cut” the sliders on the midrange and higher frequencies. The end result will be the same – You’ll have more bass.<br />
Conversely, if you’d like to hear more High Frequencies, you have two ways to accomplish this. #1 – “Boost” the sliders for the highest frequencies –<br />
on both channels Left & Right. #2 – “Cut” the sliders of the Midrange and Bass frequencies.<br />
As you can see, there are a variety of ways to accomplish your objectives. Be aware that due to the nature of all equalizer sliders, you will find that<br />
movement of any given slider will also have some effect on the setting of the sliders adjacent to either side of it. Experiment – let your ears decide<br />
what sounds best, but try to have a clear objective before you begin. One suggestion: avoid the “Boost – Boost Syndrome”… avoid “Boosting” on<br />
frequency area too much, by “Cutting” another frequency area. Don’t just radically boost everything- it will add noise to the system, and overtax your<br />
other components. Subtle, careful equalization will make a huge improvement in the overall sound of your system. Enjoy your EQ 200, and if you have<br />
any questions, we are here to help. You can call <strong>AudioSource</strong> at 877.715.5439, Monday through Friday, 7:00am to 5:30pm Pacific Time.<br />
9<br />
8<br />
9<br />
1 2 3 4 5 6<br />
Using the Controls<br />
1. Power<br />
Press this button to activate the power on the EQ 200. The LED will be<br />
green to show power is “On”. Push the button again to turn “Off” the<br />
EQ 200. The LED will be red to show this selection.<br />
2. Tape 1-2 / Tape 2-1<br />
This button allows you to make a tape copy of “Dub” between the two<br />
cassette decks. Press this button “In” to “Dub” from Tape 1 to Tape 2.<br />
The LED will be green to show this selection. Leave this button in the<br />
“Out” position to “Dub” from tape 2 to Tape 1. The LED will be red to<br />
show this selection. When the “Line / Tape” switch is “Out”, or in the<br />
TAPE position , this “Tape 1-2 / Tape 2-1” switch will select which tape<br />
deck is to be listened to. Leave it “In” for Tape 1, “Out” for Tape 2.<br />
3.<br />
Audio / Video<br />
This button selects between two input sources. Press the button “In”<br />
to select an Audio input source, such as a CD player, or MP3 player.<br />
The LED will be green to show this selection. Leave the button “Out”<br />
to select a Video input source, such as a DVD player or VCR. The<br />
LED will be red to show this selection.<br />
Note: The EQ 200 equalizes the sound of these various components.<br />
At no time does the EQ 200 alter the picture, and no “Video – Type”<br />
connections are included. These inputs will accept any “Line Level”<br />
source, such as a CD player, MP3 player, tape deck, VCR, etc.<br />
4. EQ / Bypass<br />
Use this switch to instantly compare the “equalized” and “un-equalized”<br />
sound. Press this button “In” to hear the result of your equalization curve.<br />
The LED will be green to show this selection. When this button is “In”<br />
the red LEDs in all twenty sliders will light up. Leave this switch in the<br />
“Out” position to bypass the equalization of the EQ 200. The LED will<br />
be red to show this selection, and the red LEDs in the sliders will<br />
disappear at this time.<br />
5. EQ Rec<br />
EQ Record. Press this button to make a tape copy of with the equalization<br />
curve you have just set. The LED will be green to show this selection.<br />
This can be useful when making a cassette tape to play in your car.<br />
A well equalized tape can improve the sound from smaller, less<br />
expensive car stereo speakers. With this button in the “Off” position,<br />
the cassette tape copy will be recorded without equalization. The LED<br />
will be red to show this selection.<br />
6. Line / Tape<br />
This button selects between input sources. In the “In” position, the<br />
“Line Input” is chosen. The LED will be green to show this selection.<br />
Leave this button in the “Out” position to hear the “Tape Input”. The<br />
LED will be red to show this selection.<br />
7<br />
13970 SW 72nd Ave. Portland, OR 97223 • 503.914.4688 • www.audiosource.net 3
EQ 200<br />
OWNER’S MANUAL<br />
Using the Controls (continued)<br />
7. Level Controls<br />
Both left and right channels have a control marked “Level”. This controls<br />
the level, or volume of each channel. Usually, these controls can be<br />
set to their maximum position, but these levels can be reduced if an<br />
overly strong input signal causes distortion. Usually, similar adjustments<br />
should be made for both channels.<br />
8. Spectrum Analyzer Display<br />
This provides a visual display of the relative signal levels in each of the<br />
EQ sliders. The Spectrum Analyzer display is divided into ten columns<br />
of LEDs which correspond to the ten EQ sliders. You can use this display<br />
to assist you in setting your equalizer sliders, as well as to obtain<br />
information about the frequency content of the music as you play it<br />
through the EQ 200.<br />
9. EQ Sliders<br />
Each of these sliders will give 12 dB of “Boost” and 12 dB of “Cut”.<br />
There are ten sliders per channel – ten for the Left channel, and ten<br />
for the Right channel.<br />
9. EQ Sliders (continued)<br />
Looking at the front panel, the sliders that control the lowest frequencies<br />
are on the left, with the higher frequencies farther right. Usually,<br />
identical adjustments should be made for both channels.<br />
These sliders are one octave apart from one another. This corresponds<br />
with the entire range of human hearing. The last page of this owners’<br />
manual contains a chart, showing which sliders to adjust to affect the<br />
sound of various instruments.<br />
For instance, the lowest note of a bass guitar is 42 Hz. By adjusting the<br />
sliders at 30 Hz and 60 Hz you can raise or lower the volume of the<br />
bass guitar, bass drum, and any other musical instruments that occupy<br />
this frequency range. On the other hand, the sound of the female vocalist<br />
occupies a frequency range from roughly 200 Hz to 1500 Hz. By adjusting<br />
the sliders within this range, you can change the tonal character of the<br />
female voice, and any other musical instruments that occupy this<br />
frequency range.<br />
Hooking it all up<br />
The EQ 200 should be connected through the “Tape Monitor Loop” of your receiver, integrated amplifier, or preamplifier. Since the EQ 200 replaces the<br />
tape deck, remember to activate the “Tape Monitor” switch on your receiver, integrated amplifier, or preamplifier – as you would when playing your tape<br />
deck. Your tape deck can now be plugged into the back of the EQ 200.<br />
When making or changing connections, it is always wise to unplug the power cords of your components – or at least make sure the power is “Off”, so<br />
you won’t hear any unexpected “pops” during connection of cables.<br />
The steps below are for connecting two tape decks, the EQ 200, a receiver, and an auxiliary source such as an MP3 player. Your set up may vary.<br />
1. Connect the TAPE OUT or TAPE RECORD jacks (different components use different terminology) on the back of your receiver/integrated<br />
amplifier/preamplifier to the AUDIO IN jacks of the EQ 200.<br />
2. Connect the MAIN OUT jacks of the EQ 200 into the TAPE IN or TAPE MONITOR jacks of your receiver/integrated amplifier. This completes the “loop”.<br />
3. Always make sure to engage the “TAPE MONITOR” button on our receiver, no matter which input source you want to listen to. This allows the<br />
“equalized” signal to be heard on any source material.<br />
4. You can connect two tape decks to the EQ 200. For Tape 1, connect the LINE OUT or MONITOR jacks on your tape deck to the TAPE 1 IN (play)<br />
jacks on the EQ 200. Next, connect the LINE IN or RECORD jacks on your tape deck to the TAPE 1 OUT (rec) jacks on the EQ 200.<br />
5. You may use the VIDEO IN jacks on the EQ 200 to connect any high output source, such as an MP3 player, CD player, tape deck, or the audio<br />
outputs of a DVR, cable box, DVD player or VCR.<br />
Note: Any of the inputs-<br />
Audio In, Video In, Tape 1 In,<br />
or Tape 2 In can be used as<br />
inputs for the EQ 200.<br />
VIDEO<br />
AUDIO<br />
IN<br />
OUT<br />
L<br />
R<br />
MP3 / CD<br />
DVD / VCR<br />
CABLE BOX<br />
DIGITAL ANTENNA<br />
DIGITAL-<br />
CONVERTER<br />
LINE<br />
OUT<br />
LINE<br />
IN<br />
L<br />
R<br />
CASSETTE DECK 2<br />
TAPE<br />
OUT (rec)<br />
L<br />
TAPE<br />
IN (play) VIDEO PHONO<br />
CD<br />
AUX<br />
RECEIVER<br />
LINE<br />
OUT<br />
LINE<br />
IN<br />
L<br />
R<br />
R<br />
CASSETTE DECK 1<br />
4<br />
13970 SW 72nd Ave. Portland, OR 97223 • 503.914.4688 • www.audiosource.net