


You also want an ePaper? Increase the reach of your titles
YUMPU automatically turns print PDFs into web optimized ePapers that Google loves.
<str<strong>on</strong>g>Snap</str<strong>on</strong>g>-<strong>on</strong> EEWB300A Operators Manual<br />
8.0 SELF CALIBRATION<br />
All balancers are carefully calibrated by the manufacturer<br />
and do not require a new calibrati<strong>on</strong>, except after many years<br />
of service or in case of replacement of any electr<strong>on</strong>ic comp<strong>on</strong>ent.<br />
To recalibrate the machine proceed as follows:<br />
A. Switch the machine off.<br />
B. Mount a wheel with an average size steel rim ( i.e. 14"),<br />
even unbalanced.<br />
C. Press CAL while turning the machine <strong>on</strong>. Hold the butt<strong>on</strong><br />
for at least 5 sec.<br />
After the lamp test, the displays blink:<br />
[CAL] [Usr] then display [diS] [ 60].<br />
D. Enter the correct wheel data (secti<strong>on</strong> 6.1) and press F .<br />
The displays show: [CAL] [ 1 ].<br />
IMPORTANT!<br />
IF THE WHEEL DATA ENTERED ARE NOT CORRECT, A<br />
WRONG CALIBRATION WILL BE MADE AND ALL SUB-<br />
SEQUENT BALANCING READOUTS WILL BE WRONG.<br />
E. Lower the wheel guard to spin the wheel.<br />
While the wheel is cycling the displays show:<br />
[CAL] [ 1 ] and when the wheel stops :<br />
[100] [Add] ([4.00] [Add] in ounces).<br />
The inner plane angular displays are illuminated.<br />
F. Attach 4 oz (100gr) weight <strong>on</strong> the inner plane at top, when<br />
the angular displays of the inner plane are illuminated. Spin<br />
the wheel. While the wheel is cycling the displays show: [CAL]<br />
[ 2 ] .<br />
G. When the wheel stops the displays show two numbers.<br />
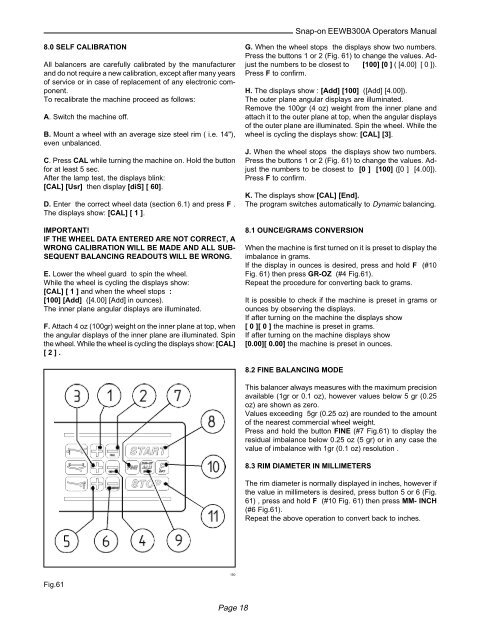
Press the butt<strong>on</strong>s 1 or 2 (Fig. 61) to change the values. Adjust<br />
the numbers to be closest to [100] [0 ] ( [4.00] [ 0 ]).<br />
Press F to c<strong>on</strong>firm.<br />
H. The displays show : [Add] [100] ([Add] [4.00]).<br />
The outer plane angular displays are illuminated.<br />
Remove the 100gr (4 oz) weight from the inner plane and<br />
attach it to the outer plane at top, when the angular displays<br />
of the outer plane are illuminated. Spin the wheel. While the<br />
wheel is cycling the displays show: [CAL] [3].<br />
J. When the wheel stops the displays show two numbers.<br />
Press the butt<strong>on</strong>s 1 or 2 (Fig. 61) to change the values. Adjust<br />
the numbers to be closest to [0 ] [100] ([0 ] [4.00]).<br />
Press F to c<strong>on</strong>firm.<br />
K. The displays show [CAL] [End].<br />
The program switches automatically to Dynamic balancing.<br />
8.1 OUNCE/GRAMS CONVERSION<br />
When the machine is first turned <strong>on</strong> it is preset to display the<br />
imbalance in grams.<br />
If the display in ounces is desired, press and hold F (#10<br />
Fig. 61) then press GR-OZ (#4 Fig.61).<br />
Repeat the procedure for c<strong>on</strong>verting back to grams.<br />
It is possible to check if the machine is preset in grams or<br />
ounces by observing the displays.<br />
If after turning <strong>on</strong> the machine the displays show<br />
[ 0 ][ 0 ] the machine is preset in grams.<br />
If after turning <strong>on</strong> the machine displays show<br />
[0.00][ 0.00] the machine is preset in ounces.<br />
8.2 FINE BALANCING MODE<br />
This balancer always measures with the maximum precisi<strong>on</strong><br />
available (1gr or 0.1 oz), however values below 5 gr (0.25<br />
oz) are shown as zero.<br />
Values exceeding 5gr (0.25 oz) are rounded to the amount<br />
of the nearest commercial wheel weight.<br />
Press and hold the butt<strong>on</strong> FINE (#7 Fig.61) to display the<br />
residual imbalance below 0.25 oz (5 gr) or in any case the<br />
value of imbalance with 1gr (0.1 oz) resoluti<strong>on</strong> .<br />
8.3 RIM DIAMETER IN MILLIMETERS<br />
The rim diameter is normally displayed in inches, however if<br />
the value in millimeters is desired, press butt<strong>on</strong> 5 or 6 (Fig.<br />
61) , press and hold F (#10 Fig. 61) then press MM- INCH<br />
(#6 Fig.61).<br />
Repeat the above operati<strong>on</strong> to c<strong>on</strong>vert back to inches.<br />
Fig.61<br />
150<br />
Page 18


