P350 MANUAL 1.cdr - Harmar
P350 MANUAL 1.cdr - Harmar
P350 MANUAL 1.cdr - Harmar
You also want an ePaper? Increase the reach of your titles
YUMPU automatically turns print PDFs into web optimized ePapers that Google loves.
PRE-INSTALLATION<br />
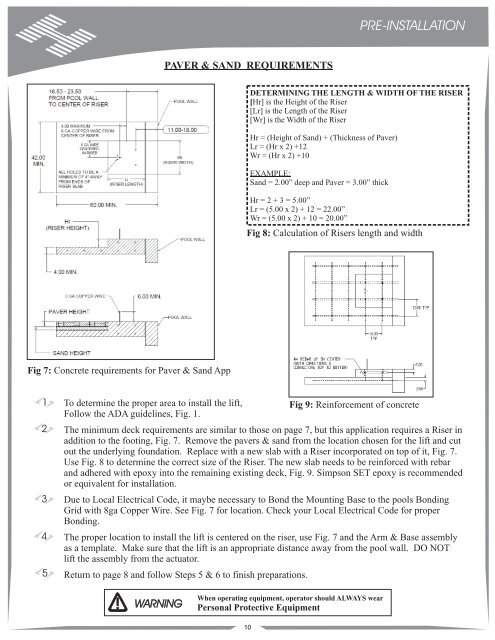
PAVER & SAND REQUIREMENTS<br />
DETERMINING THE LENGTH & WIDTH OF THE RISER<br />
[Hr] is the Height of the Riser<br />
[Lr] is the Length of the Riser<br />
[Wr] is the Width of the Riser<br />
Hr = (Height of Sand) + (Thickness of Paver)<br />
Lr=(Hrx2)+12<br />
Wr=(Hrx2)+10<br />
EXAMPLE:<br />
Sand = 2.00” deep and Paver = 3.00” thick<br />
Hr=2+3=5.00”<br />
Lr = (5.00 x 2) + 12 = 22.00”<br />
Wr = (5.00 x 2) + 10 = 20.00”<br />
Fig 8: Calculation of Risers length and width<br />
Fig 7: Concrete requirements for Paver & Sand App<br />
1<br />
2<br />
3<br />
4<br />
5<br />
To determine the proper area to install the lift, Fig 9: Reinforcement of concrete<br />
Follow the ADA guidelines, Fig. 1.<br />
The minimum deck requirements are similar to those on page 7, but this application requires a Riser in<br />
addition to the footing, Fig. 7. Remove the pavers & sand from the location chosen for the lift and cut<br />
out the underlying foundation. Replace with a new slab with a Riser incorporated on top of it, Fig. 7.<br />
Use Fig. 8 to determine the correct size of the Riser. The new slab needs to be reinforced with rebar<br />
and adhered with epoxy into the remaining existing deck, Fig. 9. Simpson SET epoxy is recommended<br />
or equivalent for installation.<br />
Due to Local Electrical Code, it maybe necessary to Bond the Mounting Base to the pools Bonding<br />
Grid with 8ga Copper Wire. See Fig. 7 for location. Check your Local Electrical Code for proper<br />
Bonding.<br />
The proper location to install the lift is centered on the riser, use Fig. 7 and the Arm & Base assembly<br />
as a template. Make sure that the lift is an appropriate distance away from the pool wall. DO NOT<br />
lift the assembly from the actuator.<br />
Return to page 8 and follow Steps5&6tofinish preparations.<br />
!<br />
WARNING<br />
When operating equipment, operator should ALWAYS wear<br />
Personal Protective Equipment<br />
10


