P350 MANUAL 1.cdr - Harmar
P350 MANUAL 1.cdr - Harmar
P350 MANUAL 1.cdr - Harmar

You also want an ePaper? Increase the reach of your titles
YUMPU automatically turns print PDFs into web optimized ePapers that Google loves.
TECHNICAL<br />
TROUBLESHOOTING PROCEDURE<br />
**THE BATTERY SHOULD BE FULLY CHARGED BEFORE TROUBLESHOOTING**<br />
Issue: Lift stopped moving over the water.<br />
1<br />
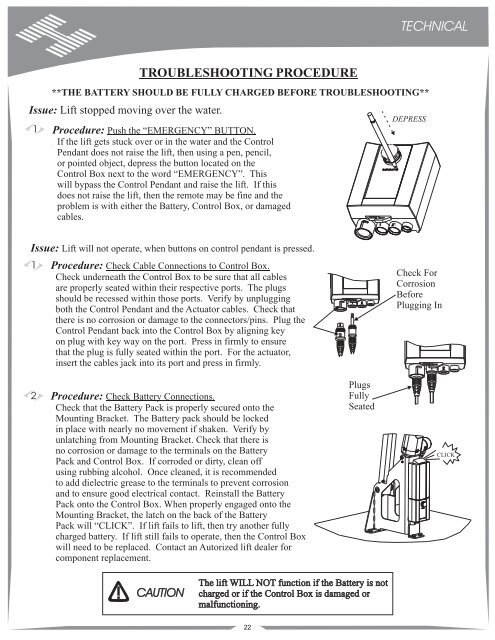
Procedure: Push the “EMERGENCY” BUTTON.<br />
If the lift gets stuck over or in the water and the Control<br />
Pendant does not raise the lift, then using a pen, pencil,<br />
or pointed object, depress the button located on the<br />
Control Box next to the word “EMERGENCY”. This<br />
will bypass the Control Pendant and raise the lift. If this<br />
does not raise the lift, then the remote may be fine and the<br />
problem is with either the Battery, Control Box, or damaged<br />
cables.<br />
DEPRESS<br />
Issue: Lift will not operate, when buttons on control pendant is pressed.<br />
1<br />
Procedure:<br />
Check Cable Connections to Control Box.<br />
Check underneath the Control Box to be sure that all cables<br />
are properly seated within their respective ports. The plugs<br />
should be recessed within those ports. Verify by unplugging<br />
both the Control Pendant and the Actuator cables. Check that<br />
there is no corrosion or damage to the connectors/pins. Plug the<br />
Control Pendant back into the Control Box by aligning key<br />
on plug with key way on the port. Press in firmly to ensure<br />
that the plug is fully seated within the port. For the actuator,<br />
insert the cables jack into its port and press in firmly.<br />
Check For<br />
Corrosion<br />
Before<br />
Plugging In<br />
2<br />
Procedure:<br />
Check Battery Connections.<br />
Check that the Battery Pack is properly secured onto the<br />
Mounting Bracket. The Battery pack should be locked<br />
in place with nearly no movement if shaken. Verify by<br />
unlatching from Mounting Bracket. Check that there is<br />
no corrosion or damage to the terminals on the Battery<br />
Pack and Control Box. If corroded or dirty, clean off<br />
using rubbing alcohol. Once cleaned, it is recommended<br />
to add dielectric grease to the terminals to prevent corrosion<br />
and to ensure good electrical contact. Reinstall the Battery<br />
Pack onto the Control Box. When properly engaged onto the<br />
Mounting Bracket, the latch on the back of the Battery<br />
Pack will “CLICK”. If lift fails to lift, then try another fully<br />
charged battery. If lift still fails to operate, then the Control Box<br />
will need to be replaced. Contact an Autorized lift dealer for<br />
component replacement.<br />
Plugs<br />
Fully<br />
Seated<br />
CLICK<br />
!<br />
CAUTION<br />
The lift WILL NOT function if the Battery is not<br />
charged or if the Control Box is damaged or<br />
malfunctioning.<br />
22