

Vec1365 Arbor Manual 02/02
Vec1365 Arbor Manual 02/02
Vec1365 Arbor Manual 02/02

Create successful ePaper yourself
Turn your PDF publications into a flip-book with our unique Google optimized e-Paper software.
NOTE: Recharging battery after each use will prolong battery life; frequent heavy<br />
discharges between recharges will reduce battery life. You cannot<br />
overcharge the battery with the supplied AC charger/adapter. The time<br />
required to fully recharge the battery depends on the charge status of the<br />
battery after it's use or storage. If the battery is discharged, recharge the<br />
battery until the green LED changes from lit to unlit. Fastest recharge is<br />
achieved when the lamp switch is OFF.<br />
NOTE: The supplied AC charger/adapter can be left continuously powered and<br />
connected to the lamp without harming the battery.<br />
BATTERY REPLACEMENT<br />
The rechargeable battery is contained in the base of the Lamp. The battery should<br />
be replaced when it does not hold a charge or power the lamp. Disconnect the AC<br />
charger/adapter from the AC outlet. You will need a 6 volt, 6 ampere hour<br />
replacement battery Vector part# VEC199, and a Phillips screwdriver (number 1<br />
size) four inches long or similar. The procedure to replace the battery is as follows:<br />
1. Set the lamp on its' side.<br />
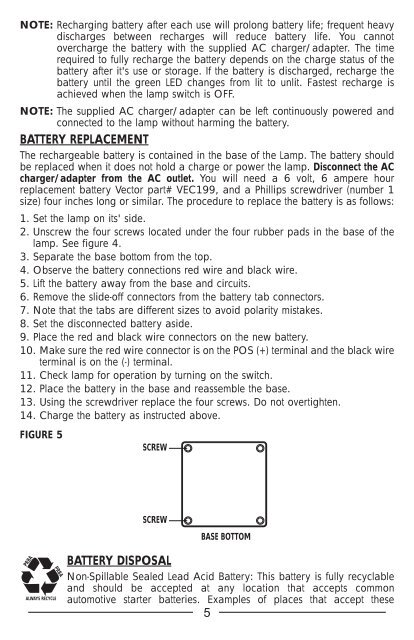
2. Unscrew the four screws located under the four rubber pads in the base of the<br />
lamp. See figure 4.<br />
3. Separate the base bottom from the top.<br />
4. Observe the battery connections red wire and black wire.<br />
5. Lift the battery away from the base and circuits.<br />
6. Remove the slide-off connectors from the battery tab connectors.<br />
7. Note that the tabs are different sizes to avoid polarity mistakes.<br />
8. Set the disconnected battery aside.<br />
9. Place the red and black wire connectors on the new battery.<br />
10. Make sure the red wire connector is on the POS (+) terminal and the black wire<br />
terminal is on the (-) terminal.<br />
11. Check lamp for operation by turning on the switch.<br />
12. Place the battery in the base and reassemble the base.<br />
13. Using the screwdriver replace the four screws. Do not overtighten.<br />
14. Charge the battery as instructed above.<br />
FIGURE 5<br />
SCREW<br />
SCREW<br />
PRBA<br />
PRBA<br />
ALWAYS RECYCLE<br />
BASE BOTTOM<br />
BATTERY DISPOSAL<br />
Non-Spillable Sealed Lead Acid Battery: This battery is fully recyclable<br />
and should be accepted at any location that accepts common<br />
automotive starter batteries. Examples of places that accept these<br />
5


