Swivel Table - EastPoint Sports
Swivel Table - EastPoint Sports
Swivel Table - EastPoint Sports

You also want an ePaper? Increase the reach of your titles
YUMPU automatically turns print PDFs into web optimized ePapers that Google loves.
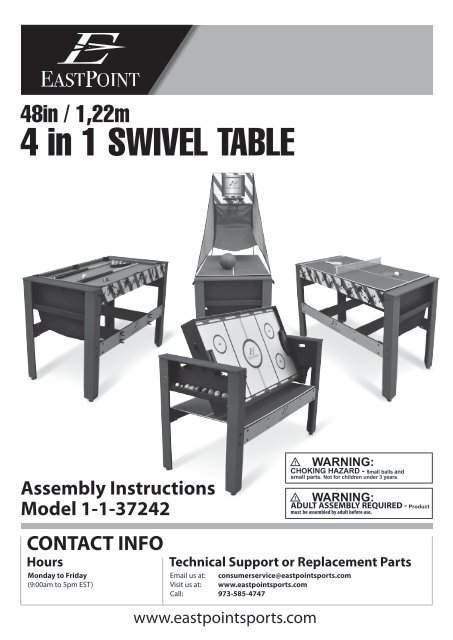
48in / 1,22m<br />
4 in 1 SWIVEL TABLE<br />
Assembly Instructions<br />
Model 1-1-37242
IMPORTANT -<br />
<strong>Table</strong> components are stored inside the table cabinet.<br />
IMPORTANT -<br />
Lay out all parts before you begin<br />
• Please review the parts identifier and make sure that you have all parts before beginning assembly.<br />
• If any questions or issues, please contact us at 1-973-585-4747 BEFORE returning the product to the original place<br />
of purchase.<br />
• Please keep your original sales receipt. Staple it on the adjacent page in the space provided for future reference/use.<br />
It will be required to receive service help or parts under warranty.<br />
CONTACT INFO<br />
Hours<br />
Monday to Friday<br />
(9:00am to 5pm EST)<br />
Technical Support or Replacement Parts<br />
Email us at: consumerservice@eastpointsports.com<br />
Visit us at: www.eastpointsports.com<br />
Call: 973-585-4747<br />
1
BEFORE BUILDING -<br />
Please inspect your playfield<br />
Your Playfields are NOT replaceable. Any damage that exists to your playfields are not reparable under<br />
warranty. If your playfields are damaged, the entire game must be returned to the original place of<br />
purchase for an exchange.<br />
Please attach<br />
RECEIPT HERE<br />
It will be required to receive service help or parts under warranty.<br />
2
IMPORTANT SAFETY INSTRUCTIONS<br />
1. Read all Instructions - All the safety and operating instructions should be read carefully<br />
this can be operated or played.<br />
2. Caution - This is not a toy and is intended for use by or under the supervision of adults.<br />
3. Caution - This table rotates on a central axis and can pose a small risk of a pinch hazard.<br />
Keep hands clear when swivel cabinet is in motion.<br />
4. We recommend - That the game be periodically examined for conditions that may result in<br />
the risk of injury to persons. In the event such conditions exist, the game should not be used<br />
until properly repaired.<br />
5. Storage Conditions - This product is made from wood based components and is sensitive<br />
to extreme temperatures and moisture / humidity. Subject to these conditions will effect<br />
game play, cosmetics and longevity.<br />
Save These INSTRUCTIONS<br />
How to use the: PARTS IDENTIFIER<br />
Before you begin assembly, please make sure that<br />
you have all the parts listed and in the correct<br />
quantities. This will ensure the quickest and most<br />
organized assembly.<br />
Be sure to work on the assembly on a soft<br />
non-marring surface such as carpet or the inside of<br />
the corrugate box top to prevent causing damage<br />
to the table surface during assembly.<br />
Item #<br />
1<br />
Instructions Parts ID #<br />
Part Name<br />
Part Name<br />
Part Image<br />
Part Quantity<br />
# 52703-QT x2<br />
FOR USE WITH STEP # 1<br />
Step Used In<br />
3
PARTS IDENTIFIER<br />
1<br />
Cabinet<br />
2<br />
Billiard Cabinet<br />
3<br />
Billiard Corner Pocket<br />
4<br />
Billiard Side Pocket<br />
FOR STEP 1<br />
x1<br />
FOR STEP 1<br />
x1<br />
#37242-03ES<br />
FOR STEP 2<br />
x4<br />
#37242-04ES<br />
FOR STEP 2<br />
x2<br />
5<br />
Left Leg Panel A<br />
6<br />
Right Leg Panel A<br />
7<br />
Left Leg Panel B<br />
8<br />
Right Leg Panel B<br />
#37242-05ES<br />
FOR STEP 3<br />
x1<br />
#37242-06ES<br />
FOR STEP 3<br />
x1<br />
NOTE:<br />
BASKETBALL<br />
SIDE<br />
#37242-07ES<br />
FOR STEP 3<br />
x1<br />
NOTE:<br />
BASKETBALL<br />
SIDE<br />
#37242-08ES<br />
FOR STEP 3<br />
x1<br />
9<br />
Plastic Leg Base<br />
10<br />
End Board<br />
11<br />
Ball Shelf<br />
12<br />
Lock Pin<br />
#37242-09ES<br />
FOR STEP 3<br />
x4<br />
#37242-10ES<br />
FOR STEP 4<br />
x2<br />
#37242-11ES<br />
FOR STEP 4<br />
x2<br />
#37242-12ES<br />
FOR STEP 5<br />
x4<br />
13<br />
Side Leg Panel<br />
14<br />
Leg Support Block<br />
15<br />
Leg Leveler<br />
16<br />
Lower Support Panel<br />
#37242-13ES<br />
FOR STEP 9<br />
x2<br />
#37242-14ES<br />
FOR STEP 9<br />
x4<br />
#37242-15ES<br />
FOR STEP 10<br />
x4<br />
#37242-16ES<br />
FOR STEP 11<br />
x2<br />
17<br />
End Top Rail<br />
18<br />
Crooked Pole (Basketball)<br />
19<br />
Basketball Backboard<br />
20<br />
Basketball Rim<br />
#37242-17ES<br />
FOR STEP 11<br />
x2<br />
#37242-18ES<br />
FOR STEP 12<br />
x2<br />
#37242-19ES<br />
FOR STEP 13<br />
x1<br />
#37242-20ES<br />
FOR STEP 13<br />
x1<br />
21<br />
Short Pole (Basketball)<br />
22<br />
Basketball Net<br />
23<br />
Rod Cap (Short Pole Basketball)<br />
24<br />
Basketball Ball Return<br />
#37242-21ES<br />
FOR STEP 13<br />
x2<br />
#37242-22ES<br />
FOR STEP 13<br />
x1<br />
#37242-23ES<br />
FOR STEP 14<br />
x2<br />
#37242-24ES<br />
FOR STEP 15<br />
x1<br />
4
PARTS IDENTIFIER<br />
25<br />
Rivet Plug<br />
26<br />
Cue Holder<br />
27<br />
Storage Organizer<br />
28<br />
<strong>Table</strong> Tennis Surface<br />
#37242-25ES<br />
FOR STEP 15<br />
x2<br />
#37242-26ES<br />
FOR STEP 15<br />
x2<br />
#37242-27ES<br />
FOR STEP 16<br />
x1<br />
#37242-28ES<br />
FOR STEP 17<br />
x1<br />
29<br />
<strong>Table</strong> Tennis Post<br />
30<br />
<strong>Table</strong> Tennis Net<br />
31<br />
Hockey Pusher<br />
32<br />
Felt Pad<br />
#37242-29ES<br />
FOR STEP 17<br />
x2<br />
#37242-30ES<br />
FOR STEP 17<br />
x1<br />
#37242-31ES<br />
FOR STEP 18<br />
x2<br />
#37242-32ES<br />
FOR STEP 18<br />
x2<br />
HARDWARE<br />
60<br />
3 x 22mm Screw<br />
61<br />
3 x 12mm Screw<br />
62<br />
4 x 25mm Screw<br />
63<br />
4 x 45mm Screw<br />
#37242-60ES<br />
FOR STEP 1,11<br />
x22<br />
#37242-61ES<br />
FOR STEP 2,5<br />
x20<br />
#37242-62ES<br />
FOR STEP 3<br />
x8<br />
#37242-63ES<br />
FOR STEP 4,11<br />
x26<br />
64<br />
6.5 x 45mm Bolt<br />
65<br />
6.5mm Barrel Nut<br />
66<br />
12mm Hex Bolt<br />
67<br />
12mm Steel Washer<br />
#37242-64ES<br />
FOR STEP 7<br />
x8<br />
#37242-65ES<br />
FOR STEP 7<br />
x8<br />
#37242-66ES<br />
FOR STEP 8<br />
x2<br />
#37242-67ES<br />
FOR STEP 8<br />
x2<br />
68<br />
12mm Plastic Washer<br />
69<br />
6.5 x 28mm Bolt<br />
70<br />
8mm Butterfly Bolt<br />
71<br />
4 x 12mm Bolt<br />
#37242-68ES<br />
FOR STEP 8<br />
x2<br />
#37242-69ES<br />
FOR STEP 9,13<br />
x20<br />
#37242-70ES<br />
FOR STEP 12<br />
x4<br />
#37242-71ES<br />
FOR STEP 13<br />
x4<br />
5
PARTS IDENTIFIER<br />
72<br />
4mm Lock Nut<br />
73<br />
6.5mm Nut<br />
74<br />
3.5 x 8mm Screw<br />
75<br />
4 x 15mm Screw<br />
#37242-72ES<br />
FOR STEP 13<br />
x4<br />
#37242-73ES<br />
FOR STEP 13<br />
x4<br />
#37242-74ES<br />
FOR STEP 14<br />
x4<br />
#37242-75ES<br />
FOR STEP 16<br />
x2<br />
77<br />
4mm Allen Key<br />
78<br />
8mm - Wrench<br />
#37242-77ES<br />
x1<br />
#37242-78ES<br />
x1<br />
ACCESSORIES<br />
80<br />
Billiard Ball Set<br />
81<br />
Cue Chalk<br />
82<br />
Triangle<br />
83<br />
Cue Stick<br />
#37242-80ES<br />
x1<br />
#37242-81ES<br />
x2<br />
#37242-82ES<br />
x1<br />
#37242-83ES<br />
x2<br />
84<br />
Basketball<br />
85<br />
Air Pump<br />
86<br />
<strong>Table</strong> Tennis Paddle<br />
87<br />
<strong>Table</strong> Tennis Ball<br />
#37242-84ES<br />
x1<br />
#37242-85ES<br />
x1<br />
#37242-86ES<br />
x2<br />
#37242-87ES<br />
x2<br />
88<br />
Hover Puck<br />
89<br />
Hover Puck Charger<br />
#37242-88ES<br />
x1<br />
#37242-89ES<br />
x1<br />
6
<strong>Swivel</strong> <strong>Table</strong><br />
BEFORE<br />
BEFORE BUILDING - Please inspect your<br />
playfield and layout all your parts<br />
Your Playfields are NOT replaceable. Any damage<br />
that exists to your playfields are not reparable<br />
under warranty. If your playfields are damaged,<br />
the entire game must be returned to the original<br />
place of purchase for an exchange.<br />
STEP 1<br />
2<br />
1<br />
1 Cabinet x1<br />
2 Billiard Cabinet x1<br />
HARDWARE<br />
QTY.<br />
Repeat for all<br />
sides.<br />
DO NOT<br />
overtighten<br />
Screws.<br />
60<br />
60 3 x 22mm Screw x18<br />
STEP 2 4<br />
3<br />
3<br />
Step 1 Assembly<br />
Step 1 Assembly<br />
x1<br />
3 Billiard Corner Pocket x4<br />
4 Billiard Side Pocket x2<br />
HARDWARE<br />
QTY.<br />
61 3 x 12mm Screw x12<br />
Slide Corner<br />
Pockets & Side<br />
Pockets into<br />
correct spots (As<br />
shown in Left<br />
image).<br />
Once Pockets are<br />
in place, screw in.<br />
Do Not<br />
overtighten<br />
Screws.<br />
61<br />
61<br />
7
<strong>Swivel</strong> <strong>Table</strong><br />
STEP 3<br />
5<br />
LEG<br />
BOTTOM<br />
TOP VIEW<br />
62<br />
9<br />
5<br />
5 Left Leg Panel A x1<br />
6 Right Leg Panel A x1<br />
7 Left Leg Panel B x1<br />
8 Right Leg Panel B x1<br />
Repeat for all 4<br />
legs.<br />
DO NOT<br />
overtighten<br />
Screws.<br />
NOTE: Repeat<br />
Steps A,B, & C for<br />
the following parts.<br />
NOTE:<br />
Folds together.<br />
STEP A<br />
6<br />
7<br />
STEP B<br />
8<br />
9 Plastic Leg Base x4<br />
HARDWARE<br />
QTY.<br />
62 4 x 25mm Screw x8<br />
STEP 4<br />
11<br />
63<br />
10 End Board x2<br />
11 Ball Shelf x2<br />
Repeat for both<br />
ends.<br />
DO NOT<br />
overtighten<br />
Screws.<br />
HARDWARE<br />
QTY.<br />
63 4 x 45mm Screw x6<br />
10<br />
STEP 5<br />
61<br />
Step 4 Assembly<br />
x2<br />
12 Lock Pin x4<br />
Make sure the Pin<br />
from the Pin Lock<br />
(12) is in the<br />
correct direction.<br />
12<br />
HARDWARE<br />
QTY.<br />
61 3 x 12mm Screw x8<br />
Repeat for both<br />
ends.<br />
Do Not<br />
overtighten<br />
Screws.<br />
IMPORTANT:<br />
Make sure<br />
the Pin from<br />
the Pin Lock (12)<br />
is in the direction<br />
that is shown.<br />
Lock Pin<br />
Pin<br />
8
<strong>Swivel</strong> <strong>Table</strong><br />
STEP 6<br />
NOTE: There are extra holes on Legs<br />
(Parts 7 & 8) for fixing the Basketball Poles<br />
(Part 18) which should be at the same side.<br />
Make sure legs are assembled correctly.<br />
6<br />
5<br />
8<br />
(NOTE: Step 11)<br />
NOTE: Shows <strong>Table</strong> in the<br />
upright position<br />
7<br />
NOTE: Basketball<br />
System holes<br />
Step 5 Assembly<br />
x2<br />
5 Left Leg Panel A x1<br />
6 Right Leg Panel A x1<br />
7 Left Leg Panel B x1<br />
8 Right Leg Panel B x1<br />
HARDWARE<br />
QTY.<br />
Repeat for all 4<br />
legs.<br />
Step 5<br />
Assemblies<br />
WILL BECOME: Step 7<br />
STEP 7<br />
NOTE:<br />
Make sure Bolt goes<br />
through Leg & into<br />
Barrell Nut (As shown<br />
below).<br />
65<br />
A Assembly<br />
WILL BECOME: Step 7 B Assembly<br />
64<br />
77<br />
Step 7 B<br />
Assembly<br />
Step 7<br />
Step 7<br />
A<br />
B<br />
Assembly<br />
x1<br />
Assembly<br />
x1<br />
HARDWARE<br />
QTY.<br />
64 6.5 x 45mm Bolt x8<br />
65 6.5mm Barrel Nut x8<br />
77 4mm Allen Key x1<br />
NOTE: Make sure<br />
Bolt goes through<br />
Leg & into Barrell<br />
Nut (As shown).<br />
Repeat for both<br />
ends.<br />
DO NOT<br />
overtighten<br />
Bolts.<br />
65<br />
Step 7<br />
A<br />
Assembly<br />
STEP 8<br />
66<br />
67<br />
Step 7<br />
B<br />
Assembly<br />
68<br />
78<br />
Step 2 Assembly<br />
Step 7 A Assembly<br />
Step 7<br />
B<br />
HARDWARE<br />
Assembly<br />
x1<br />
x1<br />
x1<br />
QTY.<br />
Billiard Top MUST<br />
FACE DOWN.<br />
Repeat for both<br />
ends.<br />
Do Not<br />
overtighten Bolts.<br />
IMPORTANT: Billiard Top MUST FACE DOWN<br />
Step 7<br />
A<br />
66 12mm Hex Bolt x2<br />
67 12mm Steel Washer x2<br />
68 12mm Plastic Washer x2<br />
78 8mm - Wrench x1<br />
Assembly<br />
9
<strong>Swivel</strong> <strong>Table</strong><br />
STEP 9<br />
69<br />
x4<br />
77<br />
14<br />
69<br />
x4<br />
13<br />
69<br />
x4<br />
Step 8 Assembly<br />
x1<br />
13 Side Leg Panel x2<br />
14 Leg Support Block x4<br />
HARDWARE<br />
QTY.<br />
69 6.5 x 28mm Bolt x16<br />
77 4mm Allen Key x1<br />
NOTE: There are<br />
4 T-Nuts pre-assembled<br />
in each Leg Support<br />
Block (14).<br />
The Leg Support Block<br />
(14) should be located<br />
inside of legs.<br />
Use 6.5 x 28mm Bolt<br />
(69) go through the<br />
holes on legs and Side<br />
Leg Panel (13) to reach<br />
the T-Nuts on the Leg<br />
Support Block.<br />
DO NOT overtighten<br />
Screws.<br />
Repeat for all 4 legs.<br />
Step 8 Assembly<br />
STEP 10<br />
Step 9 Assembly<br />
15<br />
Step 9 Assembly<br />
x1<br />
15 Leg Leveler x4<br />
Repeat for 4 Legs.<br />
NOTE: Flip table<br />
when all Leg<br />
Levelers are in<br />
place. Use at least<br />
2 strong ADULTS.<br />
IMPORTANT: Make sure Lock Pins (12) are<br />
plugged in to avoid cabinet from flipping.<br />
NOTE: Flip table when<br />
all Leg Levelers are in<br />
place. Use at least 2<br />
strong ADULTS.<br />
STEP 11<br />
Step 10 Assembly<br />
16<br />
x2<br />
x2<br />
63<br />
16<br />
63<br />
x3<br />
x3<br />
17<br />
60<br />
Step 10 Assembly<br />
x1<br />
16 Lower Support Panel x2<br />
17 End Top Rail x2<br />
HARDWARE<br />
QTY.<br />
60 3 x 22mm Screw x4<br />
63 4 x 45mm Screw x20<br />
Repeat for both<br />
ends & sides.<br />
NOTE: Make sure<br />
Lock Pins (12) are<br />
Engaged to avoid<br />
cabinet from<br />
flipping.<br />
DO NOT<br />
overtighten<br />
Screws.<br />
10
<strong>Swivel</strong> <strong>Table</strong><br />
STEP 12<br />
Step 11 Assembly<br />
18<br />
Step 11 Assembly<br />
x1<br />
18 Crooked Pole (Basketball) x2<br />
Repeat for both<br />
Poles.<br />
Do Not<br />
overtighten Bolts.<br />
x2<br />
70<br />
HARDWARE<br />
QTY.<br />
70 8mm Butterfly Bolt x4<br />
STEP 13<br />
19<br />
STEP A<br />
71<br />
72<br />
x4<br />
x4<br />
20<br />
19 Basketball Backboard x1<br />
20 Basketball Rim x1<br />
21 Short Pole (Basketball) x2<br />
22 Basketball Net x1<br />
DO NOT<br />
overtighten<br />
Bolts.<br />
77<br />
73<br />
69<br />
HARDWARE<br />
QTY.<br />
69 6.5 x 28mm Bolt x4<br />
78<br />
71 4 x 12mm Bolt x4<br />
STEP B<br />
21<br />
STEP C<br />
22<br />
72 4mm Lock Nut x4<br />
73 6.5mm Nut x4<br />
STEP 14<br />
23<br />
Step 13 Assembly<br />
74<br />
Step 12 Assembly<br />
x1<br />
Step 13 Assembly<br />
x1<br />
23 Rod Cap x2<br />
HARDWARE<br />
QTY.<br />
DO NOT<br />
overtighten<br />
Screws.<br />
74 3.5 x 8mm Screw x4<br />
Step 12 Assembly<br />
11
<strong>Swivel</strong> <strong>Table</strong><br />
STEP 15<br />
24<br />
26<br />
NOTE: Use Straps to fix<br />
Basketball Ball Return on<br />
poles, to both sides.<br />
24<br />
25<br />
Step 14 Assembly<br />
x1<br />
24 Basketball Ball Return x1<br />
25 Rivet Plug x2<br />
26 Cue Holder x2<br />
NOTE: Use Straps<br />
to fix Basketball<br />
Ball Return on<br />
poles, to both<br />
sides.<br />
Attach Basketball<br />
Ball Return to<br />
Rivet Plugs.<br />
Add Cue Holders<br />
as shown.<br />
Step 14 Assembly<br />
26<br />
STEP 16<br />
Step 15 Assembly<br />
x1<br />
27 Storage Organizer x1<br />
DO NOT<br />
overtighten<br />
Screws.<br />
75<br />
27<br />
HARDWARE<br />
QTY.<br />
75 4 x 15mm Screw x2<br />
Step 15 Assembly<br />
STEP 17<br />
29<br />
30<br />
29<br />
28<br />
28 <strong>Table</strong> Tennis Surface x1<br />
29 <strong>Table</strong> Tennis Post x2<br />
30 <strong>Table</strong> Tennis Net x1<br />
IMPORTANT:<br />
Be sure to remove the<br />
Basketball setup before<br />
attaching the <strong>Table</strong> Tennis<br />
Surface & Net. The <strong>Table</strong><br />
Tennis Surface should lay<br />
on top of the Billiard<br />
Surface.<br />
NOTE: Be sure to<br />
remove the<br />
Basketball setup<br />
before attaching<br />
the <strong>Table</strong> Tennis<br />
Surface and Net.<br />
12
<strong>Swivel</strong> <strong>Table</strong><br />
STEP 18<br />
32<br />
31 Hockey Pusher x2<br />
32 Felt Pad x2<br />
Repeat for both<br />
Pushers.<br />
31<br />
STEP 19 - Charging the Hover Puck<br />
STEP A STEP B STEP C<br />
89 88<br />
89<br />
Insert 4 AA Batteries into the Hover Puck<br />
Charger (89). (NOT INCLUDED)<br />
88<br />
Make sure the Hover Puck is turned to the OFF<br />
position. Plug the Hover Puck Charger (89) into<br />
the back of the Hover Puck (88). Switch the<br />
Hover Puck Charger (89) to the ON position.<br />
Allow the Puck to charge for 60 minutes.<br />
When the Puck is fully charged, the LED light will<br />
change from RED to GREEN.<br />
To use the Hover Puck, just turn the<br />
Switch on the backside to “ON”. The<br />
Hover Puck will operate for 20-30<br />
minutes when fully charged.<br />
88 Hover Puck x1<br />
89 Hover Puck Charger x1<br />
STEP A<br />
STEP B<br />
STEP C<br />
Insert 4 AA Batteries into the Hover Puck Charger (89). (NOT INCLUDED)<br />
Make sure the Hover Puck is turned to the OFF position. Plug the Hover Puck Charger (89) into<br />
the back of the Hover Puck (88). Switch the Hover Puck Charger (89) to the ON position. Allow<br />
the Puck to charge for 60 minutes. When the Puck is fully charged, the LED light will change<br />
from RED to GREEN.<br />
NOTE: Only charge the Hover Puck when it is completely out of power.<br />
To use the Hover Puck, just turn the Switch on the backside to “ON”. The Hover Puck will operate<br />
for 20-30 minutes when fully charged.<br />
13
MC<br />
FCC IDENTIFIER :<br />
This device complies with part 15 of the FCC rules. Operation is subject to the following two conditions: (1) This device may not cause harmful interference, and (2) This device must accept any<br />
interference received, including interference that may cause undesired operation.<br />
Warning! Changes or modifications to this unit not expressly approved by the party responsible for compliance could void the user’s authority to operate the equipment.<br />
NOTE: This equipment has been tested and found to comply with the limits for a Class B digital device, pursuant to Part 15 of the FCC Rules. These limits are designed to provide reasonable<br />
protection against harmful interference in a residential installation. This equipment generates, uses and can radiate radio frequency energy and, if not installed and used in accordance with the<br />
instructions, may cause harmful interference to radio communications.<br />
However, there is no guarantee that interference will not occur in a particular installation. If this equipment does cause harmful interference to radio or television reception, which can be<br />
determined by turning the equipment off and on, the user is encouraged to try to correct the interference by one or more of the following measures:<br />
- Reorient or relocate the recieving antenna.<br />
- Increase the separation between the equipment and receiver.<br />
- Connect the equipment into an outlet on a circuit different from that to which the receiver is connected.<br />
Consult the dealer or an experienced radio/TV technician for help.<br />
Do not mix old and new batteries.<br />
Do not mix alkaline, standard (carbon-zinc), or rechargeable (nickel-cadmium) batteries.<br />
Do not dispose of batteries in fire, batteries may explode or leak.<br />
MADE IN CHINA<br />
Limited Warranty<br />
As described in and as limited by this Limited Warranty, <strong>EastPoint</strong> <strong>Sports</strong>, Ltd. (the “Company”) warrants this <strong>Swivel</strong> <strong>Table</strong> (the “Product”) to be free from defects in workmanship and materials<br />
for a period of 90 days from the date of original purchase. The term defects shall mean any imperfections that impair the use of the product. The Company reserves the right to request<br />
confirmation of Proof of Purchase when requesting parts or service in order to confirm that the game is within its warranty period.<br />
What is Covered: Except as provided herein, this Limited Warranty covers all defects in materials and workmanship. This Limited Warranty is void if the Product is:<br />
• Damaged through improper usage or storage, negligence, misuse, abuse, transportation damage, acts of nature, or accident (including failure to follow the instructions supplied with the<br />
product)<br />
• Used in commercial applications, rentals or a commercial environment<br />
• Modified or repaired by anyone not authorized by the Company<br />
What is Not Covered:<br />
The Limited Warranty does not cover:<br />
• Expendable items such as cosmetic parts, game playing accessories, and any other items that may show signs of wear due to normal usage<br />
• Any transportation/delivery/installation costs incurred by the Consumer (either home from the original place of purchase or back to the original place of purchase)<br />
What the Company Will Pay For:<br />
• If any part or component of the Product which is covered by this Limited Warranty is found by the Company to be defective, the Company will provide replacement parts without charge.<br />
The Company’s obligation to repair or replace the Product or any portion thereof, shall be limited to the original purchase price of the product.<br />
• If during the Limited Warranty period, the product is found to be defective, the Company will, at the Company’s option, repair, replace, or make remuneration for the Product (either the<br />
same or equivalent value) without charge.<br />
How to Obtain Warranty Service: In order to enforce your rights under this Limited Warranty, you must follow these procedures:<br />
• You must return the ORIGINAL COPY OF YOUR SALES RECEIPT to the Company.<br />
• You must call the Company’s Consumer Service Department at 1-877-279-7071 on Monday through Friday between the hours of 9:00 A.M. and 5:00 P.M. (EST) to notify the Company of the<br />
nature of the problem. At the Company’s option, replacement parts or a new Product (either the same or equivalent value) will be sent to you at no charge.<br />
• If you are instructed to return the Product to the Company for servicing, you are responsible for shipping the Product, at your expense, to the address designated by the Company in<br />
packaging that will protect against further damage.<br />
• You must also include your name, address, daytime telephone number, Product model number, and a description of the problem.<br />
• The Company will pay for any shipping charges to return the repaired of replaced Product to you.<br />
THIS LIMITED WARRANTY IS AVAILABLE ONLY TO THE ORIGINAL PURCHASER OF THE PRODUCT AND IS VALID ONLY IN THE UNITED STATES. THE COMPANY’S LIABILITY IS LIMITED<br />
TO THE REPAIR, REPLACEMENT, OR REMUNERATION, AT ITS OPTION, OF ANY DEFECTIVE PRODUCT AND SHALL NOT INCLUDE ANY LIABILITY FOR INDIRECT, INCIDENTAL, OR<br />
CONSEQUENTIAL DAMAGES OF ANY KIND. THIS WARRANTY IS EXPRESSLY MADE IN LIEU OF ALL OTHER WARRANTIES, EXPRESSED OR IMPLIED, INCLUDING BUT NOT LIMITED TO<br />
THE IMPLIED WARRANTY OF MERCHANTABILITY AND THE IMPLIED WARRANTY OF FITNESS FOR A PARTICULAR PURPOSE. SOME STATES DO NOT ALLOW LIMITATIONS ON HOW<br />
LONG AN IMPLIED WARRANTY LASTS OR DO NOT ALLOW FOR EXCLUSION OF INCIDENTAL OR CONSEQUENTIAL DAMAGES. TO THAT EXTENT, THE ABOVE LIMITATIONS MAY NOT<br />
APPLY TO YOU.<br />
This Limited Warranty gives you specific legal rights, but you may also have other rights that vary from state to state.<br />
If you have any questions regarding this Limited Warranty or the operation of the Product, you may call or write us.<br />
ALL WARRANTY CLAIMS MUST BE ACCOMPANIED BY A COPY OF THE SALES RECEIPT/PROOF OF PURCHASE. REPORT ANY DEFECTS TO:
TABLE MAINTENANCE AND CARE<br />
<strong>Table</strong> Top –<br />
• It is OK to gently vacuum the felt side of the billiard table with any standard handheld vacuum brush<br />
attachment.<br />
• If Hockey or <strong>Table</strong> Tennis side needs to be cleaned, you can use any gentle surface cleaner (no bleach or<br />
ammonia) with a lint free cloth.<br />
NOTE: DO NOT spray the cleaning product directly on the table surface. It must be applied to the cloth<br />
directly. Then the table top can be wiped in a lengthwise direction<br />
Pucks -<br />
• If a puck is rough or not gliding smoothly on top of the table surface, gen rks with<br />
Speed -<br />
• If faster puck speed is desired, it is OK to use a wax or oil based cleaner to “slicken” the surface.<br />
NOTE: DO NOT OVER APPLY. A little goes a long way.<br />
NOTE: DO NOT spray the cleaning product directly on the table surface. It must be applied to<br />
the cloth directly and then the table top can be wiped in a lengthwise direction.<br />
628 ROUTE 10, SUITE #5 WHIPPANY, NEW JERSEY 07981 • 1-973-585-4747<br />
Printed in China<br />
1-1-37242 IM0015